Preface
Try to guess the correct order of the blocks in order to make the program below work (hint: try to deduce from the even parity of the parentheses and the indentation):
This study material is the so-called lecture notes for the course Programming 1. The phrase "lecture notes" refers to literary material that introduces the topics of the course approximately in the same order and the same perspective as they are introduced on lectures. In order to keep the length of the lecture notes in check, topics are not introduced in exhaustive detail. Therefore, a good book on the topic and an unprejudiced attitude towards searching for information on your own are recommended to support your learning. The most current information is of course found online - as long as you remember source criticism. Note also that most of the books that are available approach programming from the point of view of a certain programming language - especially those directed towards beginners. This is somewhat natural, because people also need a common language to communicate with each other. For the same reason, learning to program would be quite difficult without learning the basics of one language first.
To make the structure clearer, most books usually cover one topic systematically from the beginning to the end. However, when a child is learning how to speak, they are not able to adopt all of the grammar rules of a certain clause structure all at once. Similarly, while learning the basics of programming, the student may not yet have the necessary understanding to be able to grasp all structures and possibilities. Discussion concerning the topics in these lecture notes as well as during lectures is arranged as follows: first, we give examples or discuss the necessity of these examples. Then, we explore the theoretical and practical aspects of the topic. Hence, these lecture notes stratch the surface of the basics of programming from one point of view. Books and online sources offer necessary advanced information.
The language of choice in these lecture notes is the C# language. It should be noted, however, that the chosen language should be treated as just an example: the structure and examples in the lecture notes could be almost identical for any other programming language. The most important thing on an introductory course to programming is to learn the programmer's way of thinking. Changing the language to another language in the same language family is more like changing dialects in a natural language rather than changing languages altogether. In other words, if you learn to program in one language, you can already read programs coded in other languages after a small amount of practice. Coding in another language may be more challenging, but usually they contain the same constructs. Programming languages come and go, and you shouldn't learn just one, but learn as many as you can. Programming courses equivalent to this one have been taught in the University of Jyväskylä with the following languages: Fortran, Pascal, C, C++, Java, and now C#. Some universities use Python, others use Scala as their beginner language. All of these in some sense belong in the same language family and abide mostly by the same principles even though the details may vary a lot from time to time.
It is impossible to learn how to program by just reading books. For this reason, the course also contains weekly exercises (demos), supervised computer lab work, and a programming project. More information about these, as well acquiring and installing the tools used on the course can be found on the course home page:
These lecture notes are based on the Programming 1 lecture notes written in 2009 by Martti Hyvönen and Vesa Lappalainen, which was the result of the work by multiple different authors starting all the way from the 80's. The largest contributions have been made by Timo Männikkö and Vesa Lappalainen.
Jyväskylä, 2.1.2013
Martti Hyvönen, Vesa Lappalainen, Antti-Jussi Lakanen
Epilogue of preface
The newest version of the lecture notes have been written directly in TIM (The Interactive Material). The idea behind TIM is that different things, such as programming, can be tried without installing any programs at all. This will hopefully lower the threshold to starting programming. Unfortunately the technology we use (the language and subroutine libraries) do not offer the possibility to make interactive games in TIM, so for more advanced programming we still need to install programming tools, Visual Studio and Jypeli in this case. These tools will be discussed later in these lecture notes and in other materials for the course in more detail.
Special thanks to the ACOS Content Server project in the Aalto University for the algorithm visualisations in the material.
Jyväskylä, 29.8.2014 Vesa Lappalainen, Antti-Jussi Lakanen
Lecture notes translated in 2017 by MK.
—The 2023 version of the brochure will change the references to Visual Studio to a more generic one, because in the JY courses the tool has been changed to Rider.
0. Introduction
Even though the course is designed as a "game programming" course, 90% of its content is exactly the same as in any other programming course. If there is someone who does not want to make a game as one's project work, it is of course possible to write any other kind of small program.
0.1 About the content and aims of the course
To get the general idea (in English) of the content of this course, watch the video about how to make the game GalaxyTrip in less than five minutes. While watching these videos, don't be afraid of the fact that you can't do the same (yet); Watch these videos in order to understand what you should learn and will learn during this course.
If you want to watch a longer (45 minutes) video about the same topic (in Finnish), watch this video:
These videos showcase what kinds of games have been made in courses before:
0.2 Aims of the course
At the beginning of the course, you are expected to be able to know how to use a computer. You should be familiar with at least the use of different (text) editors, keyboard shortcuts, and preferably the command prompt as well. These days, of course, the command prompt is (unfortunately) not very familiar to most, which is why it is recommended that you see the extra material page of this course or Paavo's survival guide (Note: both of these are currently available only in Finnish; if you cannot understand Finnish, see for example An A-Z Index of the Windows CMD command line or search for English command prompt tutorials)
Which of the following can you do in the command prompt? After answering, a very simple list of commands is given. Commands in Windows and commands in Linux and macOS are separated by a slash(/). More detailed instructions (in Finnish) in the links above.
You won't need any previous programming experience.
During the course you should learn the following (the level of competence on an adapted Bloom taxonomy: 1=remember, 2=understand, 3=know how to apply, 4=know how to analyse, 5=know how to review, 6=know how to create)
Below move your skill forward during the course. First check Modify.
Please
| Osattava asia | 1 | 2 | 3 | 4 | 5 | 6 |
|---|---|---|---|---|---|---|
| The basic idea of structured programming | o | |||||
| Algorithmic thinking | o | |||||
| Basics of the C# language | o | |||||
| Sequence | o | |||||
| Variables | o | |||||
| Subprograms and functions | o | |||||
| Passing parametres | o | |||||
| Conditional statements | o | |||||
| Loops | o | |||||
| Arrays | o | |||||
| File handling within programs | o | |||||
| Use of objects | o | |||||
| Unit testing (TDD) | o | |||||
| Use of debugger | o | |||||
| Notations, ASCII code | o | |||||
| Recursion | o | |||||
| Reading and writing documentation | o |
Remember to view the video directory of the course as well.
0.3 TIM instructions
Instructions below are for TIM-version that is available from https://tim.jyu.fi/view/kurssit/tie/ohj1/moniste/Ohjelmointi-1/en. We recommend to use the TIM-version parallel to this material. For example the full program codes are visible only in TIM-version.
This TIM-environment-based material consists of different interactive parts. Videos were already introduced in the previous chapters. It is best to close the videos after viewing to save the capacity of your device.
This material contains links to other materials. These links are extra material and there is no need to follow them when going through the material for the first time. It is easy to get lost in a jungle of links.
It is best to be logged in (Login) at all times in order to keep track of your own progress. When you are logged in, you can see red bars on the right side of the material which indicate the parts that you haven't marked as read yet. When you have read (and understood :-) ) a passage of text, click the red bar to remove it. This way you can easily see which parts you haven't gone through yet. This is especially helpful if you jump from place to place in the material in different order than in which it was written. The bar may also be yellow when you have read a passage, but its contents have changed since you've read it. Click on the yellow bar after you have understood and internalised the changed passage.
The upper left corner of the page contains an image of a book or depending on the size of the screen/resolution a menu image which contains an image of a book. Click on the book image to open the table of contents. Click the image again to close the table of contents.
When you point the cursor to the left side of a paragraph, a blueish green bar appears. Clicking this bar opens a menu where you can find e.g. the Comment/Note button, which allows you to add notes related to the paragraph. Use this feature actively. You can add notes either to yourself or use a comment to point out that something in the paragraph is unclear or erroneous.
In case of an error in the paragraph, please provide a correction suggestion as well. Otherwise, use the "Everyone" choice with consideration, and add your personal notes with the choice "Just me".
If you want to search for something, use the Find function of your browser (Ctrl-F in most browsers).
If you want to find a specific page again easily, make a TIM bookmark of it. You can add a bookmark by clicking the paper clip icon in the upper left corner of the page. Of course you can also add a regular bookmark in your browser, but the benefit of a TIM bookmark is that it works in any browser. Start by bookmarking this page. Click the paper clip icon and add the page for example under the heading Ohj1 with the name Material or Handout.
In the preceding videos, programs were coded in the Visual Studio IDE (Integrated Development Environment). TIM itself contains a small built-in environment, which can complete simple tasks, such as:
There is a link Show all code under the task box. By clicking this link you can view all of the code required to run this program. You can still edit the program, but you cannot insert any code in the "wrong" place. The same link also hides the "extra code".
The Highlight link changes to a type of editor that highlights the code according to the syntax of the language and can fill in words that are familiar to the editor.
The link Reset allows you to "reset" your answer and start from template from the beginning. Try each link.
The task could continue by adding (before the line Add(ball)) the line:
ball.Position = new Vector(150, 100);Try this as well. So, copy/paste the line of code above to the longer code from earlier, above the line Add(ball). See what happens when you write the colour Red in lower case. Correct the colour back to capitalised Red and see what happens when you change the values in Vector.
You can also play around with this example coded in another language (VPython). Here, you can also change the point of view by holding the right mouse button and moving the mouse around.
1. What is programming?
Programming is giving instructions.
1.1 Algorithms and instructions
At its simplest, programming is giving instructions in order to perform a predefined task. There are many actions similar to programming in a person's everyday life. An example of an algorithm is giving directions to someone by phone so that they can drive to a place formerly unfamiliar to them. We do this by giving a series of instructions and commands that direct the performance of this action. Nowadays a navigator reads directions one by one. Similarly, a program executes commands one by one, keeping track of the place where the execution currently is. An example of rudimentary programming is using a microwave oven; the oven is given instructions of how long it should operate and how much power to use.
Programming has many levels. Nowadays there are, for example, tractors where the farmer can program it to go through the fields in a certain pattern. For caution and in case of sharp turns, the farmer must still be inside the tractor to make sure that everything goes well. In a certain way, the farmer must also know how to program. But before we got to this point, it required a vast amount of engineering work and programming to make sure that the GPS satellites, error correction and the programming in the tractor's computer got to the level where it is easy for the farmers themselves to program.
In Suonenjoki, strawberry pickers have an NFC (Near Field Communication) chip on their necks, so that every time a picker has filled his/her punnet and takes it to the gathering point, it is automatically registered how many kilos of strawberries were picked, who picked them, and where they picked them. The farmer has programmed in the information about the location of the fields and the actions and can now monitor more efficiently which field has decreased profit and should be "formatted" altogether.
To sum up, computers and programming are present everywhere in everyday life. However, very often the users are not even aware (and hopefully don't need to be) that they are using a computer and perhaps even programming it.
In these cases, the concept we are dealing with is embedded systems, and/or IoT (Internet of Things) if the device is connected to the web, like in the case of the tractor and farmer.
So, the previous examples concerned giving unambiguous instructions. However, these examples included very different types of communication situations. Interpersonal communication, turning the switches and pressing the buttons of a microwave oven, and timing a digital television adapter are all parallel when it comes to programming, but they include the use of different tools. In programming, the choice of tools depends on the devices or tools available for performing the task at hand. Interpersonal communication can happen via talking, writing, or a combination of the two. Similarly, programming often allows choosing between different methods of implementation, depending on the nature of the task.
Although programming is for the most part performed on a computer, it is always good to have a pen and paper on hand. The most difficult part of programming for a beginner is that the person often can't bear to sit down with a pen and paper and think about what needs to be done. If for example you are designing a Battleship game, you first need to play the game multiple times in order to get an idea of all the possible things that you will face while designing the game.
Programming has multiple levels depending on which tools are used for completing the task at hand. Advanced high-level tools allow working with concepts and expressions which, at their best, are similar to concepts and expressions in a natural language, whereas low-level tools require working with simple and rudimental concepts and expressions.
This recipe for making a sponge cake can be considered an example of programming:
Sponge cake

6       eggs
1,5 dl  sugar
1,5 dl  flour
1,5 tsp baking powder

1.  Whip the eggs and sugar into a froth.
2.  Mix the flour and baking powder.
3.  Blend the egg-sugar froth and flour mixture together.
4.  Bake for 45 mins in 175°C
The recipe if clearly written for a person, more specifically for someone who knows quite a lot about baking. If the same recipe was written for a person who has never baked anything in his/her life, the recipe above would not be even nearly sufficient - it would have to include many tips related to baking: pre-heating the oven, the art of whipping ingredients to a froth, etc.
Instructions written for a machine differ considerably from the instructions written for a person. A machine doesn't automatically know how to ask for advice when it runs into a new and unexpected situation. It operates exactly according to the instructions it has been given, whether or not they are sensible in the current situation. Unlike people, a machine loyally repeats the instructions it has been given without succumbing to creativity. Because of this, programming languages today require presenting the instructions to a machine in a very precise format and taking into account all the possible emerging situations. [MÄN]
1.2 On programming languages
This section is a brief introduction to the basic principle of computers and programming languages. For more information on the topic, refer to the course materials for Computer Organization and Architecture and Operating Systems. The topic is also discussed briefly in chapter Lukujen esitys tietokoneessa.
1.2.1 Processor and machine code
The most important parts of the computer are the processor and memory. An essential feature of the processor is that it knows which command to run. The command is usually stored in the IP register (Instruction Pointer, also known as PC = Program Counter). The IP register points to a memory slot that holds the command to run. The processor actually works in a simple way:
- Get the command from the memory slot indicated by the IP register
- Increment the IP register so that it points to the next command
- Run the command (can change the IP with JUMP commands)
- Continue from 1.
Registers are fast memory slots inside the processor. Commands are usually low-level, e.g.
- retrieve number from memory slot 7F34 to the AX register
- Add the value of BX register to the AX register
Each command has a numeric value in the form of bits. For example the command
- put number 62 (hex) in BL register
in an Intel x86 processor would be in form
B3 62and in memory in binary form
10110011 01100010To sum up, the programming task here would be to enter the correct binaries to the memory of the computer. Because binaries are hard to read by humans, they are usually presented as hexadecimals. Even that is not trivial, remembering that B3 means "put in BL register". This is why an assembly language is usually used: it has almost a 1:1 equivalence with machine language binary and human-readable mnemonic. In one assembly language (there are many variants) the previous command would be
mov bl,$62First, computers were programmed by entering command numerals directly. Then with the advent of assembly languages, commands were typed in assembly and compiled to numerals in order to get the correct program in the computer's memory.
Because processor commands are rudimentary, a lot of them are needed to make up even the simplest of programs. Especially when reading user input or a file. This is why an operating system is needed: to offer the most frequently used features out-the-box. Nevertheless, writing even a small program in an assembly language would require a lot of lines of code.
Since the 1950s, programming languages were developed to make writing programs easier and clearer than with assembler. Fpr example, Fortran (1957), Lisp (1958), Cobol (1959), and Pascal (1970) are still used today. By the 1970s, there were already dozens, even hundreds of languages when including all the small languages.
1.2.2 C language and robot
A language compiler is a program that reads as input a human-written plain-language (e.g. C or C++ -language) program file (text file) and produces a binary executable machine-language file, which can then be run. This is why, for example, in a Windows system the name of the executable file is often specified as .exe. When the program is started, the operating system's task is to put the program code into the computer's memory and pass the program counter to the first instruction of the program.
C language (1972) is the most known of all compiled high level languages developed in the 1970s. Its idea (as with its predecessors) is to raise the abstraction to a higher level, so that we can for example state:
int a = 15;
int b = 23;
int c = a + b;
If this was written in machine language, the programmer would have to know which memory slots to use for storing variables a, b, and c. In C programs (and C# programs used on this course) the compiler takes care of used memory slots, e.g. all references to variable a are compiled by the compiler to a reference to the memory slot reserved for a.
The course exercises have as example a small robot that knows only a few commands. The robot works similarly to a processor. For example the previous part of a C program (which is exactly the same in C#) would be:
You can try the robot by clicking the Step button. As an exercise, you can change it to count the sum of all numbers on the Input line (however, this requires that the 0 on the line stops counting). You can put more numbers on the Input line by placing them in Preset input and clicking Reset. Click Run to get the robot to run the entire program.
The yellow line on Program is equivalent to the processor's IP register which points to the command to run.
The used language is basically the robot's assembly language.
If commands are given numeric values (which they actually have internally), for example:
00 = INPUT
01 = OUTPUT
02 = ADD
03 = SUB
04 = COPYTO
...
09 = JUMPIFNEG
this program would be compiled to the robot's "machine language" like this:
00 04 00 00 02 00 01where some of the commands take up two bytes (a byte is eight bits, presented in two number pairs), for example COPYTO which has the command's numeric value and the target address for the command (memory slot 00 here).
Then we could have a C compiler that would compile the previously described program to these numbers. Memory slots a and b would be compiled to places on the Input line. The same program could also be made using memory slots:
This is already very similar to a carefully written C program. One of the tasks of the compiler would be to decide that references to variable a mean memory slot 00 and references to b mean memory slot 01.
1.2.3 Byte languages
C language was the majority language from late 70s to late 80s. During the 80s, a backward compatible language, extended with objects was made: C++(1982). It was also a compiled language. In the 90s, Java was developed (1995), originally as a language for different embedded systems. Java also mended some known problems with C++. Java had some significant differences compared to C++:
- Java is not compiled directly to machine language, but into an intermediate language. The intermediate language file is run with a processor-specific program called Java. The Java program (Java Virtual Machine) reads the intermediate byte code (cf. robot language in numeric format) and executes it step by step. Java was not the first byte-code-based language, but it is currently the most widely known virtual-machine-based language.
- Java has automatic memory allocation, meaning that the programmer doesn't need to remember to free the memory slots that have been reserved. Automatic memory allocation already existed before Java.
- With Java, it is not possible to point to a memory slot that has not been reserved for this purpose (i.e. there are no pointers in Java).
The principle of byte code is that there is no need to make a compiler for each processor architecture and operating system separately. One compiler is enough to generate the intermediate language file (usually .class in Java). On the other hand, executing the program requires interpreting the intermediate language to actual processor machine language, and at first Java programs were slower than C programs. Nowadays Java compilers are more developed, and byte code is also compiled to machine language while it is executed (JIT = Just In Time compiling), meaning that if the same code is executed again, it has already been compiled and executing speed is no different than with C code.
Popularity of Java skyrocketed in the latter half of the 90s. VL's opinion on why this happened: >"The reason is automatic memory allocation that lowered the number of errors that programmers usually made. Java also had functional strings, which were missing from the C++ standard at the time. The C-like syntax also significantly lowered the threshold to switch languages."
Microsoft had put a lot of effort into C++, but they also noticed the popularity of Java and started using it, adding their own features into it. This cause licensing disputes with Sun, the company that developed Java. Microsoft then started developing its own language which would have all the good qualities of Java. The resulting language was C# (C sharp, 2000). The languages were very similar, making it easy for programmers to switch between them.
1.2.4 C# and Jypeli
Around 2008-2009, the Faculty of Information Technonology in University of Jyväskylä started planning a programming course suitable for young people. It was quite clear that it would contain making games. At the time, Microsoft had great environments (Visual Studio) and libraries (XNA) for making games with C# and get them to work on both computers and phones (Windows Phone). However, programming games with XNA was too challenging, which is why Jypeli library was developed to hide away "extra" details that would hinder a beginner's enthusiasm. The resulting course, "Nuorten pelikurssi" was a success. At the same time, university students had problems with motivation on Java-based programming courses. Many university students are also interested in games, which is why the theme of the first programming course was switched to game programming, also changing the tools to Jypeli and C#. Making "more meaningful" programs significantly increased the pass rate of Programming 1. Just printing "Hello World" no longer piques interest in the 2010s.
1.2.5 Other languages
A couple of popular languages were mentioned above, C, C++, Java, and C#. They basically share the same roots. Intermediate language interpreting was also mentioned. One very well-known, originally interpreted language is Basic (1964). Its idea was that compiling stage is omitted and the program code is executed directly row by row. Nowadays Python (1991) is a very popular interpreted language. A different approach to programming is functional programming, which can be done with for example Haskell (1990), Scala (2004), and F# (2005).
Javascript is a language used in browsers that makes the originally static HTML pages "come alive". For example, this material is viewed on an application called TIM, where a server program written in Python and Haskell transmits Javascript (1995) and HTML (1993), which allows the browser to form an interactive text. Additionally, nowadays TIM is written with TypeScript (2012) instead of Javascript, which is then compiled into Javascript. In 3D graphics, shader languages like GLSL and HLSL are used regardless of which languages other parts of the application using the graphics is written in. In addition to these, there are countless different DSLs (domain specific languages). In summary, writing one program may require knowing multiple different programming languages.
- Try different programming languages in TIM
- HelloWorld in different languages, example contains 603 programming languages
The popularity and history of different languages can be read about in the links below. The popularity of languages can be measured in multiple ways, so take different indices with a pinch of salt.
Nevertheless, the example language on this course is C#.
2. First C# program
2.1 Coding a program
C# (pronounced c sharp) programs can be coded with any text editor. There are dozens, even hundreds of text editors, so naming just one for coding purposes is hard. However, some have been specifically designed for programming. These kinds of text editors can automatically format the source code (or just code in short) that the programmer produces so that reading is easier and therefore understanding and editing it faster. Programmers favour editors such as Vim, Emacs, Visual Studio Code, Sublime Text and NotePad++, but other text editors are presumably as good as these. Any text editor is applicable to coding the examples at the beginning of this material.
Code, source code = A file produced by the programmer from which the program itself is either compiled or interpreted into machine language that the computer can understand.
Next, write a C# program similar to the example below and save it for example under the name HelloWorld.cs. The established filename extension is .cs, which stems from the name of the used programming language and which we will in this course as well. Be careful when you save a file because some text editors save files with the extension .txt by default, and in this case the file name can accidentally become HelloWorld.cs.txt.
Animation: study the meaning of the words and the function of the program
This program should print the text
Hello World!In order to try out the functionality of this program, it must first be compiled into a form that the computer can understand.
Compiling = transforming the source code into a runnable program.
When you click the Aja('Run') button in TIM, the program is first transformed into machine language format and if the compilation is successful, the program is run and its output is printed on the screen. More information about these phases is presented in the sections to follow. Before that, here are some tasks where you can test your skills, so to say.
Examples of the HelloWorld program coded in different programming languages can be found e.g. here:
Try what happends and why if you leave away all letters \n.
2.2 Compiling and running programs
In order to compile and run a program, a C# application developer has to be installed on the computer. If you use Windows, a sufficient starting tool is Microsoft .NET SDK (Software Development Kit). With other operating systems, one of the options is Novell Mono. Many of the exercises on this course can be completed with the Mono application developer, but the instructions and examples in the material are for the Windows development environment. Once again, the use of all the features of the Jypeli library is only possible in the Windows environment.
For example, the TIM environment that you are using is implemented (in Python, Haskell, and Javascript) so that the text you write is relayed to a Linux server which saves it in a temporary file and compiles it with the aforementioned Mono compiler. If the compilation is completed without errors, the created assembly language program is run on the Linux server and the output is captured and shown on the browser window. All these phases only take a few seconds.
Lisätietoa .NET-kehitystyökaluista ja asentamisesta löytyy kurssin kotisivuilta kohdasta Työkalut.
Next, we will learn to complete these phases manually in order to gain a better understanding of what happens in the background.
Kääntäjän versiot vaihtuvat helposti vuosittain, samoin miten niitä käytetään. Ajantasaisimman esimerkin kääntämisestä löydät harjoituksesta:
- Pääteohjaus 1, HelloWorld (syksy 2023)
The program should print the text Hello World! on the screen, as in the image below.
md:Open the attached material in a new window (*ctrl+click* the link) and complete the
exercises there. Then answer the questions in the following quiz:
>
2.3 The structure of the program
Although the "only significant line" in our first program is
the C# language requires surrounding information about which part of the program contains this statement and from which part the program should start. This adds a little to the number of code lines in this program that in itself is simple. In some languages, it is enough to simply write the print statement. Generally, a low number of lines has no intrinsic value, which is why the (low) number of lines is not enough to define which language is the best.
The HelloWorld.cs program we coded (or actually the text file that we wrote) is almost the simplest possible C# program. Below are the two lines of the simplest possible program.
public class HelloWorld
{
The first line defines the class, the name of which is HelloWorld. At this stage, it is enough to think of the class as a "home" for subroutines (aka subprograms). Subroutines will be discussed later. On the other hand, a class can also be compared to a "cookie cutter" - it is a building instruction for creating objects (or "cookies"). During the run-time of a program, objects can be created with the code inside a class. Objects can also be destroyed. One class can be used to create many objects of the same type, exactly like one cookie cutter can be used to make a lot of (almost) identical cookies.
Each C# program contains at least one class, but there can be multiple classes as well. The name of the class that contains the program code is preferably the same as the name of the file. If the name of the file is HelloWorld.cs, it is recommended that the name of the class is also HelloWorld, just like in the example. At this stage, it is not absolutely necessary to fully understand what a class exactly is - this will become clearer later.
Note: C# is case sensitive. Be careful when you write class names.
Note: The name of a class in the C# language is always capitalised. Do not use Scandinavian letters, such as Ä, Ö, Å.
The word public before the word class is a type of an access modifier. The access modifier allows the class either to be displayed without limitations or with some limitations to others (classes) or to be hidden completely from others. The word public means that the class is public from the point of view of other classes, as most classes usually are. Other access modifiers include protected, internal, and private.
The access modifier can also be blank, which will automatically define the class as internal. Subroutines will be discussed later, but it can be mentioned that accordingly, if the access modifier of a subroutine is left blank, it automatically becomes private. However, in this course we will practice coding public classes (and subroutines), in which case the word public will almost always be written in front of the class and subroutine. Notice however that when we will discuss object variables (attributes), their access modifier will almost without exception be private.
Classes and subroutines are usually defined with the access modifier public. Attributes, on the other hand, are defined as private.
The second line contains a left brace {. In many programming languages, parts that belong together are grouped or gathered within braces. A left brace is an opening brace, which in this case tells the compiler that this is where the contents of the HelloWorld class start. For every opening brace there must be a closing right brace }. The ending brace of the HelloWorld class is in line five, which is also the last line of the program. The area between the braces is called a block.
Line three defines (or more specifically introduces) a new subroutine named Main. Because it uses this name, it is the main program of the class. The words static and void are always a part of the introduction of the Main subroutine. static means that the subroutine is class-specific (as opposed to object-specific, in which case the word static is not used). void means that the subroutine does not return any information. These modifiers will be discussed in detail later. Main may also return a value, in which case the word void is replaced with int, but this feature will not be used during this course.
Similarly to classes, the contents of the main program are also coded within braces. In C# the execution of program code always starts from the main program (Main) of the executed class. Of course, many things happen on the background even before this.
On line four, the text Hello World! is printed on screen. In C# this is accomplished by requesting the .NET environment's Console class in the System class library to print the text using the WriteLine() method.
Note: in literature, it is common to refer to subroutines by writing parentheses after the name of the subroutine, for example WriteLine(). This writing style emphasises that we are referring to a subroutine, but depending on the context the parentheses can also be omitted (but not in program code). This material usually applies the latter method of omitting the parentheses, depending on the situation.
Libraries, objects, and methods will be discussed more in section 4.1 and in chapter 8.
The character string to be printed is written in quotes inside parentheses (Shift + 2). This line is also the only statement in the program. Statements can be thought of as being individual actions that form the program. In C#, each statement ends with a semicolon. Because a semicolon marks the end of a statement, white spaces, such as line breaks or spaces, make no difference to the function of a program in the syntax of C#. They are highgly relevant to the readability of the code, however. Note that forgetting to add a semicolon is one of the most common errors in programming, or more specifically one of the most common syntax errors.
Syntax = the set of grammatical rules in a certain (programming) language (such as C#).
Note that in the example below the value of variable a is printed by forming a new string which combines another string and value of a with a plus operator. In this way, we can give the WriteLine subroutine just one string as parameter as is supposed to. The WriteLine subroutine cannot be given a list with a comma separator like in some languages.
Where can you add extra spaces or line breaks in C\# without changing the way the program works?
Which of the following statements concerning the program in task 2.4 are true?
2.3.1 Error types
Programming errors can be broadly categorised into syntax errors and logical errors.
In the previous example, it was studied where extra spaces or line breaks are allowed. When the program could not be compiled, it was due to a syntax error. When the program worked, but the output looked different, it was due to an error in writing style (or a difference in opinion).
A syntax error prevents the compilation of the program even if the meaning (aka the semantics) of the program was correct. Examples of syntax errors include spelling mistakes or forgetting to add a semicolon at the end of a statement.
Logical errors happen when the semantics, aka the meaning, of the program is faulty. They are harder to notice because the program is compiled successfully despite semantic errors. The program may even seem to be working exactly as intended. If a logical error goes unnoticed even during testing, the consequences can be catastrophic, depending on the purpose of the software. Here is one commonly known example of a logical error which was luckily noticed in time and correcting it prevented a wide-spread disaster:
2.3.2 Interpreting compiler error messages
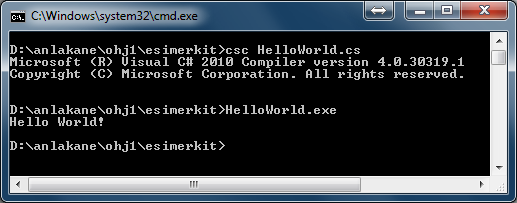
The following is an example of a syntax error in the HelloWorld program.
The program contains a minor spelling error, which (without aid) is fairly hard to notice. Study the error message given by the csc compiler.
HelloWorld.cs(5,17): error CS0117: 'System.Console' does not
contain a definition for 'Writeline'The compiler tells us that row 5 and column 17 in the file HelloWorld.cs contains the following error: 'System.Console' does not contain a definition for 'Writeline'. This is true, because the word Line in WriteLine should be capitalised. After fixing this spelling error, the program works.
Unfortunately, the content of the error message does not always describe the problem very well. In the following example, a semicolon has been misplaced. Try to find it yourself first before continuing or running the program.
The error message, or error messages look something like this, depending on the compiler:
HelloWorld.cs(4,3): error CS1519: Invalid token '{' in class,
struct, or interface member declaration
HelloWorld.cs(5,26): error CS1519: Invalid token '(' in class,
struct, or interface member declaration
HelloWorld.cs(7,1): error CS1022: Type or namespace definition,
or end-of-file expectedThe first error message points to line 4, when in reality the stem of the problem is in line 3. In other words, the compiler error messages are not helpful in this case; on the contrary, they instruct us to do something we don't want to, and should not, do.
More examples of interpreting error messages can be found on the extra material for the course (page currently available in Finnish only).
2.3.3 White spaces
As we tried out in a task earlier, the HelloWorld example program could be coded, without altering its function, in the following alternative format.
Furthermore, the program could also be coded as follows.
Or even by writing all of the code on one line, try it.
Although both of the examples above are syntactically correct, in other words, they abide by the grammatical rules of C#, their readability is significantly lower than in the original program. C# has commonly agreed coding conventions that define how program code should be written. When everyone writes code in the same way, it is easier to read the code. The examples in this material are coded according to these conventions. Links to coding conventions can be found on the course extra information page (currently only available in Finnish):
A string of text is written between " quotes. While processing strings, spaces, tabs, and line breaks are significant. Compare the output of the programs below.
The line above prints out:
Hello World!whereas the line below prints out:
H e l l o W o r l d !To make reading easier, white spaces are used in front of lines to indent blocks. It is customary that after each opening brace the code lines are indented by four spaces, and the indentation is decreased accordingly by four spaces after a closing brace. In C#, a pair of braces is usually located in the same column. Usually IDEs automatically format the text, which is definitely a feature worth using if you don't know how to format the text properly yourself.
2.4 Commenting
“Good programmers use their brains, but good guidelines save us having to think out every case.” -Francis Glassborow
The C# language contains three different types of comments and four different types of annotation:
| annotation | meaning |
|---|---|
// |
single-line comment |
/// |
dokumentation comment |
/* |
beginning of a multiline comment |
*/ |
end of a multiline comment |
Commenting and documenting also includes abiding by coding conventions, for example using correct indentation and giving descriptive names to variables etc. Program code should be readable to a person familiar with some other language.
Source code is usually hard to understand just from reading the code itself. This is why you can and you should add descriptions or comments in your code. Comments help both the programmer himself/herself as well as any person who reads or maintains the code in the future. Many things may seem obvious at the time of writing, but even after a week you may wonder what purpose each line of your code serves.
The compiler ignores comments, so they won't affect the functionality of the program.
// Single-line commentSingle-line comments start with two slashes (//). They're effective until the end of the row.
/* This comment
lasts for
multiple
lines */A comment that starts with a slash and an asterisk (/*) lasts until another asterisk and slash ends it (*/). Note that there is no space between the asterisk and slash.
For example, the comment line /* cat */ can be added in the same places where spaces could be added in a previous task. Respectively, you cannot write a comment line in places where you cannot add spaces either.
2.4.1 Documentation
The third comment type is the documentation comment. Documentation comments have a specific syntax, and abiding by its rules allows transforming documentation comments into a summary, which can be viewed in a browser or printed neatly on paper, for example.
A documentation comment should be written in front of each class, main program, subroutine, and method (subroutines and methods will be discussed later). In addition, each C# file should start with a documentation comment that clarifies the meaning, author, and version of the file.
Documentation comments always start with three slashes (Shift + 7). Accordingly, each following documentation comment line starts with three slashes as well.
Documentation utilises tags. If you have ever written HTML pages, this type of notation should be familiar to you. Documentation comments begin with a start tag, like <example>, which is followed by the content of the comment. Comments end with an end tag, like </example>, i.e. otherwise just like the start tag but with one slash after the first angle bracket.
C# tags include for example <summary>, which is a short summary of the block of code to follow (for example the main program or a method). The summary ends with the end tag </summary>.
During compilation, documentation tags can be saved in a separate XML file, from which they can be easily transformed into browsable HTML pages. You can come up with more tags, but the list of recommended tags is sufficient for the purposes of this course. Information of the recommended tags can be found in the C# documentation:
We can now add the following C# comments to the beginning of the HelloWorld program:
The author is given at the beginning of the program. This is followed by the first documentation comment (note the three slashes), which is a brief description of the class. Nore that in some documentation summaries only this first sentence is shown. Click the link Document and study the generated documentation by clicking the links in it. The content of the documentation is gathered from the program's documentation comments that start with ///.
Documentation comments ensure that a program could eventually be documented to the similar extend as Jypeli.
Note that the documentation indicator /// is not used anywhere else (like in front of a subroutine or a class) in the program but in front of documentation comments. Regular single-line comment indicators // or multi-line indicators `/* ... */ are used within the code.
Documentation is an extremely important part of programming. As the number of classes and lines of code grows, documentation eases both your own work as well as the work of future users and administrators. The importance of documentation is emphasised by the fact that as much as 40-60% of the work time of administrators is spent on trying to understand how the program under revision works. [KOSK][KOS]
Which of the following concepts are you familiar with? Revise if necessary
3. Algorithms
“First, solve the problem. Then, write the code.” - John Johnson
3.1 What is an algorithm?
When we write machine-readable instructions, the action to be performed needs to be written as a series of simple actions. This series of actions needs to be unambiguous, which means that in each situation it can offer only one course of action, and it cannot contain any contradictions. An unambiguous description of the series of actions that need to be taken in order to perform a task are called an algorithm.
The coding process of a program can start with outlining the necessary algorithms, i.e. by listing the necessary actions to perform a task:
Brewing coffee:
1. Fill the coffee pot with water.
2. Boil the water.
3. Add the coffee grounds.
4. Let the coffee even out.
5. Serve the coffee.In general terms, an algorithm is a series of actions defined as specifically as possible, consisting of unambiguous step-by-step actions that are necessary to solve the task at hand.
3.2 Specification
When inspecting almost any assignment, you will notice that the performance of the task consists of clearly distinguishable parts of the task. The way in which a single part of the task is performed has no effect on performing the other parts. Only the fact that each part is performed has relevance to the result. For example, each part of the coffee brewing task can be divided into smaller parts:
Brewing coffee:
1. Fill the coffee pot with water:
1.1. Place the pot below the tap.
1.2. Open the tap.
1.3. Let the water run until there is enought water in the pot.
1.4 Close the tap.
2. Boil the water:
2.1. Place the pot on the stove.
2.2. Turn the hotplate on.
2.3. Let the hotplate warm up until the water boils.
2.4 Turn the hotplate off.
3. Add the coffee grounds:
3.1. Measure out the coffee grounds.
3.2. Mix the coffee grounds into the boiling water.
4. Let the coffee even out:
4.1. Wait until most of the coffee has blended into the water.
5. Serve the coffee:
5.1. This is a story on its own...The solution to the coffee brewing problem was divided into five phases. The algorithm of the solution contains five statements to perform. Upon closer inspection, it turns out that each of these five statements is divisible to even smaller phases, i.e. the main algorithm of the solution can be divided into subalgorithms which present steps to solve each phase.
Writing algorithms turns out to be a hierarchical process, where a task is divided into parts which are specified until each part of the task is so simple that there is nothing ambiguous about it.
3.3 Generalisation
One important stage in writing algorithms is generalisation. Generalisation means trying to locate all the factors in an algorithm that depend on the task at hand and analysing if these factors could be replaced with more general factors or even removed completely.
3.4 Exercise
3.5 Sequence
Similar to the recipe in chapter 1 and other instructions written for people, also instructions for computers are read top-down, unless defined otherwise. For example, instructions for drawing a snowman could be presented in the simplified manner below.
Draw a circle of radius 20 cm to the point (20,80)
Draw a circle of radius 15 cm on top of the previous circle
Draw a circle of radius 10 cm on top of the previous circleThe code above is not written in any programming language yet, but it already contains the idea of how to draw a snowman on a computer. We will draw a snowman in C# in the next chapter.
An example of an algorithm: let's assume that you face a situation where you have an array of numbers and each number in this array should have the same value as the first number in the array. In the following task, you can write an "algorithm" for this situation by using the Tauno program.
Drag the elements in the array in Tauno so that you finally have the required result. At the same time, look at what kind of code Tauno generates for you. This is an algorithm for performing this task in C#. If you want to start again, hide Tauno and show Tauno again (click Hide Tauno and Click here to show Tauno).
Try to think if the order of the statements in your solution to the Tauno task could be altered. If it could, your code is parallel; if it couldn't, your code is purely sequential.
4. A simple graphical C# program
The following example utilise the Jypeli programming library developed in University of Jyväskylä. Originally the library was designed and implemented for the Youth game programming course, but it was found suitable for the level of the Programming 1 course as well. You can download the library from here:
4.1 What is a library?
C# programs consist of classes. Classes contain methods (and subroutines/ functions), which perform tasks and possibly return values after performing these tasks. A method could, for example, calculate the sum of two numbers and return the result, or draw a circle of the requested size. Methods related to the same topics are collected into classes and classes are further collected into libraries. The idea behind libraries is that there is no need to redo something that has been done by someone else already. In other words, there is no need to reinvent the wheel.
The most significant library for a C# programmer is the .NET Framework Class Library (FCL). The documentation of the class library is worth exploring, because it contains multiple methods that are very useful. The documentation can be found on Microsoft's site at
Class documentation contains information about all the classes and their methods (and subroutines) in a library. Usually available in at least WWW format.
4.2 The Jypeli library
Development of the Jypeli library started in University of Jyväskylä in spring 2009. The examples in this material use version 4. The Jypeli library contains classes and methods which make it easier to include for example physical and mathematical phenomena as well as characters and their movements into your own programs.
4.3 Example: Snowman
The description that follows refers to the line numbers in this program.
Click the link Highlight to show the line numbers.
When you run the program, it should draw a simple snowman in the middle of the screen, as in the image below.

For continuation, we will shorten the program and write the repeated main program in a separate file. This way, we can focus on the problem itself. Try to add a fourth circle to the snowman.
4.3.1 Running a program
Execution of a program always starts from the opening brace of the main program and moves line by line, top-down all the way to the closing brace of the main program. The main program (just like any other subroutine) can also contain subroutine calls, which move the execution from the main program to the subroutine and then back to the main program (the subroutine that made the call). Subroutines will be discussed in detail in chapter 6. In fact, even the examples from before made subroutine calls, such as Add(p1)
Let's inspect the most significant parts of the Snowman program.
First we have to let the compiler know that we want to utilise the entire Jypeli library. Now all the classes in the Jypeli library (and their methods) are in our use. In fact, we don't even have to use the statement using. But if we leave it out, the compiler will not recognise words such as PhysicsGame. This problem could be solved by stating that it can be found in the Jypeli library:
And similarly, Jypeli. would have to be added in front of each introduction of a Jypeli tool. For this reason, we can save trouble by simply stating using Jypeli. In fact, if we would have stated this at the beginning of the HelloWorld.cs file:
for printing, it would have been enough to write:
Now, let's return to inspecting the Snowman program:
08 /// <summary>
09 /// A class where we practice drawing cirles on screen.
10 /// </summary>
11 public class Snowman : PhysicsGame
12 {Lines 8-10 are documentation comments. Line 11 creates a new class, Snowman, which differs from the style of creating a class HelloWorld example. Here, we are using the Jypeli library for the first time to state that the Snowman class that we are creating is "based" on the PhysicsGame class in the Jypeli library. To be more specific, the Snowman class is inherited from the PhysicsGame class. This way the Snowman class can utilise all of the features in the PhysicsGame class and can add new features to it. Here, we are adding the function of the Begin method, which defines what will be drawn at the beginning of the "game". In a way, Begin is the "main program" of a Jypeli program.
Drawing and (later) moving objects on screen and utilising laws of physics is much easier by utilising the PhysicsGame class.
14 /// <summary>
15 /// The main program starts the "game" as is customary in Jypeli
16 /// </summary>
17 public static void Main()
18 {
19 using (Snowman game = new Snowman())
20 {
21 game.Run();
22 }
23 }Also the Main method, aka the main program, is practically always written in this format in Jypeli, so we won't have to change it much in the future. We will skip explaining the contents of the main program at this point and simply state that the main program creates a new object (i.e. a new "game") using the Snowman class which is then run with the statement game.Run(). Due to the structure of the Jypeli library, all of the actual game-related code is coded within their own subroutines. Next, the code that is executed at the beginning of a "game" is coded into the Begin subroutine, which will be executed next.
To be specific, Begin starts from line 29. The first statement is written on line 30.
The first of these two lines calls the ZoomToLevel subroutine within the Camera object, which makes sure that the "camera" is focused and zoomed in on the right spot. The subroutine doesn't require any parameters, so the area between the parentheses is blank. The second line changes the colour of the background.
Let it be known that the Camera and Level objects are objects of the game (the variable game in the main program) created from the Snowman class. In reality, the code should be as follows:
but when we refer to the object's own features, the self-reference this. can be left out. Some programmers like to write out the self-reference for clarity, although it is not necessary. This is a typical example of a matter of opinion in programming.
With these three lines, we create a new physics object, a circle, give its radius, y-coordinate, and add it to the "stage", i.e. the visible area of the program. If the x-coordinate is not provided, it is 0 by default.
More specifically, we create a new PhysicsObject object, i.e. an instance of the PhysicsObject class, which we name p1. PhysicsObject objects are objects that move on the game field and abide by the laws of physics. Within the parentheses, we state what kind of object we want to create - in this case, the width and height (on the Jypeli scale, not in pixels) and the shape of the object. In summary, we are creating a circle (Circle) of radius 100 (width = 2 * 100 and height = 2 * 100). Other shapes in the Shape collection include a triangle (Triangle), an ellipse (Ellipse), a rectangle (Rectangle), a heart (Heart), etc. Objects will be discussed in more detail in chapter 8.
The next line defines the position of the object with its Y-coordinate value:
Notice that Y is capitalised. This is an attribute of the p1 object. The x-coordinate need not be defined separately because it is 0 by default and that suits us. To draw circles in specific positions, we need to calculate the coordinates. By default, the centre of the window is the origin of the coordinates, i.e. the point (0, 0). The values of the x-coordinate grow when moving right and the values of the y-coordinates grow when moving up, similarly to "ordinary" coordinates that we learn in school.
The coordinates can also be entered in vector format by providing both of the coordinate components at the same time. For example, in the previous task the ball could have been placed in the position x=20,y=50 by coding:
The game object always needs to be added to the stage before it becomes visible. This can be done with the Add method, which takes in the name of the object to be added as its parameter (here p1).
More specifically, we should state that we are adding the object to this game, like this:
but as discussed before, self-references can be left out.
The information provided to methods is parameters. The method ZoomToLevel doesn't take in any parameters, but the Add method takes in one parameter: a PhysicsObject object that we want to add to the stage. Another parameter that the Add method can take in is the layer number to which the object is added. By using the layers you can manage which objects are added on top. The layer parameter can be left out of the method call though, which makes the program decide the best order of the layers by itself.
Parameters are written in parentheses after the method name and separated by commas.
MethodName(parameter1, parameter2,..., parameterN);In the following lines we create two more circles in a similar way, but changing the radius and coordinates of the circles.
In the Snowman example, the arithmetic operations of C# are utilised in calculating the coordinates. Of course, we could calculate the coordinates ourselves, but why should we if the computer can do it for us? The basic arithmetic operations of C# are sum (+), subtraction (-), multiplication (*), division (\), and the remainder (%). Arithmetic operations will be discussed in more detail in section 7.7.1.
The middle circle is placed on top of the top circle so that the circles touch. In other words, the centre of the middle circle is located so that its x-coordinate is 0 and its y-coordinate is the position of the bottom circle + the radius of the bottom circle + the radius of the middle circle. If we want the radius of the middle circle to be 50, we need to place its centre in the position (0, p1.Y + 100 + 50), which can be drawn with the statement:
Notice that in addition to setting the Y-attribute of the physics object (set) we can also read or request (get) the value of the parameter in question. In the example above, we do this by simply writing p1.Y to the right side of the assignment operator =.
The following image demonstrates the positioning of the first and second ball.
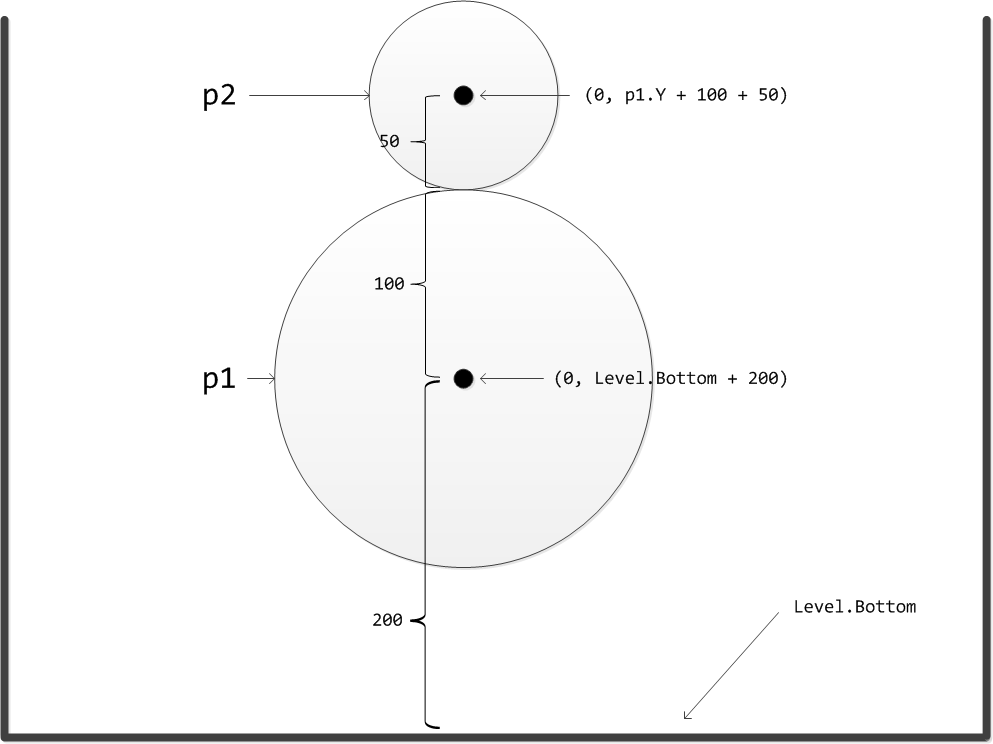
The top circle touches the middle circle. As a practice assignment, calculate the coordinates of the top circle when its radius is 30.
All information about classes, class methods and what parameters each method takes in can be found in the documentation of the library you are using. The class documentation of Jypeli can be found here:
Documentation of Jypeli is in Finnish, but the names of classes and attributes are in English.
4.4 Exercise
Find the class RandomGen in the documention of the Jypeli library. What information can you find about the
NextInt(int min, int max) method?
What other methods does the class contain?
The next example teaches the use of the random number generator in the C# library. The example is run in the Mono environment and it gives different results for the random number from the .NET environment. The example demonstrates that the random number in the Mono environment does not work well. Both Jypeli and the Windows .NET environment have this problem with the random number fixed.
4.5 Compilation and referring to class libraries
In order to compile the Snowman example program with a C# compiler, you need to save the Jypeli library on your computer. Jypeli utilises not only the XNA library but also free open-source physics and mathematics libraries. In other words, the Jypeli library has built-in physics and mathematics libraries.
Before compiling in the command prompt, copy the following files from the course website (see: Snowman in command prompt(in Finnish)) and paste them in the same folder that contains the Snowman.cs file.
- Jypeli.dll (found in the jypeli.zip file)
We still need to tell the compiler to use the Jypeli library in order to compile the Snowman code. In addition, the compiler needs the information that this program is made for the use of 32-bit systems (x86). This can be done with the help of the /reference parameter of the csc program (the compiler). The reference to the XNA library that Jypeli utilises is needed as well. Write the following command (all rows on the same line, one space in front of the /) in the command prompt
csc Snowman.cs /reference:Jypeli.dll;
"%XNAGSv4%\References\Windows\x86\Microsoft.Xna.Framework.Game.dll"
/platform:x86Koska näin komennoista tulisi varsin pitkiä ja sitä varten Microsoft on tehnyt dotnet-nimisen ohjelman, jolla voidaan hallita näitä tarvittavien kirjastojen suhteita. Tämän ohjelman avulla kääntämisen vaiheet ovat seuraavat
Yhden kerran asennetaan Jypelin tarvitsemat kirjastot, eli annetaan komentoriviltä komento
dotnet new install Jypeli.TemplatesTätä ei tarvitse enää antaa toista kertaa
Siirrytään luodaan tarvittaessa ja siirrytään hakemistoon, johon uusi projekti halutaan
cd HAKEMISTOPOLKULuodaan uusi projekti Lumiukkoa varten
dotnet new Fysiikkapeli -n LumiukkoTässä syntyy
Lumiukko-hakemistoon mmLumiukko.csniminen tiedosto, joka muokataan halutulla tavalla toimivaksi.Käännetään ja ajetaan ohjelma
dotnet runJos ei toimi halutulla tavalla, muokataan tiedostoa ja käännetään ja ajetaan uudelleen.
More information about the topic on the course's extra material page (in Finnish).
5. From source code to the processor
5.1 Compiling
Now, we will inspect more carefully how the C# source code eventually transforms into a format that the processor can understand. When the programmer creates the program's source code that utilisises the .NET Framework environment, the internal compilation process is divided into two phases. First, the program is compiled into an intermediate language, MSIL (Microsoft Intermediate Language), which is not yet executable in any operating system. During runtime, the finished program is compiled from this indermediary phase code to the desired operating system and processor. The operating system can be for example Windows, macOS, iOS, Android, or Linux. The processor can be for example one of the Intel processors abiding the x86 architecture or with mobile devides for example ARM. This run-time compilation is performed with the so-called JIT compiler (Just-In-Time). The JIT compiler transforms the intermediary code into code that is compatible with the operating system specifically during run-time - hence the name "just-in-time".
Before the first compilation the compiler checks that the code has the correct syntax. [VES][KOS]
Compilation was performed with the Windows command prompt by using the command
5.2 Executing/running the program
So, C# produces an executable (or "runnable") file from the source code. This file is OS-dependent and only executable on the platform on which the compilation was performed. In other words, programs that have been compiled in the Windows environment are not executable in macOS, or vice versa.
Unlike C#, some other programming languages produce OS-independent code. For example, in Java, the file that the compiler produces is in so-called bytecode, which is OS-independent. In order to execute Java bytecode, a Java Virtual Machine is required. A Java Virtual Machine is a program that imitates a real computer which interprets bytecode and executes it on the processor of the target computer. This differs significantly from traditional compiled languages (such as C and C++) in which the compilation needs to performed separately for each different device platform.
6. Subroutines
“Copy and paste is a design error.” - David Parnas
In addition to the main program, a program can contain other programs as well. A subroutine is called from the main program, a method, or another subroutine in order to perform a certain task. Subroutines can receive parameters and return a value, similarly to methods. A subroutine can call another subroutine and sometimes even itself (this is called recursion). A real program consists of several subroutines, each of which performs a small task on their own. In this way, a large task can be didived into a set of smaller, easily manageable subtasks.
Subroutines are used because
- they allow dividing the program into smaller parts
- they help with structuring the program
- they are helpful for reusability
- smaller parts make testing easier
The objects in modern object-oriented languages are actually a collection of object-specific variables (attributes) and subroutines that handle them (methods). In addition, the API (Application Programming Interface) of modern languages is significantly larger than the langauge itself. In addition to subroutine libraries included in a language, also application-specific libraries, which can be very extensive, are used often. The Jypeli library used on this course is one example of an application-specific library. Using existing libraries eases the workload of programmers, because not all has to be done by themselves.
On the other hand, subroutines are also coded by the programmer himself/herself. In practice, it is often the case that the program contains a part that is often repeated almost identically. In these cases, the programmer tries to find the common factors between these parts and tranform them into a subroutine. If the functionality wasn't completely identical in repeated parts, the difference is relayed to the subroutine as parameters. This way, the same subroutine can do slightly different things with each different call. An example of this will be presented shortly.
However, sometimes subroutines are also coded when there is a problem such as "I need to find the largest number in this array". In most cases, it makes no sense to write out the search and instead the programmer makes the request: "we should have a subroutine that does this". The same in writing:
large = Largest(array);Later on the Largest subroutine (or function in this case because it returns a value) is implemented. Now if the same task would have to be completed again, the same subroutine call could be made again (reuse).
The same subroutine is often called from a program multiple times, but for the sake of clarity it can be reasonable to code independent entities into subroutines as well (structured/top-down programming), even if they are called only once.
The following is an example of structuring, reuse, and clarifying.
If the task was to draw multiple snowmen, the solution would probably look something like this with our current know-how.
We notice that the lines of code for drawing the first and the second snowman are almost identical. In fact, the only difference is the coordinates of the snowmen. First, we try to make the lines of code for drawing both the snowmen exactly identical.
First, we could write the code so that the centre of the bottom snowball in the snowman is saved as variables x and y. With the help of these coordinates we can then calculate the position of the other snowballs. Let's also define p1, p2, and p3 as PhysicsObjects. Line numbers have been left out for clarity. At the end of this chapter, line numbering is included when we present the finished program. Remember: we can include the this self-reference when referring to the object's own attributes.
double x, y;
PhysicsObject p1, p2, p3;
// Let's make the first snowman
x = 0; y = Level.Bottom + 200;
p1 = new PhysicsObject(2*100, 2*100, Shape.Circle);
p1.X = x;
p1.Y = y;
this.Add(p1);
p2 = new PhysicsObject(2 * 50, 2 * 50, Shape.Circle);
p2.X = x;
p2.Y = y + 100 + 50; // y + radius of 1st snowball + radius of 2nd ball
this.Add(p2);
p3 = new PhysicsObject(2 * 30, 2 * 30, Shape.Circle);
p3.X = x;
p3.Y = y + 100 + 2 * 50 + 30; // y + radius of 1st ball + diameter of 2nd ball + radius of 3rd ball
this.Add(p3);Respectively, we only need to set the correct values of x and y for the second snowman.
// Let's make the second snowman
x = 200; y = Level.Bottom + 300;
p1 = new PhysicsObject(2 * 100, 2 * 100, Shape.Circle);
p1.X = x;
p1.Y = y;
this.Add(p1);
p2 = new PhysicsObject(2 * 50, 2 * 50, Shape.Circle);
p2.X = x;
p2.Y = y + 100 + 50;
this.Add(p2);
p3 = new PhysicsObject(2 * 30, 2 * 30, Shape.Circle);
p3.X = x;
p3.Y = y + 100 + 2*50 + 30;
this.Add(p3);Let's inspect the changes in detail.
The line above introduces two variables, the type of which are floating point numbers. A floating point number is a way of presenting real numbers in computers. In C# each variable has to have a type, and one of types of the floating point number is double. Variables and their types will be discussed in more detail in chapter 7.
Floating point (number) = one way of presenting real numbers in computers. More information about floating point numbers can be found in chapter 26.
The line above contains two statements. The first one sets the value of x to be 0 and the second one sets the value of yto be 50 (if, for example, Level.Bottom happens to be -150). Now we can use these variables for the calculations related to the snowballs.
Respectively, the line above sets new values for the variables which are used for calculating the positions of snowballs in the next snowman. Notice that the y-cooordinate receives a negative value, in which case the centre of the bottom snowball in the snowman descends below the middle level of the screen.
Now, the x-coordinate is set to be variable x and respectively the y-coordinate is set to be variable y, and the positions of the other snowballs are calculated based on the coordinates of the first snowball.

After these changes, the drawing process of both snowmen is performed with exactly the same code from line x= onwards.
Drawing new snowmen is now somewhat easier because all we have to do is just indicate the position of the new snowman before drawing it, and the drawing itself is simply a matter of copying and pasting the code. However, if we must copy-paste our code, we should consider if it's reasonable to do so.
In the case of drawing two snowmen, copying and pasting is still manageable without increasing the amount of code uncontrollably, but what if we have to draw 10 or 100 snowmen? How many lines of code would the program then contain? When an almost identical strip of code is appears in several places, it is usually necessary to form a subroutine of it. Pasting the same code into several places would only increase the amount of code and complicate both understanding and testing the program.
In addition, if the repeated code contained errors, corrections would also have to made in several places. One of the criteria for how good a program is is that if something needs to be changed, would these changes be done in one place only (good) or several places at a time (bad).
6.1 Subroutine calls
We want to make a subroutine that draws a snowman in a specific point. Just like methods, subroutines also receive necessary information with the help of parameters. Parameters should only convey the most minimal amount of information in order to perform the task of the subroutine.
Let's agree that our subroutine always draws a snowman of the same size in a specified point (position). What is the necessary information that the subroutine needs to draw a snowman?
The subroutine needs the information about which point the snowman should be drawn in. For this, we will give the centre point of the bottom snowball in the snowman as a parameter. The positions of the other snowballs can be calculated with the help of this centre point. Additionally, we need one parameter of the type Game so that our subroutine can be called from other programs as well. These parameters are anough to draw a snowman.
When a subroutine is used in a program, we say that we are calling a subroutine. The call can be performed by writing the name of the subroutine and giving it its parameters. The only difference between a subroutine call and a method call is that a method is always related to a certain object. For example, the ball object p1 could be removed from the game level by calling the method Destroy(); this call would be written as follows:
In other words, when we call methods, we first need to write the name of the object for which we call the method, then a full stop (.), and finally, the name of the method we are calling. The parentheses naturally contain the necessary parameters of the method. The Destroy-method above does not receive any parameters.
6.1.1 Coding subroutine calls
Let's decide that the name of the subroutine is DrawSnowman. Let's also agree that the first parameter of the subroutine is the game in which the snowman is drawn (by writing this). The second parameter is the x-coordinate of the centre point of the bottom snowball in the snowman and the third parameter is the y-coordinate of the centre point of the bottom snowball. Now we can draw a snowman with the centre of the bottom snowball at the point (0, Level.Bottom + 200) with the following call:
DrawSnowman(this, 0, Level.Bottom + 200);The call can also start with the name of the class in which the subroutine is located. With this call the subroutine can also be called from other classes, because the access modifier of the Snowmen class is public.
Snowmen.DrawSnowman(this, 0, Level.Bottom + 200);Although this format resembles a method call quite a lot, there is a clear difference. When we call a method, its action is always performed for a certain object, like p1.Destroy() destroys only the ball to which the object p1 refers. Of course, there can be multiple ball objects in the program (like in our example). However, the subroutine call below simply uses the DrawSnowman subroutine which is located in the class Snowmen.
If we had coded the subroutine itself already, Begin would now draw us two snowmen.
/// <summary>
/// Calls the subroutine DrawSnowman
/// with the necessary parameters.
/// </summary>
public override void Begin()
{
Camera.ZoomToLevel();
Level.Background.Color = Color.Black;
DrawSnowman(this, 0, Level.Bottom + 200);
DrawSnowman(this, 200, Level.Bottom + 300);
}Of course, because the subroutine DrawSnowman doesn't exist yet, the program is not functional yet. In order to get the calls to work we have to implement the subroutine itself.
It is often wise to progress specifically in this order when implementing a program: first, formulate the subroutine call, write the call in the place it belongs, and only then implement the code of the subroutine itself.
More information about calling subroutines can be found in the document Calling subroutines (currently only available in Finnish):
6.2 Coding subroutines
Before we start to code the functionality of the subroutine DrawSnowman, we need to introduce or declare the subroutine. Let's write the declaration of the subroutine that was already called in the previous section.
We will add the frame of the subroutine into our program. We will also document the subroutine right away.
/// <summary>
/// Calls the subroutine DrawSnowman
/// with the necessary parameters.
/// </summary>
public override void Begin()
{
Camera.ZoomToLevel();
Level.Background.Color = Color.Black;
DrawSnowman(this, 0, Level.Bottom + 200);
DrawSnowman(this, 200, Level.Bottom + 300);
}
/// <summary>
/// A subroutine that draws a
/// snowman in the specified position.
/// </summary>
/// <param name="game">The game that contains the snowman</param>
/// <param name="x">The x-coordinate of the centre point of the bottom snowball in the snowman</param>
/// <param name="y">The y-coordinate of the centre point of the bottom snowball in the snowman</param>
public static void DrawSnowman(Game game, double x, double y)
{
}The image below clarifies the connection between the subroutine call and the subroutine declaration and its complementary parameters.
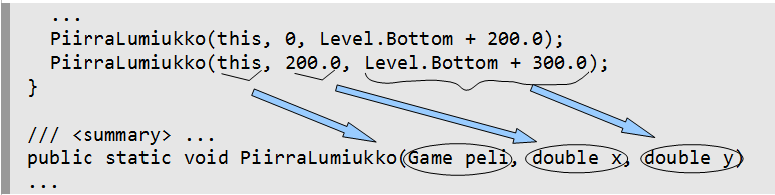
The first line of the subroutine implementation
public static void DrawSnowman(Game game, double x, double y)is called the subroutine header or introductory line. The first part of the header (the access modifier) defines the visibility of the subroutine as public. When a subroutine is public, it can be called (or used) in other classes as well.
This subroutine is also defined static. The implementation of a static subroutine cannot use the this self-reference, because it is not associated with any object. However, its benefit is that then the subroutine can be called from any part of the program and it is not (in this case) dependent on our game; also other games can make calls to this subroutine. If we would not define this subroutine as static, it would be a method, i.e. an object function (see section 8.5.).
A static subroutine needs to be able to perform all of its functions only with the help of the information provided to it as parameters.
However, a static subroutine can also use static (global) variables and constants. Use of static variables is not recommended, but use of constants is possible.
The subroutine has the return value type void, which means that the subroutine does not return any value. As a matter of fact, a subroutine could return a value that is needed in the program when the subroutine is finished. These types of subroutines will be discussed in chapter 9.
After the definition ´void´, we named the subroutine DrawSnowman.
Note! In C#, the names of subroutines are usually capitalised.
Note! The names of subroutines (and methods) should be verbs or clauses that express an action, for example CreateBall, Move, RanIntoAnObstacle.
The parameters of the subroutine are declared within parentheses after the name of the subroutine. Before each parameter we also need to declare the data type of the parameter. In this subroutine, the provided parameters were the x- and y-coordinates of the bottom snowball. The data type of both of these is double, so the complementary parameters in the subroutine also need to be of the type double. We will also give them descriptive names x and y.
To recap, here are the words in the introductory line of the subroutine:
public static void DrawSnowman(Game game, double x, double y)| Word | Meaning |
|---|---|
public |
subroutine is public and it can be called by anyone |
static |
subroutine only needs information received via parameters |
void |
subroutine does not return any value |
DrawSnowman |
the name of the subroutine (can be anything you want; note the naming conventions though) |
Game |
data type of the game (note: this is capitalised because it's the name of an object (class)) |
game |
name of the first parameter (can be anything you want) |
double |
data type of the x-coordinate |
x |
name of the second parameter, the x-coordinate (can be anything you want) |
double |
data type of the y-coordinate |
y |
name of the third parameter, the y-coordinate (can be anything you want) |
Because we decided to call this subroutine with three actual parameters in the following way:
DrawSnowman(this, 200, Level.Bottom + 300);the introductory line of the subroutine needs to declare three formal parameters of the same type in the same order. Of course, 200 is an integer, but an integer can be assigned to a real number, so for the sake of general use, x and y are declared as real numbers in this case. Thanks to this, the subroutine can also be called as follows:
DrawSnowman(this, 10.3, 200.723);More information about data types can be found in section 7.2. and chapter 8.
Parameters are separated by commas in both the subroutine call (actual parameters) and the intorductory line of the subroutine (formal parameters).
Note! The names of formal parameters in a subroutine do not need to be the same as in the parameter call. The names should, however, be as descriptive as possible.
Note! The parameter types do not need to be exactly the same as long as each formal parameter is assignment-compatible with the complementary parameter in the subroutine call. More examples of functions can be found in the document Coding subroutines (currently only available in Finnish):
https://tim.jyu.fi/view/kurssit/tie/ohj1/materiaali/aliohjelmienKirjoittaminen.
In fact, because this in the call above is of the type Snowmen, inherited from the class PhysicsGame but because PhysicsGame is inherited from the regular game class Game, variables of both the type Snowmen and PhysicsGame can be assigned to a variable of the type Game. Of course, the introductory line of the subroutine could also declare the variable type of game to be SnowMen or PhysicsGame, but then the subroutine would not be able to draw a snowman into a game of the type Game (inherited from the class Game). In other words, the generalisation here is similar to assigning 200 (an integer) into a variable of the real number type (double).
So, the subroutine call and declaration have a very strong connection. The information provided in the subroutine call (actual parameters) are "assigned" to the complementary parameters in the introductory line of the subroutine (formal parameters) with each call. In other words, broadly the following actions are performed when calling a subroutine.
the game in the subroutine = this;
x in the subroutine = 200;
y in the subroutine = Level.Bottom + 300;Now we can run our program. It works (it runs), but of course it doesn't draw any snowmen, and it shouldn't because the subroutine we just created is "empty". Between the braces, let's add the code that is necessary to draw snowballs.
A small change to the earlier version is needed, however. Lines that add the snowballs to the field are changed as follows
game.Add(...);in which the dots are replaced by the name of the ball object. This is because, in fact, we originally should have always written:
this.Add(p1);
this.Add(p2);
etc.In the original snowman program we called the method Begin of the Snowman class, which was meant to declare that the snowballs need to be added to this (this) specific game (game object, which is an instance of the Snowman class). In many object-oriented languages it is possible to either include or leave out the self-reference this when referring to the object's own methods (like Add here) or attributes. Everyone can chooseone's own style, but in this material this is usually left out. Similarly, DrawSnowman is not the subroutine of a particular object (this is caused by the declaration static), which is why it receives the information about which game includes the snowman it draws as a parameter. In our example, we particularly relayed the parameter this to it. This is why the subroutine call in our example
game.Add(p1);is specifically
Finally, the complete Begin method and DrawSnowman subroutine:
In C# (like in many other languages) it doesn't matter which one is coded first, the the main program (in this case Begin) or the subroutines it calls (in this case DrawSnowman). The most important thing is that they form entities (i.e. they are blocks enclosed within braces {}).
Subroutines are not executed in the order they appear in the code but in the order they are called. The execution of a program always starts from the Main program, and in the case of Jypeli the main program calls the Begin method which can call other subroutines, which can also call other subroutines. When the subroutine is executed, the execution of the program returns to the part where the subroutine was called.
When we form the code for the subroutine functionality, we use the names we gave to parameters. The coordinates of the centre of the bottom circle are provided in the parameters x and y, but the centres of the other circles need to be calculated with the help of the coordinates of the bottom circle. This is done exactly like in the example earlier. In fact, if we compare the contents of the subroutine with the contents of the previous example, they are exactly the same.
In C#, it is customary to capitalise the names of subroutines and methods and each word within the name. This style of writing is called PascalCasing. Variables are not capitalised, but each following word within the name of the variable is capitalised: for example double speedOfCar. This style of writing is called camelCasing. More about the naming conventions of C# here:
Let's take a look at what happens in the subroutine call.
DrawSnowman(this, 0, Level.Bottom + 200);The call above assigns the value this (i.e. the game in question) to the variable game, the value 0 to the variable x (an integer can be assigned to a floating point number), and the value Level.Bottom + 200 to the variable y. Of course, we could also assign any other floating point number to x and y.
The execution of a subroutine call first calculates the value of each expression in the call and then these calculated values are assigned to the corresponding parameters in the subroutine in the order designated in the call. For this reason the corresponding parameters must be assigment-compatible with the expressions in the call. The example call has simple expressions: the name of a variable (this), an integer (0), and a real number (Level.Bottom + 200). However, they could also be more complex, for example like this:
DrawSnowman(this, 22.7+sin(2.4), 80.1-Math.PI);An expression is the combination of values, arithmetic operations, and subroutines (or methods), which is evaluated into one value.
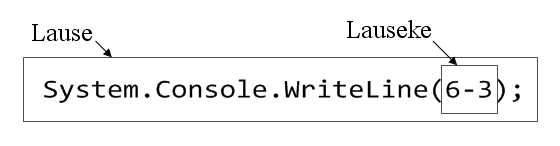
Because we defined the type of coordinates as double, we could assign any other types of decimal numbers as parameters as well. Remember that in C#, the decimal number constant uses the dot (.) as decimal separator, i.e. to separate the integer from the decimal part.
6.2.1 Complete program
In its entirety the program looks like this:
When calling a subroutine the execution of the program jumps to the first line of the called subroutine immediately after assigning parameters and start executing the subroutine with the parameters defined in the call. When the exeution reaches the last line of the subroutine, the execution continues from the next statement after the subroutine call. In our example, when the first snowman has been drawn, the execution continues from the semicolon at the end of the first statement and then the main program continues with the call to draw the other snowman.
If we now want to draw more snowmen, each new snowman would only add one line to the code.
Note! The use of subroutines makes the program code clearer and more readable, which is why subroutines should be added even if they were called only once. A well-formed subroutine might be called on other occasions as well.
(käänt.) saisko esimerkin Snowman.cs, jotta voisi kutsua aliohjelmaa DrawSnowman?
—In C# subroutines and functions can be overloaded with different parameters. This means that the program can contain multiple subroutines with the same name as long as they have the different number (or different types) of parameters. More in section 6.5..
6.3 Documenting subroutines
According to good coding conventions each subroutine should contain a documentation comment. The documentation comment for a subroutine should contain at least the following information: a short description of the functionality of the program, a description of all the parameters, and an explanation of the return value. This information is described in tags in the following way:
- The documentation comment starts with the
summarytags; the text between the tags is a short and clear description of the functionality of the subroutine - Each parameter is described between the
paramtags, and - Each return value between the
returnstags
The documentation comments for the DrawSnowman subroutine are on lines 36-42 in our previous example.
36 /// <summary>
37 /// A subroutine that draws a
38 /// snowman in the specified position.
39 /// </summary>
40 /// <param name="game">The game that contains the snowman</param>
41 /// <param name="x">The x-coordinate of the centre point of the bottom snowball in the snowman</param>
42 /// <param name="y">The y-coordinate of the centre point of the bottom snowball in the snowman</param>You can try documentation in the previous complete Snowman example by clicking the Document link. Then try to different links in the documentation to see what's behind them. The same can be seen in the image below.
The HTML page produced from this class by the Doxygen tool (see: http://en.wikipedia.org/wiki/Doxygen) would look like this:
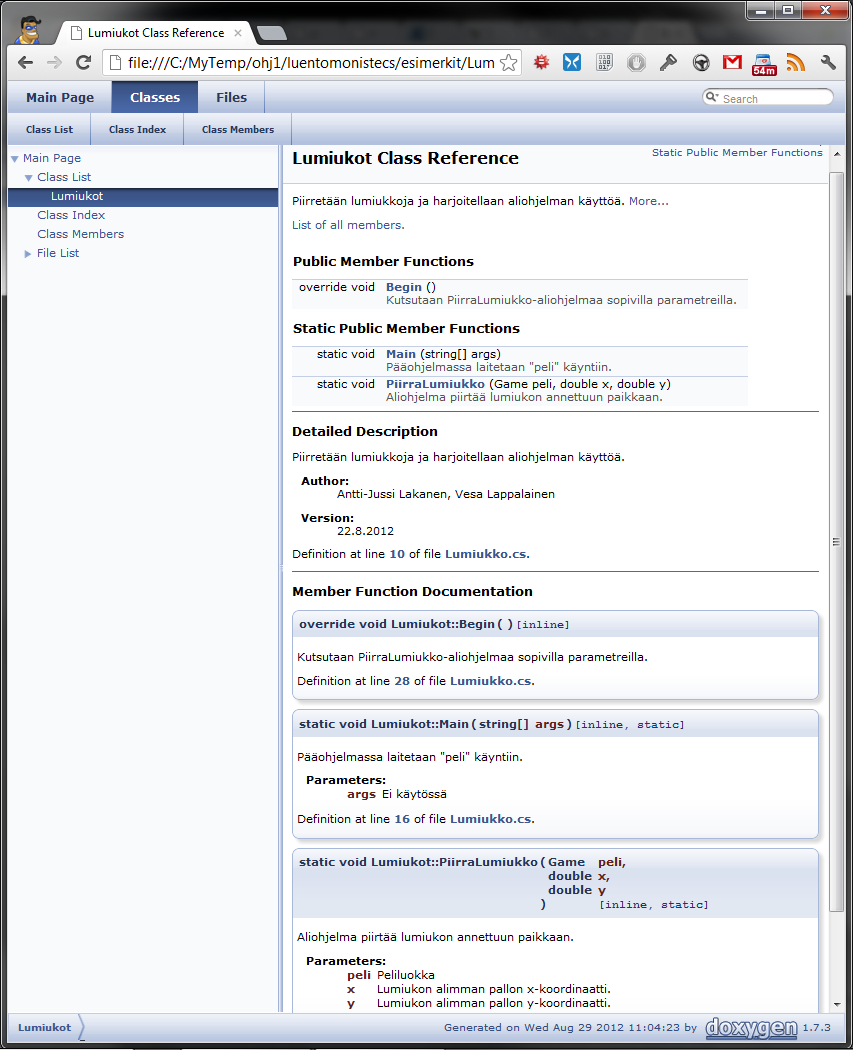
The documentation shows all the subroutines and methods in the class. Notice that Doxygen names both subroutines and methods as member functions. As said, naming conventions vary in literature, and in this case the naming convention resembles the one used in C++. However, member functions are called subroutines and methods on this course.
The details of each subroutine and method can be found in the section Detailed Description. The documentation of the DrawSnowman subroutine with its parameters can be seen at the bottom of the image.
6.3.1 Note
All of the information needed in the DrawSnowman subroutine was relayed with the help of the parameters and no external information was needed during the execution of the subroutine. This is typical and usually also a desirable feature of subroutines. In these cases, the subroutine is defined as static.
6.4 Subroutines, methods, and functions
As you may have noted, subroutines and methods have a lot in common. Many sources also call subroutines methods. In these cases subroutines are separated from object methods by calling them static methods. However, in this material, methods refer to object functions only. In Jypeli documentation, we can study static methods of the RandomGen class which generate random number for example. A single ball was removed with the method Destroy, which is an object function.
Ww talk about subroutines on this course because the term is used in many other programming languages as well. This course is primarily a programming course that uses C#. Our main goal is therefore to learn how to program and we use the C# language as a tool for learning it.
Our subroutine DrawSnowman did not return any value (void). Subroutines (or methods) that return a value can also be called functions more specifically.
Different names are used for subroutines and methods in different languages. For example, in the C++ language, both subroutines and methods are called functions. In C++ methods are more specifically called member functions, like Doxygen did in the case of C# as well.
Let's revise the differences of subroutines, functions, and methods in brief.
Subroutine: a general name for any kind of subroutine, function, or method. A word subroutine does not specicy the number of parameters or return value. In void-type subroutine there can be a return-sentence, but without a value. Then the only meaning for return is to jump out of from the subroutine.
In some languages, for example C++, all different types of subroutines are called functions. In Java literature all subroutines are usually called methods.
On this course, the gereral name subroutine is used when we don't want to emphasise that the block is especially a function or a method. Next, let's specify these concepts.
Function: a subroutine that returns a result value, for example the average of two numbers. According to this definition, a function always contains at least one return statement followed by an expression, for example return (a+b)/2.0; Even a void subroutine (i.e., a subroutine that doesn't return a value) can contain a return statement, but it can't be followed by an expression. A function should usually be static.
Method: a subroutine that uses the information of an object for performing a task. Methods are used on this course (for example string.IndexOf), but not coded except for methods of the game class (for example Begin). At the end of the course, some can also potentially make a new class and then write own methods for it. In practice, a method uses the this reference and for this reason it cannot be static.
A method can also return a value, similarly to a function, or it can be void, i.e. not return a value, similarly to a subroutine.
6.4.1 Coding subroutines
When coding subroutines, it would be best to progress like this (as long as we learn how to test, TDD, Test Driven Development):
- Separate the problem into parts.
- Come up with a descriptive subroutine call that starts the solving of a certain problem.
- Write the call line of the subroutine and think what parameters it requires.
- Write (first manually, later generate automatically) the introductory line (the header) of the subroutine.
- think about if it needs the words
public,static - is the return type of the subroutine
voidor something else? - the name of the subroutine
- the same number of parameters as in the subroutine call.
- assignment-compatible types of parameters to the call.
- think about if it needs the words
- Make a syntactically correct stub of the subroutine that compiles, for example a function subroutine needs to a have a return statement that return an expression (for example one number) that is of the same type (or is automatically turned into the same) as the type of the function.
- Document the subroutine (don't mention where it was called, it is not important here)
- Write the tests (TDD) - see the note about testing below
- Run the tests (they should fail == you will see a red bar).
- Make the subroutine functional.
- Run the tests (repeat phases 8-10 until it works = you will see a green bar).
- Move onto the next subroutine.
Read more in the document Writing subroutines (in Finnish).
The instructions above are the common "recipe" for coding subroutines. It includes tests, but with the information provided on this course we can only test the functions that are discussed later in this material in chapter Return value of a subroutine. In other words, the "recipe" above cannot be used properly before we learn more about functions and testing. Subroutines that print out something cannot be tested with the information from this course.
Once again! Dont forget to use Tulosta instead of Print in subroutine calls, or it won’ work
—Of course, subroutines like the ones above are not very efficient and it would be more sensible to give the subroutine the text it should print as a parameter.

6.4.2 Task: Terminology
/// <summary>
/// Calls the DrawSnowman subroutine
/// with necessary parameters.
/// </summary>
public override void Begin()
{
Camera.ZoomToLevel();
Level.Background.Color = Color.Black;
DrawSnowman(this, 0, Level.Bottom + 200);
DrawSnowman(this, 200, Level.Bottom + 300);
}Which of the following statements concerning the program above are true?
6.5 Overloading subroutines
In C# subroutines and functions can be overloaded with parameters. This means that a program can contain multiple subroutines with the same name that have a different number or types of parameters. This can be utilised so that the function that takes in more parameters can do more or do the same operation with more details than a function that takes in less parameters.
6.5.1 A simple example
First, let's take as simple an example as possible about overloading. The function in case sums numbers.
First, we make a function that returns the sum of two numbers.
We write a function with the same name but in the introductory line (function signature) we give three parameters instead of two. We will implement the function immediately as well.
But now we notice that we have almost similar code in two function. We will change the first function so that it calls the first function (that can do less) calls the second function (that can do more). We will provide 0 as the third number (third parameter).
Tämän esimerkin avulla näimme yksinkertaisella tavalla sen, mitä kuormittaminen tarkoittaa. Seuraava esimerkki valottaa kuormittamisen hyötyjä paremmin.
6.5.2 Standard-size snowman vs. size of snowman as parameters
We can create a standard-size snowman with the following subroutine.
/// <summary>
/// A subroutine that draws a standard-size
/// snowman in the specified position.
/// </summary>
/// <param name="game">The game that contains the snowman</param>
/// <param name="x">The x-coordinate of the centre point of the bottom snowball in the snowman</param>
/// <param name="y">The y-coordinate of the centre point of the bottom snowball in the snowman</param>
public static void DrawSnowman(Game game, double x, double y)
{
PhysicsObject bottomcircle, middlecircle, topcircle;
bottomcircle = new PhysicsObject(2 * 100, 2 * 100, Shape.Circle);
bottomcircle.X = x;
bottomcircle.Y = y;
game.Add(bottomcircle);
middlecircle = new PhysicsObject(2 * 50, 2 * 50, Shape.Circle);
middlecircle.X = x;
middlecircle.Y = bottomcircle.Y + 100 + 50;
game.Add(middlecircle);
topcircle = new PhysicsObject(2 * 30, 2 * 30, Shape.Circle);
topcircle.X = x;
topcircle.Y = middlecircle.Y + 50 + 30;
game.Add(topcircle);
}We can call the subroutine in Begin like this for example.
But what if we want to draw snowmen of different size sometimes? In other words, it would be enough if the DrawSnowman subroutine drew a snowman of different size in addition to a standard size snowman. The calls in Begin could look like this.
But now Visual Studio shows the error
No overload for method 'PiirraLumiukko' takes 4 arguments.So now we will write a new subroutine called DrawSnowman (yes, the same name) but the in addition to the game and position parameters we also provide the radius of the bottom snowball.
Move the code from the original subroutine to this new subroutine and set the radius of snowballs to be dependent on the radius provided as a parameter. Additionally, set the positions of the middle and top snowball to be dependent on the size of the snowballs! The new (four-parameter) subroutine would look like this.
public static void DrawSnowman(Game game, double x, double y, double radius)
{
PhysicsObject bottomcircle, middlecircle, topcircle;
bottomcircle = new PhysicsObject(2 * radius, 2 * radius, Shape.Circle);
bottomcircle.X = x;
bottomcircle.Y = y;
game.Add(bottomcircle);
// size of the middlecircle is 0.5 * radius
middlecircle = new PhysicsObject(2 * 0.5 * radius, 2 * 0.5 * radius, Shape.Circle);
middlecircle.X = x;
middlecircle.Y = bottomcircle.Y + bottomcircle.Height / 2 + middlecircle.Height / 2;
game.Add(middlecircle);
// size of the topcircle is 0.3 * radius
topcircle = new PhysicsObject(2 * 0.3 * radius, 2 * 0.3 * radius, Shape.Circle);
topcircle.X = x;
topcircle.Y = middlecircle.Y + middlecircle.Height / 2 + topcircle.Height / 2;
game.Add(topcircle);
}We can now call this "version" that does more from the three-parameter DrawSnowman subroutine, which saves us from copy-pasting code.

.
7. Variables
type name;
Variables act as data storage for different things in programs. A variable is like a small box that can store things like numbers, words, information about the user of the program, and much, much more. In procedural languages, processing information would be impossible without variables. In functional programming, things are a little different. We have already used variables, for example in the Snowman example we created the PhysicsObject-type variables p1, p2, and p3. Accordingly, the parameters (Game peli, double x, double y) in the DrawSnowman subroutine are also variables: the Game-type object variable game and the double primary-type variables x and y.
The term variable is borrowed from mathematics, but these two concepts should not be confused with each other - a variable in mathematics and a variable in programming have a slightly different meaning. You will notice this in the next sections.
Muuttuja arvo muuttuu vain sijoituslauseen suoritushetkellä:
int ika = 21;
int nyt = 2021;
int syntymavuosi = nyt - ika; // arvoksi tulee 2000
nyt = 2022; // syntymävuosi on edelleen 2000Muuttujan arvo ei muutu vaikka sen arvon tuottavissa lausekkeissa jokin myöhemmin muuttuisi. Esimerkiksi edellä syntymavuosi on edelleen 2000 vaikka jatkossa tehtäisiin sijoitus.
Eli lausekkeen arvo lasketaan sillä hetkellä kun sijoitus tehdään.
The values of variables are saved in main memory or registers, but in programming languages we can give each variable a name (an identifier) in order to make it easier to handle them. The naming of variables makes programming easier, because then the programmer does not need to know the addresses of the information they need in the main memory or registers; it is enough to remember the name of the variable the programmer himself/herself named.
Because the compiler needs to reserve a memory area of the right size for the variable, the type of the variable also needs to be introduced. The type of the variable is also needed in order to know how to handle the information saved in the memory location. In order to understand the different ways in which data types are saved, we will get familiar with binary numbers etc. later. For example, the combination of eight bits, aka the byte 01000001can be interpreted as the letter A or as the natural number 65 etc.
For example, the statement Console.WriteLine(a) would not know what to print unless the type of the variable a was known. Accordingly, if you hear the word knight, you would not tell it apart from the word night unless you are given the context as well.
7.1 Defining variables
When a mathematician says that "n is equal to 1", it means that the term (or variable) n is in some inexplicable way equal to the number 1. In mathematics, variables can be introduced as sporadically as this.
However, a programmer needs to be more specific about variables. In C#, values are assigned to variables like this:
The first line roughly translates to "chip a small piece - the size of an ìnt value - of storage space from the memory of the computer, and use the name n for it from now on". The second line declares that "save the value 1 to the variable, which has the name n, in this way replacing whatever may already be in the storage space".
The character = is the assignment variable, which will be discussed later.
Then what is the int in the previous example?
In C# each variable must have a data type (usually type in short). The data type must be defined so that the program would know what kind of information is saved into the variable. On the other hand, the data type also needs to be defined so that the program knows how much space to reserve from the memory for the information in the variable. For example, in the case of an int variable the required space is 32 bits (4 bytes), the byte variable requires 8 bits (1 byte), and a double variable requires 64 bits (8 bytes). A variable is declared by writing the data type, followed by the name of the variable. Variable names are not capitalised in C#, but each word in the name that follows is capitalised. As was mentioned before, this naming convention is called camelCasing.
variableDataType variableName;The int we mentioned is a data type, which stores integers. We can assign the numbers 1, 2, 3, and also 0, -1, -2 etc. in the n variable , but not the number 0.1 or the word "Hey". However, whatever we assign to it, the variable can only have one value at a time. If a variable is assigned a new value, the previous value can no longer be accessed in any way.
A person's age could be saved into the following variable:
Notice that we are not assigning any value to the variable, we are simply defining the variable type to be int and naming it.
Multiple variables of the same type can be defined at once by separating the names of variables with commas.
The data type double is used when we want to store decimal numbers.
Definition can also be done separately (which is even more preferable):
Variables can also be assigned values already when defining them. Then we talk about initializing variable. Note that the value can also be the result of an expression.
variableDataTypemuuttujanTietotyyppi variableName = CONSTANT;
variableDataType variableName = expressionThatProducesValue;The values (or values of expressions) assigned to variables should be of the type that can be assigned to the variable in question. For example, an int variable cannot be assigned the following real number:
but a real number can be assigned the integer
Notice that the decimal separator in real numbers (such as double) is always a dot (.) and thousands are not separated.
Which of the following variable definitions are allowed?
7.2 Primitive data types
The data types in C# can be categorised into primitive data types (aka basic types, basic data types) and reference types. Reference types include for example the PhysicsObject type that we used earlier, like p1 etc. and the string object for saving character strings. Reference types will be discussed in more detail in chapter 8.
Different data types require a different amount of capacity in the computer's memory. Even though computers nowadays have a lot of memory, it is extremely important to select the right type of variable for each situation. In large programs this problem is magnified very fast if we use variables that use up too much memory in relation to the operation they perform. The primitive data types in C# are listed below.
Table 1: The primitive data types in C# in size order.
During this course, the most important primitive data types are bool, char, int, and double.
In this material, it is recommended that the data type used for saving decimal numbers is always double (in some cases even decimal) even though many other sources use float as well. This is because floating point numbers, which are used in computers for handling decimal numbers, are rarely accurate values in computers. In fact, they are only accurate when they represent the combinations of any two powers, like 2.0, 7.0, 0.5, or 0.375, for example.
Most often, floating point numbers are only approximations of real numbers. For example, the number 0.1 cannot be presented accurately with bits in primitive data types. In this way, the inaccuracy only grows as the number of calculations rises. For this reason, it is always safest to use the double type, because thanks to its larger number of bits it can store more significant decimals.
In certain applications where high accuracy is necessary (for example in banking and nanophysics applications), it is recommendable to use the type with the highest possible accuracy, the decimal type. The presentation of real numbers in computers will be discussed in more detail in section 26.6.
The next example demostrates what happens when we sum two too large integers or increment the variable too much in other ways.
7.3 Assigning values to variables
You can assign values to variables with the assignment operator =. Statements in which variables are assigned values are called assignment statements. It is important to notice that an assignment always happens from right to left: the value that is assigned is on the right side of the equal sign and the target variable is on the left side of the sign.
Note that a decimal point is used in real number constant, not a comma.
The variable needs to be defined as a certain type before it can be assinged a value. Variables can be assigned only values of the defined data type or assignment compatible values. For example, floating point number types (float or double) can also be assigned integer values, because integers are a subset of real numbers. In the example below, we assign the value 4 to the variable number2 and on the third line we assign the value of number2 (4) to a variable named number1.
This cannot be done vice versa: a value of the type double cannot be assigned to an int variable. The code below could not be compiled:
If the int <- double assignment above would be absolutely necessary to make, we would have to use a variable transformation aka a typecast (try in the example above, change also 4.0 to 4.8. To start with, however, typecasting is always a bad solution.
number1 = (int)number2; // force the number2 to be of the type int. The number is rounded down.When a decimal variable is initialized with a number, the number needs to be followed (before the semicolon) by m (or M). Accordingly, initialising a float variable needs to be followed by f (or F).
Notie that a char variable is assigned a value by writing it within apostrophes like this:
This sets it apart from assigning values to the string variable (discussed in detail later), which is done by placing the string within quotation marks, like this:
An assignment statement can also contain more complex expressions, for example arithmetic operations:
An assignment statement can also contain variables.
So the assigned value can be any expression that produces a value that is compatible with the variable type. By combining variable and operations, an expression can be even more "complex" than the previous examples:
Notice that even though we don't need the multiplication sign on paper, programming languages require using the * sign.
C# requires assigning a value to the variable before using it. The compiler won't compile a code in which a variable with no assigned value is used. The program below would not be compiled.
The error message looks ike this:
Example.cs(7,34): error CS0165: Use of unassigned local variable 'age'The compiler tells that there is an attempt to use the age variable before any value is assigned to it. This is not allowed, so the attempt to compile the program ends here.
7.3.1 The target of assignment is always on the left
The variable for which the value is assigned is alawys on the left side of the statement. The right side of the = assignment operator is always some expression, the value of which is always calculated before the assignment and this value is assigned to the variable.
7.3.2 Task 7.4 assigning the value of a to b
First, answer the multiple choice questions below and then complete the task after it.
How would you assign the value of a to b after the two existing lines in the task below?
7.3.3 The value of the variable changes when a value is assigned to it
The value of a variable only changes when a value is assigned to it. Primitive variables are always assigned a value. If the value of a another variable is assigned to a variable, the variable receives the value which the other value has at the moment of assignment. In the following example, try changing the value of i and observe that it no longer affects the value of the sum variable:
7.3.3.1 Task 7.5 Incrementing i, what the program prints
What will the program print?
7.4 Naming variables
The names of variables must describe the information saved in them. Usually a letter alone is a bad name for a variable, because it rarely describes the variable very well. Descriptive variable names clarify the code and reduce the necessity to write comments. A short variable name has no intrinsic value; only two decades ago it may have had because it sped up the coding process. However, with modern development environments this no longer holds true, because editors can fulfill the variable names while writing the code, so in practice the names of variables never have to written in full after defining them.
Single letter variable names can still be used when justified, if for example they have a meaning in mathematics or physics. The names x and y are good variable names for coordinates. The name l refers to length and r to radius. In a physics program the name s can be used for distance.
Note! In C#, the name of a variable cannot start with a number.
According to the coding conventions of C#, the name of a variable begins with a lowercase letter. If the name of the variable consists of multiple words, each new word in the name is capitalised, like in the example below.
int bicycleTyreSize;In C# the name of a variable can contain scandinavian letters, but their use is not recommended, because then moving from one character encoding to another will usually cause extra problems.
Character encoding = Defines an individual code number for each character in a character set. The numeric representation of characters is usually necessary in computers. The character set defines a set of characters and their names, numbers, and some kind of description of their format. Character set and character encoding usually refer to the same thing, for example the Unicode character set contains multiple encoding methods (UTF-8, UTF-16, UTF-32). In other words, character encoding is the part in a character set that defines the numeric code value for each character. Character encoding usually causes problems when moving from a character encoding that includes scandinavian letters (ä,ö,å, ...) to the 7-bit ASCII encoding that has no support for scandinavian letters. More about ASCII encoding in chapter 27.
7.4.1 C# keywords
Names of variables cannot be any of the reserved words in the used programming language, i.e. words that have another meaning and function in C#.
Table 2: C# keywords i.e. the "reserved words".
| abstract | do | in | protected | true |
| as | double | int | public | try |
| base | else | interface | readonly | typeof |
| bool | enum | internal | ref | uint |
| break | event | is | return | ulong |
| byte | explicit | lock | sbyte | unchecked |
| case | extern | long | sealed | unsafe |
| catch | false | namespace | short | ushort |
| char | finally | new | sizeof | using |
| checked | fixed | null | stackalloc | virtual |
| class | float | object | static | void |
| const | for | operator | string | volatile |
| continue | foreach | out | struct | while |
| decimal | goto | override | switch | |
| default | if | params | this | |
| delegate | implicit | private | throw |
Which of the following variable definition are both syntactically right and abide by coding conventions?
7.5 The scope of variables
The scope of variables refers to the usability of variables in different situations. If the variable is "in scope", the variable can be used in this particular point in the code.
A variable can only be used (read and assigned values) in the block where it has been defined. A block starts with the brace { and ends with the brace }.
{
int number = 5;
}Variables exist for as long as the block is not exited. During a subroutine call the block has not been exited, because the execution returns to the block after the subroutine has been executed. A nested block does not cause exiting either.
{
int number = 5;
SubroutineCall();
{
number++;
}
}The definition of a variable must always precede (be earlier in the code) its first use. Even within the same block the variable needs to be defined before its use, because the variable turns visible only after it has been defined.
In the following example, number and d are in scope and transformable only in the main program (except if taken as an out-parameter in C#). Every defined variable in the main program (or in any other subroutine) live until the closing brace } of the main program. Here the value of the variable is copied into a corresponding parameter in a subroutine. The subroutine cannot "see" the variable in the main program in any way, rather the subroutine only receives the value from the information that has been relayed to it.
The variable defined in the subroutine cannot be viewed by other subroutines; this is called a local variable. Variables number and d are local variables in the Main program.
In the example the name of the parameter variable is the same number as in the main program, but the name could be anything else. The most important point is that in the subroutine call, the variable in the corresponding place in the subroutine is assigned the same value as in the program that calls it. Even if the variable number was assigned some value, it won't affect the program that calls the subroutine, because number is its own local variable in the subroutine and only exists until the execution of the subroutine reaches the closing brace } of the subroutine.
When compiling, the program warns that the subroutine variable newValue is not used after it has been assigned a value. If the subroutine was called again, a new newValue variable would be created with the call, and it wouldn't have anything to do with the corresponding value in the previous call.
The auxiliary variable newValue is in scope after it has been defined in the subroutine, but it stops existing after the closing brace }. Changes made to this variable (even if there is a variable of the same name somewhere) in no way affect any other place than this variable. The main program or anything else in the program cannot reach this variable in any way (except in this case this value depends on the number variable given as a parameter)
Changing parameter variable is not usually considered as abiding good conventions. If the parameter variables need to be changed, it's better to make a local copy of it and change the local copy so that by the end of the subroutine, the parameter still has the same value as it did at the beginning of the subroutine.
Below, we have defined subroutines within a class. All variables are local variables.
A variable can also be defined to be in scope everywhere within a class, so for all subroutines. When a variable is in scope to all parts in a program, it is called a global variable. Global variables should be avoided whenever possible.
The variables points and result above are global variables, because they are defined outside of subroutines. They are also in use from classes outside this class, because they are unfortunately defined with the access modifier public. If the word static was missing from the definition of the variable, they could not be used in static subroutines. In this case, the variables would be attributes and to use them we would have to create an object which would contain and define the attributes. This is extra information that is not a part of the course's main content.
Next, try what happens if you write the assignment d=4 in the subroutine Change.
However, C# does not allow a nested block use the same variable name that has been used in the outer block. However, if a global and a local variable have the same name, the local variable is in scope in its own block.
Try to comment the line i=9 away so that the program is compiled and prints the local i in the main program. If the line i=5 is commented away too, the global variable i is printed.
More information (currently only in Finnish) about the scope of variables can be found on the extra material page of the course.
7.6 Constants
One man's constant is another man's variable. -Alan Perlis
In addition to variables, constants can also be defined in programmming languages. The values of constants cannot be changed after definition. In C# a constant is defined like any other variable, but the additional modifier const is provided before the type of the variable.
In this course, constants are uppercase and words within the name are separated with an underscore (_). This way they are easily distinguishable from variable names that are not capitalised. Other ways to write constants exist, for example Pascal Casing is the second most popular convention for writing constants.
The previous task contains the comments `//FROM HERE` and `//TO HERE`. Which variables are in scope in the area between these two comments?
Whic of the following statements are correct?
7.7 Operators
We often need to save the results of different calculations into variables. In C# calculations can be done with arithmetic operations, which were already mentioned in the context of the snowman example. The arithmetic calculations in programs are called arithmetic expressions.
C# also contains comparison operators, logical operators, bitwise operators, shortcut operators, the assignment operator =, the is operator, and the condition operator ?. The most important operators will be discussed in this chapter.
7.7.1 Arithmetic operations
Basic calculations in C# are performed with arithmetic operaions, of which + and - were already handled in examples before. There are five arithmetic operators.
Table 3: Arithmetic operations.
| Operator | Function | Example |
|---|---|---|
| + | adding | Console.WriteLine(1+2); // 3 |
| - | subtraction | Console.WriteLine(1-2); // -1 |
| * | multiplication | Console.WriteLine(2\*3); // 6 |
| / | division | Console.WriteLine(6 / 2); // 3 |
| \ | \ | Console.WriteLine(7 / 2); //Huom! 3 |
| \ | \ | Console.WriteLine(7 / 2.0); // 3.5 |
| \ | \ | Console.WriteLine(7.0 / 2); // 3.5 |
| % | remainder (modulo) | Console.WriteLine(18 % 7); // 4 |
Note: 18/7 = 2 4/7. The integer division / returns 2 and the remainder returns 4. Remainders are often used to test if a number is divisible by some number, for example:
Animation: Perform arithmetic operations
7.7.2 Comparison operators
Comparison operators compare the values of variables with each other. Comparison operators return a truth value (true or false). There are six comparison operators. More comparison operators are presented in chapter 13.
7.7.3 Shortcut operators
Shortcut operators allow presenting calculations in a more concise format: for example ++x; (four characters) means the same as x = x+1; (six characters). They can also be used to initialize variables.
Table 4: Shortcut operators.
Operator| Function | Example | =========+======================+=======================================================+ ++ | Increment operator. | int number = 0; | | Increments the | | | value of the variable| Console.WriteLine(number++); // 0 | | by one. | Console.WriteLine(number++); // 1 | | | Console.WriteLine(number); // 2 | | | Console.WriteLine(++number); // 3 | |
|||
-- |
Subtraction operator. Reduces the value of the variable by one. |
|
|
+= | Increment operation | int number = 0; | | | number += 2; // the value of the number variable is 2 | | | number += 3; // the value of the number variable is 5 | | | number += -1; // the value of the number variable is 4 | |
|||
-= | Subtraction operation| int number = 0; | | | number -= 2; // the value of the number variable is -2 | | | number -= 1; // the value of the number variable is -3 | |
|||
*= | Multiplication | int number = 1; | | operation | number *= 3; // the value of the number variable is 3| | number *= 2; // the value of the number variable is 6 |
|||
/= | Division operation | double number = 27; | | | number /= 3; // the value of the number variable is 9| | number /= 2.0; // the value of the number variable is 4.5 |
|||
%= | Remainder operation | int number = 9; | | | number %= 5; // the value of the number variable is 4| | number %= 2; // the value of the number variable is 0 |
|||
The increment operator (++) and the subtraction operator (--) can be used before of after the variable. When used in front of the variable, the value is changed first and the possible action, for example printing, is performed afterwards. If the variable is followed by the operator, the function is performed first and the value is changed afterwards.
Note! Value changing operators are so-called side-effect operators. In other words, the operations change the value of the variable, unlike arithmetic operations for example. The next example illustrates this.
7.7.4 The order of arithmetic operations
The order of arithmetic operations is equivalent to the order of operations in mathematics. Multiplication and division is always performed before addition and subtraction. Also, the expressions in parantheses are performed first.
7.8 Remarks
7.8.1 Assigning integers to floating point number variables
When we attempt to save the result of a division of integers into a floating point number type (float or double) variable, the result may be saved as an integer if the divisor and the dividend are both entered without the decimal part.
However, if even one of the numbers in the division provided in decimal format, the result of the operation is saved into the variable correctly.
When making calculations with floating point numbers, it is best to keep all numbers in decimal format, even the integers, for example, by giving the number 5 in format 5.0.
When making calculations with integers, note the following:
As we can see above, integers are not rounded to the nearest whole number, but rather the decimal part in division is "lost" in C#. If both the divisor and the dividend are integer variables, the division is cut into an integer. This problem can be avoided by starting off with a real number term.
7.8.1.1 Task 7.8
See all answer options below. First, think about the answer for each question and only then view the lecture video to see the right answer.
| Number | 1 | 2 | 3 | 4 | 5 | 6 | 7 | 8 | 9 |
|---|---|---|---|---|---|---|---|---|---|
| Answer | 0 | 1 | 1.5 | 2 | 7 | 8 | 9 | 13 | The program crashes |
7.8.1.1.1 What is the result of the following expressions?
7.8.1.1.2 What are the values of the variables?
7.8.2 About addition and subtraction operators
There are four ways to increment the value of a number by one.
In programming, an idiom refers to the way in which something should be done. From the example above, a++ is an established practice in programming and the most recommended option, i.e. an idiom. However, if the variable a should be incremented (or subtracted) by two or three, this practice would not work. The next example illustrates different ways to subtract by two. There are three alternatives for this.
In this example, the use of the += operator is the most recommended option, because the number to add can be positive or negative (or zero), so the += operator does not limit what kinds of numbers can be added to the variable a.
Animation: Perform operations
7.8.3 Be careful not to divide by zero
One of the most common programming mistakes is dividing by zero. This is not a syntax error, because it can seldom be noticed during compilation. In other words, dividing by zero is a logical error that goes unnoticed until during runtime. The programmer needs to make sure that the divisor is never zero. However, the conditional statement (if), which will be introduced later, is needed for aid here:
7.8.4 Numeeristen tietotyyppien arvo-alueet
Numeeristen tietotyypin pienin ja suurin mahdollinen arvo saadaan
tietotyyppi.MinValue
tietotyyppi.MaxValueReaalilukutyypeille on myös
tietotyyppi.Epsilonjoka kertoo pienimmän positiivisen arvon jonka muuttuja voi saada. Tästä seuraava pienempi arvo on 0.
7.9 Example: Body Mass Index
Let's make a program that calculates a person's body mass index (BMI). BMI is calculated by dividing the weight (kg) by the height (m) squared, i.e. with the equation:
weight / (height * height)in C#, the BMI can be calculated as follows.
Jypeli class list:
http://kurssit.it.jyu.fi/npo/material/latest/documentation/html/classes.html
8. Object data types
The primitive data types in C# provide a very limited framework for programming. They can only store numbers (int, double, etc.), single characters (char), and truth values (bool). Even slightly more complex programs require more advanced structures for storing information. In C#, Java, and other object-oriented languages these structures are provided by objects. In C#, even a string of characters (string) is an object.
8.1 What are objects?
An object is a data structure that is aimed to represent a real world phenomenon in programming. In class-based languages (such a C#, Java, and C++), the structure and behaviour of an object is defined by its class, which describes the attributes and methods of the objects created from it. Objects have different attributes, and methods describe the functions of an object. An object is said to be an instance of the class. So, multiple objects with the same attributes and functions can (usually) be created from one class. Attribute values form the state of the object. Note however that even if several objects have the same state, they might still have a different identity. For example, two exactly identical circles can appear in the same position (=look like one circle), but in reality there are two different circles.
Objects can be created on your own, or you can use ready-made objects in libraries. Making your own object classes is not required on the Programming 1 course, but using object classes is. Next, we will study the relationship between a class and an object, and how to use an object.
The relationship between a class and an object can be described with the following example. Let's say that there are several people in a lecture hall. Everyone in the lecture hall is a person. They have certain features that all people have, for example a head, a nose, and other body parts. However, everyone in the lecture hall is a different instance of a person, so each object has their own identity - they are not one and the same, there are several of them. Different people can have different hair and different colour eyes and their own manner of speech. Additionally, people can be of different height, weight, etc. Even identical twins in the lecture hall would each be a different instance of a person, i.e. a Person object. Hair, eyes, height, weight would be object attributes. A Person might also have functions, i.e. methods, for example Eat, GoToWork, Study, etc. Next, we will study a more conventional example of objects.
Let's assume that we are designing a pay system for a company. We would need an Employee class, among others. The Employee class would need at least the following attributes: name, job, department, salary. The class would have at least the following methods: PaySalary, ChangeJob, ChangeDepartment, ChangeSalary. Each employee would be their own instance of the Employee class i.e., an object.
8.2 Creating objects
Employee joe = new Employee("Joe Bungler", "Project manager", "Research department", 5000);Object references are defined by first writing the name of the class from which the object is created. Next, we name the object ("joe" in the example above). After the name, we write the equals sign, after which we write the word new to inform that we are creating a new object. This new operator reserves space for the object from the memory of the computer.
Next, we write the name of the class again, after which we write (in parentheses) the parameters that are possibly required to create the object. Parameters depend on how the class constructor has been implemented. The constructor is a method that is always executed when a new object is created. However, in order to use ready-made classes, you don't have to know about the implementation of the constructor, because the requires parameters can be read from the class documentation. In general format, a new object can be created in the manner below.
Class objectName = new Class(parameter1, parameter2,..., parameterN);If an object doesn't require any parameters for creating it, an empty pair of parentheses is written.
Before an object has been reserved a space from the memory of the computer by using the new operator, it cannot be used. Before the new operator the value of the object variable (i.e. the reference value) is null. Using an object with a null reference causes a run-time error. In some special cases, the value of an object variable can also intentionally be set as null by stating nameOfObject = null.
The value of an object cannot be null, but the value of the variable, which contains the reference to the object or the object itself, can be null.
—A new Employee object could be created for example in the following way. The parameters depend on how the constructor of the Employee class has been implemented. In this case, we provide all the attributes as parameters to the object.
Employee donaldDuck = new Employee("Donald Duck", "Manager", "Department3", 3000);At the beginning of this material, we drew snowmen by creating objects of the PhysicsObject class as follows.
In fact, an object variable in C# is only a reference to an object. This is why they are often called reference variables as well. Reference variables differ significantly from primitive data type variables.
8.3 The difference between object data types and primitive data types
C# contains two types of structures that can store information. Depending on the case, information is either stored into primitive data types or object data types. Object data types differ from primitive data types in that they are references to a certain object and, for this reason, they are also called reference types or reference variables.
Primitive data types store their information in one place in the computer memory (a stack)
Reference types contain a reference to another place in memory (a heap), where the data itself is located. However, the reference to the object remains in the stack.
Muuttujien luominen ohjelmassa vaatii muistitilaa tietokoneen keskusmuistista. C# varaa muistista tilaa muuttujan sisältämälle tiedolle (yllä olevassa esimerkissä 3 ja { 1, 2, 3 }) jommasta kummasta kahdesta muistialueesta: pino tai keko. Tällä kurssilla pääsääntö on seuraava: arvopohjaisten tietotyyppien data sijaitsee pinossa ja viitetyyppien data sijaitsee keossa.
Tarkasti ottaen arvopohjaisten muuttujien arvot voivat sijaita joko pinossa tai keossa riippuen siitä, missä kontekstissa muuttuja on määritelty. Esimerkiksi Henkilö-luokka (viitepohjainen, sijaitsee keossa) voisi sisältää int-tyyppisen ikä-attribuutin. Tässä tilanteessa myös ikä sijaitsisi keossa, ei pinossa.
Usually we won't have to worry about whether we use primitive data types (like int, double, or char) or object data types (like string). Generally, the most important difference is that primitive data types should (apart from a few exceptions) always have a value, but object data types can also have a null value (i.e. "nothing" value). Later, some examples of the differences between primitive data types and reference data types will be presented.
Several variables can refer to the same object. Compare the lines of code below.
The code above prints "10" as it should. The value of variable number2 won't change even when we assign the value 0 to number1 on line three. The reason for this is that on the second line, we assign the value of number1 to the variable number2, and not the reference to variable number1. Object data type variables act differently. Compare the example above to the following example:
The code above draws the following image:

We could make the rash assumption that the image just shows two similar circles in the same location. This is not the case, however: both of the PhysicsObjects refer to the same circle with radius 50. This is caused by the fact that variables p1 and p2 are object references which refer (or point) to the same object.
PhysicsObject p2 = p1;In other words, the line above does not create a new PhysicsObject, only a new object reference which now refers to the same object as p1.
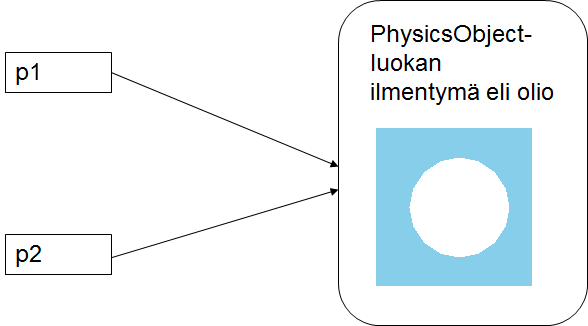
Object variable = reference to an object. One object can have several references to it.
References are discussed in detail in chapter 14.
8.4 Calling methods
Each object created from a certain class has all the public methods of the class in its use. In the method call we command the object to do something. For example, we could command the PhysicsObject to move, or the Employee object to change its salary.
Object methods are called by writing the object's name, a dot (.), and the name of the method to call. The possible method parameters are placed within parentheses and divided by commas. If the method doesn't require any parameters, the parentheses are still required, they simply won't contain anything. The method call in general format:
nameOfObject.MethodName(parameter1,parameter2,...parameterN);For example, we could change the salary of the donaldDuck object with the following.
donaldDuck.ChangeSalary(3500);Or make the p1 object (assuming that p1 is a PhysicsObject) move with the Hit method.
String class has for example the Contains method that returns either the value True or False. The Contains method is given a string as a parameter, and the method will search for instances of the provided string in the object. If the object contains the string (once or several times), it returns True. Otherwise it returns False. An example of this below.
8.5 The difference between methods and subroutines
A subroutine is introduced as static if the subroutine does not use any other information apart from the information provided as parameters. For example, section 20.4.2 contains the following subroutine.
private void ListenToMovement(AnalogState mouseState)
{
ball.X = Mouse.PositionOnWorld.X;
ball.Y = Mouse.PositionOnWorld.Y;
Vector mouseMovement = mouseState.MouseMovement;
}Here, in addition to the mouse state, the information of the ball object introduced in the game object (this) is required, so this is no longer a static subroutine, which is why the word static was left out. However, a method can use the object's own attributes, methods, and the so-called property fields. Remember that the object's own properties can be referred to like this as well:
this.ball.X = Mouse.PositionOnWorld.X;so if the subroutine needs the this reference, it is a method (not static).
8.6 Destroying objects and garbage collection
When there are no variables (object references) that refer to an object anymore, the memory locations must be freed for other use. The objects are removed from memory with the help of a cleaning operation. In C#, garbage collection takes care of this. When there are no longer any references to an object, it is marked as removable, and every now and then the garbage collector frees the memory locations of the marked objects.
All programming languages don't have this feature (e.g. original C++), in which case freeing up memory and destroying objects needs to be taken care of manually. These languages usually have a destructor which is executed whenever an object is destroyed. Self-made destructors usually call the destroying of the objects created during the object's life cycle and freeing of other resources. Compare to the constructor which is executed when the object is created. The challenge in these languages is that sometimes the life cycle of objects is automatic in some cases and sometimes not. This can easily cause a memory leak, i.e. a memory location is not freed up, but it no longer has any pointers to it that would enable using it, which will leave the memory location reserved for the remainder of the program. Memory leaks are very common for starting C++ programmers. Languages like Java and C# have made it remarkably easy to avoid memory leaks.
Usually C# programmer don't have to worry about freeing up memory, but there are certain situations in which you may have to remove objects by yourself. One example of this is handling files: if an object has opened a file, it would be sensible to close the file before destroying the object. In this case, closing the file would have to be performed in the same context as destroying the object. This could be done by introducing a destructor which is a class method that strips the object of all the information it contains and frees up all the constructions it contains, like links to open resources (e.g. files; however, it is not recommended to keep files open for times as long as the duration of the entire life cycle of an object)
8.7 Documentation of object classes
Class documentation contains information about the class, the constructors of the class, and methods. Class documentation usually contains links to examples, like in the case of the String class. Now, we will study the documentation of the String class in more detail. The documentation of the String class can be found here: http://msdn.microsoft.com/en-us/library/system.string.aspx. The documentation contains e.g. a list of members, i.e. the constructors, attributes (fields), properties, and methods that can be used.
At this point, we are interested in the String Constructor and String methods (in the hierarchy tree on the left side of the page). Click String Constructor to get more information about the class constructors and click String Methods to get more information about the methods that can be used.
8.7.1 Constructors
Open the String Constructor page of the String class. This page contains all the information about the class constructors. There can be several constructors as long as their parameters differ in some way. Each constructor has its own page, and each programming language has its own version (the .NET Framework contains several programming languages). Naturally, we are now interested only in the C# versions.
For each constructor, there is a short description of what it does, which types of and how many parameters it receives. You can click the introductory line of the constructor to see more information about it. For example the link
takes you to the page (http://msdn.microsoft.com/en-us/library/ttyxaek9.aspx) which contains more information and usage examples of the constructor public String(char[]).
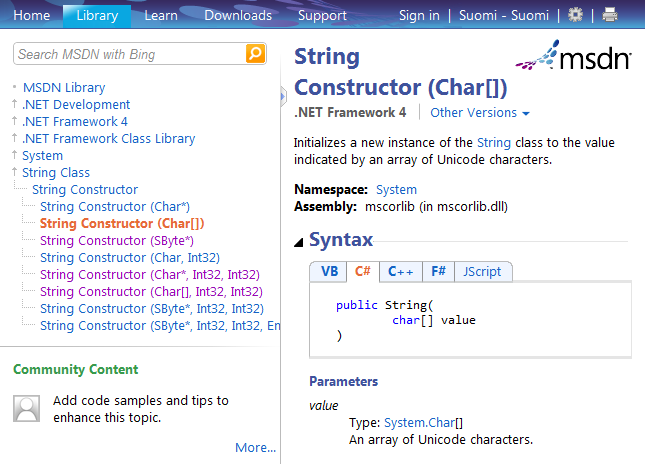
Note that many of the constructors in the String class have been marked as unsafe, which means that they should not be used in your code. These types of constructors are only used for inter-system communication.
At this point it might be difficult to understand the meaning of all the constructors, because they contain data types that we haven't discussed yet. For example, the square brackets after the data type (e.g. int[]) mean that the data type is an array (a table). Arrays will be discussed in chapter 15.
A String object is perhaps the most common object in C#, and it is in fact a collection (an array) of consecutive char type characters. It can be created as follows.
Of course, this way of writing strings is burdensome. However, a String object can exceptionally be created in a manner that resembles the definition of primitive data types. The statement below is equivalent to the example above, but it is much shorter.
Note that the string is written with quotation marks. The keyboard shortcut is Shift+2. In a similar manner, a string could be initialized with any other String class constructor, of which there are many.
If we study the documentation of the PhysicsObject class (found here: http://kurssit.it.jyu.fi/npo/material/latest/documentation/html/ -> Luokat -> Luokkalista -> Jypeli -> PhysicsObject), we find multiple different constructors (see the list of public member functions, Julkiset jäsenfunktiot, and find the items that begin with the word PhysicsObject). The second one on the constructor list takes in two numbers and a shape as parameters. This constructor was already used in the snowman example.

However, we could leave out the shape (the first constructor) and define the shape later with the Shape attribute of the PhysicsObject class.
8.7.2 Exercise
Study the other constructors. What can you find out based on the documentation? What is the default shape?
8.7.3 Methods
The section Methods (http://msdn.microsoft.com/en-us/library/system.string_methods.aspx) contains information about all the String class methods. Each method has its own line in the table and each line has a short description of what the method does. When you click on a method, a page with information about it is opened. This page contains information about e.g. the parameter types the method takes in and its return value type. For example, the String class contains the ToUpper method which returns a String type value.
8.7.4 Note: Looking up class documentation
Note that when you search for class documentation, the search engine results can refer to the older versions of the .NET Framework (for example 1.0 or 2.0). At the moment of writing this, the latest version of the .NET Framework is 4 and you need to be make sure that the documentation you find refers to the right version. You can use the version number in your search like this: "c# string documentation .net 4". The version number is located under the title of the document. You can change between versions by clicking the drop-down menu Other Versions.
8.8 Typecasting
In C#, a variable can only store one type of information. For this reason, we sometimes need to change a String varibale into an int variable or a double variable into an int variable etc. Changing a variable type into another type is called typecasting.
All primitive data types and C# object types have the ToString method, which transforms the object into a string. Below is an example of typecasting an int to a string.
Changing a string to a primitive data type can be done with the help of the equivalent class method for each primitive data type. As we can remember, primitive data types are not objects, so they do not have methods. However, each primitive data type has an equivalent struct in C#, which contains useful methods for handling primitive data types. Structs are located in the System namespace, which is why the following statement is needed at the beginning of the program
Structs equivalent to primitive data types are in the following table.
Table 5: Primitive data types and their equivalent structs.
Note that the struct and data type names are synonymous in C#. The following lines produce the same result (if the System namespace has been utilised with the using statement).
All the struct methods are in use, regardless of if you write the name of the primitive data type or the name of the struct. Here is an example.
In C#, a String type can be changed into an int with the int.Parse function as follows.
Specifically, the Parse function creates a new int based on the string it received as a parameter, which is stored into the variable number2.
If parsing a number fails, this causes a so-called exception. Parsing a double can be done with the Parse function found in the Double struct (note the capital D).
In practice, if the information is entered by a person, it is very likely that it doesn't form a legitimate number. For this reason it is often more useful to use the function TryParse:
Things are made even more complex by the fact that the operating system may use either the comma (,) or the dot (.) as the decimal separator.
9. The return value of the subroutine
The Snowman subroutine we created in the Subroutines chapter didn't return any value. However, it is often useful to have the subroutine return some information about the execution of the subroutine. For example, what use would it be to have a subroutine that calculates the average of two numbers if we never found out what the average was? We could of course print the average in the subroutine, but it is often more useful to return the value to the "asker" as return value. In this case the subroutine could also be used in a situation where we don't want to print the average but rather use it in another equation. Returning a value can be performed with the return statement, and the return statement always ends he execution of the subroutine (i.e. the execution returns to the part in the program that made the subroutine call).
A subroutine that returns a value is usually called a function.
9.1 A function for calculating averages
The contents of this chapter on video (in Finnish):
Before implementing the function we plan that it will be called as follows:
double average;
average = Average(3, 4);This means that when we return from the subroutine, it returns the result it calculated and the result is assigned to a variable.
Now we will implement the function.
The first line declares the public and static subroutine. In the Snowman example, the word void followed the word static, which meant that the subroutine returned no value. Now, because we want the subroutine to return the average of the numbers it received as parameters, we must write the type of the return value instead of the word void after the word static. Because the average of two integers can be a decimal number, the type of the return value is double. The parameters are given in parentheses. Now the parameters are the two integers a and b. The second line declares the real number variable average. The third line assigns the sum of a and b divided by two to the variable average. The fourth line returns the value of the average variable.
9.2 Calling functions
Subroutines can now be used in the main program like below for example.
The call can also be written in short:
Because the Average subroutine always returns a double type floating point number, the call can be used like any other value of the double type. It can for example be printed or stored in a variable.
The animation below contains two consecutive calls, which demonstrate subroutine calls with different values. The latter call demonstrates how the value of an expression is calculated in a subroutine call. In other words, the function (or any other subroutine) call can contain any type of expressions that produce a value that can be assigned to the corresponding parameter. In this case, 2+6 is an expression that produces an int value and the corresponding parameter in the subroutine, called b, is also of the type int. We will learn later that an expression can also contain function calls.
Animation: Study the function call
9.3 Implementing the function in another way
In fact, the entire Average subroutine could be shorter:
At its simplest, the Average subroutine could even be coded as follows.
All the different methods above are correct, and it cannot be said which one is the best. Sometimes writing the "intermediary" phases clarifies the code, but in the case of the Average subroutine, the last method is the clearest and shortest.
If the function needs to be debugged, it is easier if there are intermediary results that are assigned to variables. In this case, a one-line function may need to be pieced.
One purpose of tests is to make sure that even if we change the implementation, the correctness of the result is easy to check. However, we need to remember that tests may not ensure that the function works in each case! View the tests in the previous example by clicking Show all code and run the tests by clicking Test. See the generated documentation by clicking Document.
9.4 Several return statements
A subroutine can also contain several return statements. An example of this can be found in section 13.5.1. If the code contains several return statements, the "extra" statements must be executed conditionally.
However, code that contains several return statements is usually risky. A good example is when a code that calculates something and returns it has been written first:
...
if ( a < 0 ) return sum / number;
...
return sum/number;When the code has been tested with several values, we notice that number can be zero, and we change the code:
...
if ( a < 0 ) return sum / number;
...
if ( number == 0 ) return 0;
return sum/number;What goes wrong here? The fact that even the first return statement fulfills the condition that number is zero.
It is up to you if you want to avoid multiple returns or not. Multiple return statements can make your code clearer because it allows to avoid blocks within blocks.
9.5 The function returns one value
A subroutine cannot have multiple return values at a time per se. However, it can for example return an array which contains several values. Another method is to create and return an object that has several attributes (values). There is a third way in C#, which will not be taught in this course: ref and out parameters (however, the out parameter was used in the TryParse function), see:
Methods and subroutines that take in parameters and return a value are called functions. The name is actually quite descriptive if you compare the Average subroutine to the mathematical function \(f(x, y) = (x + y) / 2\).
Functions should always work by using the information they receive as parameters alone (and not require any other information about the program). Also, changing the values received as parameters should be avoided. In purely functional way of thinking programming, functions have no side effects. Side effects include for example printing on screen or changing the program status. In object-oriented way of thinking programming (and on this course as well) this requirement cannot be fully accomplished. For example, functions in Jypeli games often change the game status by for example adding a new object to the game level, which means that they are not completely free of side effects.
9.6 Function calls have a cost
What is the difference between this:
and this:
in regard of code execution?
In the first one, the average of 2 and 5 is only calculated once, after which the result is stored in a variable. Printing uses the result that was stored.
The latter version calculates the average of 5 and 2 at the time of printing. In other words, the result is calculated twice. Even thought the latter method saves one line of code, it uses the computer's resources in vain by calculating the same expression twice. In this case it doesn't matter too much, because executing the Average subroutine doesn't strain modern computers much. However, it would be useful to learn to code so that no extra actions are performed in vain.
9.7 CircleArea, an example of a one-parameter function
In the previous example, the function received two parameters. The number of parameters depends on the needs of the function, and the number can be anything from 0 to n. However, functions that don't take in any parameters are quite rare.
The following is an example of a one-parameter function:
Remember that the previous function could be called in any of the following ways (try in the example):
...
double radius = 2.1;
area = CircleArea(radius); // with a variable
...
area = CircleArea(radius + 7.0); // and with any expression that results in a double
...
CircleArea(12); // this call can be used as well, but it doesn't make any sense
// because the result is not handled in any way here. 9.8 Tasks related to functions
Which of the following comments are true:
9.8.1 Exercise
At the end of the Variables chapter we made a program that calculated the BMI of a person. Make a new version of the program that calculates the BMI in a function. The function receives the height and weight as parameters and returns the BMI. Printing the result is performed in the main program.
9.8.2 Exercise
We have the following program, in which the implementation of the subroutine is still in progress. XXX YYY ZZZ TriangleArea(??? number1, IIII number2) {} . Think about the answers to the following questions and then watch the video to see the right answer. Complete the program to work.
9.8.2.1 Answer options
| 0 | 1 | 2 | 3 | 4 | 5 | 6 |
|---|---|---|---|---|---|---|
| void | static | public | int | double | char | string |
9.8.2.2 Questions and answers
10. Integrated Development Environment (IDE)
10.1 Git
Käytännön ohjelmistokehitystyössä ohjelmistojen kehittämiseen osallistuu aina useampi henkilö yhteistyönä. Yhtenäisten koodien varmistamiseksi käytetään niin kutsuttuja versionhallintatyökaluja, joista nykyisin yleisimmin käytetty on Git. Git on kehitetty Linus Torvaldsin toimesta.
Git-versiohallinnan pääidea on mahdollistaa ohjelmakoodiin tehtyjen muutosten seuranta ja hallinta. Versiohallintaan tallennetaan ohjelmistoon tehdyt muutokset aikajärjestyksessä. Tämä mahdollistaa yhteistyön useiden kehittäjien kesken samanaikaisesti ja tarjoaa mahdollisuuden palata aiempiin versioihin tarvittaessa. Git tallentaa kunkin kehittäjän tekemät muutokset erillisinä "commiteina", jotka voidaan yhdistää pääkehityshaaraan ("main"), tai ns. haarojen ("branch") kautta, mikä helpottaa uusien ominaisuuksien lisäämistä ja virheiden korjaamista eristyksissä.
Tällä kurssilla käytämme vain muutamia Git-versiohallinnan ominaisuuksia, mutta suosittelemme tutustumaan myös muihin ominaisuuksiin, kuten haarojen käyttöön, mikäli aiot jatkaa ohjelmistokehityksen parissa.
Netissä on lukuisia palveluita, joissa voidaan säilyttää ja julkaista Git-versiohallintaa käyttäviä projekteja. Eräitä tunnettuja ovat GitHub ja GitLab. Näihin palveluihin on rakennettuna myös tikettijärjestelmä, johon lisätään havaittuja bugeja ja kehitysehdotuksia kortteina. Kehittäjä valitsee näistä korteista yhden tai useampia ja työskentelee niiden parissa. Kun kortti on valmis, se siirretään valmiiden korttien joukkoon, ja haarassa oleva koodi yhdistetään versiohallinnan pääkehityshaaraan. Tikettijärjestelmä ei siis ole osa Git-versiohallintaa, vaan yksi lisäpalvelu käytettäväksi Gitin ohessa. Git on ilmainen, mutta lisäpalvelut usein maksavat.
Voit tarkastella esimerkiksi TIMin GitHubiin kirjattuja tikettejä tästä linkistä.
Ohjeet Git-versiohallinnan asentamiseksi ja käyttämiseksi tällä kurssilla löydät työkalut-sivulta.
10.2 Integroitu kehitysympäristö, IDE
Even though coding can be done even in a simple text editor, the programmer might start needing more features from the development tool as the size of the program grows. IDEs, Integrated Development Environments, offer more features than basic editors.
IDEs combine a set of individual tools such as:
- text editor (that usually understands the target language better than a regular editor
- compiler
- linker tools
- version management tools
- debugger
Free IDEs for C# include for example
These instructions have been tested for the Visual Studio 2015 Community version in the Windows environment.
Kaikenlaiset pilvipalvelut ovat yleistyneet, ja myös pilvipohjaisia kehitysympäristöjä on olemassa. Kuitenkin edelleen yleinen käytäntö ohjelmoinnin opiskelussa, kuten myös Ohjelmointi 1 -kurssilla, on asentaa kehitysympäristö omalle paikalliselle tietokoneelle. Tämä lähestymistapa tarjoaa useita merkittäviä etuja.
- Suorituskyky: Paikallisella asennuksella hyödynnät tietokoneesi tehon täysimääräisesti, mikä yleensä tarkoittaa nopeampaa koodin kääntämistä, suorittamista ja vianmääritystä verrattuna etäympäristöihin.
- Täysi kontrolli: Sinulla on täysi hallinta asetuksista ja konfiguraatiosta. Voit mukauttaa ympäristöä omiin tarpeisiisi ja työskennellä ilman riippuvuutta ulkopuolisista palveluista.
- Hinta: Pilvipohjaiset kehitysympäristöt, jotka täyttävät Ohjelmointi 1 -kurssin osaamistavoitteet, kuten debuggaus, eivät yleensä ole ilmaisia. Omalle koneelle asennettu kehitysympäristö on maksuton.
- Toimialan standardi: Paikallisen kehitysympäristön asentaminen vastaa alan normeja ja toimintatapoja.
10.3 Usage
10.3.1 Coding a program
First, change the name of the code file to something more descriptive by right-clicking the file in `Solution Explorer´ and selecting Rename. When the name of the file has been changed, Visual Studio asks if you want to roll the changes in other parts of the program as well. Answer Yes.
10.3.2 Compiling and running a program
When the program code has been written, compiling and running the program can be done by clicking the Debug button (green triangle, a "play" button) or by clicking F5 (debug). When you click this button, Visual Studio will compile the program automatically and execute it in the so-called debug mode. The program can also be executed without debugging by pressing Ctrl+F5 (start without debugging). However, during the development of a program it is often useful to run the program specifically in debug mode so that possible run-time errors can be viewed in Visual Studio. On the other hand, command prompt programs "stop" ("Press any key to continue...") after the execution of the program if run without debug mode, which can sometimes be a more useful option, especially with very small programs.
If we want to stop the execution of a program for some reason, this can be done by pressing Shift+F5.
10.4 Debugging
Errors in program code are an unfortunate reality. Bugs will be part of your life forever no matter how good of a programmer you are. A good programmer acknowledges this fact and prepares for this by acquiring tools for tracing and fixing errors. There are small errors that do not affect the function of a program in any way (like a spelling mistake in a button), but there are also critical errors. These types of errors crash the program. Syntax errors can be small, but they prevent the compilation of a program. Logical errors won't be caught by the compiler, but they might cause runtime errors.
For example, your program might not be able to enter the correct data to database because a necessary field is missing or the data might be entered incorrectly in some circumstances. These kinds of errors related to some fault in application logic might be either semantic errors or logical errors.
Finding logical errors can be hard, especially with more complex programs, because the program might not in any way indicate that there is an error - you only notice the error from the end result.
This is where the error tracking function, the bebugging tool in VS comes in handy. With debugging, you can follow the execution of the program line by line, also keeping track of how the values of variables change. This helps significantly in finding the reason for an error or unwanted functionality. Another traditional way to do this is to add print statements in the program, but these might accidentally end up in the final version and even change the functionality of the program.
In VS, debugging starts by setting a breakpoint somewhere in the program. A breakpoint is the point in code where we want to halt the execution of the program temporarily. Once we halt the program, we can execute it statement by statement. Therefore, we have to set the breakpoint somewhere before the supposed error point. If we want to debug the entire program, we set the breakpoint at the beginning of the program. Set a breakpoint to where the cursor is currently by clicking F9 or by clicking the grey area left of the line numbers in the code window. The breakpoint appears as a red circle and the (first) statement on the line is highlighted red.
When the breakpoint has been set, click the Debug button at the top of the screen or press F5. In Visual Studio, running the program and debugging the program is the same thing. Of course the program can be run without debug mode as well, but then the possible errors in the program are not caught by Visual Studio, and dividing by zero for example will crash the program.
Execution of the program has now stopped at the point where we set the breakpoint. Open the Locals tab (at the bottom of the screen) unless opened already. In debug mode, the Locals panel shows all the (local) variables that are currently in scope and their values. The centre of the screen contains the program code and the line where the execution currently is is highlighted in yellow. There is also a yellow arrow to the left which points the current line number.
There are two commands for executing the program line by line: Step Into (F11) and Step Over (F10). The commands are quite similar, but if the statement is a subroutine call, the Step Into command moves execution to the first line of the subroutine whereas the Step Over command executes the subroutine call as if it was a single statement. All the variables currently in scope and their values are visible on the Variables tab to the right.
When we no longer want to execute the program line by line, we can either execute the rest of the program by clicking Debug ? Continue (F5), or we can end the execution of the program immediately by clicking Terminate (Shift+F5).
Termi debug johtaa yhden legendan mukaan aikaan, jolloin tietokoneohjelmissa ongelmia aiheuttivat releiden väliin lämmittelemään päässeet luteet. Ohjelmien korjaaminen oli siis kirjaimellisesti hyönteisten (bugs) poistoa. Katso lisätietoja Wikipediasta:
- lue lisää debuggauksesta
- sivulla on kerrottu myös vastaavat Mac painkikkeet
10.5 Useful features
10.5.1 Search for syntax errors
Visual Studio spots the majority of syntax errors, so a large number of errors can be fixed already before compilation - more specifically, VS compiles code all the time to spot and notify about all possible errors. When VS finds an error, an error message appears in the Error List panel with the line number where the erroneous code is located. Additionally, if the error can be located, VS will underline the erroneous strip of code with red wavy underscore. If you hover the cursor over the red cross, a specification of the error in question is shown. Notice that VS might not locate the error exactly right every time. The error might also be in the previous or following line.
10.5.2 Code completion, IntelliSense
IntelliSense is one of the best features in VS. IntelliSense is a versatile automatic code completion tool and documentation interpreter.
One documentation-based feature in IntelliSense is the browsing of parameter lists in overloaded subroutines. Write for example
string name = "Kalle";After this, write name and a dot ".", and a list of the functions and methods that the object can use will appear. After selecting a subroutine from the list, click the parentheses: this allows you to browse the different "versions" of the subroutine, i.e., the functions with the same name but different number of parameters. In addition, you get a short description of the functionality of the method and even examples of its use.
IntelliSense also allows you to write faster and especially to avoid spelling errors. You can work so much faster if you use the Ctrl+Space shortcut while you write code. By pressing Ctrl+Space, VS will attempt to complete the statement based on what you have written so far. If there are multiple options, VS will show a list of all the available options.
10.5.3 Automatic formatting
Visual Studio tries to format the code "neatly" while you write code. However, the user can either intentionally or accidentally break the internal formatting settings in VS. In this case, the code can be formatted correctly again automatically by clicking Edit/Advanced/Format Document or by pressing Ctrl+E,D (hold Ctrl, click E first and then D).
10.5.4 Task List
If the comment lines in the code read TODO:, VS will put together a task list, which shows the line comment, project, file, and line number. You can open the task list from View > Task List.
Double-clicking a "task" in the Task List will move focus on the line that contains the text TODO, which makes it easy to return to tasks later. This can be utilised in case implementing something is interrupted for some reason.
10.6 More information about the use of Visual Studio
The course extra material page contains more tips and instructions for using Visual Studio (currently only available in Finnish):
I read through this chapter and installed the tools.
11. Testing
“Program testing can be a very effective way to show the presence of bugs, but is hopelessly inadequate for showing their absence.” - Edsger W. Dijkstra
Testing a program means inspecting the quality or flawlessness of a program. Testing can be done by runnign the program as is, for example by trying out different types of usage or by printing the status of a variable on screen or by investigating if the program works as expected. However, testing even the most simple program like this would take a lot of time.
Printing or running the program would have to be done again each time the programmer changes the code. This is because we cannot possibly know whether the tests we did before the change will work similarly after the change. One technique that eases testing is unit testing. The idea behind unit testing is that each component, such as a subroutine or a method has its own test which can all be run at the same time. In this way, we can execute all the tests (that only need to be written once) again after each small change we do.
One notable style of design is TDD Test Driven Development. Its idea is that before we write the code we think about how to test the functionality, preferably with automated tests. In this way, thinking about testing gives direction to the planning and coding. Combining writing tests beforehand and unit tests, we can produce higher quality code according to modern standards.
11.1 Comtest
Visual Studio allows writing unit tests. The problem is that writing these VS-supported unit test files is quite laborous. To make unit testing easier, the department of information technology in Jyväskylä has developed the Comtest tool, which utilises the internal testing system in Visual Studio, but considerably lowers the threshold to write unit tests in programs.
The idea of the Comtest testing tool is that tests are written within the documentation comments in subroutines and methods with a simple syntax and then the tool automatically generates the test projects and test files themselves. The tests also act as examples of the functionality of the subroutine or method. Because writing the tests is so easy with Comtest, this is in favour of writing tests while we think about what the function should do e.g. with the value of each parameter. This allows us to achieve the goals of TDD more efficiently.
The installation instructions for ComTest can be found from:
The phases of writing and testing subroutines was discussed in chapter Coding subroutines. Revise the steps!
11.2 Usage
In order to use ComTest, the class in which we want to test subroutines needs to be public, otherwise testing cannot be completed. Similarly, each subroutine that is tested needs to be a public subroutine.
Write documentation comments in the subroutine. Then move to the end of the documentation comment, add one empty line (without slashes), write comt, and press Tab+Tab (Press Tab two times). Visual Studio will automatically generate a template for writing the tests. The following lines should appear in the documentation comments.
The tests are written within the pre tags. The syntax above is for the Doxygen tool (and other automatic documentation tools).
Subroutines and methods can be tested simply by giving them parameters and writing the expected outcome with the given parameters. ComTest utilises a specific comparison operator, which consists of three equals signs (===). This means that the value must be of the same type and have the same content. When testing real numbers (e.g. float types), the test has to be written with the comparison operator "almost equal" (~~~). Due to an error in Doxygen, there must be an even number of ~~~ test lines in order to generate documentation.
Notice that subroutine calls in ComTest need to contain the name of the class before the name of the subroutine. In the example below, the class name is Calculations.
When doing TDD correctly, tests are written before implementing the subroutine itself. First we will write a subroutine stub (minimal code with the correct syntax). Then we write the tests and check that they return red (i.e. are not passed). When the tests return red, we can implement the subroutine to work as planned, after which the tests should return green.
With the help of tests we can plan any special cases that need to be taken into account in the subroutine and how to act with them. For example, the average of elements in an empty array. When the tests are in the subroutine comments, the documentation comments about special cases can be left out because the course of action for them is clear from the test examples.
- See also additional examples of ComTests.
11.2.1 Write a stub implementation
In order to test the syntactic function of tests and their ability to detect errors, we first write a stub of the subroutine. A stub is a syntactically correct subroutine, but it doesn't solve the task it's given, not at least for all the possible test values. A stub for a void subroutine can simply be an empty subroutine. For a function, the stub can be a return statement which returns an expression of any value that matches the function return type. For an integer function, 0 is a good return value, for example.
Examples of stubs:
return; // for a void subroutine
return 0; // int or double type functions
return ""; // string type functions
return new StringBuilder(""); // StringBuilder type functions
return object; // for a function that receives an object as
// parameter and needs to return an object of the
// same type.
return null; // this can be used for object types as well
// (including strings, arrays, StringBuilders)
return new int[0]; // returns an empty int array Let's write for example a Combine subroutine that combines the numbers of two non-negative numbers given. First, we write the introductory line for the subroutine, braces, and a stub between the braces:
public static int Combine(int a, int b)
{
return 0;
}11.2.2 Write documentation and tests
Next, add the documentation of the subroutine (in Visual Studio you can simply write /// above the introductory line of the subroutine to generate the template).
Then write the tests for the subroutine.
In the previous example, view the generated documentation by clicking the link Document. Then click the class name Calculations and the link Combine. You can now view the examples generated from the subroutine documentation.
Now when we run the test above (click the Test button), we receive the message that the test on line
24 /// Combine(1, 0) === 10;fails, because the value 10 was expected, but the value 0 was returned. Now we know that the tests can detect at least some of the cases where the subroutine works wrong. These types of tests based on examples unfortunately cannot detect all possible erroneous functionality in a subroutine.
11.2.3 Implement the subroutine and run the tests
When we have a syntactically correct subroutine and its stub, we can write the implementation of the subroutine (a function in this case), which should accomplish the intended task and pass the test cases.
In this subroutine implementation there is the (naive) assumption that the numbers given as parameters fulfill the condition (non-negative). Later we will learn how to handle situations where this condition is not fulfilled.
The implementation above is perhaps not the most efficient, but with the help of tests it can be improved and still check the correct functionality quickly. Now run the tests by clicking the Test button.
Try changing the implementation so that you replace the return statement with:
return result+1;Now rerun the tests. Restore the original format and rerun the tests again.
Let's study the tests in more detail,
Combine(0, 0) === 0;The line above tests that if the Combine subroutine receives the values 0 and 0 as parameters, it should also return the value 0.
Combine(1, 0) === 10;Next we will test the case where if the first parameter is the number 1 and the other is the number 0, the combination is 10, so the subroutine should return the number 10. The combination of zero and one would be 01, but the equivalent number is of course 1, so 1 is the number that we expect the subroutine to return, and so forth.
The Visual Studio test project can now be generated and run by pressing Ctrl+Shift+Q or clicking Tools/ComTest. If the Test Results tab (at the bottom of the screen by default, appears when you run ComTest) appears green and reads Passed, the tests passed correctly. In the case of a red circle the tests either didn't pass or the test file contains errors.
11.2.4 General about tests
Tests are basically just like any other part in a subroutine where calls to the tested subroutine are executed. In the example above, the test cases contain only one line, but one test case can of course consist of multiple lines as well, in which the test parameters are first set, then the subroutine call is made, and finally the results are inspected with the "test operators" === or ~~~ to see if everything worked as planned. For example, the tests for the Combine function could be written on multiple lines as well. Below are a few examples of writing the same tests more widely. However, if the same thing can easily be written on one line, it is often easier to read more compact test cases.
Later when discussing arrays, lists, and the StringBuilder class we will present examples where test code has been divided on several lines.
In practice, running ComTest means that the test code in the comments is formulated into a "regular" subroutine (NUnit test methods) and all the tests in the file is formulated into one test class (CombineTest.cs in the example). Then, this test class is run with the NUnit test environment so that the environment calls each test subroutine and executes the code there. If some condition is not fulfilled, the result will appear in red. After you have learned more about ComTest and testing, you can look at what the Test files contain.
Also tests need to be tested. It might be that our tests contain errors as well. A part of this test is done when testing the stub. You might want to try writing an error in the tests on purpose. In this case, the tests should of course appear red. If not, one of the tests is wrong or there is an error in the subroutine.
Writing good tests is a skill on its own. All possible situations cannot be tested, so we have to select which parameters to test. At the very least, it is best to test the most probable error spots, which are usually at least any "borderline situations".
Typical borderline situations are for example when the largest element in an array is located at the beginning, centre, or end of the array. Usually also arrays with one element or empty arrays (or strings) are special cases worth testing. In addition, when searching for the location of the largest element it can be useful to test the situations where there are multiple elements with the same size as the largest element.
The borderline cases in the Combine subroutine in the example are zeros, on each side separately and combined. Otherwise the test values have been selected pretty much at random. Additionally, it would be useful to add tests and handling for negative numbers.
Tests don't prove that the subroutine works! Tests can only prove that the subroutine works correctly in the selected test cases.
11.3 Testing floating point numbers
Floating point numbers (double and float) are tested with the ComTest comparison operator with three tildes (~~~). This is because all real numbers cannot be presented accurately on a computer, so we need to allow a small error margin between the expected value and the actual result. Let's make a subroutine called Average that calculates the average of two double numbers, and write documentation comments and Comtest tests for it at the same time.
Because of an error in the Doxygen program, there needs to be an even number of ~~~ test lines in order to generate the documentation of the tested function.
By default, the error margin (comparison accuracy) is six decimals. The error margin can be changed with the #TOLERANCE definition:
When testing floating point numbers, the parameters need to be given in decimal form. For example, if the first test in the example above would be Average(0, 0) ~~~ 0.0, the function Average(int x, int y) would be called if it existed. If function with int parameters does not exists, the version with double parameters is called.
ComTest works on my computer
12. Strings
In this chapter, we will discuss strings in detail. Strings can be divided to immutable and mutable strings. In C#, an immutable string is of the type String, which we already introduced when we discussed objects. Immutable strings cannot be changed after creation. Handling a mutable string, a StringBuilder object is more sensible in some situations. Even though String objects cannot be changed, they are useful enough in certain situations.
12.1 Initialisation
We already saw some examples of String objects when the discussed objects. A String can be initialized in two ways:
The latter way resembles initialising primitive data types, but we must still remember that strings in C# are always objects. We can have for example two string variables (i.e. references) that both point to the same string. On the other hand, we might also have different references that point to different strings with the same content.
Seuraavassa animaatiossa on vielä näytetty mitä tapahtuu jos jono1-merkkijonoa "muutetaan". Merkkijonohan on muuttumaton ja siksi rivi
jono1 += " istuu";on sama kuin
jono1 = "Kissa" + " istuu";jolloin syntyy uusi merkkijono-olio, johon jono1 käännetään viittaamaan.
The example program forces to create a new string for the variable jono4 because otherwise the user would take advantage of immutability of strings and assign the same reference to jono4 as was assigned to jono3.
Reference variable = variable that refers to an object. Usually the used term is variable.
String reference variable = variable that refers to a string object. Usually the used term is just reference variable, variable, or (misleadingly) a string.
String object = An object somewhere in memory that represents the content of the string. This can be referred to as a string.
Thanks to the immutability of the string object strings can be thought to behave like regular variables. For example, if a subroutine call takes a string as parameter, it will still have its original value after returning from the subroutine. This allows us to not constantly think of strings as references and objects. This is not true for mutable strings (StringBuilder)
For example if an integer variable has the following assignment:
int number = 5;we say that the value of number is 5. If a string variable has been assigned
string str = "Cat";we should technically say that the value of str is a reference to an object that contains the letters Cat. Instead we somewhat erroneously say that the value of the string is Cat.
12.1.1 A string is like an array
Because a string is similar to an array, we can take one character from it just like from the elements in an array:
Be careful not to point to an index that is not in the array, or in this case, in the string. For example:
Running this kind of program would result in an exception:
Unhandled Exception:
System.IndexOutOfRangeException: Array index is out of range.
at Pohja3.Main () [0x00000] in <filename unknown>:0
[ERROR] FATAL UNHANDLED EXCEPTION: System.IndexOutOfRangeException: Array index is out of range.
at Pohja3.Main () [0x00000] in <filename unknown>:0 12.1.2 Be careful of empty strings
Because a string is an object, the equivalent variable is a reference and a reference can also be a null reference. In this case the string might be empty, i.e. the string contains no characters. This is different from a string that contains spaces (blank characters).
An empty string can actually be useful, but you also need to be careful not to include any characters in it, not even one.
The emptiness of a string can be tested by comparing its length. However, there is the risk that the reference itself is null, which might result in a NullReferenceException and crash the program. Only if we can be certain that the reference cannot be null, testing the length is ok. This can be tested with the static function IsNullOrEmpty in the String class (also works with null references) or with a combined condition statement.
12.2 Useful methods and features
The String class contains a lot of useful methods, some of which will be discussed now. All methods can be found in the C# MSDN documentation.
12.2.1 Methods return a new string
Note that the methods in the String class that return a string actually create a new string, i.e. return a reference to this new object.
For example ToLower() return the reference to a new string which has all the letters of the string in lower case. Here, as in any of the other similar methods, the original string doesn't change at all. The method creates a new object with the same letters as the original string, but in lower case. Then the reference to this new string is returned. The original string remains unchanged (immutable).
The value of the reference variable k in the example above can also be replaced while assigning. In this case, the original object that contains the string "Cat" becomes garbage (unless another reference variable points to it).
Assigning the value to the auxiliary value k is not necessarily needed because the object created when calling the ToLower method can be used as part of an expression, for example as the argument of the WriteLine method. Note however that in the example below the k variable still refers to the string "Cat" (with a capital C).
Remember that the object for which the conversion is made doesn't necessarily need its own variable; the example below converts the string "Dog".
Because the original string remains unchanged, it's not useful to make the call without assignment. Example below.
The animation below demonstrates how the ToLower method creates a new string:
Animaatio: Tutki ToLower-toimintaa
12.2.2 String methods
Alla tärkeimpiä String-luokan metodeja. Lisää löydät sivulta:
12.2.2.1 Equals
- Equals(String) Returns true if the two strings have the same content including case. Otherwise returns false.
Exceptionally, equivalence of strings can also be tested using the comparison operator ==. However, this comparison operator does not work with other objects!
Try to make small changes to the variable containing the first name, for example write "aku", "Aku Ankka" etc.
12.2.2.2 Compare
- Compare(String, String, Boolean) Compares the alphabetic order of a string to another string. Returns the value
0if the strings are the same, a value below zero if the first string comes before the second string alphabetically, and a value greater than zero if the second string comes before the first string alphabetically. The method can be set case-sensitive by giving the third parameterfalse, or it can ignore case by giving the third parametertrue.
12.2.2.3 Contains
- Contains(String) Returns a truth value based on whether the string to investigate contains the string given as parameter.
12.2.2.4 IndexOf
- IndexOf(char) Returns the location (index) of the first instance of a given character in a string. return -1 if the character is not found in the string. There are also other versions of this method, for example one where the search starts from a certain location instead of the beginning (index 0), see documentation.
12.2.2.5 Substring
- Substring(Int32) Creates a new string which contains the characters of the original string starting from the index given as parameter. Returns the reference to the new string.
- Substring(Int32, Int32) Returns the reference to a new string which contains the part of the original string between the given indexes. The first parameter is the starting index and the second parameter is the number of characters to return. Note that in Java the second parameter is the end index which will not be included in the subtring. If the starting index is 0, the methods in Java and C# are similar, otherwise not.
IndexOf ja Substring-metodit yhdessä soveltuvat joskus hyvin merkkijonon pilkkomiseen ja tietyn palasen ottamiseen. Toisissa tapauksissa taas 🔗 Split-metodi on kätevämpi tähän; tästä lisää luvussa Merkkijonojen pilkkominen ja muokkaaminen.
12.2.2.6 ToLower
- ToLower() Returns a reference to a new string where all the letters of the original string are lower case. Note that here the original string is unchanged, as in all equivalent functions.
12.2.2.7 ToUpper
- ToUpper() Creates and returns a reference to a new string where all the letters in the original string are uppercase.
12.2.2.8 Replace
- Replace(Char, Char) Returns the reference to a new string, which has certain characters of a string replaced with other characters. The first parameter is the character to be replaced and the second parameter is the replacing character. Note that the parameters are placed within apostrophes, as usual for
charvariables.
- Replace(String, String) Returns the reference to a new string where the instances of a certain string have been replaced with another string. The first parameter is the string to replace and the second parameter is the replacing string. Note that the string itself doesn't change, the method just returns a reference to a new string where the change has been made. In the example below, the reference to the new string is assigned to the reference
word. The original string (which has no references to it) is unchanged.
12.2.2.9 Useful properties
- Length i.e. the length of the string. Returns the length of the string as an integer. Note that this is NOT a subroutine / method; this is a property of the string object.
- Certain character in a string: Because a string is a collection of individual
charvariables, each character in a string can be returned as achartype by placing the index of the character within brackets after the name of the string object, for example:
The indexing of string starts from 0! This means that the first character of the string is in index 0. The last index is Length-1.
Which of the following statements are true?
12.2.3 Task 12.2
Can you complete a task where the user is asked for a name (Firstname Lastname) and then the program prints the initials of the person? For example, if the name is Maya Bee, the program prints M.B. See the lecture video for making the program and fill in the program code in the box below. Fill in the tests as well.
12.3 Note
Note that string (lower case) is an alias for the System.String class. This allows using both string and String in setting the variable type even though technically the other is an alias and the other is a class name. For simplicity, we will mainly discuss the String type with the assumption that the System namespace has been utilised with the statement using System;. It is customary that the variable type is introduced as string. If we refer to a class method (a static subroutine), the subroutine is called in the capitalised format String.SubroutineName.
12.4 Mutable strings: StringBuilder
Tässä luvussa esitellään vain tärkeimpiä StringBuilder-luokan metodeja. Täydellisen luettelon metodeista löydät dokumentista:
In addition to the so-called immutable string, i.e. the string type there are also mutable string in C#. The idea behind mutable strings is that we can add and remove characters from them after creation. This cannot be done with String type strings. In practice, if we want to change a string, we need to create a new object. If there are a lot of changes that need to be done (for example, characters are added to a string multiple times), processing eventually becomes slow - and this slowness will start to show fairly quickly.
In the C# language (as in Java) the mutable string class is StringBuilder, which is located in the System.Text namespace. You can utilise the namespace by typing the following at the beginning of the program:
Adding character to the string can be done with the Append method. The Append method can add for example all C# primitive data types and String objects to a string. Append also allows adding all C# ready-made objects, because they contain the ToString method which allows converting the objects to strings. The code strip below demonstrates the use of the Append method.
Characters and strings can be added to a certain place with the Insert method which takes two parameters: the index, i.e. the location where the character(s) will be added, and the character(s) to be added. Indexing starts from zero, as usual. The Insert method allows adding all the same data types as the Append methos. For exaple, we could add the regnal number VIII to the previous example. Before that, let's study the order and indexing of the characters and write the index of each printed character above the character.
012345678901234567890
|----+----|----+----|
Henry of EnglandHere we notice that he index where we want to add VIII is 6.
Note that the Insert method does not replace the character in index 7 but rather add an entirely new character to the string, which increases the length of the string by one. The Replace method can be used for replacing characters. An individual character can also be replaced with the statement name[6] = 'X';.
12.4.1 Other useful methods in the StringBuilder class
- Remove(Int32, Int32). Removes characters from character strings; the first parameter is the starting index and the second parameter is the number of characters to remove.
- ToString() and ToString(Int32, Int32) Returns the content of a
StringBuilderobject as a "regular"String. TheToStringmethod can also be given twointnumbers as parameters which will return a part of the string (see Substring).
Other methods can be found in the MSDN documentation of the StringBuilder class:
Note that objects of the StringBuilder class cannot be compared with the equals operator ==; the comparison always needs to be done with the equals method. Similarly, you need to be extra careful with comparing StringBuilder and String objects:
12.4.2 Testing StringBuilders
StringBuilders cannot be compared with strings as is, they first need to be converted to strings.
Accordingly, if there was a function that returns a StringBuilder type object, the result returned by the function would need to be converted to a string first in ComTest:
/// Strings.CreateString("a",4).ToString() === "aaaa";Although it was stated before that it usually makes no sense to call a function without assigning its return value somewhere, in situations such as the the example above it is vice versa. Because C# allows callign a function without assigning the result value anywhere, the function above can be StringBuilder type without "breaking any" of the existing code. Converting the subroutine to a function gives the opportunity to make shorter call chains and shorter tests.
Testejä, joissa joudutaan testattava muuttamaan merkkijonoksi ToString-metodilla, voidaan myös lyhentää tyyliin (kokeille em esimerkkeihin):
/// jono =S= "kissakoti";
/// Lisaa(jono, "kissa") =S= "kissakoti";
/// Lisaa(jono, "korjaamo") =S= "kissakotikorjaamo";Tuo ComTestin vertailuoperaattori =S= tekee sen, että se muuttaa vertailun molemmat puolet ensin ToString-metodilla merkkijonoiksi ja suorittaa sitten vertailun.
Lue lisää ComTestin dokumentista.
12.4.3 Chaining calls
Calling format used in the previous example is very common for methods in the StringBuilder class, among others.
Although methods change the string itself, they still return the reference to the changed object (which is in fact the same reference as the original). Thanks to this, calls can be chained like this:
12.5 string-viite vs. StringBuilder-viite
12.6 Note: arithmetic + vs. string combiner +
You can also add the values of numerical variables to strings by using the + sign. There is a very small difference between using the "+" sign as an arithmetic operator or as a operator that combines strings. Study the difference with the example below.
Combining strings always creates a new object, which is why it should be used with consideration. In loops, using StringBuilders and the Append method is preferred.
Animation: Execute a program that combines strings
12.7 Hint: convenient typecast to string
If we add a string to a variable using the "+" sign, C# automatically makes a typecast, converting the variable and the string added to it into a `string´ type variable. Thanks to this feature, we can conveniently typecast any primitive data type to String types by adding an empty string to the variable.
Without adding an empty string this would not succeed because we of course can't store int or boolean type variables in a String variable.
However, storing a real number in a String cannot be done without defining how many decimal places it will have. For this, we can use the Format method in the String class.
12.8 Formatting real numbers with String.Format method
The Format method in the String class offers a large variety of formatting tools for several data types, but we will now focus on how to format real numbers. We can retrieve pi from the Math class with a precision of 20 decimal places by typing Math.PI. Note that PI is not a method, so don't type parentheses after it. PI is a public static constant (public const double) in the Math class. If we want to typecast pi to a String type with only two decimal places, we do it this way:
In the example above, the Format method receives two parameters. The first parameter is called a format string. The other parameter is the value to format. There are multiple ways to format a string. You can find more of them in the MSDN documentation section Formatting types.
The 0 within braces in the format string means that it is the place of the first parameter (in index 0) that comes after the format string. In latter examples, we will present format strings with multiple parameters.
You can also give WriteLine a format string as the first parameter, and then one or more parameters (values or expressions) that will be printed according to the format string.
Since version 6, the C# compiler comes with a feature that allows converting a string literal (constant) into a format string with the $ sign; this allows including any kinds of formattable expressions within braces. Microsoft calls this String Interpolation. E.g., the previous example with this format string would be:
Next, we present some examples of different formatting modifiers. The same modifiers work as string interpolation (starting with $) modifiers as well.
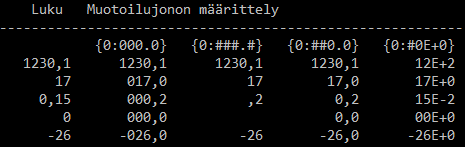
The third column in the example {0,11:##0.0} is an example of how different numbers can be arranged neatly on top of one another according to the decimal point. The first 0 means that the value in index 0 (the first parameter) in the parameter list is printed in this place. ,11 means that the place in question uses at least 11 characters of space (if the number is not that long, the rest of the space is blank). Note the title does not contain the modifier ,11. The colon (:) indicates the start of the more specific printing instructions. The hash (#) indicates that if the number does not have a number in the position of the hash, it will be left out, except in E formatting. For example, the hash before the dot in columns 3 and 4 has no effect on the result. Zero, on the other hand, "forces" the number in its place even if the input contains nothing in this position: for example, the input 17 and 0 will be formatted to 17.0 and 0.0. For example in applications related to money it is sensible to include two decimal points in numbers, even when the amount of money is exact.
Note that in the example image above the decimal separator is a comma. The decimal separator is OS-specific and it can be changed in Windows 10 for example
Control panel/Region/Formats/Additional settings/Decimal symbolThe format string is placed within quotation marks and each parameter to format in it needs to have its index number within braces. A format string may contain formatting instructions for multiple parameters at a time. An example of this below
- the parameter in index 0 is printed in place 0 (the value 1 in the example),
- the parameter in index 2 is printed in the next place in the format string, i.e. the value 3
- the parameter in index 1 is printed in the next place in the format string, i.e. the value 2
- the parameter in index 0 is printed again in the last place, i.e. the value 1
Each value to print can also contain more specific formatting instructions, like in the previous examples. In the next example, each number that is printed has been given a minimum width to use. Additionally, the second place contains the parameter in index 2 so that it uses six characters of space and has three zeros if the number is not at least three characters long as is. In other words, {2,6:000} indicates that the value 3 (in index 2 in the parameter list) is printed "___003" (blank spaces are indicated with underscores). If the formatting instructions were {2,-6:000}, this would print "003___". Accordingly, if the value in index 2 was for example 2018, the original formatting instructions would print "__2018 and the latter would print "2018__.
A formatted string (and its definition) can also be given as a parameter to the WriteLine method. A shorter version of the previous example below.
The values to print can also be variables or even expressions:
Same example with the $ formatting (String Interpolation)
Even though the new String Interpolation formatting is neat, the older String.Format needs to be used at least when the format string is stored in a variable. Storing the content of the string format is convenient when, for example, the same formatting is required multiple times.
More information about string formatting in the MSDN documentation:
12.8.1 Summary of different ways to print text
WriteLine subroutine takes one parameter. If the parameter is a reference to a string, it will be printed as a string. Normally printed strings are not separated by comma but rather "glued" together with a plus operator. Format function allows to produce a string that contains the expressions to print in the wanted position. The resulting string can be given as parameter to the WriteLine subroutine. There is an existing special case where the first parameter for the WriteLine subroutine is a similar formatted string as in the Format function, followed by the expressions to print separated with a comma.
This means that it is not syntactically wrong to write
Console.WriteLine("Cat", age, weight);but this will only print Cat, because the first parameter is interpreted as a formatted string, but since it doesn't contain any print inserts, marked with braces, the string is printed as is.
Also
Console.WriteLine("Cat" + age + weight);would print everything together all ugly, which is why it would be nice to add a whitespace somehow.
The following example is summary of different ways:
12.9 Char class
Tyyppi char edustaa yhtä kirjainta ja sitä vastaava vakioarvo laitetaan yksinkertaisiin heittomerkkeihin. Merkkijonoluokista string ja StringBuilder tehdyt muuttujat ovat olioviitteitä ja niillä on tukku metodeja, joilla olioita voidaan käsitellä. Näistä oli edellä paljon esimerkkejä. Koska char on perustietotyyppi, niin sillä ei ole vastaavia metodeja.
On kuitenkin luokka Char, joka sisältään joukon staattisia funktioita, joilla voidaan tuottaa uusia kirjain arvoja tai kysellä kirjaimeen liittyviä asioita. Luokan funktioita kutsuttaessa pitää kertoa minkä luokan funktiota kutsutaan ja parametrina viedä "tutkittava asia", eli muoto on:
Huomaa että tämä poikkeaa olioiden metodien kutsusta, jotka voivat olla muotoa (esim String):
Different conversions and comparisons for an individual character can be found in the Char class:
13. Conditional statements
Don't use if statements in vain, you can do just fine without them in most cases - Vesa Lappalainen
13.1 When do we need conditional statements?
Task: Design a subroutine that receives an integer as parameter. The subroutine returns true if the integer is an even number and false if the integer is an odd number.
With the knowledge we have now, it is almost impossible to implement the subroutine above. We know how to find out whether the number is even or odd but we have no method of changing the return value according to whether the number is even or odd. When we want to complete different actions depending on the user input or on subroutine parameters, we need conditional statements.
13.2 The if construct: "If the sun is shining, go outside."
A regular conditional statement always contains the word "if", the condition, and action to perform if the condition is true. A naive everyday conditional statement could be expressed as follows:
If the sun is shining, go outside.A little more complex conditional statement could also contain the instructions on what to do if the condition is not true:
If the sun is shining, go outside, else code indoors.Both of these statements have equivalents constructs in C#. First, we will study the first one: the if construct.
In general format the if construct in C# looks like this:
if (condition)
{
statement1;
statement2;
...
statementN;
}The condition located between parentheses is a logical statement, which is followed by the stem within braces. The value of the logical statement is either true or false. A logical statement can contain for example comparing numeric values with comparison operators.
If a logical statement gets the value true, the stem is executed. If the logical statement gets the value false, the stem is not executed but rather it is skipped over and the execution of the program continues.
The example condition "If the sun is shining, go outside" can now be presented according to the C# syntax like this:
if (sunShines)
{
GoOutside();
}If there is only one statement in the stem, like in the example above, the braces can be left out and the if statement can be written on one line with the stem.
if (condition) statement;As a flow chart the if construct can be presented like this:
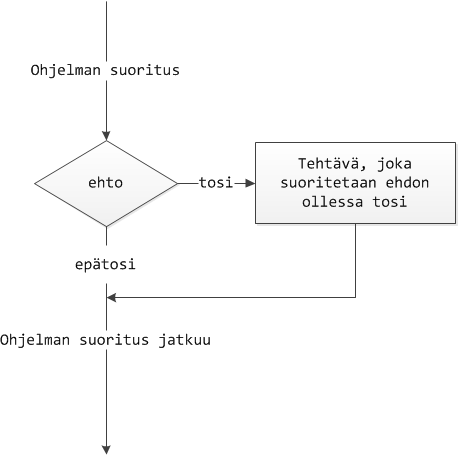
- Ohjelman suoritus = Execution of the program
- ehto = condition
- tosi = true
- epätosi = false
- Tehtävä, joka suoritetaan ehdon ollessa tosi = the statement to execute if the condition is true.
- Ohjelman suoritus jatkuu = Execution of the program continues
Flow chart = A chart that can be used to model an algorithm or a process.
Before we can give more detailed examples of the ifconstruct, we need more information about comparison operators.
13.3 Comparison operators
Comparison operators allow comparing arithmetic values.
Table 6: Comparison operators in C#.
| Operator | Name | Action |
|---|---|---|
== |
equal to | Returns true if the compared values are equal. |
!= |
unequal to | Returns true if the compared values are unequal. |
> |
greater than | Returns true if the number on the left side is greater. |
>= |
greater than or equal to | Returns true if the number on the left side is greater or equal. |
< |
less than | Returns true if the number on the left side is less. |
<= |
less than or equal to | Returns true if the number on the left side is less or equal. |
Animation: Execute the program
13.3.1 Note: assignment operator (=) and comparison operator (==)
Remember that the assignment operator (=) cannot be used for comparison. This is one of the most common programming errors. Always use two equals signs (==) for comparison and one (=) for assignment. See the following example.
13.4 Example: simple if statements
Equality is measured using the two = signs as a comparison operator.
The code below results in an error message because the attempted comparison is made with only one =sign.
The following example demonstrates the use of another comparison operator.
The expression above prints The number is negative if the value of the variable number is less than zero. The condition is the logical expression number < 0 which gets the values true whenever the value of the variable number is less than zero. If the condition is true, the statement or block that follows it is executed.
13.5 if-else
The if-else construct also contains informations about what to do if the condition is not true.
If the sun is shining, go outside, else code indoors.The statement above contains the idea of the if-else construct in programming. It contains a condition, instructions on what to do if the condition is true, and instructions on what to do is the condition is false. The statement could also be written this way:
If (the sun is shining), go outside,
else code indoors.The format above already abides by the syntactic rules of most programming languages. The condition has been isolated within parentheses, and it is followed by instructions on what to do if the condition is true. The second line contains instructions on what to do if the condition is false. We'll make a few more changes and it abides by the syntax of C#.
if (the sun is shining) go outside;
else code indoors;The general structure of an if-else struct:
if (condition) statement1;
else statement2;Similarly to if structs, if-else structs can also contain a block instead of single stamements.
if (condition)
{
statement1;
statement2;
statement3;
}
else
{
statement4;
statement5;
}The if-else construct could be described with the following flow chart:
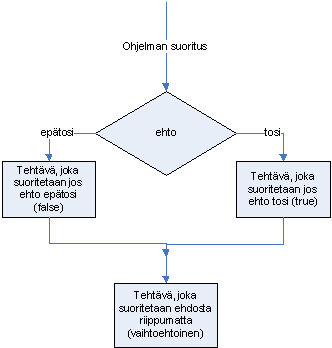
Animation: Execute the program
13.5.1 Example: Odd or even
We will write a subroutine which returns true if the number is even and false if the number is odd.
The subroutine receives an integer as parameter and returns true if the integer is even and false if the integer is odd. The second line takes the variable numberand the remainder of the division by 2. If the remainder is zero, the number is even, which returns true. If the remainder is not zero, the number has to ve odd, which returns false.
In fact, since the execution of the subroutine ends with a return statement, the word else can be left out completely, because this else statement is only executed if the ifcondition was not true. We could shorten the subroutine like this:
If statements are overused a lot. This example could as well be written in a shorter (not always clearer for everyone) way as follows:
This is because the expression (number % 2) == 0 returns true if the number is even and otherwise it will return false. We may as well return the value of this expression and the subroutine will work exactly like it did earlier.
It is never elegant to test logical values in the format
13.6 Logical operators
Logical expresions can be combined with logical operators.
Table 7: Logical operators.
| C# code | Operator | Function |
|---|---|---|
! |
logical no | This operator computes the logical negation of the operand: If the operand is true, the result is false. If the operand is false, the result is true. |
&& |
logical conditional and | True if both expressions are true. Differs from the following in that if the truth value is already clear, the rest will not be checked. In other words, if the first expression is already false, the second expressions will not be executed. |
& |
logical and | True if both expressions are true. Always checks both conditions. |
|| |
logical conditional or | True if one of the expressions is true. If the truth value is already clear, the rest will not be checked. In otehr words, if the first expression is already true, the entire expression is true and the second expressions will not be executed. |
| |
logical or | True if one of the expressions is true. Always checks both conditions. |
^ |
exclusive or (XOR) | True if the other one but not both are true. |
The use of two sign operators && and || is recommended, because they will stop calculations as soon as the truth value is clear.
Animation: Execute the program
13.6.1 Operator truth tables
Table 8: In the following 0=false, 1=true. Truth table for different operators.
| p | q | p && q | p || q | p ^ q | !p |
|---|---|---|---|---|---|
| 0 | 0 | 0 | 0 | 0 | 1 |
| 0 | 1 | 0 | 1 | 1 | 1 |
| 1 | 0 | 0 | 1 | 1 | 0 |
| 1 | 1 | 1 | 1 | 0 | 0 |
13.6.2 The use of operators
The NOT operator negates the logical expression.
if (!(number <= 0)) Console.WriteLine("The number is greater than zero.");The NOT operator returns the opposite bool value: true becomes false and false becomes true. If the number variable in the statement above received the value 5, the condition number <= 0 would receive the value false. However, the NOT operator receives the value true when the value of the expression is false, which makes the entire condition true and the print statement will be executed. In other words, the statement would be equal to the one below:
With the AND operator both of the expressions need to be true to make the entire condition true.
The condition above is fulfilled if the number is between 1-99. The same could also be written with two nested conditional statements as follows
However, nested conditional statements such as above should be avoided because they increase the risk of error and make testing more complicated.
It may make it easier to read inequalities if they are always written by using the less than sign (left-pointing arrow). This way the operands in the inequality are in the same order as humans understand the order of magnitude of numbers.
There can be more than one logical operators in the same condition. They are executed in the order && first (cf. multiplication) and then the || operators (cf. addition). If you are not certain about the execution order, you can use parentheses to clarify.
Usein funktiossa voidaan palauttaa heti arvo kun jonkin asian tiedetään olevat totta. Seuraavana sama funktio kirjoitettuna 3:lla eri tavalla. Yhdistetyllä ehtolauseella, ilman if-lausetta sekä monena if-lauseena, jossa palautetaan aina tieto jota pidetään "varmana".
13.6.3 De Morgan's laws
Note that De Morgan's laws, familiar from set theory and logic also apply to logical operators. Let p and q be variables of bool type. Therefore:
!(p || q) is equal to !p && !q
!(p && q) is equal to !p || !qThe laws could be tested by changing the values of the p and q variables in the code strip below. Regardless of the values of p and q the printed value should always be true.
You can sometimes simplify expressions by using De Morgans laws. These statements may seem useless as is, but if p and q were for example inequalities:
which makes moving the NOT operator sensible. Another law to utilise is the distributive law.
13.6.4 Distributive law
The distributive law, as learned in school says that multiplication can be used as a common factor and vice versa:
p * (q + r) = (p * q) + (p * r)for example
2*(3+4) = 2*7 = 14
2*3 + 2*4 = 6 + 8 = 14By identifying * <=> && and + <=> || we can verify the distributive law for logical operators too:
p && (q || r) = (p && q) || (p && r)for example:
(a > 5) && ((b < 3) || (c==2)) is the same as
(a > 5) && (b < 3) || (a > 5) && (c==2)This can be proved with for example a truth table. We will name the conditions:
a > 5 : A
b < 3 : B
c == 2 : CEach of these conditions can be false (0) or true (1). We will write all the possible combinations of conditions. && and & work the same way in accordance with logical truth, so we will just use the & sign:
A |
B |
C |
B||C |
A&(B|C) |
A&B |
A&C |
A&B | A&C |
|---|---|---|---|---|---|---|---|
| 0 | 0 | 0 | 0 | 0 | 0 | 0 | 0 |
| 0 | 0 | 1 | 1 | 0 | 0 | 0 | 0 |
| 0 | 1 | 0 | 1 | 0 | 0 | 0 | 0 |
| 0 | 1 | 1 | 1 | 0 | 0 | 0 | 0 |
| 1 | 0 | 0 | 0 | 0 | 0 | 0 | 0 |
| 1 | 0 | 1 | 1 | 1 | 0 | 1 | 1 |
| 1 | 1 | 0 | 1 | 1 | 1 | 0 | 1 |
| 1 | 1 | 1 | 1 | 1 | 1 | 1 | 1 |
and we notice that the right and the left side (bolded column) of the proposition are the same in all situations.
Unlike in normal arithmetic, logical operators have another version of the distributive law:
p || (q && r) = (p || q) && (p || r)13.7 else if
If the variable needs to be made a series of exclusive checks, we can use the special else if struct. It contains two or more conditional statements and the next condition is only checked if none of the earlier conditions was true. The general format of the struct:
if (conditions1) statement1;
else if (conditions2) statement2;
else if (conditions3) statement3;
else statement4;The bottom else is only entered in the case that none of the conditions above it was true. This construct is often introduced as a separate construct, even though it is actually a series of consecutive if-else constructs, which have a slightly atypical indendation.
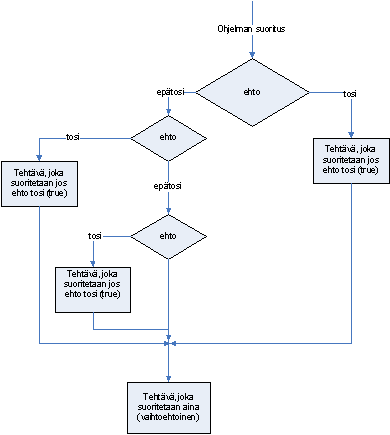
The above flow chart describes a construct with one if statement, followed by two else if statements.
13.7.1 Example: Calculating the exam grade
We will make a subroutine that allows the staff to calculate a student's exam grade. The subroutine takes the maximum points, boundary minimum score for passing, and the student's points as parameters. The subroutine returns the grade 0-5 so that the grade 1 is received with the minimum, and the other grades are scaled as evenly as possible.
The subroutine first calculates the difference between the points for different grades, which is then used for calculating the grades. Calculation of grades is started from top-down. A condition can also contain arithmetic operations. We also initialize the variable grade, which stores the student's grade. The variable receives the value 5, if the exam points exceed the required minimum to which the difference between grades by times four is added. If the student's points were not enough for the grade 5, the execution moves onto the next else-if construct and checks if the points are enough for the grade 4. The execution continues this way until all grades have been checked. Finally, the value in the variable grade is returned. The main program tests the subroutine with a few test prints.
The use of multiple if statements in this example could be avoided by using a loop and/or arrays. This will be discussed in chapter 15.
13.7.2 Exercise
How should the program be changed so that it starts checking the points from the grade 0?
13.7.3 Exercise
Would the code be shorter and would there be any need for else statements if the statement grade = 5 was replaced with the statement return 5; ? Try it.
13.8 The switch construct
The switch construct can be used when we have to make a choice between individual integers or chars. For each expected variable value in the switch construct there is an individual case part, which contains the actions to perform in the particular case. The general format of the switch construct is as follows.
switch (switcher) //the switcher is usually a variable
{
case value1:
statements;
break;
case value2:
statements;
break;
case valueX:
statements;
break;
default:
statements;
break;
}For each case part and the default part, the statements need to be followed by a goto statement that jumps out of the switch block. The above example uses the break statement as its goto statement. Unlike e.g. C++, C# does not allow moving execution from case to case if the case contains even one statement. For example, the following code would cause an error.
However, "bleeding" from case to case is allowed if the case does not contain any statements. The following is an example of this.
Animation: Execute the program
13.8.1 Example: Grade in writing
Next, we will make a subroutine that takes the student's exam grade as a number (0-5) and returns the grade in writing as a String object.
Because the return statement ends the execution of the method, the subroutine above could be shortened by returning the grade in writing in each case part. In this case, the break statements can be / need to be left out, because the return statements make it impossible for the cases to bleed into each other.
In other words, the break statement needs to be left out of the case part if the case part returns some value with the return statement (or the current case part does not contain any statements). Otherwise leaving out the break statements results in an error.
In most cases the switch construct can be replaced with if and else if constructs, which means that it should simply be considered a type of an if statement. Also the use of the switch construct can usually be avoided by using tables (arrays).
Why were else statements not required in the example above? What would happen if the last return was left out? Try it! Why does it have this effect?
14. The difference between objects and primitive data types
Tässä luvussa tutustutaan siihen, miten oliotietotyypit tallennetaan muistiin ja mikä niiden ero on alkeistietotyyppeihin kuten esimerkiksi int. Tähän lukuun kannattaa palata useammankin kerran, jotta lopulta ymmärtäisi mistä on kyse. Ensimmäisellä lukukerralla ei luonnollisesti kaikki tule ymmärretyksi. Kuitenkin ymmärtämällä tämän luvun asiat, on monet muut tämän kurssin asiat helpompi sisäistää. Eli tähän kannattaa panostaa!
Lukemisen rinnalla voi kannattaa ajaa esimerkkiohjelmaa oman IDE:n debuggerilla kuten on tehty alla olevassa videossa.
Esimerkissä käytetään oliotietotyyppinä StringBuilder-luokan ja taulukkoluokan olioita. Kaikki muutkin oliotyypit kuten Jypelin fysiikkaoliot yms. toimivat vastaavasti. Eli ei saa takertua siihen että esimerkissä on StringBuilder, vaan yleistää ajatus kaikille oliotietotyypeille. Muuttumatonta merkkijonoluokkaa String ei ole käytetty sen takia, että C#-kielessä String-tyypin olioita voidaan verrata sisällön puolesta ==-operaattorilla, mutta juuri muita oliotietotyyppejä ei voi, vaan == vertaa olioviitteiden arvoja. Eli sikäli StringBuiler on hyvä yksinkertainen luokka edustamaan muitakin olioluokkia.
Alla oleva video pysähtyy siihen kun tämä asia on käsitelty, mutta jos jatkat sen katsomista, on lopussa esimerkkejä, joissa on muunkin tyyppisiä olioita.
Let's study the program in detail:
StringBuilder s1 = new StringBuilder("first");
StringBuilder s2 = new StringBuilder("first");The statements above create two instances of the StringBuilder class aka objects. The variables s1and s2 are references to these objects.
The comparison returns false because we are comparing the object references, not the object values to which the object references point.
The object contents, to which the variables point, can be compared with the Equals method like above.
The primitive data types in C# are placed directly as values in the stack memory (or later, in the case of object attributes, in the memory are allocated to the object). That is why the comparison
(i1 == i2)is true.
Similarly to the StringBuilder objects, the print statement above prints false. Note that even though the array contains int type integers (which are primitive types), the integer array is an object. Once again, we are comparing the references to array variables, not the values to which variables point.
All of the variables in the program are local variables, which means that they have been introduced locally inside the Main method and are not "visible" outside of the Mainmethod. Variables like this are usually reserved a space in the call stack. The call stack is a dynamic data structure, which stores information about the active subroutines. It is also often referred to simply as stack. The stack will be discussed in detail in the course ITKA203 Käyttöjärjestelmät (Operating Systems). At this point, a simplified picture of the stack with local variables could be as follows (io should be it):
Translations:
- Kutsupino muuttujien osalta = Call stack in relation to local variables
- Kekomuisti = Heap (memory)
The memory location addresses (100-120 ja 8010-8090) in the example are made-up examples. They change with each use and are different in different operating systems and processors. This is why the memory location addresses are usually not included in images but rather the references are drawn as arrows pointing to the objects to which they refer. The image above roughly describes the implementation of internal references.
Kuvassa on yksinkertaistettu sitä, miltä StringBuilder oikeasti näyttää. StringBuilderissä on oikeasti varattu enemmän tilaa kuin tarvitaan ja se tila on vielä "omassa laatikossaan". Tällöin nuolen päässä olevassa oliossa (esim muistipaikassa 8010) olisi hallinta käytettyjen merkkien määrästä ja viite sinne, missä merkit oikeasti ovat. Samoin on yksinkertaistettu sitä, miltä muistipaikoissa 8070 ja 8080 olevat yksipaikkaiset taulukot näyttävät. Lisäksi viitenuolet, tai oikeastaan mitä on nuolen alun ja lopun välillä, on C#:issä monimutkaisemmin automaattiset muistinhallinnan takia. C-kielessä kuva olisi kohtuullisen oikean näköinen, erona lähinnä että merkkijonon viimeisen merkin jälkeen olisi nul-merkki.
Lisäksi on piirtämättä vakiomerkkijono ”eka”, joka aluksi syntyy, jotta siitä voidaan kirjaimet kopioida StringBuilder-olioihin.
Olioviitteiden ja olioiden ymmärtämiseksi kuva on kuitenkin riittävä muodostamaan mielikuvamallin siitä, miten perustietotyyppien muuttujat eroavat olioviite-tyyppisistä muuttujista ja olioista.
Luvussa Listan sisäinen rakenne on rakenne piirretty tarkemmin kokonaislukulistan tapauksessa. StringBuilder toimii vastaavasti.
If an "object" is assigned to another "object", we are actually assigning the values of the reference variables, i.e. after the assignment s2 = s1 both of the string object references "point" to the same object. The situation would change to this:
YAML is malformed: 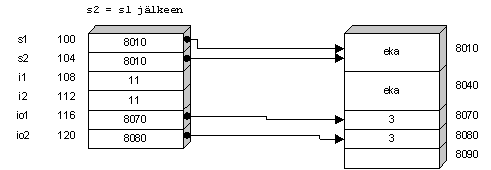{width=491}Sijoitus s2 = s1; toimii aivan vastaavasti kuin toimisi sijoitus i2 = i1, eli haetaan muistipaikassa s1 oleva arvo (esimerkissä 8010) ja se sijoitetaan muistipaikkaan s2. Tietokoneessa ei ohjelman ajon aikana ole noita muuttujien nimiä, vaan esimerkin kuvassa tuo sijoitus s2 = s1 tarkoittaa prosessorille:
- hae muistipaikassa
100oleva arvo (esimerkissä8010) ja sijoita se muistipaikkaan104.
After assignment, the memory location in address 8040 is not pointed (referred) to by anything anymore, which means that this memory location turns into "garbage". Next time the garbage collection (gc) starts, these unused memory locations are "freed up". Automatic garbage collection is considered one of the reasons for the success of Java, for example. However, it should be remembered that memory is only one of the resources and this automatism only exists to take care of the memory. Other resources, such as files and databases, still need to be taken care of with the same caution as in other languages. [LAP]
Above, the object in the memory location 8040 turned into garbage with the assignment s2 = s1. An object can also be turned to garbage by assigning the null reference to its reference variable. For this reason, we often need to test if the object reference is null before using the object reference when we are not entirely sure if the reference points to any object.
s2 = null;
...
if (s2 != null) Console.WriteLine("The length of s2 is " + s2.Length);Without testing this, the example above would throw a NullPointerException.
Muista vielä, että esimerkin muistipaikkojen osoitteet (100-120 ja 8010-8090) ovat keksittyjä. Ne vaihtuvat täysin eri käyttökerroilla ja ovat erilaisia eri käyttöjärjestelmissä ja prosessoreissa. Siksi nykykielissä ei oikeasti enää mietitä tuota, mihin muistipaikkoihin mikäkin muuttuja menee. Jatkossa piirretään kuvat niin, että unohdetaan muistipaikat ja viitettä olioon kuvataan nuolella.
Sisäisesti viitteet toteutetaan karkeasti kuten edellisissä kuvissa. Samoin muistipaikat yleensä piirretään erilleen, koska mikään ei luotettavasti takaa, että tietyt muuttujat menisivät peräkkäisiin osoitteisiin.
Pitää kuitenkin muistaa, ettei tietokoneen muistissa ole "nuolia", vaan ainkostaan niitä lukuarvoja (bittijonoja), jotka loogisesti voidaan tulkita viittaamaan (osoittamaan) toiseen paikkaan. Muistipaikan (muuttujan) tyypin perusteella päätetään miten sen sisältönä olevaa lukuarvoa tulkitaan.
Ilman muistipaikkojen osoitteita piirrettynä edellinen kuva olisi silloin:
Voit vielä alla animoida -nuolilla esimerkin toimintaa askel kerrallaan. Animaatiossa ensin syntyy kaikki lokaalit muuttujat (pinossa), koska karkeasti näin kääntäjäkin tekee, eli varaa heti lohkoon (esimerkiksi aliohjelmaan) tultaessa sen tarvitseman muuttujien tilan ja päättää mitä muistipaikkaa käytetään mihinkäkin tarkoitukseen. Esimerkiksi että s1 on olioviite StringBuilderiin ja i1 tavallinen primitiivitietotyypin (esimerkissä int) arvomuuttuja.
Kun pääset animaation loppuun, huomaat että muistipaikat 8040 ja 8090 olisivat vapaana. Jos joku nyt tarvitsisi tilaa esimerkiksi 40 tavua, niin tuo 8040 osoitteesta alkava 30 paikkaa ei siihen riittäisi. Jos muualla ei olisi enää tilaa, niin siirtämällä 8070 ja 8080 sisällöt ylemmäksi tulisi niiden alle yhtenäinen 40 tavun tila. Jos uutta tilaa olisi haluttu 30 tavua tai vähemmän, olisi se voitu allokoida suoraan paikasta 8040 alkaen ilman, että mitään olisi tarvinnut siirrellä. Muistin saa korruptoitumaan sillä, että varailee paljon pieniä alueita ja sitten vapauttaa niistä vaikka joka toisen. Sen jälkeen ei löytyisi yhtään isoa yhtenäistä lohkoa ja silloin muistisiivouksella olisi paljon siirreltävää.
Tämä on juuri sitä mitä muistinsiivous (garbage collection) tekisi. Esimerkissä jos tuo 40 tavua tarvittaisiin, niin siirtelyn lisäksi pitäisi samalla viitemuuttujien it1 ja it2 arvoja muuttaa. Tämän takia oikeasti tuossa "nuolen" kohdalla on monimutkaisempi toteutus, jotta kaikkia tarvittavia viitteitä saataisiin muutettua. Hyvin toimivan muistinhallinnan toteutus on ollut merkittävä alan tutkimuskohde. Toteutukset eivät ole kovin yksinkertaisia ja siksi emme edes tässä vaiheessa yritä piirtää kuvia aivan täsmällisesti "oikein".
In the animation below the id1 is the same as the 8010 in the images above. Similarly, the id3 is equivalent to the location 8040.
Animation: Execute the program
Which of the following are true and which are false?
15. Arrays
Variables can store one value at a time. However, there are often situations where we need to store multiple values of the same type that belong together. For example, if we want to store the number of days in each month, we could do it like this:
int january = 31;
int february = 28;
int march = 31;
int april = 30;
int may = 31;
int june = 30;
int july = 31;
int august = 31;
int september = 30;
int october = 31;
int november = 30;
int december = 31;This is still an ok way to do this in the case of months, but what if we need to store the names of all the students in Programming 1 or the average temperature of each day of the year?
When we handle multiple values that are related to the same entity and are in some way similar or belong together, it is often best to utilise arrays (or lists which will be discussed later). An array is a data structure that can store multiple variables of the same type. Individual array variables are called elements. Each element has its place in the array which is called an index. Indexing of the array starts from zero in C#, which means that for example in an array with 12 elements, the index of the first element is 0 and the last is 11.
The size of an array needs to be defined in advance, and it cannot be changed later. There is a method called Array.Resize which doesn't change the original array but creates a new array, copies all the elements of the original array into the new array, and then replaces the original array (reference) with the new array (reference). See document.
Taulukot ja silmukat ovat kuin reppu ja reissumies. Toki kumpikin voi tulla toimeen ilman toista. Mutta usein nimenomaan taulukot ovat tyypillisin silmukoiden käyttökohde. Molemmat pitäisi käsitellä kerralla, mutta toisella on aloitettava. Kun aloitamme taulukoilla, niin joissakin esimerkeissä on pakko viitata silmukoihin, joten palaa uudestaan sellaisiin kohtiin sitten kun olet käynyt läpi silmukka-luvun.
15.1 Creating arrays
In C#, an arrays can be created for both primitive data types and object data types, but one array can only store only one kind of data type. The general format of defining and creating arrays is as follows:
Datatype[] arrayName;
arrayName = new Datatype[sizeOfArray];First we define the data type of the array and then we create the array itself. This could also be done with one statement:
Datatype[] arrayName = new Datatype[sizeOfArray]; //all elements are null referencesAn array for the number of days in each month could be defined as follows:
int[] daysOfMonths = new int[12]; // all elements are 0An array can also be assigned values simultaneously to definition. The term for this is initializing the array. A statement for creating the array is not needed in this case, because the size of the array is defined by the number of values that were assigned. The values to assign are written inside braces.
Datatype[] arrayName = {value1, value2,...valueX};For example, we could define and initialize an array for the number of days in each month as follows:
int[] daysOfMonths = {31, 28, 31, 30, 31, 30, 31, 31, 30, 31, 30, 31};The array could be pictured as follows:
tai:
Note that each element in the array has an unambigious index. The index is needed in order to "find" the elements in the array later. If the array is not initialized simultaneously to definition, the elements are automatically initialized to default values when the array is created. Numeric values are initialized to zero, bool type is initialized to false, and object types (e.g. String) are assigned a null reference. [MÄN][KOS]
The number of array elements can be found easily from the Length attribute, similarly to the length of strings. Notice that Visual Studio might offer the expansion method Count which is not the right option, unless we add the appropriate using statements at the beginning of the code.
15.2 Referring to array elements
Array elements can be accessed with the array name and index. Both must exists if one wants a value from certain poistion. The syntax has been chosen so that first type the name of the array, then inside brackets the index of the element you want to access. The general format for referring to array elements is as follows.
arrayName[index];References to array elements can be used like any other value of the same type. For example, we can print the number of days in January from the daysOfMonths array.
Or save the number of days in January in a variable.
The index referring to an array can also be an int type expression, which makes it possible to refer to elements in the daysOfMonths array as follows:
The values in an array can also be changed of course. If for example the current year is a leap year, we could change the length of February to 29. February is located in index 1, of course, because indexing starts from zero.
If we refer to an index that doesn't exist in the array, we receive an IndexOutOfRangeException. This results in the compiler printing the following error message and the execution of the program ends.
Unhandled Exception: System.IndexOutOfRangeException:
Index was outside the bounds of the array.Later we will learn how to recover from exceptions and continue the execution of the program.
15.2.1 Functions for handling arrays and testing them
Ajatellaanpa aluksi, että meillä olisi aluksi taulukko t:
Sitten pitäisi laskea yhteen taulukon luvut muuttujaan s. Tämähän onnistuisi alkeellisesti koodilla
Toki tuo koodi olisi aika hyödytön muun kokoisille taulukoille. Aloitetaan järkevämmäksi muuttaminen lisäämällä apumuuttuja i:
Nythän koodi tekee saman asian, koska t[0] on sama kuin t[i], koska i == 0. Mutta
ei enää toimisikaan (paljonko tulisi summaksi?). Siksi i:tä pitää kasvattaa ennen seuraavaa riviä jotta siellä i olisi 1, eli:
Ja kun ajatusta jatketaan eteenpäin saadaan täysin alkuperäisen kanssa saman asian tekevä koodi:
int s = 0;
int i = 0;
s += t[i]; // i == 0
i++;
s += t[i]; // i == 1
i++;
s += t[i]; // i == 2
i++;
s += t[i]; // i == 3
i++; // viimeinen kasvatus on toki turha, mutta ei haittaa => i == 4Nyt kun saimme koodiin täysin identtisiä rivejä, voi olla järkevä käyttää silmukkaa hoitamaan saman asian, samalla näkee että siinä ylimääräisessä kasvatuksessa olikin järkeä:
Vielä kun 4 korvataan sillä, että otetaan huomioon mahdollinen eri kokoinen taulukko, saadaan:
ja meillä on koodi, joka laskee minkä tahansa (jopa 0) kokoisen taulukon alkioiden summan. Useinhan tällaisessa tapauksessa käytetään mieluummin saman asian tekevää for-silmukkaa (ks. tarkemmin Toistorakenteet (silmukat)-luvusta):
Nyt voimme soveltaa tätä ajatusta seuraavassa Summa-funktiossa.
As an example, we will now make a function that sums up all the numbers in an array. The example also presents models for including an array in a test, either with the help of an auxiliary variable or by creating an array simultaneously to the function call.
The following is an example of a function which changes the array. All the values in the array that exceed the limit received as parameter are replaced with the limit value. The function returns the count of the changed numbers. Tests include ecamples of how to test the contents of an array with the String.Join function.
Tutki ohjelman toimintaa alla olevalla animaatiolla, mutta kokeile myös askeltaa askel kerrallaan oman IDEsi debuggerissa ja mieti tarkkaan mitä tapahtuu.
15.2.2 Other array examples
Animation: Execute the array program
Voit alla olevasta videosta katsoa näytelmän, jossa koetetaan havainnollistaa miten parametrin välitys mm. taulukoille toimii:
Sivulla luento12/syksy 2024 on ohjeet miten voit oman IDEsi debuggerin asetukset laittaa jos haluat debugata koodia samaan tahtiin tai jälkeenpäin omaan tahtiin.
15.3 Example: the circles of the snowman into an array
In chapter 4.3. we made a snowman from three circles. We will do the same now by placing the individual PhysicsObjects into an array.
The visible result is the same snowman as before. Now the snowballs are just placed in an array contruct.
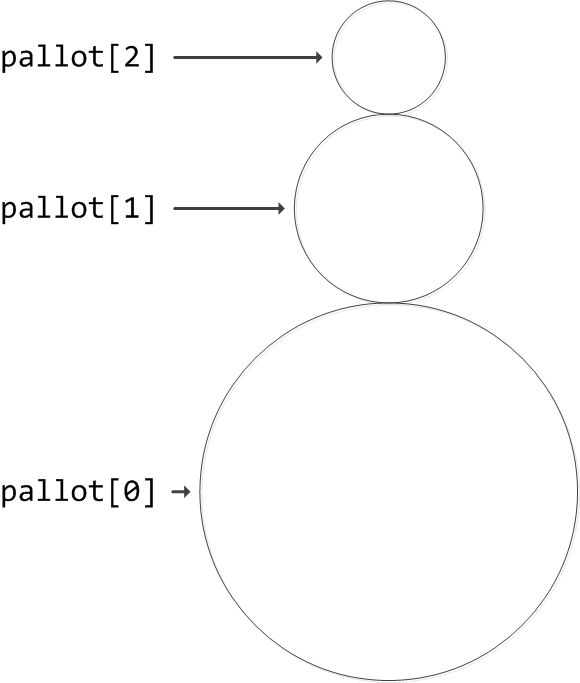
Now the array allows us to access the individual ball objects. For example, changing the color of the snowball in the middle could be done as follows
15.4 Example: grade in writing
In relation to conditional statements we made a subroutine that utilised the switch construct to return the numeric grade it received in writing. We will now make the same subroutine by using an array. Grades in writing can now be stored in a string array.
First the subroutine defines and initializes an array which contains all the grades in writing. The array is defined so that index 0 in the array contains the grade equivalent to 0, index 1 in the array contains the grade equivalent to 1, and so forth. In this manner the array index is directly equivalent to the equivalent grade in writing. Retrieving the grades in writing is very efficient this way.
Jos vertaamme tätä tapaa switch-rakenteella toteutettuun tapaan huomaamme, että koodin määrä väheni huomattavasti. Tämä tapa on lisäksi nopeampi, sillä jos esimerkiksi hakisimme arvosanalle viisi kirjallista arvosanaa, switch-rakenteessa tehtäisiin viisi vertailuoperaatiota. Taulukkoa käyttämällä vertailuoperaatioita ei tehdä yhtään, vaan ainoastaan yksi hakuoperaatio taulukosta.
Piirretään vielä kuvan miltä arvosanat-taulukko "oikeasti" näyttää. Arvosanat on siis viite taulukkoon, jossa on viitteitä merkkijonoihin. Toisaalta kukin merkkijono on oikeastaan merkkitaulukko, eli tämä on vastaava kuin myöhemmin esille tuleva jagged-array. Esimerkiksi sanan hyvä y-kirjain voitaisiin hakea lauseella:
Toisaalta usein "laiskuuksissaan" nimenomaan string-taulukko piirretään ikäänkuin taulukon alkiot olisivat muuttujia. Tämä on osin puolusteltavissa sillä, että koska merkkijono on muuttumaton, niin tämä mielikuva ei kuitenkaan johda väärään tulkintaan koodin toiminnasta.
On kuitenkin oltava varovainen sikäli, että jos taulukon alkiot olisivat esimerkiksi StringBuilder-luokan olioita (tai oikeastaan mitä tahansa muita olioita kuin string), niin kuva on ehdottomasti piirrettävä kuten ensimmäisessä kuvassa.
15.5 Multidimensional arrays
type: small
stem: "Arrays can also be multidimensional. A two-dimensional array
(that is, a matrix) is an example of a multidimensional array, which consists
of a minimun of two arrays of the same length. A two-dimensional array can
for example represent the coordinates on a (geometrical) plane or on the
surface of an object."
videoname: Introduction to matrices (in Finnish)
start: 59:20
end: 1:02:25
width: 400
height: 300
file: "http://kurssit.it.jyu.fi/ITKP102/2014s/luento/luento12a.mp4"Esimerkiksi kirja voitaisiin kuvitella 3-ulotteiseksi taulukoksi, koska tietyn sanan paikan ilmoittamiseksi pitäisi antaa kolme "indeksiä":
- sivunumero
- rivinumero
- monesko rivin sanaTai jopa 4-ulotteiseksi jos haluttaisiin ilmaista tietyn kirjaimen paikka:
- sivunumero
- rivinumero
- monesko rivin sana
- monesko sanan kirjainToki voitaisiin riviltä jo ilmoittaa monesko kirjain ja silloin kirjain olisi tällä tavalla alkio 3-ulotteisessa taulukossa. Tietokoneessa ei ole kuin peräkkäisiä muistipaikkoja, eli tietokoneen muisti on tässä mielessä yksiulotteinen taulukko. Mutta tuolla "kirjaimen paikka rivillä" vaiko "sanan paikka rivillä + kirjaimen paikka sanassa" -idealla voidaan yksiulotteisia taulukoita tulkita useampiulotteisiksi, ja näin toteuttaa tietokoneessa useampiulotteisia taulukoita.
Sitten jos ajateltaisiin yhtä kirjahyllyn hyllyä, niin silloin kirjaimen ilmoittamiseen tarvittaisiin 5 indeksiä, edellisten luettelon alkuun vielä kirjan paikka hyllyllä. Jos otetaan koko kirjahylly, niin kirjaimen ilmoittamiseen vielä pitäisi lisätä hyllyn numero. Eli meillä olisi 6-ulotteinen taulukko. Jos kirjahyllyjä olisi monta, se olisi 7-ulotteinen taulukko. Ja tätä voidaan jatkaa eteenpäin niin paljon kuin halutaan. Kadun jokaisessa talossa voi myös olla kirjahyllyjä. Toki tämän esimerkin huono puoli on se että esim kirjan rivit eivät ole yhtäpitkiä keskenään, tosin siitäkin selvitään myöhemmin esiteltävällä jagged-array idealla.
Huomaa tässä ero tyypillisiin geometrisiin koordinaatteihin, joissa ensin sanotaan x-suunta ja siten y-suunta. Kirjavertauksella tai kerrostalovertauksella kuitenkin rivi tai kerros on tärkeämpi kuin "sarake", siksi taulukoissa "y"-suunta tulee ensin. Lisäksi vielä "y-koordinaatti" kasvaa "alaspäin", toisin kuin geometrian y-koordinaatti. Muutenkin on aina oltava tarkkana miten eri koordinaatistot toimivat. Maantieteellisissä koordinaateissa y-suunta tulee ensin, esimerkiksi Agora on koordinaatissa: 62.232, 25.737 (pohjoinen kulma päiväntasaajalta, itäinen kulma Greenwichin nollameridiaanista). Jypelissä käytetään geometrista koordinaatistoa oletuksena.
Samalla idealla esimerkiksi yksi kirjain voitaisiin pyytää meidän 7-ulotteisesta kirjahyllyjen joukosta lauseella:
char k = kirjaimet[2,3,7,123,17,6,4];jos olisi:
- 2 = kirjahyllyn numero
- 3 = hyllyrivin numero
- 7 = kirjan numero hyllyllä
- 123 = sivunumero
- 17 = rivinumero
- 6 = monesko rivin sana
- 4 = monesko sanan kirjain
Taulukon ulottuvuus on siis se, montako "indeksiä" tarvitaan, jotta päästään haluttuun alkioon käsiksi. Indeksi ovat vasemmalta alkaen eniten määräävässä järjestyksessä. Eli kun aletaan etsimään tiettyä kirjainta meidän "kirjastosta", niin toki pitää ensin mennä oikean kirjahyllyn luokse, sitten siinä oikealle hyllyriville jne.
A two-dimensional array is defined as follows:
type[,] arrayName;Note that the [,] in the definition means that the introduced array is two-dimensional. Similarly, [,,] would mean that the array is three-dimensional and so forth.
The number of elements in a multidimensional array must always be defined before using the array. This can be accomplished with the new operator as follows:
arrayName = new type[numberOfRows, numberOfColumns]For example, a String type two-dimensional array for storing the names of the students in this course could be initialized as follows.
String[,] courseStudents = new String[256, 2];The names of students could now be placed in the array as follows:
//first student
courseStudents[0, 0] = "Virtanen";
courseStudents[0, 1] = "Ville";
//second student
courseStudents[1, 0] = "Korhonen";
courseStudents[1, 1] = "Kalle";The array would look like this now:
Pitää taas kuitenkin muistaa, että edellinen kuva on "riittävä" vain jos alkiot ovat string-olioita. Jos alkiot ovat perustietotyyppisiä, niin kuva on nimenomaan kuten edellä. Mutta olioille siis kuten alla:
Referring to a multidimensional array is similar to a one-dimensional array. As dimensions are added, we simply need to give more indexes.
// prints Ville Virtanen
Console.WriteLine(courseStudents[0,1] + " " + courseStudents[0,0]);Note that the "+" sign in the example above does not function as an arithmetic operator but it is rather used for combining the strings to print. In C# the "+" operator is used for combining strings as well.
When the first name and last name have been stored in the array in their own dedicated places, it allows more flexible handling of information. Now the names of the students can be printed in the format "firstName lastName" or in format "lastName, firstName" as below:
// prints Virtanen, Ville
Console.WriteLine(courseStudents[0,0] + ", " + courseStudents[0,1]);In reality, a personal data register is not made this way. It would be more sensible to create a Person class with fields for first name, last name, and other information. Each student would then be represented by an object created from this class. However, during this course, we will not be making our own object classes yet.
Animation: Execute the program
A multidimensional array can be initialized at the same time as it is defined, similarly to a one-dimensional array. Next, we will define and initialize an array for films:
String[,] films = { {"Pulp Fiction", "Action", "Tarantino" },
{"2001: A Space Odyssey", "Scifi", "Kubrick" },
{"Casablanca", "Drama", "Curtiz" } };The definition above creates an 3 x 3 sized array:
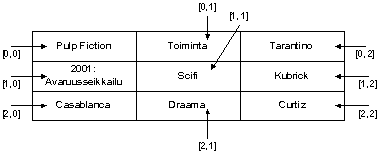
After the array has been created, its elements can be referred to in the following way.
arrayName[rowIndex, columnIndex]The example below demonstrates references to array elements.
Kuten edellä opiskelija-taulukon kohdalla, tämäkin esimerkki on sikäli hieman väärin, että taulukon eri alkiot eivät tarkoita samaa asiaa. Kun seuraavilla kursseilla perehdytään tietueisiin ja olioihin, ne olisivat oikeampi tapa ratkaista opiskelijoiden ja elokuvien tallentaminen taulukkoon.
This way each row will have as many columns aka elements. If we want a different number of elements per each row, we can use the so-called jagged arrays. Read more about jagged arrays in the MSDN documentation from https://docs.microsoft.com/en-us/dotnet/csharp/programming-guide/arrays/jagged-arrays.
15.5.1 Exercise
15.6 Copying arrays
Also arrays are objects. This means that array variables are reference variables. For this reason, we cannot copy arrays in the same way that we copy primitive data types, as demonstrated in the example below:
In the example above, both array1 and array2 are object references and they now refer to the same array.
Copying arrays can be done with for example the Clone method.
Notice that the assignmnet requires a so-called typecast: before the array.Clone statement we write (int[]) with parentheses, which will typecast the "general" Object that the Clonemethod returns into an integer array.
Now we have an identical copy of the array that we can change without affecting the original array.
In the next chapter we will learn how to do this for arrays of all sizes and how to print the array more conveniently.
15.7 Example: multidimensional arrays in practice
Two-dimensional arrays are usually called matrices and they are especially useful for describing linear functions in mathematical applications. However, there are also other uses for matrices. For example, you can think of the game grid in a Battleship game as a two-dimensional array.
Even though the grid is still quite small (2 rows x 3 columns), printing the elements is quite a lot of work. For example, printing a 20 x 20 sized array by just writing consecutive print statements would already be unreasonably arduous.
Still, one of the tasks could be to find the row with the most empty spaces from the "grid". This information could help us place a new ship correctly. With the information we currently have, this is not possible for a random grid yet.
To accomplish these tasks, we need iterative constructs, which will be presented in the next chapter.
Katso seuraava video ja tehtävät sen jälkeen, kun olet tutustunut silmukka-lukuun.
Huomaa että Jyplissä on valmiina rakenteita pelikentän tekemiseksi tämän idean pohjalta, eli katso:
- Kentän luominen merkkijonotaulukosta (yleensä suositeltavin)
- Kentän tekeminen tekstitiedostosta
- Kentän tekeminen kuvatiedostosta
15.8 Complete arrays on the extra material page
More information (in Finnish) about one-dimensional and two-dimensional arrays can be found on the course extra material page. Read this information as well (it is included in the exam).
16. Iteration constructs (loops)
While programming, we often face situations where the same or nearly the same thing needs to be repeated in a program multiple times. This is often the case with handling arrays especially. For example, if we want to print all the numbers in the daysOfMonths array we made in the previous chapter, we could of course do the following:
However, it feels stupid to repeat almost identical code multiple times. In this case, it is more sensible to use an iteration construct. Iteration constructs are especially handy for handling arrays, but they can also be used for several other purposes. Iteration constructs are often also called loops.
This chapter is long and contains multiple examples. However, mastering loops is one of the most essential first steps in learning how to program.
16.1 "Eat for as long as there is porridge on the plate"
The idea behind iteration constructs is that the repeat the same thing for as long as some condition is true. For example, we can use this iteration construct to tell a person how to eat their breakfast porridge:
Eat breakfast porridge for as long as there is porridge on the plate.The example above contains all the elements needed for an iteration construct. It contains the actions to perform: "Eat breakfast porridge.", and the condition for how long to repeat the action: "for as long as there is porridge on the plate". Another example of an iteration construct could be as follows:
Print all the numbers in the daysOfMonths array.The statement above also contains all the elements in an iteration construct even though they are a little more complicated to recognise. The action is to print the numbers in the daysOfMonths array, and the condition could be phrased as "until all the numbers have been printed". The statement could be rephrased to:
Print numbers from the daysOfMonths array until all the numbers have been printed.C# has four types of iteration constructs:
- for
- while
- do-while
- foreach
There are situations where we can freely choose any of these, but in most cases you need to be careful with your choice of iteration construct. Each of them has its own special features, and not all iteration constructs fit every possible situation.
When we handle loops, all of them contain a condition expression. Loops should have very few exceptions apart from a statement/statements where we change the variables in a manner that the condition will become false at some point in order to end the loop. On this course, this statement is usually something like i++ if the condition is something like (i < limit).
16.2 while loop
The general format of the while loop is the following:
while (condition) statement;Similarly to conditional statements, the condition needs to be an expression which either gets the value true or false. There can also be a block after the condition instead of an individual statement.
while (condition)
{
statement1;
statement2;
statementX;
}Statements in a loop are repeated for as long as the condition holds true. The condition is always checked before moving on to the next round. This means that if the condition is already false at the very beginning, the statements will not be executed, not even once.
16.2.1 Towards the loop
Let's look at an example where we have numbers that need to be added up. At this point, we won't concern ourselves with where these numbers come from. In real life scenarios, they are usually received from measuring equipment or read from a file, for example. The first version of the program could be:
In reality, whenever we have a group of variables that are in some way equal, it is best to place them in a data construct, for example in an array or a list. The array implementation of the program would be:
This still has the disadvantage that if we add more numbers in the array, we still only have the sum of the first four elements. Similarly, if we take away numbers, we will have a reference to an element that doesn't exist.
We will start gradually moving towards the loop so that we first try to make all the lines exactly the same.
We start by introducing the index variable i which replaces the index constant.
So when i=0, it doesn't matter whether we write t[0] or t[i]. But if the next line is replaced with t[i] as well, it would not be the same as t[1], unless we increment i by one before executing the next line. Then we do the same for the next line, and so forth. In the end, the resulting program does the same as the original program:
Now we have made all the lines exactly identical. This is one approach to loops. First, we implement the program in the way that we can, then we try to make all the similar lines exactly identical.
Consider if it is easier now to move onto a loop:
However, it is usually customary to write each statement on it's own line and use the count of elements in the array rather than a constant such as 4:
Now the program works even if we change the array by adding or taking away elements. Try it!
Thanks to the loop construct we don't need to care about the number of elements in the array. The while loop even works for empty arrays, because then the condition i < t.Length is the same as i < 0 which means it is false and the statements in the loop are not executed at all.
16.2.2 Examples of While loops
Animation: Execute the program
16.2.3 Note: infinite loops
Note that if the condition of the while loop is always true, it is an infinite loop. An infinite loop is, true to its name, a loop that never ends. Infinite loops happen if the condition of the loop never turns to false. Usually an infinite loop is a programming error, but sometimes creating a (controlled) infinite loop is acceptable. In these cases, however, the loop is exited with a break statement. In this case, the loop is not really infinite, although it is often referred to as infinite. The break statement is discussed in more detail in section 16.8.1.
It is possible to make infinite loops with other iteration constructs as well.
For example, the following construct would print the character 0 infinitely.
while (true)
{
System.Console.Write("0"); // error
}A loop can be cut off with a break statement. Unlike the example below, usually a break is executed based on some condition.
A loop can be interrupted by changing the condition to false. The default condition true cannot be changed to false, so we will make a new variable for the condition. However, usually in these cases it is a bad solution to use these kinds of flag variables, because in longer code it is more difficult to notice when they are changed.
bool condition = true;
while (condition)
{
System.Console.Write("0");
condition = false;
}16.2.4 while loop as a flow chart
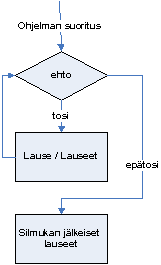
16.2.5 Example: Printing an array
Let's inspect the contents of the PrintArray subroutine in detail.
Here we are creating a new variable to control which element in the array we are currently printing. It is also used to keep track of when all the elements in the array have been printed on screen. The variable is initialized to value 0, because the first element in the array is in index 0. The variable is named i. Usually single characters are bad variable names, because they are not descriptive. However, the variable name i has become the standard in controlling the laps of loops, which is why it can be used.
while (i < array.Length)The second line in the subroutine is the beginning of the while loop. The condition is that (the loop is executed as long as) the value of the variable i is less than the length of the array. The lenght of an array can always be retrieved by typing .Length after the array name. Note that there are no parentheses after the word Length, because it is not a method but an attribute.
Console.Write(array[i] + " ");The first statement in the loop prints the element in index i in the array. It is followed by a space in order to separate the elements from one another. Instead of the Console.WriteLine method we are now using another method from the Console class. The Console.Write method doesn't print a line break, which allows consecutive printing of the array elements.
The last statement in the loop increments the value of i by one. Without this statement, we would have an infinite loop, because the value of index i would be 0 all the time and the condition of the loop would stay true forever. Errors related to controlling the index variable are typical mistakes for a beginner (and even more advanced) programmer. The most problematic aspect of this mistake is that it is not a syntax error, which will not result in an error message in for example Visual Studio.
Here, it is adviced to print a newline character by calling the WriteLine() method after printing the line. This way the possible next printouts starts with their own line. Try out what happens if you change Write to WriteLine.
The while loop should be used when we don't have exact information about the number of iterations of a loop. Because the lenght of an array is known from the beginning of creating the array, it would make more sense to pass through it by using a for loop where the risk of creating an infinite loop is smaller. A more sensible use for the while loop will be presented later.
The following is an animation of code that prints the sum of provided numbers:
Animation: Execute the program
Invalid markup: {'header': [['Not a valid string.'], {'_schema': ['Invalid input type.']}]}16.2.6 Example: Multiple balls
When we run the code, it should draw a hundred balls on screen that fall down towards the border of the level (when run in a computer, in TIM we can only see a static image). See the image below.
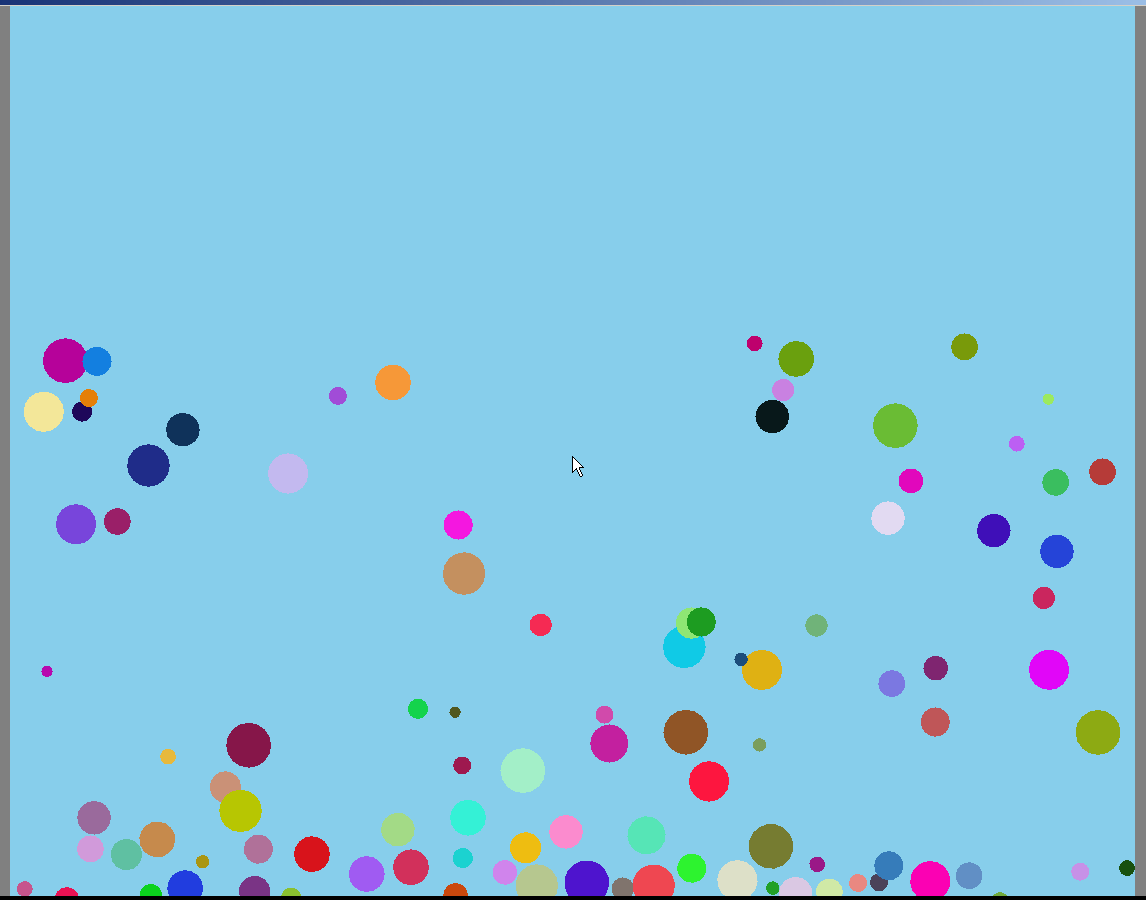
Let's inspect the CreateBall subroutine in detail. The subroutine returns a PhysicsObject, so naturally the return type is PhysicsObject. The parameters are
double x, double y, Color colour, double radiusi.e. the x and y coordinates of the centre of the ball, the colour and the radius.
Note that CreateBall is a function subroutine that doesn't do anything "visible" in the program. It jsut creates a ball, as the name would imply, but it doesn't add the ball to the screen. For this reason, we won't need the Game parameter like we did in the Snowman example. Instead, we add the ball on screen in the Begin subroutine. Generally, subroutines shouldn't do anything more than what the documentation indicates - even the name of the subroutine should already reveal the most important things.
If we want the subroutine to also add the ball on screen, we should give it another name, for example AddBall would be a more logical option. In this case, the ball would not be returned to the caller, and the return type would be void.
We'll then move back to the Begin subroutine.
This initializes the int type index i as zero and defines the condition for continuing the loop inside parentheses. Braces have been left out of the listing on purpose.
int radius = RandomGen.NextInt(5, 20);
double x = RandomGen.NextDouble(Level.Left + radius, Level.Right - radius);
double y = RandomGen.NextDouble(Level.Bottom + radius, Level.Top - radius);
Color colour = RandomGen.NextColor();
PhysicsObject ball = CreateBall(x, y, colour, radius);
Add(ball);
i++;The loop starts by randomizing the radius of each ball with the random number generator in the RandomGen class. The first parameter for the NextInt subroutine is the smallest possible number to randomize, the next number sets the maximum for the random number. In this example, the numbers are between 5-19. We also randomize the double type coordinates and the Color type color.
After this we create a regular PhysicsObject and give the randomized variable values as parameters to the CreateBall subroutine, which then returns the ball with these attributes. The ball is added to the level with the Add method.
After each "lap" in the loop, the value of the index is incremented by one to prevent getting stuck in an infinite loop.
16.3 do-while loop
Do-while loop is different from the while loop in that in the do-while loop we first give the statements (to execute) and only then the condition (how long to keep going). Because of this, the do-while loop is always executed at least once. In the general format, the do-while loop is as follows:
do
{
statement1;
statement2;
(...)
statementN;
} while (condition);The do-while loop could be presented as a flow chart as follows:
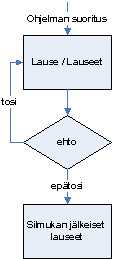
Animation: Execute the program
16.3.1 Example: asking for username
In the following example, the user is asked to enter a username as a string. If the user provides an empty string, the name is asked again. This is repeated until the user gives something else than an empty string.
This describes the essence of the do while loop well: we want to ask for the name at least once, but possibly multiple times - however, we cannot be sure how many times exactly.
In reality, checking the correctness of the name would be more complex, but the idea for the do-while loop would be exactly equivalent.
16.4 for loop
When the number of iterations of the loop is known in advance, it is best to use a for loop. For example, the for loop is usually the best option for handling arrays. The syntax of the for loop is clearly different from the earlier constructs. The general format of the traditional for loop is as follows:
for (variable initializer; condition; iterator statements)
{
statements; // the body of the loop
}The control expression of the loop, i.e. what is inside the parentheses contains three operations that are separated by semicolons.
Variable initializer: Usually only one variable is initialized, but also initialization of multiple variables is possible.
Condition: As with other loops, statements are repeated for as long as the condition is true.
Iterator statements: the actions to perform at the end of an iteration: usually incrementing the value of a variable or variables by one, but also by larger numbers or decreasing the value.
The syntax of the for loop in a graphical railroad diagram format (see chapter 28.2) - a little simplified for this example.

Only change the index of the for loop in the for control expression.
Animation: Execute the program
Below is an example of a simple for loop. It prints the text "Hello World!" and the current value of i ten times.
The control expression first initiliazes the variable i as 0. Next, the condition is that the loop continues for as long as the value of i is less than 10. Finally, the control expression defines that the value of i is incremented by one after each iteration.
The structure of the for loop above could be expressed as a flow chart as follows.
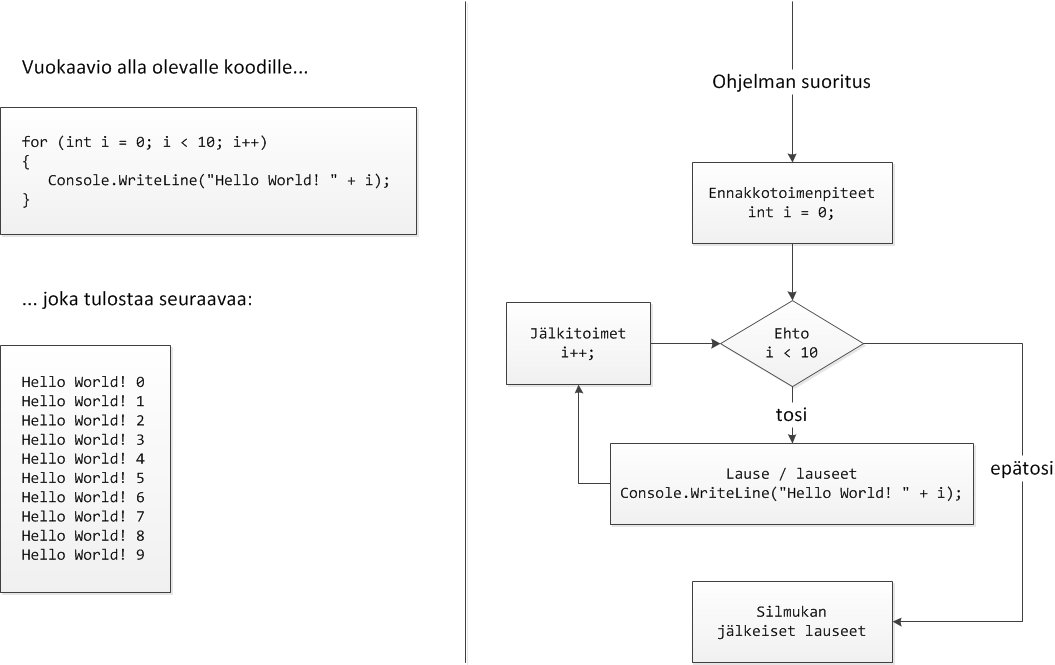
Notice that the values of the i variable start from zero, which is printed after the first "Hello World!" text. The condition for the body of the loop is that the value of i needs to be below 10, so when i reached the value 10 (at the end of the 10th iteration), the loop is exited.
The body of the loop normally doesn't contain any print statements. Let's take an example where we store the sum of two preceding elements (Fibonacci number) in an array. First, we manually initialize the two first elements in the array to have the value 1.
Note that the loop starts from index 2, so that i-2 >= 0 and every index is allowed in the statement
numbers[i] = numbers[i - 1] + numbers[i - 2];After executing the loop, the contents of the array look like this.
It is possible to make an infinite loop with a for loop as well:
for(;;)
{
// "infinitely" executed statements
}This would print the value of i infinitely
Animation: Execute the program
Earlier we made a loop that counts the sum of the elements in an array. It is actually more natural to make this loop with a for loop.
Animation: Sum positive values
16.4.1 Note: the difference between while and for loops
for and while loop constructs can basically be used for exactly the same purposes. The general format of the for loop
for (variable initializer; condition; iterator statements)
{
statements; // the body of the loop
}could be written with the while construct as follows.
variable initializer;
while (condition)
{
statements; // the body of the loop
iterator statements;
}Eli while-silmukka on helppo muuttaa for-silmukaksi kun kirjoittaa alustuslauseen eteen
for (Sitten pyyhkii pois rivinvaihdon ja while(. Sitten laittaa ehdon jälkeen puolipisteen ; ja siirtää kasvatuslauseet sen perään ja poistaa niiden jälkeisen puolipisteen. Näin lauseet tulevat for-silmukkaan oikeaan järjestykseen.
What is the for loop used for?
Oikeastaan ero on vain looginen viesti koodin lukijalle. Tyypillisesti for-silmukkaa käytetään kun tiedetään etukäteen kierrosten lukumäärä. Perusesimerkkinä kun pitää käydä jokaisessa taulukon alkiossa. while taas viestii lukijalle, että nyt tehdään monta kertaa, mutta ei vielä sitä kuinka monta.
With the for loop, a subroutine for printing would be as follows:
These three parts - variable initializer, condition, iterator statements to execute at the end - are parts that every loop construct needs. In the for loop, the three parts are presented consecutively on one line, which makes it easier to write them all correctly at once. The factors that direct the execution of the loop are also easier to read from one line than try to make them out from different lines (a loop may as well be multiple lines long). When it comes to continue statements, the for loop and the while loop work differently. In the while loop, the continue statement may skip over the iterator statements.
16.4.2 Example: make the snowman yellow
Let's return to example 15.3. Because the ball objects are in an array, we can go through the elements in the array with a loop and change the color of all balls. The Main method has been left out of the listing. For creating the snowballs we use the CreateBall subroutine introduced in example 16.2.4.
using System;
using Jypeli;16.4.3 Exercise
16.4.4 Example: Average
While discussing variables, we made a subroutine that counted the average of two numbers. This type of subroutine is not very useful, because if we want to count the average of three or four numbers, we need to make each its own subroutine. Instead, if we provide the numbers in an array, we can manage with one subroutine. We will now make a function Average that returns the average of the numbers in an array. We will also write ComTests.
The sum of all numbers in the array is first counted and stored in the variable sum. Because indexing of arrays starts from zero, it is convenient to set the counter variable to 0 first. The condition is that the loop is executed for as long as the value of variable i is smaller than the length of the array. If you feel like the condition should contain the less than or equal to operator (<=), consider the following: If the size of the array is for example 7, the last element would be located in numbers[6], because indexing starts from zero. Because of this, if the condition had the "<=" operator, we would refer to element numbers[7], which is out of the bounds of the array. This would result in the program crashing and receiving an "IndexOutOfRangeException" type exception.
return sum / numbers.Length;At the end of the subroutine, the sum of numbers divided by the count of numbers (i.e. the length of the array) is returned.
16.4.5 Exercise
Think which extremely important case is ignored in counting the array average in the previous example.
Fix the previous example so that the case is taken into account and add a test case for it.
Ongelmana on nollalla jakaminen siinä tilanteessa kun taulukko on tyhjä! for-silmukka pitää huolen siitä, että jos taulukon pituus on heti lähtötilanteessa 0, niin silmukkaa ei tehdä yhtään kertaa. Mutta sitten return-lauseessa voi tapahtua nollalla jakaminen. Tyhjän taulukon testi voitaisiin lisätä ennenkin for-silmukkaa, mutta jos kyseessä olisi tilanne, jossa kaikkia alkioita ei otettaisi huomioon ja lukumäärä laskettaisiin silmukan aikana, ei lukumäärä ole tiedosssa ennen silmukan suorittamista. Siksi nollalla jaon estäminen on turvallisinta suorittaa juuri ennen jakamista, eli lisätään ennen return-lausetta:
16.4.6 Example: Reversing the order of elements in an array
Control structures can also initialize several variables at a time. A classic example of this is reversing the order of elements in an array.
Make a subroutine that receives an int type array and returns the array in reverse order.
Huomaa että uudemmissa C#-toteutuksissa edellä voidaan taulukkoa testata suoraan taulukkona:
Ainoa pieni harmi on, että että tuohon hakasulkujen eteen on kirjoitettava tuo tyypin muunnos (int[]), koska muuten kääntäjä ei tiedä tuon oikean puolen tyyppiä.
Toinen tapa lyhentää tuota Join-käyttöä olisi käyttää =J=-vertailua, joka vertailun vasemmalla puolella olevan taulukon Join-funktiolla merkkijonoksi:
Kokeile noita edelliseen esimerkkiin ja valitse tilanteen mukaan sopivin.
Lue lisää taulukoiden testaamisesta ComTestin dokumentista.
The idea behind the subroutine above is that we use two variables, which can be called pointers. One of the pointers points to the beginning of the array and the other to the end of the array. Really the pointers are int type variables that reveice array indexes as values. The variable that points to the beginning of the array is named "left" and the variable pointing to the end of the array is named "right". The left pointer is moved from the beginning of the array towards the end of the array and the right pointer is moved from the end of the array towards the beginning of the array. During each lap, the values of the elements to which the pointers point are replaced with one another. The execution of the loop is stopped right before the pointers meet.
Let's study the subroutine in detail.
int temp;
int end = array.Length-1;First, we initialized the variable temp. This variable is needed to successfully change the places of elements in the array. We have also calculated the index of the last element in the array, end.
for (int left = 0, right = end; left < right; left++, right--)The control structure now initializes and updates two different variables. The variables are separated by a comma. Note that the variable type is only written once! The condition is that execution is continued for as long as the variable left is less than the variable right. Finally, we update the values of the variables. The iterator statements for different variables are also separated by a comma. With each lap, the variable left is incremented by one whereas the variable right is decreased by one.
temp = array[left];Next, we store the value of the element to which the left pointer points in temporary storage in the temp variable.
array[left] = array[right];Now we can replace the value of the element to which the left pointer points with the element to which the right pointer points.
array[right] = temp;The statement above replaces the value of the element to which the right pointer points with the value stored in the temp variable. Now, the switch has been completed successfully.
This function has a side-effect: it altered the array given as parameter. If we want to preserve the original array, we need to create a new array for the result at the beginning of the function, assign the values in reverse order and finally return a reference to the new array.
16.4.7 Exercise
16.4.8 Example: Calculating grades with an array
While discussing conditional statements, we made a subroutine that calculated exam grades. The subroutine received the maximum points for the exam, the limit for passing, and the student's exam points as parameters, and returned the student's grade. We will now make the same subroutine using arrays. We will also write ComTests.
The idea behind the subroutine is that each grade limit is stored in an array. When we go through the array, starting from the end of the array and moving towards the beginning, we can try which grade the student's points amount to.
double[] gradeLimit = new double[6];At the beginning of the subroutine, we initialize an array for exam grade point limits. The array is of length six, so that we can store the point limit for each grade in the equivalent index in the array. The point limit for grade 1 is in index 1, the point limit for grade 2 is in index 2 and so forth. This way, the first index of the array remains unused, but referring to the array is clearer. Because the point limits can be decimal numbers, the array needs to be of type double[].
double gradeDifference = (maximum - passlimit) / 5.0;The line above calculates the point difference between grades. Try to think why each division is by 5.0 and not 5.
gradeLimits[1] = passLimit;The line above sets the the exam passing limit as the point limit for grade 1.
for (int i = 2; i <= 5; i++)
{
gradeLimits[i] = gradeLimits[i-1] + gradeDifference;
}The loop above calculates the point limits for grades 2-5. The following point limit is gained from adding the grade point difference to the previous limit.
for (int i = 5; 1 <= i; i--)
{
if (gradeLimits[i] <= exampoints) return i;
}This loop is used for deducing to which grade the student's exam points amount to. Iteration of the grades starts from the end of the array and moves towards the beginning. This is why the variable i is first set to value 5 and decreased by one with each lap. When the right grade has been found, the exam grade (array index) is returned immediately to prevent going through all the elements of the array in vain.
The main program tries the subroutine with a few test prints. However, more precise tests are made as automatic ComTests.
If we were to calculate the exam grades of several students, our subroutine would also calculate the values of the gradeLimits array each time the subroutine is called. This is a complete waste of computing resourses. For this reason, we need to make the part of the subroutine which calculates the grade limits its own separate subroutine. This subroutine could return the grade limits as an array. Then we could change the CalculateGrade subroutine so that it receives the student's exam points and the grade limits in an array as parameters. The ComTests for both subroutines are also presented.
The example above now calculates the grade limits only once and the resulting array is used for calculating different grades. This is who subroutines should be used: one subroutine performs only one task or action. This way, the size of the subroutine doesn't grow absurdly. Also, this makes it more likely that we can utilise the same subroutine in several programs.
There is one auxiliary function for testing, ArrayToString, which returns the elements of the array in one string, divided by comma.
16.4.9 Exercise 16.4
Can you make a program which transforms the element in an array to a string? See the lecture example and complete the program in exercise 16.4.
16.5 foreach loop
Arrays and multiple other data constructs can be handled using a foreach loop as well. True to its name, a foreach loop goes through each element in an array. It is syntactically clearer when we want to perform some action for each element of the array without skipping any of the elements. Its syntax in general format is as follows.
foreach (arrayElementType element in array)
{
statements;
}This is equivalent to for loop:
for (int i=0; i<array.Length; i++)
{
arrayElementType element = array[i];
statements;
}The control expression in the foreach loop only sets up two things. First, the type and name for the variable that points to an individual array element. The type should be the same as the element type in the handled array, but the name is completely free to choose. We perform the actions which we want to perform for the array elements to this variable. The second piece of information we provide for the foreach loop is the name of the array that we want to handle. For example, PrintArray could be performed as follows.
In other words: "For each number in array (do)...".
Huomaa että edellinen foreach on täsmälleen sama kuin seuraava koodi. Siitä on ehkä helpompi ymmärtää miksi muuttujan luku muuttaminen edellisessä foreach-silmukassa ei muuttaisi itse taulukon vastaavassa paikassa olevaa arvoa.
Note! The foreach loop cannot be used to change the value of elements in the array! However, if the array contains object references, the contents of the objects can be changed like in the following example.
Animation: Execute the foreach loop
16.5.1 Example: turn the balls stored in an array yellow
In example 16.4.2. we colored the snowballs in the snowman yellow. Because we wanted to change the color of all the objects in the array, it would be more intuitive to use a foreach loop for the task. The CreateBall subroutine is the same as in example 16.4.2 and is left out of the listing.
Huomaa, että foreach-silmukalla ei voi muuttaa alkioiden arvoja. Edellisessä esimerkissä kuitenkin alkiona on pallo, joka on viitemuuttuja. Sitä ei voi muuttaa, mutta sen viitteen avulla voi muuttaa itse olioita, jonne pallo viittaa.
16.6 Nested loops
All loops can also be written within other loops. Nested loops are needed at least in situations where we want to perform actions on multidimensional arrays. In chapter 15.5 we defined a two-dimensional array for storing information about films. We will now print the contents of the array by using two for loops.
The outer for loop goes through the array row by row, i.e. through different films. When the film has been "selected", the film information is processed. The inner for loop goes through all the information of one film. The pieces of information, or fields, are separated by a "|" sign here. After going through the inner for loop we print a line break with the Console.WriteLine() method. This way different films are on different lines.
Here we need to take into account that the outer loop goes through the indexes with a different variable than the inner loop. It is usually customary to name the first (outer) index variable i and the following j. We cannot use the same name for both variables, because they are in the same scope. It is more logical in this example to use index names that refer to rows and columns - namely r and s. We could also use the index names iy and ix.
Animation: Execute the program
16.7 Example: line with most free space
Let's return to the earlier Battleship example. We will make a subroutine that searches a two-dimensional array for the row with most free space (i.e. with most free space to place a new ship).
16.8 Controlling the execution of a loop with break and continue statements
The normal function of loops can be changed by using break and continue statements. Their use is not normally recommended - loops should be designed in a way that the use of continue or break is not necessary.
16.8.1 break
A break statement jumps away from execution of the loop immediately, and the execution of the program continues from after the loop.
The program above forms an infinite loop by setting the while loop condition to true. In this case, the execution of the program would continue infinitely without the break statement. Now the break statement is performed when the counter reaches the value 10. This construct is completely senseless, because the condition of the if statement could be reversed and set as the condition of the while statement, and the program would work exactly in the same way. In most cases, the use of a break statement can be avoided similarly to this.
The use of a break statement can be reasonable however in cases where we notice in the middle of a loop that the execution of the loop should not be continued.
Animation: Execute the for loop which is disrupted with a break statement
16.8.2 continue
The continue statement skips the rest of the lap of a loop. The following step is to execute the loop condition, which either executes the body of the loop again, or if the condition is false, execution of the loop ends. In other words, the continue statement allows us to skip the rest of the body of the loop for the current lap.
The execution of the program code above moves to the beginning of the loop when the remainder of i divided by 2 is 0. In other cases, the program prints the value of variable i. In other words, the program only prints odd numbers. Also the continue construct can and should be avoided, as should unnecessary if constructs. The program code above could be reshaped as follows.
Myös continue-rakennetta voi ja kannattaa pyrkiä välttämään, samoin kuin turhia if-rakenteita. Yllä olevan ohjelmanpätkän voisi kirjoittaa vaikka seuraavasti.
Or even simpler as follows.
Usually continue statements are used in situations where we notice that some values are such that the current iteration lap should be ended, but the rest of the loop still needs to be executed.
continue is actually the only thing that works differently in for and while loops. In for loops, continue "jumps" into the increment statement and in while loops it "jumps" into the condition statement.
Lauseiden break ja continue voit kuvitella olevan hyppylauseita silmukan lopettavan aaltosulun luokse. continue sen vasemmalle puolelle ja break sen oikealle puolelle. Tällöin on helpompi ymmärtää miksi while-lauseessa ei suoriteta kasvatuslauseita continue tapauksessa, mutta for-lauseessa ne suoritetaan.
16.8.3 return
Especially subroutines can utilise return instead of break. Let's assume that we need to count the sum of numbers in an array until the array ends or we find a specific number.
However, usually this can lead to repeating the same calculations that are done at the end of the function because of the return statement within the loop. In the example above, this was not problematic, but for example when you're counting the average, there should be more code in order to avoid dividing by zero.
This is why it is recommended that a subroutine only has one return statement.
16.9 Return before loop
It was stated above that it is preferred that there is only one return statement in a subroutine. An acceptable exception is if there is a check for whether running the subroutine is sensible at all. For example, if we alter the function in the previous example so that counting the sum is not necessary if there are less than three elements.
We could also use the opposite condition and enclose the executing in the block. However, this will add the block levels and is therefore considered a worse solution in this case.
16.10 Do not make tests in a loop that could be done outside it.
The previous example had a test:
if ( t.Length < minLkm ) return 0;
outside the loop, where it should be. If the test was inside the loop, it would be run within each iteration in vain because if it's true, it will always be true with each iteration. Testing this condition in each iteration would only slow down the loop.
In other words, if the condition has no variables that change during the loop, the condition statement should be outside the loop. The length of the array is a constant during the execution of the loop, as is the parameter minLkm, so neither of them change during the loop.
16.11 A loop construct missing from programming languages
Every now and then we have the need for a construct where the body of the loop has been divided into two parts: the first part is executed even when the condition is no longer true, but the latter part is not executed. There is no ready-made construct for this in C#. However, this construct can be build by yourself, giving a good reason to use a controlled infinite loop that is stopped with a break statement. The construct could be as follows:
while (true)
{ //infinite loop
First part of the loop // executed even if the condition is false
if (condition) break;
Second part of the loop //not executed when the condition is false
}If the condition of the while loop is set to true, there must be a break statement somewhere in the program to prevent the loop from becoming infinite. This type of construct is convenient when we want to inspect whether the loop should be jumped out of in the middle of execution.
16.12 Summary
Choice of loop:
for: If the number of laps for the loop is known beforehand.
foreach: If we want to perform actions to all the elements in a Collection data construct or an array.
while: If the number of laps for the loop is not known beforehand (a special case is a controlled infinite loop, which is exited with a break statement), and when we don't necessarily want to execute the loop even once.
do-while: If the number of laps for the loop is not known beforehand but we want to execute the loop at least once.
- infinite loop: if we need to write the condition multiple times or are forced to initialize the condition so that it is true during the first lap.
The image below sums up all the ready-made loop constructs in C#:
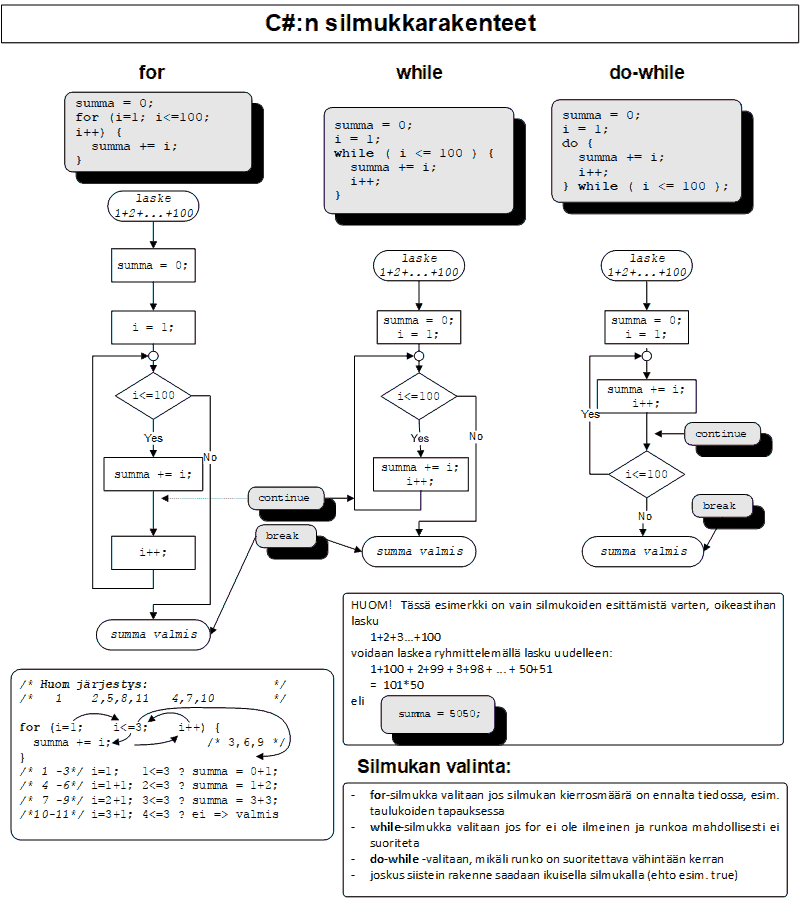
17. Splitting and editing strings
17.1 String.Split()
Strings can be split with a combination IndexOf and Substring methods as well, but in most cases a more convenient option is to use the String object's Split method. The method returns the parts of the string in a string type array string[]. The Split() method is given an array of the characters (char) that we want to use as separators. Let's assume we have an input and that we want the space, the semicolon, and the comma to act as separators.
Because the Splitmethod is introduced as follows:
the preceding call can also be done so that the array elements are listed separated by commas. In other words, a params type array can take an array or a list of array elements. A parameter with the params modifier always needs to be the last parameter in the call.
Although the documentation is not clear on this, the Split method can also be called without parameters, and then splitting is done with space as separator:
17.1.1 Tyhjien alkioiden huomiotta jättäminen
If for example the user gives multiple consecutive separators (for example, two spaces as in the example above), it is desirable that there are no empty elemtns in the array. The preceding examples included one empty element. However, this can be taken care of by giving the Split() method the extra parameter StringSplitOptions.RemoveEmptyEntries. Note that in this call there is no params modifier, so the string array needs to created manually.
By leaving out the empty elements, for example the string "kissa,,,; koira" would only return a two-element array:
Note that the separators are no longer included in the array, they simply "disappear".
A separator array can be created "on the run" in a few ways. One option is to convert the string into an array of characters:
Another way to create an array in the call:
There is also convenient version of the Split that allows limiting the number of parts:
However, we need to take into account that the preceding call does not ensure that we receive two parts. This is why we need to check the number of parts from the length of the result array if we want to handle a certain number of parts. On the other hand, because we want to avoid using if statements in vain, it may be "prettier" to take care of getting the sufficient number of parts like this:
The goal in the preceding example is to get at least three parts each time. The string has been added a sufficient number of separators (in this case, commas) before splitting, and the splitting is performed on this new string. This way the third part exists in this case as well (though it is empty here). When we added two commas, even an empty string contains three parts, and we don't need to protect future index references with an if statement. However, we need to remember the new string that is created with this "trick" when we think about efficiency and with strict loops we need to consider if an extra condition is actually faster in the end. When used on its own, this "trick" brings no measurable disadvantage.
17.2 String.Trim()
The String object's Trim() method returns the received string with all the spaces removed from the beginning and end of the string. For example, the following code
would print:
|Kalle and Kille|Note however that the "extra" spaces in the middle of the string are not removed by the Trim method. Extra repetitions in the middle of a string can be removed by using for example regular expressions. For example, we can replace all consecutive spaces with only one space:
If we now remove the spaces from the beginning and end of the string, we have gotten rid of all unnnecessary spaces:
You can try Regexps on the debuggex website, for example.
17.3 Example: splitting and converting strings to integers
We will now make a program that asks the user for positive integers as input, totals them up, and prints the result on screen. The user provides the numbers so that space and comma act as separators. If the user gives characters that are not positive integers or separators, the program gives an error message and execution of the program ends. The program contains the following subroutines.
int[] StringToInt(String, params char[])
This subroutine converts the provided string into an integer array so that the numbers are separated according to the given (separator) character array. The input can only contain integers and separators.
int Total(int[])
Returns the sum of the elements in the provided integer array.
bool ContainsOnlyNumbers(String, params char[])
Inspects if the given string only contains numbers (positive integers) and separators. If the string is empty (length=0), this returns false.
void PrintArray(int[])
Prints all the elements in the provided integer array.
17.4 Command line parameters
When a program is started from the command line, it can be given arguments with the starting command. These arguments can be used during the run of the program. In a C# program these arguments can be accessed from the args string array in the main program:
If the program in the preceding example has been compiled and executed from the command line, we can write its main program parameters after the starting command (the name of the program):
C:\MyTemp\user>ArgsExample cat sits in a treeFor example in the call:
copy own.txt own.reservethe program copy receives two parameters, own.txt and own.reserve, and performs its tasks with this information, in this case copies the file own.txt and saves it as another file.
18. Sorting
How can you sort products (that are in random order) by price, from cheapest to most expensive?
One of the most studied programming problems and algorithms is the sorting algorithm. For example, how we can sort the cards in a deck by number or the prices of online store products from lowest to highest. A simple example in terms of programming could be sorting an int array. Even though at first it feels like there cannot be too many different ways to sort, there are in fact dozens, even hundreds of ways to sort, and some of them are much more effective (most often measured by speed, but also by intuitivity, readability, or intelligibility) than others.
Sorting algorithms are discussed in more detail in other course (for example, ITKA201 Algorithms 1 ja TIEP111 Programming 2). At this points it is enough to know how to use the ready-made (static) sorting method in C#, Sort.
Arrays can be sorted with the Sortsubroutine found in the Array class. The Sort subroutine receives the array to sort as parameter. The type of the subroutine is static void, meaning that is does not return anything, only sorts the array.
The elements should now be printed in numerical order. The array could also be sorted partially by providing the Sort subroutine with a start index and the number of elements to sort.
// Prints -4 -2 5 4 5 12 9All primitive data type arrays can be sorted with the Sort subroutine. In addition, we can sort arrays which contain element types that implement the IComparable interface. For example, the String class implements this interface. Interfaces will be discussed in more detail in section 23.1.
19. Changing the appearance of objects (Jypeli)
So far we have used multiple classes and subroutines in the Jypeli library. This chapter introduces some important individual classes, subroutines, and attributes in the library.
First, we create an object the appearance of which we want to change in the examples.
PhysicsObject block = new PhysicsObject(100, 50);The object is a rectangle that is 100 units wide and 50 units high. If you want the object to be visible in the game level, remember to add it to level with the following statement.
Add(block);19.1 Color
We will now change the color of the object we created. The color can be changed as follows:
block.Color = Color.Gray;The example changes the color of the object to gray. There are multiple colors to choose from. You can view all the available colors at
You can also set any color as follows:
block.Color = new Color( 0, 0, 0 );The object turned black. The first value sets the amount of red color, the second the amount of green color, and the third the amount of blue color. This is the origin of the abbreviation of this color space, RGB (Red, Green, Blue). The abbreviation makes it easy to remember the order of the colors. The amounts are integers between 0-255 (byte). There are also other ways to set colors, but these two are sufficient.
19.2 Size
Size can be changed as follows.
block.Width = width;
block.Height = height;Width and height is entered as double type numbers. You can also give the size on one line as a vector.
block.Size = new Vector(width, height);19.3 Texture
Texture images need to be saved in png format, which allows saving the alpha channel information (transparency) of the image as well. Save the png image in the Content folder of the project. Then right-click the name of the project in Visual Studio Solution Explorer and select Add -> Existing item. Find and select the image you just saved.
After this, the texture for the image is set like this:
Image objectImage = LoadImage("imageName");
object.Image = objectImage;Note that you won't need to provide the png extension after the filename.
The same can be shortened to:
block.Image = LoadImage("imageName");imageName is the name of the image you saved in Content. For example, if the name of the image was cat.png, the image name would be just cat.
19.4 Shape
Sometimes the shape of the object can be defined when creating the object. The shape can be changed afterwards as well. For example:
object.Shape = Shape.Circle;This makes the object circle-shaped. Other possible shapes include for example a rectangle, Shape.Rectangle.
20. Adding controls in the game (Jypeli)
The game can be controlled with a keyboard, a Xbox 360 controller, a mouse, and a Windows Phone 7. The controllers are "listened" to, and each controller can be assigned its own controls. Each controller (keyboard, mouse, Xbox controller, WP7 touch screen, WP7 accelerometer) has its own Listen subroutine that allows listening to the controller.
Each Listen call has the same format regardless of which controller is listened to. The first parameter indicates which button is listened to, for example:
Keyboard: Key.Up
Xbox360 controller: Button.DPadLeft
Mouse: MouseButton.LeftThe writing aid in Visual Studio helps to discover the different button options for each controller.
The second parameter defines what button events we want to listen to, and it has four possible values:
ButtonState.Released: The button has just been releasedButtonState.Pressed: The button has just been pressedButtonState.Up: The button is released (not pressed)ButtonState.Down: The button is pressed
The third parameter indicates the action that is performed when the button is pressed. It is an event handler, i.e. the name of the subroutine that is executed when the button event happens.
The fourth parameter is an instruction text that can be shown to the player at the beginning of the game. It is enough to state here what happens when the button is pressed. The type of the instruction text is String. A String is a set of characters in the computer's memory. String can be used for presenting e.g. words and sentences. If you want or need to use the instruction text at all, the fourth parameter can be null, leaving the text empty.
You can also give more parameters according to what you need in the game. Own (optional) parameters are placed after the aforementioned obligatory parameters, and they are taken to the handler given in the Listen call automatically. An example will follow shortly.
Example of listening to the keyboard:
Keyboard.Listen(Key.Left, ButtonState.Down,
MovePlayerLeft, "Move player to the left");When the left key (Key.Left) is pressed (ButtonState.Down), the player is moved by executing the MovePlayerLeft method. The last parameter is the button instruction text shown in the game.
The same for listening to the Xbox 360 controller:
ControllerOne.Listen(Button.DPadLeft, ButtonState.Down, MovePlayerLeft,
"Move player to the left");Up to four Xbox controllers can be listened to simultaneously. This method listens to the first one (ControllerOne). Other controllers are ControllerTwo and so forth. The order number of each controller is visible from the Xbox image at the centre of the Xbox controller, where the light indicates which controller it is.
20.1 Keyboard
In this example, the keyboard arrow keys are set to move the player.
using System;
using Jypeli;
/// <summary>
/// Game where the player controls a ball.
/// </summary>
public class Peli : PhysicsGame
{
/// <summary>
/// Create the player character and set keyboard listeners
/// </summary>
public override void Begin()
{
PhysicsObject player = new PhysicsObject(50, 50, Shape.Circle);
Add(player);
Keyboard.Listen(Key.Left, ButtonState.Down,
Moveplayer, "Move left",
player, new Vector(-1000, 0));
Keyboard.Listen(Key.Right, ButtonState.Down,
Moveplayer, "Move right", player, new Vector(1000, 0));
Keyboard.Listen(Key.Up, ButtonState.Down,
Moveplayer, "Move up", player, new Vector(0, 1000));
Keyboard.Listen(Key.Down, ButtonState.Down,
Moveplayer, "Move down", player, new Vector(0, -1000));
}
/// <summary>
/// Subroutine moves the object by "pushing".
/// </summary>
/// <param name="direction">Which direction</param>
private void Moveplayer(PhysicsObject object, Vector direction)
{
object.Push(direction);
}
}The parameters PhysicsObject object and Vector direction of the event handler MovePlayer provide the information which object is moved to which direction. Note that this information is given as "optional parameters" in the call, on the Keyboard.Listen lines.
20.2 Escape button and control instruction button
Jypeli contains ready-made subroutines for quitting the game and showing the controls on screen. They can be set up as follows:
Keyboard.Listen(Key.Escape, ButtonState.Pressed, Exit, "Quit");
Keyboard.Listen(Key.F1, ButtonState.Pressed, ShowControlHelp, "Show controls");In the above example, the esc button quits the game and the F1 button shows controls.
ShowControlHelp shows the controls used in the game and their instruction texts on screen. The instruction text is the fourth (string-type) parameter in the Listen call.
20.3 Game controller
The same example using an Xbox controller can be done by replacing the lines
Keyboard.Listen(...);riveillä
for example like this
ControllerOne.Listen(Button.DPadLeft, ButtonState.Down, MovePlayer, "Move left", player, new Vector(-1000, 0));The MovePlayer subroutine does not require any changes, meaning that the same subroutine can be used for both listening to a key and the "digipad" button on the Xbox controller.
20.3.1 Analog stick
If we want to listen to the movement of analog sticks, we use the ListenAnalog call.
ControllerOne.ListenAnalog(AnalogControl.LeftStick, 0.1,
MoveAnalog, "Move the player by moving the analog stick.");Let's try listening to the left analog stick (AnalogControl.LeftStick). The number 0.1 indicates how sensitive a analog stick movement executes the subroutine. Listening is handled by the subroutine MovePlayer.
The MovePlayer subroutine takes the following parameter:
private void LiikutaPelaajaa(AnalogState stickState)
{
// Movement
}The position of the stick is determined by the AnalogState type variable received as parameter:
private void MovePlayer(AnalogState stickState)
{
Vector stickPosition = stickState.StateVector;
// Do something with the position of the stick, e.g. move the player...
}StateVector gives a vector that tells to which direction the stick points. The values of the X and Y coordinates of the vector depend on the direction of the stick and range from -1 to 1, i.e. the range is [-1,1]. This vector can be used to tell the player for example to which direction the player should move.
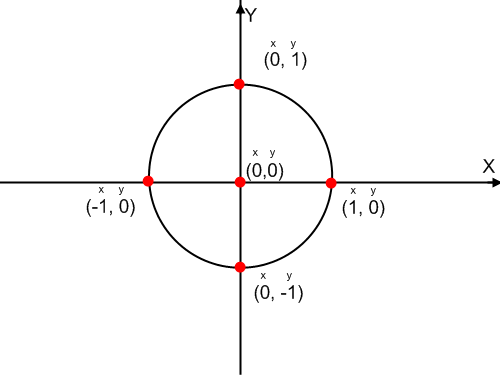
The position of the stick at a certain moment can also be found out without constantly listening to the stick by writing:
Vector stickPosition = ControllerOne.LeftThumbDirection;This returns the vector of the position of the analog stick at the moment (X and Y ranging from -1. 1).
The Xbox controller triggers can also be listened to. Read more from the wiki (in Finnish): https://trac.cc.jyu.fi/projects/npo/wiki/OhjaintenLisays.
20.4 Mouse
20.4.1 Buttons
Mouse buttons can be listened to similarly to keyboard keys and Xbox controller buttons.
Mouse.Listen(MouseButton.Left, ButtonState.Pressed, Shoot, "Shoot weapon.");In the example above, pressing the left mouse button calls the subroutine Shoot. This subroutine of course needs to be implemented:
private void Shoot()
{
// Write the code for the Shoot() subroutine here.
}20.4.2 Mouse movement
When using mouse as a controller, it is often important to know something about the location of the cursor. By default, the mouse cursor is not visible on the game screen, but it can easily be made visible by writing the following line in the code, for example when creating the level:
The position of the mouse on screen can be returned as a vector by writing:
Vector positionOnScreen = Mouse.PositionOnScreen;This tells the place of the cursor as screen coordinates, i.e. origo is in center. The Y axis increases upwards.
The mouse position in the game world (in the coordinates of the game and physics objects) can be returned by writing
Vector positionOnWorld = Mouse.PositionOnWorld;This indicates the place of the cursor in the world coordinates. Origo is in center and the Y axis increases upwards.
Mouse movement can be listened to with the subroutine Mouse.ListenMovement. It is given a double indicating the listening sensitivity, a handler, and an instruction text. You can also give your own auxiliary parameters. The handler has one obligatory parameter. An example of listening to mouse movement:
private PhysicsObject ball;
public override void Begin()
{
ball = new PhysicsObject(30.0, 30.0, Shape.Circle);
Add(ball);
Mouse.IsCursorVisible = true;
Mouse.ListenMovement(0.1, ListenToMovement, null);
}
private void ListenToMovement(AnalogState mouseState)
{
ball.Position = Mouse.PositionOnWorld;
// If the magnitude of movement is needed, it can be returned by writing:
Vector mouseMovement = mouseState.MouseMovement;
// and then the subroutine continues with handling this information
}In this example the physics object named "ball" we created follows the mouse cursor. The handler is called whenever the mouse is moved. The sensitivity in ListenMovement's parameters (here 0.1) indicates how small a mouse movement causes the event.
The event handler has an obligatory AnalogState object as parameter. It can be used to extract information about mouse movements as well. In this example mouseState.MouseMovement returns the movement vector of the mouse, which indicates to which direction and with how much force the cursor has moved (while mouse is in place, it is a null vector).
20.4.3 Listening to mouse for certain game objects only
If we want to listen to the mouse button presses only for a certain game object (or physics object), we can use the Mouse.ListenOn subroutine:
Mouse.ListenOn(ball, MouseButton.Left, ButtonState.Down, PickBall, null);The parameter is the object which we want to respond to mouse presses. Other parameters are the same as in a normal Listen call. The PickBall handler is called in this example whenever the mouse cursor is on top of the ball object and the left mouse button is pressed down.
The mouse also has the following method for example:
PhysicsObject object = new PhysicsObject(50.0, 50.0);
bool isCursorOn = Mouse.IsCursorOn(object);Mouse.IsCursorOn returns the truth value true or false depending on whether the cursor is on top of the object (game, physics, or screen object) given as a parameter.
21. Canvas (Jypeli)
The canvas can be used to draw figures in the game. These figures are elements visible in the game which are not PhysicsObjects or GameObjects but are drawn completely "separately" from game objects. They do not abide by the laws of physics. At the moment, we can draw lines on canvas.
We add the Paint subroutine for drawing in the game class, which overrides the equivalent subroutine in the base class.
protected override void Paint(Canvas canvas)
{
// Here we draw the figures
base.Paint(canvas);
}The Jypeli library calls the Paint subroutine between regular intervals (dozens of times per second) while the game is running. It can for example be used for animations by changing the coordinates according to the moment in time on which we draw.
The drawing itself is done with the methods of the Canvas object received as parameter. Currently, there is one method:
- DrawLine: draws a line. Parameters are the starting and end coordinates, either as vectors or by listing the x and y coordinates of both points.
Color can be set with the BrushColor attribute.
Piirtoalueen reunojen koordinaatteja voi lukea samaan tapaan kuin kentänkin reunoja:
canvas.Left X coordinate of the left border
canvas.Right X coordinate of the right border
canvas.Bottom Y coordinate of the bottom border
canvas.Top Y coordinate of the top border
canvas.TopLeft Top left corner
canvas.TopRight Top right corner
canvas.BottomLeft Lower left corner
canvas.BottomRight Lower right cornerExamples will follow.
21.1 Example: A red cross
The example below draws a red cross on the upper left corner and a black cross on the upper right corner of the Canvas object.
An image of the result below.

21.2 Example: A spinning line
In the following example, we create a line that changes color at random and circles around its starting point.
protected override void Paint(Canvas canvas)
{
canvas.BrushColor = RandomGen.NextColor();
double pointInTime = Game.Time.SinceStartOfGame.TotalSeconds;
Vector centre = new Vector(0, 0);
Vector borderPoint = new Vector(100 * Math.Cos(pointInTime), 100 * Math.Sin(pointInTime));
canvas.DrawLine(centre, centre + borderPoint);
base.Paint(canvas);
}22. Recursion
“To iterate is human, to recurse divine.” -L. Peter Deutsch
Recursion refers to an algorithm that needs itself to solve a problem. In programming for example a subroutine that calls itself is called recursive. Recursion can be used to solve many problems efficiently and with very little code, problems which would normally be quite laborous to solve (e.g. with loops). The structure of a recursive algorithm is something along the lines of the following:
public static void Recursion(parameters)
{
if (end condition) return;
// actions ...
Recursion(new parameters); // Calls itself
// Possibly more statements
}It is essential that a recursive subroutine contains some end condition. Otherwise the subroutine calls itself infinitely. Another essential factor is that the parameters of the next call, here Recursion(new parameters) is changed in some way, otherwise the recursion will not result in anything sensible.
The simplest example of recursion could be calculating the factorial. Factorial can be presented recursively n! = n*(n-1)!, 0! = 1. Iteratively the factorial of five is the product 5*4*3*2*1. Because in this case the recursion is easy to decipher into iteration, recursion is not necessarily the best way to calculate the factorial in languages like C#. However, this simple example is a good way to illustrate recursion.
Let's write calculating the factorial as a recursive C# function. Naturally, we will also write ComTests.
The function Factorial receives as parameter the number the factorial of which we want to calculate. The function returns a long type, because the factorial increases so quickly that any other type would become insufficient rather quickly. Let's inspect the subroutine in detail.
The line above is the end condition of the recursion. If n is less or equal to 1, we return the number 1. It is essential that the end condition comes before a new recursive subroutine call.
return n * Factorial(n-1);The line above makes the recursive call, i.e. the subroutine call itself. The line above is familiar from math:
n! = n * (n-1)!In other words, it returns n multiplied with the factorial n-1. For example, calculating the factorial five with the subroutine above could be illustrated as follows.
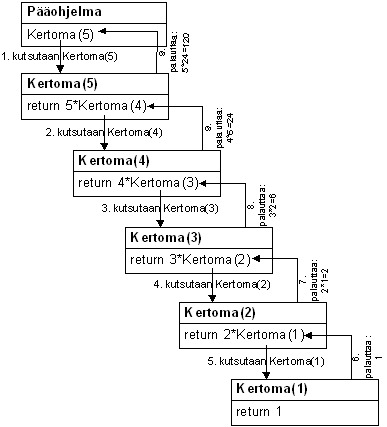
"Piling" the result can be started from the end, moving towards the beginning. Now Factorial(1) returns the number 1 and simultaneously ends making recursive calls. Factorial(2) returns 2 * Factorial(1) i.e. 2 * 1 i.e. the number 2. Factorial(3) returns 3 * Factorial(2) i.e. 3 * 2, and so forth. Finally, Factorial(5) returns 5 * Factorial(4) i.e. 5 * 24 = 120. In this way, we have successfully calculated the factorial five recursively.
Animation: Execute the recursive program
Animation: Execute the recursive Python program.
22.1 Sierpinski triangle
Sierpinski triangle is a fractal presented by the Polish mathematician Waclaw Sierpinski in the year 1915. It is an equilateral triangle with three new equilateral triangles drawn around it so that one of the apexes of each new triangle is in the middle of the side of the previous (larger) triangle. The height of each new triangle is half the height of the larger triangle. In other words, the new triangles are drawn on top, lower left corner, and lower right corner of the "large" triangle. The image illustrates this better. The second phase of the Sierpinski triangle is seen below. We use the Canvas object for drawing the lines in the triangle (see chapter 21).
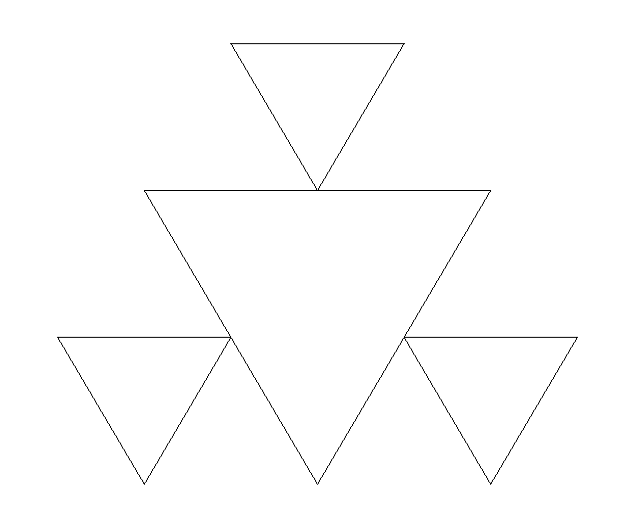
and the "end result", where the smaller triangles are already very difficult to tell apart.
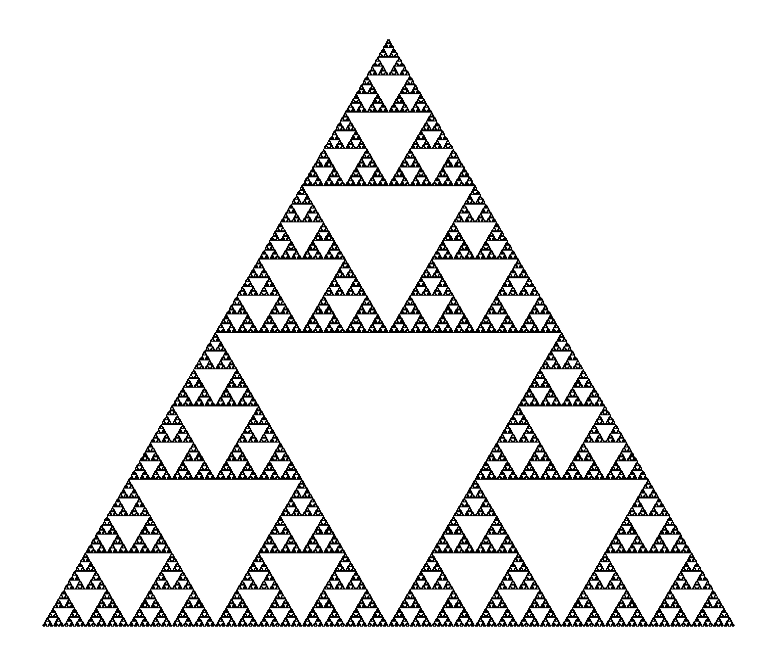
Drawing the Sierpinski triangle with recursion can be done just fine, but without recursion, drawing the triangle would be quite laborous. You can read more about the Sierpinski triangle e.g. from Wikipedia: http://en.wikipedia.org/wiki/Sierpinski_triangle.
The algorithm written in pseudocode:
Pseudocode = Code resembling a programming language, which hides the syntax differences between different programming languages and leaves the base structure of the algorithm. While planning the algorithm it can be easier to sketch out the problem in pseudocode first before writing the program itself. There is no standard for pseudocode, so the style is free. However, it would be most beneficial to write it so that as many people as possible can understand it.
DrawSierpinskiTriangle(height, x, y) // x and y refer to the coordinates of the apex
// of a triangle standing on its tip
{
if (height < SMALLEST_ACCEPTABLE_height) exit
sideLength2 = height / sqrt(3) // The length of the side divided by two
lowerTip = (x, y) // Pair of points
topLeftCorner = (x - sideLength2, y + height)
topRightCorner = (x + sideLength2, y + height)
DrawLine(lowerTip, topLeftCorner) // Line from lower apex to top left apex
DrawLine(topLeftCorner, topRightCorner) // Similarly ...
DrawLine(topRightCorner, lowerTip)
DrawSierpinskiTriangle(height / 2, x - sideLength2, y)
DrawSierpinskiTriangle(height / 2, x + sideLength2, y)
DrawSierpinskiTriangle(height / 2, x, y + height)
}This is already very close to real code. Next, we will write the same in proper C#.
Try the change minHeight=100; in the code above, which will result in four triangles. Try also smaller values, for example 50 (results in 13 triangles), or 5 or 1. Also try putting one of the three recursive SierpinskiTriangle calls in comments, one or two at a time. Think about what the resulting image will look like first before clicking Run.
Let's inspect certain parts of this program in detail.
private static double minHeight = 10.0;The attribute is a variable which controls how long the recursion goes on. The variable minHeight is visible in the entire Sierpinski class. minHeight is set as "global" so that the initialization of the variable would not be done repeatedly. In this program, the subroutine SierpinskiTriangle is executed multiple times depending on the value of minHeight, so we cannot initialize minHeight in the subroutine itself.
The variable above could also be a constant. In this program, it would even be justified. However, it is also justified to assume that as the program develops, the height of the smaller triangle could be changed by the user, in which case minHeight would not be a constant anymore but rather a number that changes during program run-time.
protected override void Paint(Canvas canvas)
{
base.Paint(canvas);
double height = 300;
SierpinskiTriangle(canvas, 0, -height, height);
}In the Paint subroutine we define the height of the triangle to be drawn first, i.e. the largest triangle. After this, we call the SierpinskiTriangle subroutine, to which we give Canvas object to draw triangles on, the location of the triangle (0, -height), and of course the height as parameters.
public static void SierpinskiTriangle(Canvas canvas, double x, double y, double h)The subroutine SierpinskiTriangle is static because in order to execute it, it only needs the information provided as parameters. It is also void, because we don't expect it to return anything. The subroutine also receives four parameters: the canvas in which the triangles are drawn, the x and y coordinates of the lowest apex, and the height of the triangle. These parameters are sufficient to draw a triangle using the Canvas object.
Let's ignore the if construct for now and inspect the statements following the if statement.
double s2 = h / (Math.Sqrt(3)); // length of the side s/2Before we can draw the triangles, we need to find out the lengths of the sides of the triangle. The sides in an equilateral triangle are of the same length, so it is enough to calculate the length of one side! We will utilise the good old Pythagorean theorem. Let h be the height of the triangle and s the length of the side.
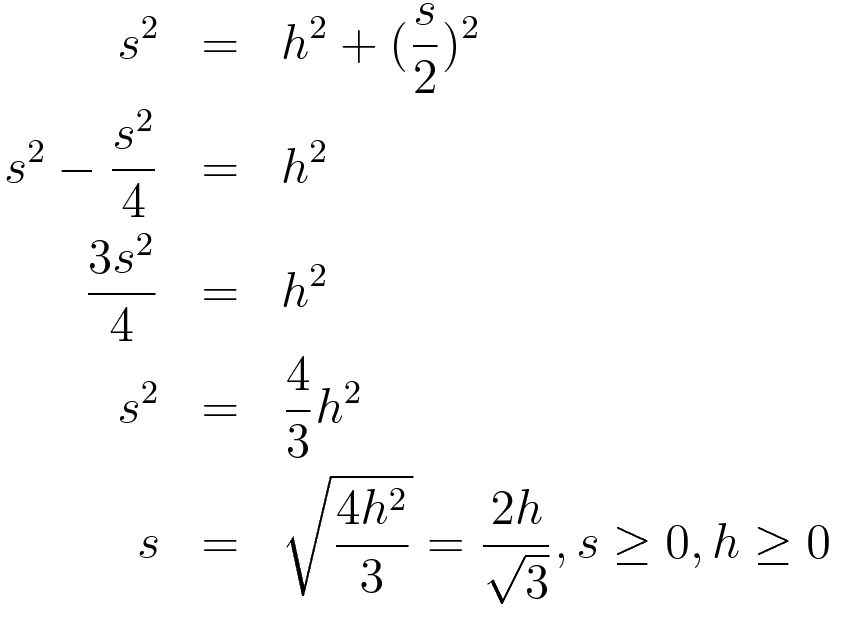
Because we move from the lowest apex in the triangle to either left or right by half the length of the side on the x axis, it is sensible to divide the length of the side s by two so that calculations are a little easier in the future.
This result is saved in the s2 variable.
In the above, the locations of the apexes in the triangle are calculated based on the calculated length of the side. The image below clarifies the calculations.
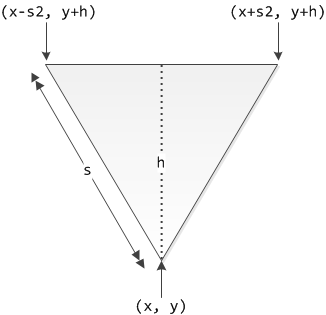
Next, we draw one triangle.
The lines above draw one triangle using the calculated apex coordinates.
SierpinskiTriangle(canvas, x - s2, y, h / 2); // Lower left triangle
SierpinskiTriangle(canvas, x + s2, y, h / 2); // Lower right triangle
SierpinskiTriangle(canvas, x, y + h, h / 2); // Top triangleCall the subroutine thrice, so that the coordinates and size of the original triangle are used to draw three smaller triangles: left, right, and on top of the original triangle.
Let's take a step back and inspect when the recursion is stopped.
if (h < minHeight) return;When we start executing the subroutine, we receive the height stored in variable h as parameter. If the value of h is under the provided minimum height, the subroutine is exited immediately with a return statement. No triangles under the minimum height will be drawn. However, if the triangle height h is not under the set minimum, triangles will be drawn as we described above.
It is essential to notice that for as long as the height h is more than the set minimum height of the triangle, we will not get past the first SierpinskiTriangle subroutine call. Each time the height h is halved, so only when the h is small enough, the end condition is fulfilled. According to the idea of recursion, we will continue to the last two SierpinskiTriangle subroutine calls only after the end condition is fulfilled.
22.2 Exercise
How many times is the SierpinskiTriangle subroutine executed in the end?
22.3 Huomautus
Myös sellainen aliohjelma (esimerkiksi aliohjelma A) on rekursiivinen, joka kutsuu toista aliohjelmaa (esimerkiksi aliohjelmaa B), joka puolestaan kutsuu aliohjelmaa A. Tällaisia tilanteita ei kuitenkaan tällä kurssilla käsitellä.
22.4 Recursion with other programming languages
The course TIEA341 teaches programming using functional programming languages. In many functional languages, recursion can be used to replace loops almost completely. The compilers for these languages are often capable of optimizing recursive programs better than C#, so recursion, when done right, does not impose similar performance problems as it does in C#.
The following is a small example of recursion using a functional programming language called Haskell:
The example above defines a function that calculates the sum of elements in a list. This function has been defined in two parts. The first part tells that the sum of an empty list ([]) is zero. The next part tells that the sum of a list with at least one element (marked as variable x) is x plus the sum of the rest of the list (marked as variable xs).
Iteratively, the function works like this:
sum [63,25,27]
Calculate according to the second rule of the sum function, x:=63, xs:=[25,27]
63 + sum [25,27]
Again the second rule of the function sum, x:=25, xs:=[27]
63 + (25 + sum [27])
Second rule of the function sum, x:=27, xs:=[]
63 + (25 + (27 + sum []))
First rule of the function sum
63 + (25 + (27 + 0))
Finally, count the sum arithmetically
115Above, the sum of elements in list [63,25,27] is calculated by hand. To help reading, we have marked both the partial results as well as descriptions of how the calculation progresses.
23. Dynamic data structures
Arrays offer us very limited framework for programming. Let's think about a situation where we have to calculate the sum of numbers that the user enters. The user could enter as many numbers as she likes and then press Enter, which would result in the program calculating the sum and printing it on screen. Where would we store the numbers that the user enters? In an array? What size array would we create? 10 elements? 100 elements? Or maybe even 1000? No matter how large an array we make, in theory the user may still enter more numbers than the array size allows. On the other hand, if we create an array of size 1000 and then the user only enters a few numbers, we are reserving an unreasonable amount of computer memory. For these kinds of situations, C# has dynamic data structures i.e. collections. Their size grows as elements are added. Dynamic data structures include lists, trees, vectors, stack, etc. Their use and structure differ significantly.
23.1 Interfaces
There are interfaces in C# which define certain methods, and all classes that implement an interface have to contain the same methods. The beauty of interfaces is that we can use the same methods for objects that implement the same interface. For example, we could have the interface Shapes. Now we can create classes Circle, Triangle, and Rectangle, which all implement the Shapes interface. We could create for example a Shapes type array, which could store objects from all classes that implement the Shapes interface. If the Shapes interface has the method Color(), we could use a loop to color all elements in an array containing circles, triangles, and rectangles with the same method.
Collection are the arrays of object-oriented programming. The Generic collection classes (the System.Collections.Generic namespace) are typesafe, i.e. the types of the members (and possible keys) in this collection can be defined. The System.Collections.ObjectModel namespace contains generic base classes for implementing own collections and "wrappers" (so-called wrapper classes), which can be used to create for example read-only collections.
There are quite many ready-made data structures in C#, so it is recommended to acquaint yourself with them first before making your own data structure. In this chapter we will mostly discuss the generic list (List<T>). Making own data structures will be discussed in detail during the Programming 2 course.
23.2 Lists (List<T>)
We will not introduce one of the dynamic data structures in C#, the List<T> class, which is a generic data structure. List<T> resembles the array in some regards; arrays and lists have a lot in common:
They can only contain elements of one type
You can access one element in the structure by writing the index of the elements within brackets, for example numbers[15,14], or balls[4].
Both have methods (functions, subroutines) and attributes
The List<T> object and other dynamic data structures can store both primitive data types as well as object data types. The generic list we are discussing always needs the information about what types of elements the data structure contains. Once it has been defined, elements of other types cannot be stored in the list.
The data type is placed within the angle brackets after the data structure class - an example of this follows.
23.2.1 Defining the data structure
The syntax of defining a dynamic data structure differs a little bit from defining a regular object. You may have already wondered what the T in the angle brackets after the word List is. The T refers to the type of elements stored in the list. It can be a primitive data type or an object type. In general format, the structure of defining a new list is:
DataStructureClassName<TypeOfStoredObjects> constructName =
new DataStructureClassName<TypeOfStoredObjects>();For example, we could store names of films in the following List<String> structure. We will define a new (empty) list as follows.
List<String> films = new List<String>();23.2.2 Adding and removing elements
Adding elements in a List<T> object, or in fact in any object of the classes in the Collections.Generic namespace, can be done with the Add method. The Add method adds an element to the "end" of the data structure, in other words as last element, logically thinking. When indexing starts from 0, as usual, the first element is in index 0, the next one in index 1, etc. So, we could add films as follows:
Removing an element from a certain place (index) on the list can be done with the RemoveAt method. The parameter we give to the method is the index of the element we want to remove. For example, removing the element "Casablanca" could be done as follows.
Because the structure is dynamic, the order of elements on the list is changed on the run. Now the string "Star Wars" is found in index 0. You can also remove elements by giving the contents of the element as parameter.
The Remove method works so that it removes the first occurrence that is equivalent to the given parameter. The method returns true if an element was removed from the list. Similarly, it returns false if an element equivalent to the given parameter is not found on the list, meaning that nothing was removed from the list.
The size of the data structure, or more specifically the number of elements in the data structure, can be found out with the Count property of the object.
A certain element can be accessed similarly to array elements, i.e. by placing the index within brackets. For example, the first element can be printed as follows:
These were some of the most useful methods. You can read about other methods from the List<T> class documentation:
http://msdn.microsoft.com/en-us/library/6sh2ey19.aspx.
Let's have another example with int type numbers. In this example we provide the list contents simultaneously to initializing the list, which is reasonable if the contents of the list are already known when we are creating the list. In other cases, it is sensible to initialize the list as empty and fill in the contents when necessary.
Note that the list above cannot store other types of elements besides int type integers.
The example above shows that the use of these strongly typed data structures is also safe - this way, wrong types of elements cannot "accidentally" be stored in the data structure, which could cause serious problems later on.
Let's check the count of elements on the list.
Now, we will remove all the elements that have the value 3. Here we can utilise the while loop and the Remove method. The return type, truth value, in the Remove method is a good condition for the while loop.
Listan alkiot näyttävät tämän jälkeen seuraavalta.
1 7 5 7Tosin edellisen ratkaisun kompleksisuus on \(O(n^2)\), eli tuhannen alkion taulukolle jouduttaisiin tekemään karkeasti 1 000 000 operaatiota, kun esimerkiksi RemoveAll on \(O(n)\), eli se olisi tähän tapaukseen merkittävästi parempi. Merkinnästä => lue lisää luvusta Anonyymit funktiot (lambda-lausekkeet).
Metodi Add lisäsi aina alkion listan loppuun. Muuhun kohtaan listassa voi lisätä metodilla Insert.
Listan alkiot näyttävät tämän jälkeen seuraavalta.
88 1 7 99 5 7Mitä tapahtuisi jos edellä Insert lauseiden järjestys vaihdettaisiin keskenään?
23.2.3 Listan sisäinen rakenne
Sisäisesti C#:issa ja Javassa vastaava lista on toteutettu niin, että siinä on pieni olio, joka ylläpitää listan tämän hetkistä alkioiden määrää (count) ja viite taulukkoon, jossa on itse alkiot. Taulukolle on aluksi varattu joku koko ja jos tila loppuu, niin silloin luodaan uusi isompi taulukko, johon kopioidaan nykyisen taulukon alkiot. Tämän jälkeen sisäinen viite käännetään siihen. Itse asiassa myös StringBuilder on toteutettu vastaavalla tavalla. Katso ideaa seuraavasta animaatiosta nuolella liikkumalla. Mikäli listasta poistetaan alkioita, ei välttämättä tilaa pienennetä.
Koska tuollainen kuva on aika työläs piirtää ja useinkaan ei tarvitse ajatella mitä listalle sisäisesti tapahtuu piirretään listan kuvat jatkossa yksinkertaisemmin, kuten tehtiin StringBuilder-luokan tapauksessakin. Merkitään kuitenkin käytettyjen alkioiden määrä johonkin erotukseksi taulukosta. Tärkeää on kuitenkin ymmärtää, että samaan listaan voi olla useampiakin viitteitä ja silloin jos lista-olioita muutetaan jonkin viitteen kautta, muuttuu se luonnollisesti toisenkin viitteen perspektiivistä. Tätä käytetään erityisesti kun listoja (tai mitä tahansa muita olioita) viedään parametreina aliohjelmille ja aliohjelma haluaa muuttaa listaa.
Eli jos meillä olisi edellisten lauseiden lisäksi lopussa sijoitus
olisi kuva seuraavan näköinen:
23.2.4 Example of a function for handling lists and testing it
Lists can be iterated with a loop just like arrays by using an index based loop (if index is needed). If index is not needed, foreach is usually the most convenient option.
In the example above, index i has not been incremented in a normal way in the increment statement of the for loop. Try to think why!
However, this way is ineffective for removing a large number of elements, because each removal requires moving elements backwards on the list. A more effective way would be to use the RemoveAll method, which would however require making a predicate function. A predicate function receives one element and returns either true or false depending on whether the element is to be handled or not. In the example below a predicate function has been implemented as a Lambda expression, which will be discussed in the next section.
Using a lambda function also allows counting words more briefly:
23.3 Anonymous functions (lambda expressions)
Lists, arrays, and other data structures can also be altered or handled with methods from the List<T> class (in addition to handling with loops). Many of these methods take in a subroutine list as parameter. The subroutine is used to handle the list. Methods include e.g. Find, FindIndex, Exists, FindAll, and ForEach. These methods can also be given the reference to the subroutine, in parentheses. Using existing methods instead of self-made loops allows to do the exact same thing with much less code.
Usually the easiest way to give these methods parameters is to create subroutines as lambda expressions, where the subroutine is defined anonymously as the method call parameter. For example, if we have a list of game objects (List<GameObject>) , named list, the following call would find the first object in the list that is in the shape of a circle, and would assign it as value in the variable ball:
GameObject ball = list.Find(obj => obj.Shape == Shape.Circle);In the code above the part obj => obj.Shape == Shape.Circle is a lambda expression that is an anonymous function with one parameter (obj). In a lambda expression, the parameters are defined before the arrow =>. Function returns the value of the expression obj.Shape == Shape.Circle, which is true if the shape of the given object is a circle, and false if not. The Find method executes the subroutine given to it for each element in the list, until it finds an element that returns true for subroutine defined as a lambda expression.
Equivalent code with a loop would be as follows:
GameObject ball;
foreach (GameObject obj in list)
{
if (obj.Shape == Shape.Circle)
{
ball = obj;
break;
}
}Lambda expressions behave like normal subroutines and functions, but they have no names and cannot be referred to elsewhere in the code. However, the value returned from a lambda function can be assigned to a variable and thus can be used elsewhere in the code.
Next, common list handling methods in the List<T> class are presented with examples. Most of the presented examples also work for arrays in C#.
23.3.1 Find
As was mentioned before, the Find method for lists takes in a function that return a bool value. Find returns the first object on the list for which the subroutine returns true. In practice, the Find method is given a condition as parameter, and it finds the first element on the list that meets the condition. If no element meets the condition, Find returns null. One example of using Find method was presented in the previous chapter. Here is a similar example where the condition is to find strings that are longer than n:
Same with a loop:
23.3.2 Delegates and Lambda expressions
The original idea is that Find gets a reference to a predicate function as its parameter. Predicate function returns a boolean according to whether the element meets the condition. First, we will do the previous as a separate function that examines the length of the string
So now Find calls the (predicate) function IsOver4Long for each element on the list and if the function return true, it is concluded that the right element was found and Find returns that element. The problem with this solution is that it is not easy to give the length of the string as a parameter. The solution works if we just want the predicate function to work with this exact element.
In C#, it is also possible to use subroutines within subroutines which can access the variables in the "outer subroutine". Then we could write:
This is not wrong per se, except that the inner function has to always have its own name.
The next solution in C# would be to use anonymous functions, delegates, so that we create a function where it's needed:
This already makes this much easier to write. But there are still a few words too much. Luckily, there are Lambda expressions which are synonyms for delegates, i.e.:
delegate(string str) { return str.Length > n; }can be shortened to:
str => str.Length > nCompared to a delegate, lambda expressions also have the benefit that we don't need to worry about types.
23.3.3 FindIndex
The FindIndex method works similarly to the aforementioned Find method but it returns the index of the element instead of the element itself. For example, the following subroutine finds the first string that has more than five characters, and returns its index.
The equivalent subroutine implemented with a loop looks as follows:
23.3.4 Exists
Exists method checks if the list contains an element that meets the given condition. If the element is found, Exists returns true, otherwise false. For example, the following subroutine checks if a list of integers (List<int>) contains a number that is larger than 10.
Equivalent loop subroutine could be implemented like this:
A common mistake is to get too excited and do the same thing twice:
Why? Because the first version goes through the array once looking for the number. If it finds the number, it needs to go through the array again to find the number. The second version goes through the array only once.
Index has been used because Find returns 0 if the number is not found, which would be confusing if the array itself also contained 0. For example, Find returns null for a string if the element is not found, which is easy to tell apart from actual elements in the string. For lists and arrays of objects, using Find is convenient for aforementioned use cases.
23.3.5 FindAll
The FindAll method works similar to the Find method, but it returns a list that contains all the elements that fulfill the given condition, whereas Find only returns the first such element. FindAll produces a new list from the results and returns it. For example, the following subroutine finds and return all red rectangles from a list of game objects (List<GameObject>). The example demonstrates how the parameter for Find and FindAll methods can check for multiple conditions.
public static List<GameObject> GetRedRectangles(List<GameObject> list)
{
return list.FindAll(object => object.Shape == Shape.Rectangle && object.Color == Color.Red);
}Equivalent subroutine with a loop implementation could look like this:
public static List<GameObject> GetRedRectangles(List<GameObject> list)
{
List<GameObject> results = new List<GameObject>();
foreach (GameObject object in list)
if (object.Shape == Shape.Rectangle && object.Color == Color.Red)
results.Add(object);
return results;
}List of Strings example:
Same with a loop:
23.3.6 Multiple statement anonymous functions
The ForEach method for lists (not to be confused with the foreach loop) allows you to run a subroutine for each element on a list. For example, the following subroutine changes all game objects that are over 35 units high yellow and pushes them up.
Most anonymous functions made with lambda expressions are simple and contain only one statement or expression. In this case, the function on the right side of the arrow doesn't require braces { } around it like regular subroutines. Lambda expression subroutines like the example above can contain more than one statement. In that case the code needs to be surrounded with braces like regular subroutines. Lambda function can also utilise all common C# features, like conditional statements.
Equivalent example with a loop implementation:
23.3.7 Using external variables in a lambda expression
Lambda functions can also alter local variables that were defined outside them. For example, lambda function for summing the elements on an integer list could be implemented like this:
23.3.8 Other commonly used methods
In many cases, list functions are given a predicate function as parameter. A predicate function returns a boolean true or false. A predicate function, which is usually implemented as lambda function, defines whether the element is handled or not.
If you're interested in knowing more about lambda expressions, read more on MSDN.
24. Exceptions
“If you don’t handle [exceptions], we shut your application down. That dramatically increases the reliability of the system.”
- Anders Hejlsberg
Exceptions are problems that occur during run time. If the exception is not handled, the program usually crashes or an error message appears in the console. At this point of the course, this has probably happened to you multiple times already. An exception may occur for example if we try to refer to an array element that doesn't exist.
For example the strip of code above would cause an exception called IndexOutOfRangeException. These exceptions occur at the beginning when arrays are handled in loops and the end condition of the loop is wrong. Exceptions are also caused by for example division by zero, and the attempt to change a string containing letters into some numeric data type.
However, exceptions can be controlled with exception handling. With exception handling, exceptions are prepared for and the execution of the program can be continued after the exception occurs. Exception handling always includes a try and catch block. Also the finally block can be used.
In C#, exceptions are objects. [VES][KOS][DEI]
24.1 try-catch
The idea behind the try-catch construct is that exception-prone statements are placed within the try block. After this, the catch block tells what will be done when an exception occurs. Before the catch block we need to state which exceptions we are trying to catch. The exceptions are placed in parentheses after the word catch, before the brace that starts the catch block. The general format of the try-catch construct:
try
{
//statements we are trying to execute
}
catch (ExceptionClassName nameForException)
{
//actions to perform when the exception occurs
}The catch block is only executed in the case that the try block causes the exception that is stated as caught in the catch part. In other cases the catch block is ignored. If the try block contains multiple statements, the catch block is usually entered when the first exception occurs, and the rest of the statements are not executed. Let's take division by zero as an example. Division by zero would cause the exception DivideByZeroException.
In the example above, the print statement in the middle would cause the exception DivideByZeroException and move to the catch block instantly. In other words, only the first of the three lines to print would be printed. If we want all the statements that do not throw an exception to be executed, we would need to make each one of them its own try-catch construct. This would result in a jungle of try-catch constructs. For this reason, it is usually best to perform an action like this in a subroutine that contains the try-catch construct. This would clean up and shorten the code significantly.
In our example the catch block now prints an error message. The exception object has been named "e", a very common name for a exception object reference variable. Because the exceptions in C# are objects, they also have a set of methods and properties. The catch block contains the call to the Message property in the DivideByZeroException class, which contains the error message defined for this exception, which is printed to the console window here.
We can also define multiple catch blocks to catch several different types of exceptions.
try
{
//statements to execute
}
catch (ExceptionTypeA e)
{
//some actions to perform when the exception occurs
}
catch (ExceptionTypeB e)
{
//some actions to perform when the exception occurs
}
catch (ExceptionTypeC e)
{
//some actions to perform when the exception occurs
}If the actions to perform when exceptions occur are not dependent on the exception type, we can simply catch objects that belong in the Exception class. All the exception classes in C# inherit the Exception class, so by using it, we can catch all possible exceptions. Sometimes it can be reasonable to make the last catch block catch Exception exceptions in order to catch all the rest of the exceptions. However, we usually know very specifically, which exceptions our actions may cause, so this would be in vain. If we don't know anything about the exception, we cannot know what to do with it either, which is why we need to be careful with catching Exception class exceptions. [VES][KOS][DEI]
24.2 finally
Using the finally block is not necessary, but when it's used, it is placed after the catch blocks. If the finally block is included, it is executed regardless of whether the try block caused exceptions.
The finally block is convenient for example for handling files, where it is important to always close the file after handling, regardless of possible exceptions that occur. The general format of the try-catch construct containing a finally block is the following:
try
{
//statements that are attempted to execute
}
catch (ExceptionClassName nameForException)
{
//some actions to perform when an exception occurs
}
finally
{
//statements that are executed in any case
}24.3 General
As the name suggests, exceptions are events that are caused by an exception to the rule. They should not be used with the principle: "I'm not sure if this works so I'll place it inside a try-catch construct." Exceptions are meant for cases when something unexpected may occur in well-designed and well thought-out code, and when preparing for the unexpected event can keep a plane on course or the emergency response centre information system running.
25. Reading information from an external source
Variables are suitable for storing information for as long as the program is running. However, after the execution of the program ends, the memory locations reserved for the variables are freed up for the use of other processes. For this reason, variables are not suitable for storing information that needs to be preserved after the execution of the program ends. Files and databases are suitable for storing information on the long term. Files are simpler and perhaps easier to use whereas databases offer more varied features. We can also store some necessary initial settings for the program in a file. This chapter demonstrates how to read information from a file or a website with simple examples.
We will now study an example of reading text from a file in the Windows environment. Reading other types of files, writing in files, and working in the Windows Phone and Xbox environments is not necessary to learn on this course.
25.1 Reading text from a file
The System.IO namespace contains for example subroutines needed for handling files. In the following example we will read information from a text file and write in a file.
Kalle, 5
Pekka, 10
Janne, 0
Irmeli, 15We could think of these as the points on a Top Ten list. We will name the file data.txt.
using System;
using System.Collections.Generic;
using System.Linq;
using System.Text;
using System.IO;
/// <summary>
/// Practice writing in and reading from files.
/// </summary>
public class ReadFile
{
/// <summary>
/// Read from and write in text file.
/// </summary>
    public static void Main()
    {
// Define the file path as a constant
const string PATH = @"C:\MyTemp\data.txt";
// If the file does not exist, create it and write in it
if (!File.Exists(PATH))
{
// The array elements are lines in the file
string[] newLines = { "A-J, 0", "Pekka, 0", "Kalle, 0" };
File.WriteAllLines(PATH, newLines);
}
// This text is added with each run,
// making the file a line longer with each run
string appendText = "This is an extra line" + Environment.NewLine;
File.AppendAllText(PATH, appendText);
// Open the file and print its contents on screen
string[] readLines = File.ReadAllLines(PATH);
foreach (string s in readLines)
{
Console.WriteLine(s);
}
}
}We will now study the most important parts in more detail
if (!File.Exists(PATH))Check if the file exists. If it doesn't, write a few names in the file to which the path points, and write a comma and "points" after the name.
File.WriteAllLines(PATH, newLines);The File class contains the WriteAllLines method that writes all the elements in the String array into the provided file.
File.AppendAllText(PATH, appendText);The AppendAllText method adds the text that the String object contains in the provided file so that the text is placed at the end of the file.
string[] readLines = File.ReadAllLines(PATH);The ReadAllLines method reads all the lines from the provided file location into a String array. One line in the file is equivalent to one element in the array.
Note that if the file is not given an absolute path, the program searches for the file from the folder in which the executable .exe file is. In this example, we provided the absolute path in its entirety.
25.2 Reading text from a website
Next, we will read information from a website. Here, the entire HTML page data is stored line by line into a List<String> data construct without any additional actions. Finally, the list contents are printed on screen one line at a time.
One try-catch-finally construct is included. Internet connections are prone to all sorts of errors, so catching exceptions is absolutely necessary.
25.3 Random numbers
The Random class is located in the System namepace. There are methods in the class which allow us to generate different types of random numbers. For generating we need to create a Random object to call methods. The Random object can only be created once during the program, otherwise the randomization might be ruined. The Random object has the method Next, which receives a number as parameter and then generates a random number between 0 and the number it received as parameter. The number to generate is always on a semi-open interval [0,parameter[. If we want to generate an integer on a closed interval [0,10], we need to change the parameter accordingly to equivalent semi-open interval [0,11[. The strip of code below would now generate an integer between 0 and 10 so that both 0 and 10 are included on the interval.
If we want to generate a number on a closed interval [50, 99], we write
A floating point number is generated with the NextDouble method.
The RandomGen class in Jypeli contains many static methods which make generating random numbers (and colours, truth values, etc.) easier. Read the documentation of the RandomGen class here:
26. Representation of numbers in computers
26.1 Numeral systems
The numeral system we are most familiar with is the base 10 system (decimal system). It has ten different symbols for representing numbers (0...9). The number 10 is called the base number of the decimal system. There are also other numeral systems used in information technology. The most common are the base 2 system (binary system), base 8 system (octal system), and the base 18 system (hexadecimal system). In the binary system, numbers are represented by two symbols (0 and 1) and in the octal system similarly by eight symbols (0...7). With the same principle, the hexadecimal system uses 16 symbols, but because it runs our of numbers, the alphabet is utilised. The symbol 9 is therefore followed b the symbol A, followed by B, and so forth until the symbol F, which is equivalent to number 15. In other words, the hexadecimal system consists of the symbols 0...9 and A...F. The most common use for the hexadecimal system is presenting numbers of the binary system in shorter, more human-readable format.
| Numeral system | Used symbols | Base number |
|---|---|---|
| Binary system | 0 1 | 2 |
| Octal system | 0 1 2 3 4 5 6 7 | 8 |
| Decimal systems | 0 1 2 3 4 5 6 7 8 9 | 10 |
| Hexadecimal system | 0 1 2 3 4 5 6 7 8 9 A B C D E F | 16 |
Because the numeral systems contain some of the same symbols, they need to be distinguishable from one another. This is usually done with subscripts. For example, the binary number 11 can be written as 112. This way, it is distinguishable from the decimal system number 11, which could respectively be written in format 1110. Because writing subscripts on a computer can be somewhat challenging, it is possible to use a notation where binary numbers are followed by the letter B. For example, 11B would be equivalent to 112.
The hexadecimal number D can be marked by for example D16, DH, or in some programming languages with the prefix 0x, i.e. 0xD. If it is otherwise clear from context that the number in question is a hexadecimal number, we can simply write D (which is equivalent to 13 in the decimal system). Similarly, we use decimal numbers without separate system indicators in our everyday lives.
In all the numeral systems described above, the position of the number is significant. When symbols are placed consecutively, it matters where each symbol in the number is located. [MÄN]
Open plugin
26.2 Position systems
The numeral systems we use are position systems, meaning that the position of each symbol is significant for the value of the number. If the positions of the symbols are changed, the value of the number changes as well. The value of the number
n3n2n1n0
is
n3 · k3 + n2 · k2 + n1 · k1 + n0 · k0
where k is the base number of the used system. For example in the decimal system:
253610 = 2 · 103 + 5 · 102 + 3 · 101 + 6 · 100
= 2 · 1000 + 5 · 100 + 3 · 10 + 6 · 1
We say that in the number 2536 there are two thousands, five hundreds, three tens, and six ones.
If the positions of the symbols in the number are numbered from right to left starting from zero, we can find out the value of the number by summing up the value in each position multiplied by the base number to the power of the position number. This works with decimal numbers as well if we number the positions to the right of the decimal separator with the numbers -1, -2, -3, etc. For example
25.36 = 2 · 101 + 5 · 100 + 3 · 10-1 + 6 · 10-2
= 2 · 10 + 5 · 1 + 3 · 0.1 + 6 · 0.01
26.3 Binary numbers
The binary system has the base number 2, which means that there are two symbols in use: 0 and 1. The binary system is the most important numeral system in information technology, because most processors compute with binary numbers. More specifically, binary numbers are represented in processors as voltage. A certain voltage interval is equivalent to value 0 and a certain voltage interval is equivalent to value 1.
Which of the following could be binary numbers:
Below is an example of a power supply (DC), button, and a led could form a one bit "computer". If the button is pushed down (the switch is flicked), the led lights up. If the button is not pushed down, the led is turned off. Information that is conveyed here (i.e. one bit) is the information whether there is voltage or not after pushing down the button, and the led is an indicator of this information, observable by a person.
Similarly, we could have a two-bit computer with two buttons. In this example, the buttons are toggles, capable of "locking down", which allows to preserve their states more easily. We could now present four different states. Try it!
26.3.1 Binary number to decimal number
For example, the binary number 10110 could be converted to a decimal number as follows.
101102 = 1·24 + 0·23 + 1·22 + 1·21 + 0·20 = 16 + 0 + 4 + 2 + 0 = 2210
In the decimal system the next number position is tenfold. In the binary system, the value of positions is doubled.
| 7 | 6 | 5 | 4 | 3 | 2 | 1 | 0 | |
|---|---|---|---|---|---|---|---|---|
| Binary system | 128 | 64 | 32 | 16 | 8 | 4 | 2 | 1 |
| Decimal system | 10 000 000 | 1 000 000 | 100 000 | 10 000 | 1000 | 100 | 10 | 1 |
Are the following conversions correct:
The binary number 101.1011 can be converted to a decimal number as follows. Conversion is done with the same principle as above. Now when we keep subtracting from the powers as we enter the decimal, the powers turn negative:
101.10112 = 1 · 22 + 0 · 21 + 1 · 20 + 1 · 2-1 + 0 · 2-2 + 1 · 2-3 + 1 · 2-4
= 4 + 0 + 1 + 0.5 + 0 + 0.125 + 0.0625 = 5.687500
So, the binary number 101.1011 is equivalent to the number 5.6875 in the decimal system.
26.3.2 Decimal number to binary number
A decimal number can be converted to a binary number by dividing its whole numbers repeatedly by two and marking down 0, if the division was equal, and 1 if it wasn't. When the numbers cannot be divided any further, the binary number can be read by reading the remainders starting from the opposite direction than where we started counting. For example, the number 1910 can be converted to a binary number as follows:
19/2 = 9, remainder 1
9/2 = 4, remainder 1
4/2 = 2, remainder 0
2/2 = 1, remainder 0
1/2 = 0, remainder 1Now when we read the remainders bottom-up, we get the binary number 10011. Similarly, we could sketch out the number as in the example below, which gives a clearer remainder. The idea in both is the same.
19 = 2*9+1
9 = 2*4+1
4 = 2*2+0
2 = 2*1+0
1 = 2*0+1Let's convert the number 12610 to a binary number.
126 = 2*63+0
63 = 2*31+1
31 = 2*15+1
15 = 2*7+1
7 = 2*3+1
3 = 2*1+1
1 = 2*0+1So, the binary number is 1111110.
With decimal numbers, the whole numbers and the decimal need to be converted to binary numbers separately. The whole numbers are converted as was done above. The decimal is converted by repeatedly multiplying the decimal by two and marking down the number 1, if the product is equal to or greater than 1, and marking down 0, if the product is less than 1. Let's convert the number 0.812510 to a binary number.
0.8125 * 2 = 1.625
0.625 * 2 = 1.25
0.25 * 2 = 0.5
0.5 * 2 = 1.0The number was even, so the number 0.812510 = 0.11012. The binary number can be read as demonstrated in the image below.
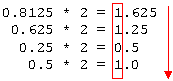
Let's convert the number 0.67510 to a binary number.
0.675 * 2 = 1.35
0.35 * 2 = 0.7
0.7 * 2 = 1.4
0.4 * 2 = 0.8
0.8 * 2 = 1.6
0.6 * 2 = 1.2
0.2 * 2 = 0.4
0.4 * 2 = 0.8Once we start multiplying the same decimal by two, the calculation can be stopped. In this case, the number is infinite. In other words, the number would start repeating the repetend 11001100. Now the number is read from the same direction where the calculation started. We no longer have to decide the precision of the number. The more bits we use, the more precise the number.
0.67510 = 0.1010110011001100112
The repetend could be continued infinitely, but the essential thing is that the number 0.675 cannot be presented precisely with binary numbers.
We will try to convert the number 23.37510 to a binary number. First we convert the whole number.
23 = 2*11+1
11 = 2 *5+1
5 = 2 *2+1
2 = 2* 1+0
1 = 2* 0+1So the whole number part is 101112. Next we will convert the decimal.
0.375 * 2 = 0.75
0.75 * 2 = 1.5
0.5 * 2 = 1.0So 23.37510 = 10111.0112.
Are the following conversion correct:
26.4 Negative binary numbers
A negative number can either be presented as is, as ones' complement, or as two's complement.
26.4.1 Literal interpretation
In the literal interpretation, one bit is reserved to represent the sign of the number (+/-). If we are using four bits, the number +310 = 0011 and -310 = 1011. The literal interpretation is problematic for calculations; for example, the number zero has two representatins, 0000 and 1000, which is not preferable.
26.4.2 Ones' complement
In ones' complement, if the number is positive, it is written normally, and if the number is negative, all the bits are reversed. For example, the number +310 = 0011 and -310 = 1100. This system is also problematic because the zero is represented by 0000 and 1111.
26.4.3 Two's complement
Useimmiten nykytietokoneissa käytetään negatiivisille luvuille niin sanottua kahden komplementtia. Eli positiivinen luku muutetaan negatiiviseksi muuttamalla kaikki bitit päinvastaisiksi ja sitten lisäämällä saatuun lukuun 1. Esimerkiksi:
3 = 0000 0011
-3 tehdään seuraavasti: 1) kaikki päinvastoin 1111 1100
2) +1 = 1111 1101 = -3Vastaavasti kun lukua muutetaan "ihmismuotoon", katsotaan sen ensimmäinen bitti ja jos se on 1, niin kyseessä on negatiivinen luku ja se muutetaan positiiviseksi ottamalla siitä kahden komplementti (kaikki bitit päinvastoin ja +1). Tällöin tulostuksessa tulostetaan ensin -merkki ja sitten itse luvun arvo.
Esimerkiksi jos meillä on binääriluvut 0010 1101 ja 1101 1111 ja ne pitäisi tulkita, niin tulkinta aloitetaan seuraavasti:
0010 1101 luku on positiivinen, eli 45
1101 1111 luku on negatiivinen, siis ensin 2:n komplementti
0010 0000 + 1 = 0010 0001 = 33, eli tulos on -33Huom! Komplementin kääntämisen jälkeen tehtävä +1 lisäys tehdään myös alla olevien bittien yhteenlasku sääntöjen mukaan eli esim.
1111 1110 luku on negatiivinen, siitä ensin 2:n komplementti
0000 0001 + 1 = 0000 0010 = 2, eli tulos on -2Bittien yhteenlasku
0 + 0 = 0 => 0 ja 0 muistiin
0 + 1 = 1 => 1 ja 0 muistiin
1 + 0 = 1 => 1 ja 0 muistiin
1 + 1 = 10 => 0 ja 1 muistiin
1 + 1 + 1 = 11 => 1 ja yksi muistiinEsimerkki yhteenlaskusta allekkain 4-bittisillä luvuilla kaikki vastinbiteistä saadut muistinumerot merkiten. Esimerkissä muistinumero on merkitty myös oikeanpuoleiseen pariin vaikka se aina onkin 0.
esim1 esim2
muistinumero 01110 11110
luku 1 0101 1111
luku 2 + 0011 + 1111
===== =====
summa 1000 1110Vinkki binäärilukujen yhteenlaskuun
The most general format of representing negative numbers is the two's complement. In two's complement, a positive number is first converted to a ones' complement, i.e. zeros become ones and ones become zeros (the bits are reversed), and 1 is added to the result. The advantage of this system is format is that addition works as usual with negative numbers as well. Subtraction is performed by adding the opposite number (complement of the number):
2-3 = 2+(-3)
So the two's complement of -2 is 1110. Let's try the same for number 3.
number 3: 0011
reverse the bits: 1100
add 1: 1101The two's complement of -3 is 1101.
Can the numbers be converted back to positive numbers using the same method? Try it!
Are the following conversions to two's complement correct:
26.4.4 Bit addition
Addition is one of the most important primary operations. First, we study two one bit additions: if both bits are 0, their sum is also 0; If the other is 1, their sum is also 1. If both are 1, the sum can no longer fit in one bit: the result is 0 and the carry digit is carried to the next bit. The operations xor and and are equivalent to this action. As a truth table:
In other words, two bits can be added with the half adder type circuit below. Try all the possible options.
If we want to sum two two-bit numbers, we need two of the circuits above. More specifically in a little more complicated format, because the other bit-pair needs to take into account the carry digit from the previous pair. We will present this type of circuit (which includes the previous and the resulting carry digit) with a FullAdder circuit (FA) with the truth table below ( c = resulting carry digit).
Then the two two-bit numbers could be summed with the circuit below. Here, the circuit that sums the bits in position 0 receives no carry digit, meaning it could be like the Half adder above, but for symmetry reasons all circuits should be similar. Similarly, the circuit that sums the bits in position 1 receives (carry in) the carry digit (carry out) from the sum of bits in position 0. Try different calculations with the circuit
| Calculation | in bits | result | decimal |
|---|---|---|---|
| 0 + 0 | 00 + 00 | 00 | 0 |
| 0 + 1 | 00 + 01 | 01 | 1 |
| 1 + 2 | 01 + 10 | 11 | 3 |
| 2 + 2 | 10 + 10 | 1 00 | 4 |
| 3 + 3 | 11 + 11 | 1 10 | 6 |
Similarly, by chaining more consecutive Full adder circuits, we can make a multiple-bit adder with as many bits as we want. The problem in practise is that the result is not final until the carry digit has passed through the entire chain, which is why usually adders are made "smarter" in a manner where there is no need to wait for the passing of the carry digit.
26.4.5 Addition of two's complement
If the most significant bit (the left-most) is 1, the result is negative and a two's complement. In this case, to interpret the result a conversion like above is performed (first the bits are reversed, then 1 is added). The result of the conversion is the absolute value, the value itself is always negative. If the most significant bit is 0, the result is positive and no conversion needs to be done.
Using a 4-bit "machine", let's calculate 2+1 for example:
0000
0010
+ 0001
-----
0011The most significant bit is 0, so the answer is 00112 = 310. Calculate 1-2 next.
0000
0001
+ 1110
----
1111The most significant bit is now 1, meaning that the number is a two's complement. When the bits are reversed and we add 1, we get the number 0001. Because the most significant bit is 1, the number is negative, so the result is -1.
Let's calculate -2-3.
1100
1110
+ 1101
----
1011The number is negative again. When the bits are reversed and we add 1, we get 01012 = 510. So the result is -510.
Finally, let's have a few more calculations the results of which cannot fit into four bits. First, 6 + 7
0110
0110
+ 0111
----
1101 => 0010 + 1 => -3 (so, a neg. result from addition of two pos. numbers)Similarly -7-6
1000
1001
+ 1010
----
0011 => +3 (positive result from addition of two negative numbers)The last two calculations ended up with wrong results! This is natural, because of course a limited number of bits is not enough to present numbers past its maximum. The four bits in our example can only present numbers in the range [-8, 7]. Compare with the number range in primitive data types which were presented in section 7.2. One added benefit of two's complement is that the overflow, i.e. exceeding the limited range is easy to discover: the carry-in bit and the carry-out bit in the last bit (the sign bit) is unequal. In the above examples that had the correct result the bits were equal and in the examples with the wrong result they were unequal. Calculations with floating point numbers can also cause an underflow when the result produces a zero even though the real-world result is not zero yet.
26.5 The relation between numeral systems
Because binary numbers are usually quite long, they are usually presented in a more human-readable format as either octal (base 8) or hexadecimal (base 16) numbers. Let's study the latter, the hexadecimal system in more detail. The hexadecimal system uses the symbols 0...9, A...F, so 16 symbols in total. This way, even the number 15 (1510 = 11112) can be presented with one symbol. The decimal system numbers equivalent to A...F are presented in the table below.
| A16 | 1010 |
| B16 | 1110 |
| C16 | 1210 |
| D16 | 1310 |
| E16 | 1410 |
| F16 | 1510 |
Which hexadecimal number is equivalent to the decimal number 20
So, one symbol in the hexadecimal system can be used to present a 4-bit binary number. A binary number can be converted to a hexadecimal number by arranging the bit into four bit groups, starting from the right, and by converting each 4-bit combination into its hexadecimal equivalent. Let's convert the number 111011012 into a hexadecimal number.
- 111011012 =1110 11012
- 11102 = E16
- 11012 = D16
- 111011012 =1110 11012 = ED16
Similarly, we can convert binary numbers into octal system number by simply arranging the bits into 3-bit groups, starting from the right.
The numbers 010..1510 have been presented as decimal, binary, octal, and hexadecimal numbers in the table below. Additionally, the equivalent two's complement format has been presented for each number.
Table 9: Equivalent numbers in different numeral systems.
| base 10 | base 2 | base 8 | base 16 | two's complement |
|---|---|---|---|---|
| 0 | 0000 | 00 | 0 | 0 |
| 1 | 0001 | 01 | 1 | 1 |
| 2 | 0010 | 02 | 2 | 2 |
| 3 | 0011 | 03 | 3 | 3 |
| 4 | 0100 | 04 | 4 | 4 |
| 5 | 0101 | 05 | 5 | 5 |
| 6 | 0110 | 06 | 6 | 6 |
| 7 | 0111 | 07 | 7 | 7 |
| 8 | 1000 | 10 | 8 | -8 |
| 9 | 1001 | 11 | 9 | -7 |
| 10 | 1010 | 12 | A | -6 |
| 11 | 1011 | 13 | B | -5 |
| 12 | 1100 | 14 | C | -4 |
| 13 | 1101 | 15 | D | -3 |
| 14 | 1110 | 16 | E | -2 |
| 15 | 1111 | 17 | F | -1 |
26.6 Floating point
Floating point numbers are used in computers for representing real numbers. Floating point numbers consist of four parts: sign (s), mantissa (or significand; m), base number (k), and exponent (c). The base number and exponent are used to define the magnitude of the number, and the mantissa describes the significant numbers in number. Number x can be calculated with the formula:
x = (-1)s · m · kc
In information technology, the most often used standard IEE 754 has the base number 2, for which the formula is:
x = (-1)s · m · 2c
In the IEE 754 standard the sign (s) of the number is marked in bit format with the first bit, in which case s can either be 0, indicating a positive number, or 1, indicating a negative number.
Next, we will study how float and double are presented in bit format.
The float is 32 bits in size. The first bit presents the sign, the following eight bits the exponent, and the remaining 23 bits the mantissa.
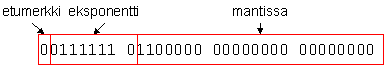
The double is 64 bits in size. The first bit presents the sign in doubles as well, the following 11 bits the exponent, and the remaining 52 bits the mantissa.

The exponent is presented so that the so-called BIAS value is subtracted from it. The BIAS value is 127 in float and 1023 in double. This way, the same binary number can be used to present both positive and negative exponents. If the bits that describe the exponent of the float were for example 01111110, i.e. 126 as a decimal number,the exponent would be 126 - 127 = -1.
The mantissa on the other hand is presented so that it's always at least 1. The bits representing the mantissa only represent the decimal of the mantissa. If the bits representing the mantissa of a float were for example 10100000000000000000000, the mantissa would be 1.101 as a binary number and 1.625 as a decimal number.
26.6.1 Converting the binary representation of a floating point number to a decimal number
Let's try to convert a few binary representations of floats into decimal numbers. The example float:
00111111 10000000 00000000 00000000The bits are now arranged by byte. We could also arrange the bits so that the different parts of the float are presented more clearly:
0 01111111 00000000000000000000000The first bit is zero, so the number is positive. The following eight bits are 01111111, which is equivalent to decimal number 127, so the exponent is 127-127 = 0. The bits representing the mantissa are just zeros, so the mantissa is 1.0, because the mantissa must always be at least 1. Now the formula of the floating point number can be used to calculate which number is in question:
x = (-1)0 · 1.0 · 20 = 1.0
So the real number in question is 1.0. As long as we remember to take into account the first bit as the sign, we can use an even simpler formula for calculating floating point numbers:
x = m · 2c
Let's convert the binary equivalent of another floating point number into a decimal number.
00111111 01100000 00000000 00000000The first bit is 0 once again, so the number is positive. The following eight bits are 01111110, which is equivalent to decimal number 126. So the exponent is 126-127 = -1. The remaining bits, the mantissa, is 11000000000000000000000 which means the mantissa is equivalent to binary number 1.11, which is equivalent to the decimal number 1.75. In other words, the real number presenting the floating point number is:
1.75 · 2-1 = 0.875
26.6.2 Converting decimal numbers to binary number representations of floating point numbers
When we convert a decimal number to the binary representation of a floating point number, we first need to find out the exponent of the floating point number. This can be done by scaling the number to range [1,2[ by multiplying or dividing the number repeatedly by 2 so that the number x is first in format:
x · 20
Now if we divide the number by two, the exponent increments by one. If we multiply by two, the exponent is reduced by one. This way the value of the number will not change and the number can be presented in the format
m · 2c
where m is a number in range [1,2[. This is the representation of a floating point number. Now we only need to convert the number to a binary number that the computer understands.
For example, let's convert the decimal number -0.1 to a binary representation of a floating point number. The sign is taken into account in the first bit, so we can handle the number 0.1. The number can be written in the format:
0.1 = 0.1 · 20
Now we multiply the number by two until it's in range [1,2[ and remember to subtract the exponent by one after each multiplication so that the value of the number doesn't change.
0.1 = 0.1 · 20 = 0.2 · 2-1 = 0.4 · 2-2 = 0.8 · 2-3 = 1.6 · 2-4
The exponent is -4, and we add the BIAS to it in the binary format of the floating point number, so we get the decimal number -4 + 127 = 123, which is 01111011 as a binary number. We will not convert the mantissa to a binary number. Remember that the whole number in the mantissa is not included in the binary representation of the floating point number.
First bit => 1 (not marked)
0.6 * 2 = 1.2 => 1
0.2 * 2 = 0.4 => 0
0.4 * 2 = 0.8 => 0
0.8 * 2 = 1.6 => 1
0.6 * 2 = 1.2 => 1We can already tell by now that the number is infinite because we had to multiply 0.6 by two already twice. We can stop calculating, because the sequence is already visible. When we extend the sequence to 23 bits, the mantissa amounts to binary number 10011001100110011001100. The following two bits would be 11, so the number is rounded to 10011001100110011001101. Now we have all the parts of the floating point number:
Sign bit: 1, because the original number was -0.1
Exponent: 01111011
Mantissa: 10011001100110011001101
So the combination is
1 01111011 10011001100110011001101The binary number can be arranged by byte:
10111101 11001100 11001100 11001101In Intel processors, the least significant byte is first, so in a computer's memory this number could be in format:
11001101 11001100 11001100 10111101In other words, the number 0.1 cannot be presented precisely as a floating point number, there will always be a small inaccuracy.
26.6.3 Note: the range of doubles
The floating point format is practical because the exponent allows it to utilise a very large range. 11 bits are reserved for the exponent in the double. The largest possible exponent in the double is therefore the binary number 11111111111 reduced by the BIAS value of the double. This results in the decimal number 2047 - 1023 = 1024. When the mantissa can be within the range [1,2[, the maximum value of double is 2*21024, which is ca. 3.59 * 10308. In other words, the range of double is ca. [-3.59* 10308, 3.59 * 10308] whereas the range of the long type is [-263,263[. So the double type can be used to present much larger numbers than the long type.
26.6.4 The accuracy of floating point numbers
Floating point numbers are accurate if the number they present can be presented with a combination of powers of two of the size of bits in the mantissa. For example, the numbers 0.5, 0.25 etc. are accurate. Unfortunately, as was noticed in the example above, the decimal number 0.1 cannot be presented accurately. For this reason, financial calculations use either cents or for example, the Decimal class in C# (BigDecimal in Java). However, these special types are slower in calculations, although not necessarily significantly, depending on the situation.
On the other hand, floating point numbers can be used to present whole numbers accurately, up until the value 2mantissa_bit_count. So double (52 bits for the mantissa) can be used to handle larger integers than the int type (32 bits for presenting numbers). The 64 bits in the long can be used to present even larger accurate integers than the double type. The ready-made integer types are usually faster than floating point types, which is why it more favourable to use integer types. However, with modern processors, double and float type calculations do not differ significantly in terms of processing speed, which is why double is usually the primary choice for presenting real numbers. All mobile platforms do not necessarily use floating point number types, which needs to be taken into accountin special cases. In some cases, the language (for example Java) may support floating point numbers, but the target platform has no processor support for them. In these cases, using floating point numbers can be slow. If necessary, calculations can be made so that the number range is scaled virtually so that internally, the number 1000 is logically 1 and 1 is logically 0.001 (fixed point arithmetic).
For example, the following program does not print the number 100 although it should:
If we replace the inaccurate 0.1 with the precise 0.25, the number 250 is printed as is supposed to.
An even worse situation is if we add small numbers to large numbers. For example, in the following example, the numbers added to 10 million have no effect.
For this reason, a sequence for example should be calculated by starting the addition from the smallest number.
26.6.5 Even Intel processors have failed to calculate floating point numbers correctly at times
Intel processors were on the Wired magazine's top 10 list of History's Worst Software Bugs because in 1993, errors in division by floating point numbers on a specific range appeared. Replacing the chips cost Intel ca 475 million dollars. The error only occurred in a few highly mathematic problems and didn't affect the ordinary office users in any way. You can read more about this and the other bugs on the list from the linked article below.
27. ASCII
ASCII (American Standard Code for Information Interchange) is an encoding system that uses a 7-bit coding. In other words, it can only present 128 characters. As the name suggests, Scandinavian letters are not included, which causes problems in computers to this day when moving from an encoding that supports Scandinavian letters to ASCII encoding.
In ASCII encoding each character has an equivalent 7-bit binary number. Equivalents are presented in the table below, with also the equivalent decimal number and hexadecimal number.
Table 10: ASCII encoding.
| Des | Hex | Merkki | Des | Hex | Merkki | Des | Hex | Mer | Des | Hex | Mer |
| 0 | 0 | NUL (null) | 32 | 20 | Space | 64 | 40 | @ | 96 | 60 | ` |
| 1 | 1 | SOH (start of title) | 33 | 21 | ! | 65 | 41 | A | 97 | 61 | a |
| 2 | 2 | STX (start of text) | 34 | 22 | " | 66 | 42 | B | 98 | 62 | b |
| 3 | 3 | ETX (end of text) | 35 | 23 | # | 67 | 43 | C | 99 | 63 | c |
| 4 | 4 | EOT (end of transmission) | 36 | 24 | $ | 68 | 44 | D | 100 | 64 | d |
| 5 | 5 | ENQ (enquiry) | 37 | 25 | % | 69 | 45 | E | 101 | 65 | e |
| 6 | 6 | ACK (acknowledge) | 38 | 26 | & | 70 | 46 | F | 102 | 66 | f |
| 7 | 7 | BEL (bell) | 39 | 27 | ' | 71 | 47 | G | 103 | 67 | g |
| 8 | 8 | BS (backspace) | 40 | 28 | ( | 72 | 48 | H | 104 | 68 | h |
| 9 | 9 | TAB (tabulator) | 41 | 29 | ) | 73 | 49 | I | 105 | 69 | i |
| 10 | A | LF (new line) | 42 | 2A | * | 74 | 4A | J | 106 | 6A | j |
| 11 | B | VT (vertical tab) | 43 | 2B | + | 75 | 4B | K | 107 | 6B | k |
| 12 | C | FF (form feed) | 44 | 2C | , | 76 | 4C | L | 108 | 6C | l |
| 13 | D | CR (carriage return) | 45 | 2D | - | 77 | 4D | M | 109 | 6D | m |
| 14 | E | SO (shift out) | 46 | 2E | , | 78 | 4E | N | 110 | 6E | n |
| 15 | F | SI (shift in) | 47 | 2F | / | 79 | 4F | O | 111 | 6F | o |
| 16 | 10 | DLE (data link escape) | 48 | 30 | 0 | 80 | 50 | P | 112 | 70 | p |
| 17 | 11 | DC1(device control 1) | 49 | 31 | 1 | 81 | 51 | Q | 113 | 71 | q |
| 18 | 12 | DC2(device control 2) | 50 | 32 | 2 | 82 | 52 | R | 114 | 72 | r |
| 19 | 13 | DC3(device control 3) | 51 | 33 | 3 | 83 | 53 | S | 115 | 73 | s |
| 20 | 14 | DC4(device control 4) | 52 | 34 | 4 | 84 | 54 | T | 116 | 74 | t |
| 21 | 15 | NAK (negative acknowledge) | 53 | 35 | 5 | 85 | 55 | U | 117 | 75 | u |
| 22 | 16 | SYN (synchronous table) | 54 | 36 | 6 | 86 | 56 | V | 118 | 76 | v |
| 23 | 17 | ETB (end of trans. block) | 55 | 37 | 7 | 87 | 57 | W | 119 | 77 | w |
| 24 | 18 | CAN (cancel) | 56 | 38 | 8 | 88 | 58 | X | 120 | 78 | x |
| 25 | 19 | EM (end of medium) | 57 | 39 | 9 | 89 | 59 | Y | 121 | 79 | y |
| 26 | 1A | SUB (substitute) | 58 | 3A | : | 90 | 5A | Z | 122 | 7A | z |
| 27 | 1B | ESC (escape) | 59 | 3B | ; | 91 | 5B | [ | 123 | 7B | { |
| 28 | 1C | FS (file separator) | 60 | 3C | < | 92 | 5C | \ | 124 | 7C | | |
| 29 | 1D | GS (group separator) | 61 | 3D | = | 93 | 5D | ] | 125 | 7D | } |
| 30 | 1E | RS (record separator) | 62 | 3E | > | 94 | 5E | ^ | 126 | 7E | ~ |
| 31 | 1F | US (unit separator) | 63 | 3F | ? | 95 | 5F | _ | 127 | 7F | DEL |
| Des | Hex | Merkki | Des | Hex | Merkki | Des | Hex | Mer | Des | Hex | Mer | |||
| 0 | 0 | NUL (null) | 32 | 20 | Space | 64 | 40 | @ | 96 | 60 | ` | |||
| 1 | 1 | SOH (otsikon alku) | 33 | 21 | ! | 65 | 41 | A | 97 | 61 | a | |||
| 2 | 2 | STX (tekstin alku) | 34 | 22 | " | 66 | 42 | B | 98 | 62 | b | |||
| 3 | 3 | ETX (tekstin loppu) | 35 | 23 | # | 67 | 43 | C | 99 | 63 | c | |||
| 4 | 4 | EOT (end of transmission) | 36 | 24 | $ | 68 | 44 | D | 100 | 64 | d | |||
| 5 | 5 | ENQ (enquiry) | 37 | 25 | % | 69 | 45 | E | 101 | 65 | e | |||
| 6 | 6 | ACK (acknowledge) | 38 | 26 | & | 70 | 46 | F | 102 | 66 | f | |||
| 7 | 7 | BEL (bell) | 39 | 27 | ' | 71 | 47 | G | 103 | 67 | g | |||
| 8 | 8 | BS (backspace) | 40 | 28 | ( | 72 | 48 | H | 104 | 68 | h | |||
| 9 | 9 | TAB (tabulaattori) | 41 | 29 | ) | 73 | 49 | I | 105 | 69 | i | |||
| 10 | A | LF (uusi rivi) | 42 | 2A | * | 74 | 4A | J | 106 | 6A | j | |||
| 11 | B | VT (vertical tab) | 43 | 2B | + | 75 | 4B | K | 107 | 6B | k | |||
| 12 | C | FF (uusi sivu) | 44 | 2C | , | 76 | 4C | L | 108 | 6C | l | |||
| 13 | D | CR (carriage return) | 45 | 2D | - | 77 | 4D | M | 109 | 6D | m | |||
| 14 | E | SO (shift out) | 46 | 2E | . | 78 | 4E | N | 110 | 6E | n | |||
| 15 | F | SI (shift in) | 47 | 2F | / | 79 | 4F | O | 111 | 6F | o | |||
| 16 | 10 | DLE (data link escape) | 48 | 30 | 0 | 80 | 50 | P | 112 | 70 | p | |||
| 17 | 11 | DC1(device control 1) | 49 | 31 | 1 | 81 | 51 | Q | 113 | 71 | q | |||
| 18 | 12 | DC2(device control 2) | 50 | 32 | 2 | 82 | 52 | R | 114 | 72 | r | |||
| 19 | 13 | DC3(device control 3) | 51 | 33 | 3 | 83 | 53 | S | 115 | 73 | s | |||
| 20 | 14 | DC4(device control 4) | 52 | 34 | 4 | 84 | 54 | T | 116 | 74 | t | |||
| 21 | 15 | NAK (negative acknowledge) | 53 | 35 | 5 | 85 | 55 | U | 117 | 75 | u | |||
| 22 | 16 | SYN (synchronous table) | 54 | 36 | 6 | 86 | 56 | V | 118 | 76 | v | |||
| 23 | 17 | ETB (end of trans. block) | 55 | 37 | 7 | 87 | 57 | W | 119 | 77 | w | |||
| 24 | 18 | CAN (cancel) | 56 | 38 | 8 | 88 | 58 | X | 120 | 78 | x | |||
| 25 | 19 | EM (end of medium) | 57 | 39 | 9 | 89 | 59 | Y | 121 | 79 | y | |||
| 26 | 1A | SUB (substitute) | 58 | 3A | : | 90 | 5A | Z | 122 | 7A | z | |||
| 27 | 1B | ESC (escape) | 59 | 3B | ; | 91 | 5B | [ | 123 | 7B | { | |||
| 28 | 1C | FS (file separator) | 60 | 3C | < | 92 | 5C | \ | 124 | 7C | | | |||
| 29 | 1D | GS (group separator) | 61 | 3D | = | 93 | 5D | ] | 125 | 7D | } | |||
| 30 | 1E | RS (record separator) | 62 | 3E | > | 94 | 5E | ^ | 126 | 7E | ~ | |||
| 31 | 1F | US (unit separator) | 63 | 3F | ? | 95 | 5F | _ | 127 | 7F | DEL |
In many programming languages, for example C and Java, the decimal values of ASCII characters can be assigned straight to char type variables. For example the letter a can be assigned in variable c as follows:
This cannot be done in C#, first we need to make a typecast:
For example a file that has the logical content
Cat sits
in a treewould actually consist of bits in a Windows operating system (presented below in hexadecimals to make reading easier):
4B 69 73 73 61 20 69 73 74 75 75 0D 0A 70 75 75 73 73 61The difference between operating systems is how line breaks are presented. In Windows, the line break is CR LF (0D 0A) and in Unix-based systems just LF (0A).
The content of a file can be viewed for example by giving the following command in the command prompt (if the file is named cat.txt)
C:\MyTemp>debug cat.txt
-d
0D2F:0100 4B 69 73 73 61 20 69 73-74 75 75 0D 0A 70 75 75 Kissa istuu..puu
0D2F:0110 73 73 61 61 61 6D 65 74-65 72 73 20 34 00 1E 0D ssaaameters 4...
...
-q27.1 Other encoding systems
Read more about encoding systems (in Finnish).
28. Describing syntax
28.1 BNF
This chapter describes the syntax of the Java language. Syntax, i.e. sentence grammar, can be described with metalanguage BNF (Backus-Naur Form). The basic elements of the language are presented in the table below:
| Symbol | Description |
|---|---|
<> |
A BNF pattern consists of non-terminals and terminals . Non-terminals are written between the less than (<) and greater than (>) characters. Each non-terminal needs to be defined somewhere. Terminals on the other hand are written in code as is. |
::= |
Starts the definition of non-terminals. The definition can contain new terminals and non-terminals. |
| |
The "|" character describes the word "or". It indicates that the part on the left side of the "|" can be replaced with the part on the right side. |
Definition in general format is as follows:
<non-terminal> ::= _statement_In which _statement_ can contain new non-terminals and terminals as well as "|" characters.
Describing the syntax of a language starts with the definition of the compilation unit. In java, this is a .java file. This is the first non-terminal that is defined. This definition contains other non-terminals, which all have their own definitions. Definitions continue until there are only terminals left and the syntax of the language is defined unambigiously.
For example, the syntax of defining a local variable can be described as follows.
<local variable declaration statement> ::= <local variable declaration>;
<local variable declaration> ::= <type> <variable declarators>
<type> ::= <primitive type> | <reference type>
<primitive type> ::= <numeric type> | boolean
<numeric type> ::= <integral type> | <floating-point type>
<integral type> ::= byte | short | int | long | char
<floating-point type> ::= float | double
<reference type> ::= <class or interface type> | <array type>
<class or interface type> ::= <class type> | <interface type>
<class type> ::= <type name>
<interface type> ::= <type name>
<array type> ::= <type> []
<variable declarators> ::= <variable declarator> | <variable declarators> ,
<variable declarator>
<variable declarator> ::= <variable declarator id> |
<variable declarator id>= <variable initializer>
<variable declarator id> ::= <identifier> | <variable declarator id> []
<variable initializer> ::= <expression> | <array initializer>We will stop the definition of the variable here. In its entirety it would very long. The entire syntax of Java as BNF can be found behind the following link.
28.2 Extended BNF (EBNF)
Describing syntax with the original BNF can be quite laborous. For this reason extended BNF (EBNF) was introduced. In it, terminals are written within quotes and non-terminals without "<>". It comes with two new features.
| Symbol | Description |
|---|---|
{} |
The parts in braces can either be left out completely or repeated once or multiple times. |
[] |
The parts within brackets can be executed either once or not at all. |
The syntax for a general variable definition can be described with EBNF as follows:
variable_declaration ::= { modifier } type variable_declarator
{ "," variable_declarator } ";"
modifier ::= "public" | "private" | "protected" | "static" | "final" | "native" |
"synchronized" | "abstract" | "threadsafe" | "transient"
type ::= type_specifier { "[" "]" }
type_specifier ::= "boolean" | "byte" | "char" | "short" | "int" | "float" | "long"
| "double" | class_name | interface_name
variable_declarator ::= identifier { "[" "]" } [ "="variable_initializer ]
identifier ::= "a..z,$,_" { "a..z,$,_,0..9,unicode character over 00C0" }
variable_initializer ::= expression | ( "{" [ variable_initializer
{ "," variable_initializer } [ "," ] ] "}" )Breaking down the expression would cause more and more non-terminals, so it's best to leave the description of variable definition here. You can study the rest of the definition here:
However, the aforementioned syntax does not seem perfect. The official Java syntax decribed with another metalanguage can be found behind the link:
https://docs.oracle.com/javase/specs/jls/se8/html/jls-19.html
Similarly, a syntax can be described with "railroads".
This is one graphical method for descibing a syntax. In railroads, non-terminals are pictured as rectangles and terminals are rounded rectangles. Options are pictured as crossroads where one of the rail options is selected. Additionally, rails have "loops", which can be used to make several laps. In other words, loops describe the statements between the "{}" characters. In addition, there are "passing rails", which can be used to pass some part entirely. These describe the statements between the "[]" characters.

The image is still missing the railroad representatuion of the identifier and variable_initializer non-terminals. Draw their "railroads" in a similar manner.
You can also draw railroads e.g. with the Railroad Diagram Generator. Note however that it uses a slightly different syntax e.g. for presenting iteration.
More information:
Paavo Nieminen's Programming 1 course slides (In Finnish) from 2007. Railroads are also found in other Paavo's slides.
The Java syntax described with EBNF. Also includes graphical railroads. This description is not as specific as Oracle's own description.
Wikipedia: Backus-Naur Form
The C# syntax is also described in the MSDN documentation and in EBNF format for example on Extern Soft's website.
29. Epilogue
Sometimes programming just makes you feel like this:
Get used to it and make some more coffee.
Appendix: Vocabulary
Here are some useful programming terms (FIN-ENG).
| aliohjelma | subprogram, subroutine, procedure | konstruktori | constructor | rajapinta | interface |
| alirajapinta | subinterface | koodaus- käytänteet |
coding conventions | roskienkeruu | garbage collection |
| alivuoto | underflow | kääntäjä | compiler | roskien- kerääjä |
garbage collector |
| alkeistieto - tyyppi |
primitive types | kääriä | wrap | sijoitus- lause |
assignment statement |
| alkio | element | lause | statement | sijoitus- operaattori |
assignment operator |
| alustaa | initialize | lippu | flag | silmukka | loop |
| aritmeettinen operaatio | arithmetic operation | lohko | block | sovellus- kehitin |
Integrated Development Environment |
| aritmeettinen lauseke | arithmetic expression | luokka | class | staattinen | static |
| bugi | bug | metodi | method | standardi syöttövirta | standard input stream |
| destruktori | destructor | muuttuja | variable | standardi tulostusvirta | standard output stream |
| dokumentaatio | documentation | määritellä | declare | standardi virhetulostus- virta |
standard error output stream |
| funktio | function | olio | object | syntaksi | syntax |
| globaali vakio | global constant | ottaa kiinni | catch | taulukko | array |
| globaali muuttuja | global variable | paketti | package | testaus | testing |
| indeksi | index | parametri | parameter | toteuttaa | implement |
| julkinen | public | periytyminen | inheritance | tuoda | import |
| keskeytys- kohta |
breakpoint | poikkeus | exception | vakio | constant |
| komentorivi | Command Prompt | poikkeusten- hallinta |
exception handling | yksikkö- testaus- rajapinta |
unit testing framework |
| ylivuoto | overflow |
Appendix: Most common error messages and their causes
A beginning programmer may sometimes struggle with figuring out what the error messages that the compiler gives mean. Here is a list of some of the most common error messages a C# compiler gives. Some of the error messages are Jypeli-specific.
More error messages and their interpretations (in Finnish) can be found from the course extra information page.
Type or namespace not found
The type or namespace name 'PhysisObject' could not be found
(are you missing a using directive or an assembly reference?)Possible reasons:
Have you spelled the name of e.g. the subroutine or type wrong? Look at words that are written in red. In the error message above, the word PhysicsObject is accidentally spelled PhysisObject. Use Visual Studio's word completion (IntelliSense) to avoid spelling errors.
Some library is missing (see Adding libraries to project; in Finnish: wiki, video)
Some using statement is missing. The following using statements are included automatically in the project models for Jypeli games:
using System; using Jypeli; using Jypeli.Widgets; using Jypeli.Assets;
Game.Subroutine(): not all code paths return a value
The subroutine has been given a return value, but it doesn't return anything (i.e. the return statement is missing).
In the following subroutine, the defined return value is PhysicsObject, but the subroutine doesn't return any value.
PhysicsObject CreateBall()
{
PhysicsObject ball = new PhysicsObject(50.0, 50.0, Shape.Circle);
}This results in Visual Studio giving the following error message.

If we want to return the circle we created in the subroutine, the following correction to the subroutine needs to be made.
PhysicsObject CreateBall()
{
PhysicsObject ball = new PhysicsObject(50.0, 50.0, Shape.Circle);
return ball;
}Variable does not exist in the current context
The name 'mass' does not exist in the current contextThe following strip of code uses a variable called mass, but the variable has not been introduced anywhere. Each variable that is used in the program needs to be introduced somewhere. Introduction means that we write a line with the variable type and name as follows:
double mass;We can also assign the variable some initial value on the same line as the introduction:
double mass = 100.0;In other words, the error in the strip of code we just viewed can be corrected by giving the type of the variable mass (type is double) when the variable is first used:
If the variable is introduced in a subroutine as a local variable, it must be initialized before use. If the variable is needed in multiple methods, it can be introduced as an attribute inside the class:
public class Game : PhysicsGame
{
private double mass; // An attribute that is visible to all class methods
public override void Begin()
{
mass = 100.0;
PhysicsObject ball = new PhysicsObject(50.0, 50.0, Shape.Circle);
ball.Mass = mass;
PrintMass();
}
public void PrintMass() // NOTE! Not static
{
MessageDisplay.Add("Mass is " + mass);
}
}Älä kuitenkaan innostu liikaa attribuuteista, koska niitä käytetään yleensä aivan liikaa. Parempi on viedä asioita parametrina.
Bibliography
DOC: Sun, , ,http://java.sun.com/j2se/javadoc/writingdoccomments/index.html
HYV: Hyvönen Martti, Lappalainen Vesa, Ohjelmointi 1, 2009
KOSK: Jussi Koskinen, Ohjelmistotuotanto-kurssin luentokalvot(Osa: Ohjelmistojen ylläpito),
KOS: Kosonen, Pekka; Peltomäki, Juha; Silander, Simo, Java 2 Ohjelmoinnin peruskirja, 2005
VES: Vesterholm, Mika; Kyppö, Jorma, Java-ohjelmointi, 2003
LAP: Vesa Lappalainen, Ohjelmointi 2, https://tim.jyu.fi/view/2
MÄN: Männikkö, Timo, Johdatus ohjelmointiin- moniste, 2002
LIA: Y. Daniel Liang, Introduction to Java programming, 2003
DEI: Deitel, H.M; Deitel, P.J, Java How to Program, 2003
Jyväskylän yliopisto University of Jyväskylä
Information Technology
These are the current permissions for this document; please modify if needed. You can always modify these permissions from the manage page.