This is a one-page version of the guide, with all the instructions on the same page. In the multi-page version of the guide , each chapter is divided into its own page. You can select the multi-page version from the navigation bar at the top of .
Remember that in this version you can search with keywords using ctrl + f.
1. About TIM
The chapter teaches
- how to log in to TIM
- how to register to TIM
- basic operations of the home page
- basic operations of the document.
The basic structure of TIM
The basic concepts of TIM are:
- document
- a document can be for example a book, a lecture note, a weekly assignment page, a registration page, a questionnaire, an agenda. So basically anything with text.
- a document consists of blocks
- block
- a block can be one or more pieces of text, which can also contain images
- the text can use mathematical (
 ) notations
 - a block can be written in MarkDown (md), -, HTML etc. languages
- a block can be a plugin
- plugin
- a plugin can be for example a video, table, multiple choice, text area, etc.
- usually a plugin is something interactive, hence the name The Interactive Material
- plugins are described in YAML or JSON
- folder
- basically a TIM consists of documents. To structure the documents a document can be given one or more directories where the document can be found
- for example a course can be thought of as a set of documents in the same directory (or subdirectories)
- user
- one TIM user who can be logged in or anonymous
- logged in users can be assigned different permissions based on their username or groups, to which they belong
- group
- a group of users who can be granted rights or managed as a single group
- preamble
- special document, whose contents are appended to the beginning of all documents in the same directory structure
- preamble may contain, for example, a menu, which in this way appears at the beginning of each page
- preamble may contain macros, which allows certain strings to be replaced by others in all documents
- macro
- a string that is replaced by another string when the document is displayed
- for example, a macro
vuosi: 2023can be made and then written in the documentTämä on vuoden %%vuosi%% materiaaliso that the text would appearTämä on vuoden 2023 materiaali. - macros allow frequently repeated queues to be easily maintained from a single location. Or even if the queue itself is not a one-time occurrence, the deadlines for different locations, such as scheduling , can be maintained from a single location.
- area
- a set of blocks can be defined as an area, which can be visible, hidden or shrinkable
- copy by reference
- a block or area of a document can be copied to the same or another document
- copying can also be done by quoting, in which case the quoted area/block of the target document changes whenever it is changed in the source document
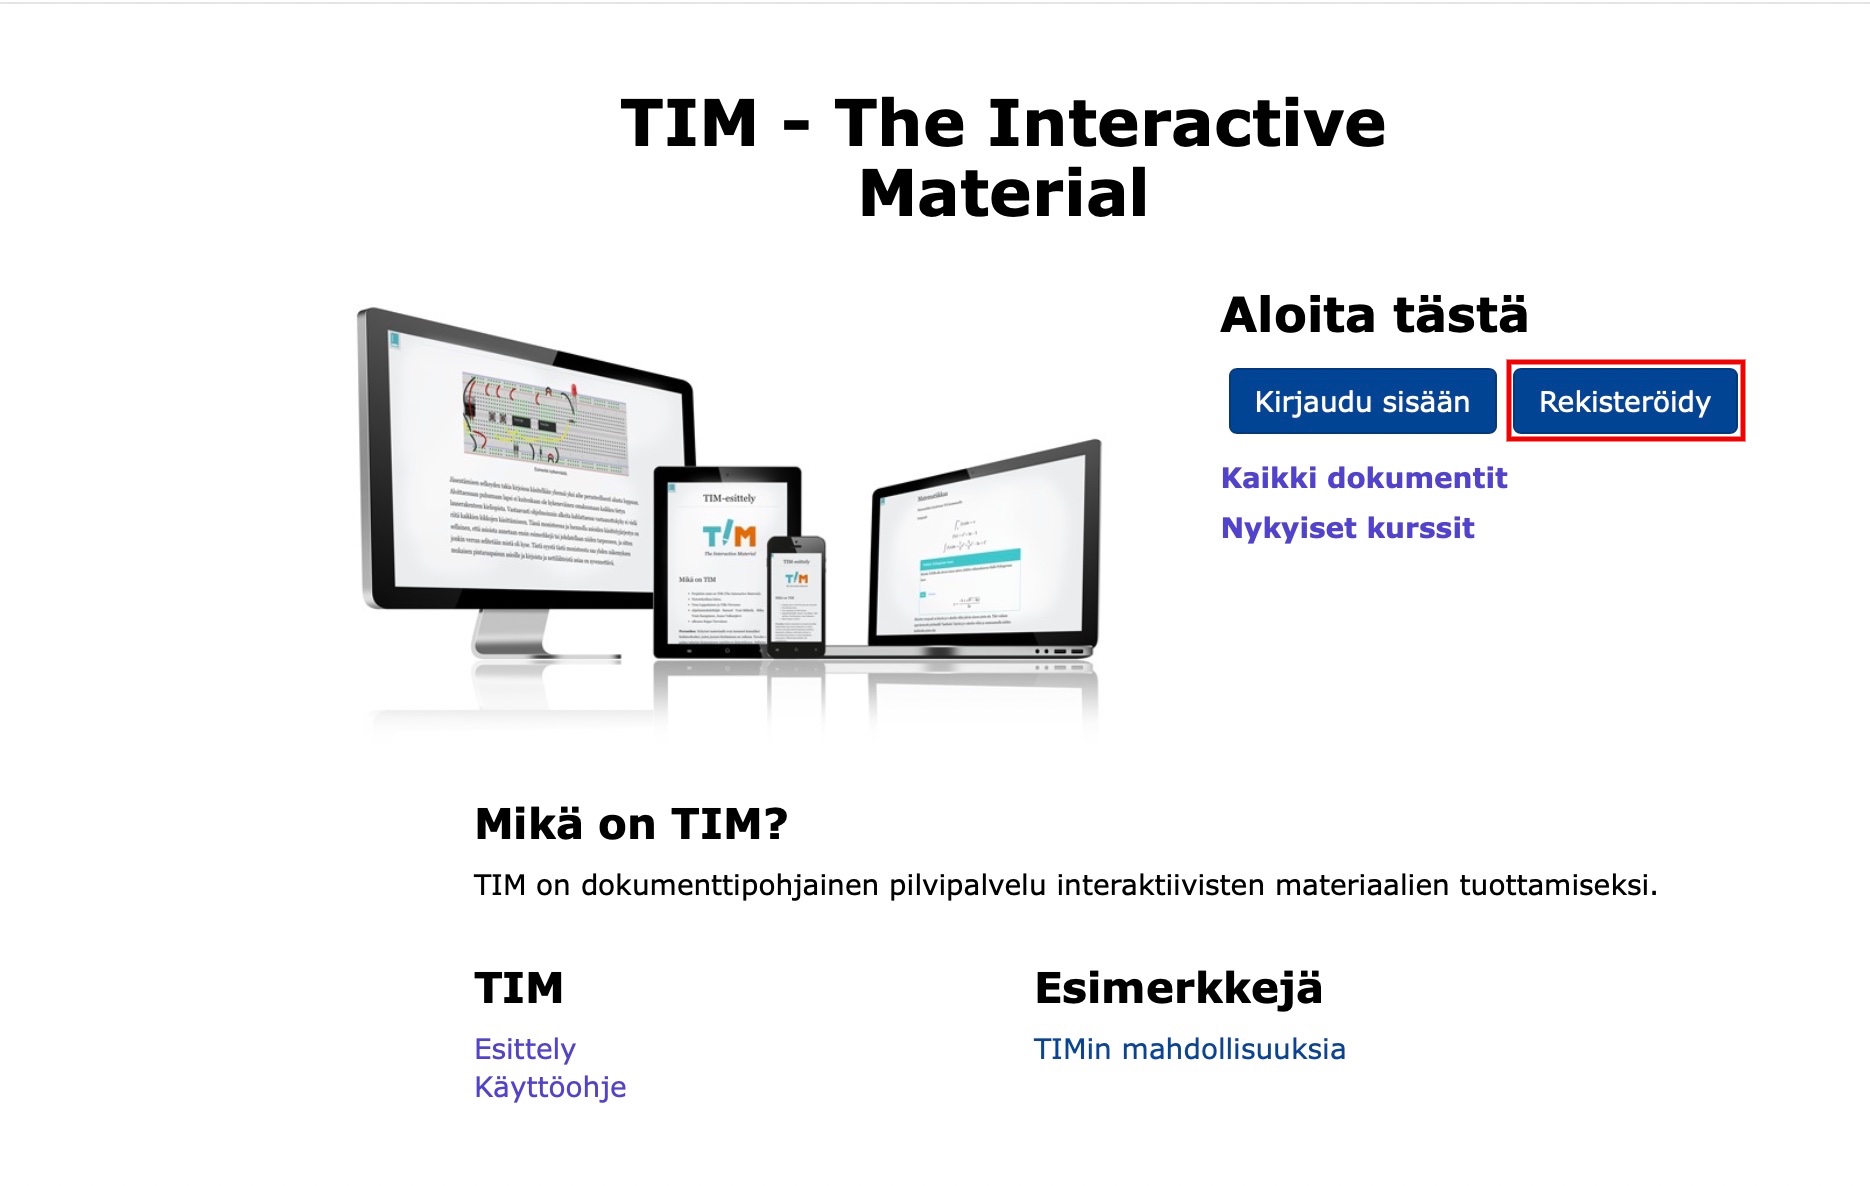
1.1 Functions on the homepage
Log in at
- Log in to TIM with your Haka ID or TIM account.
- After logging in, you will be taken to the TIM welcome page.
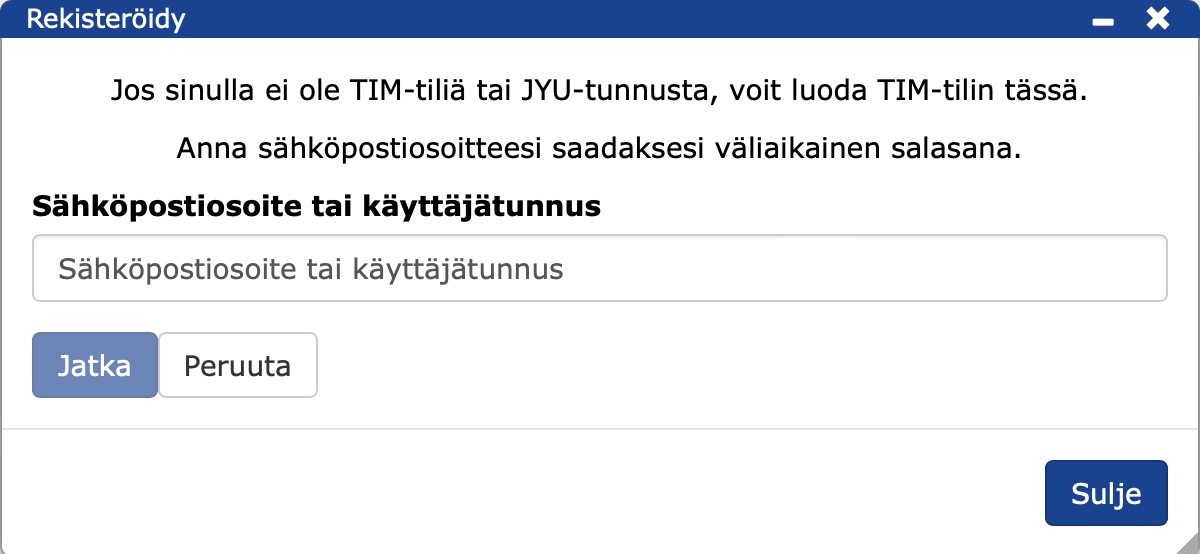
To register
- If you do not have the necessary credentials, please register as a TIM user.
- Click Register.
- Fill in your e-mail address in the form that appears.
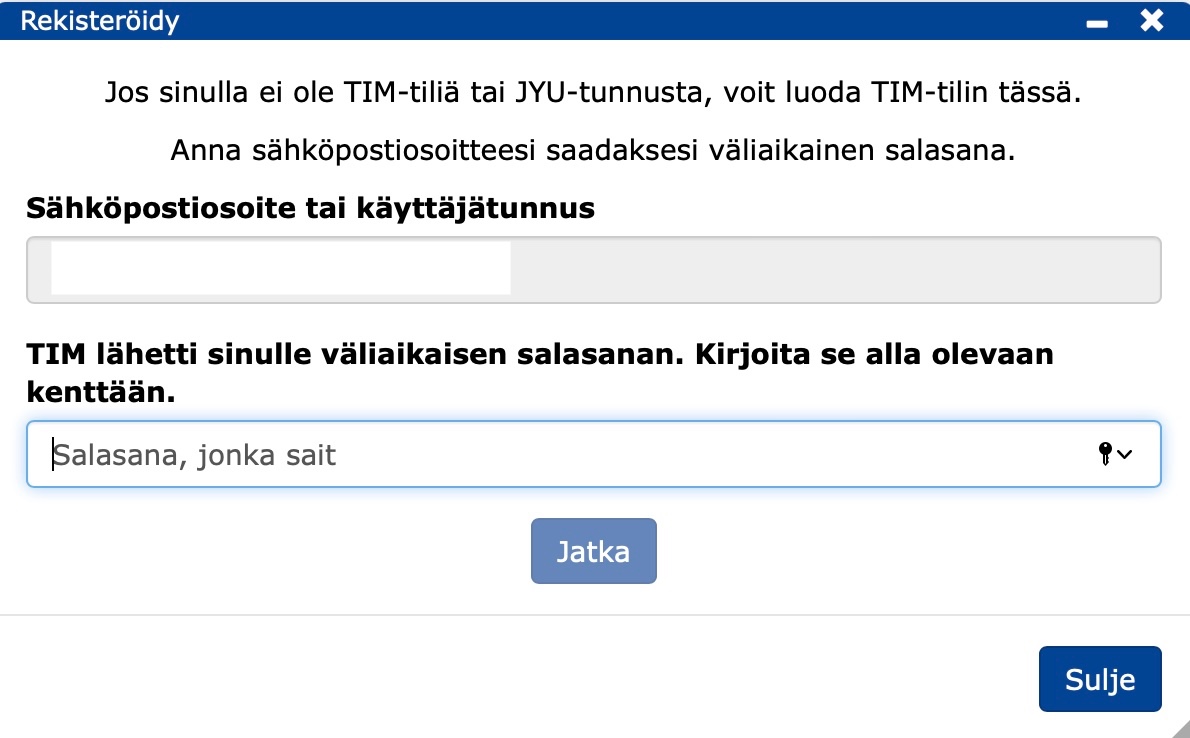
- You will receive a temporary password in the e-mail you have sent.
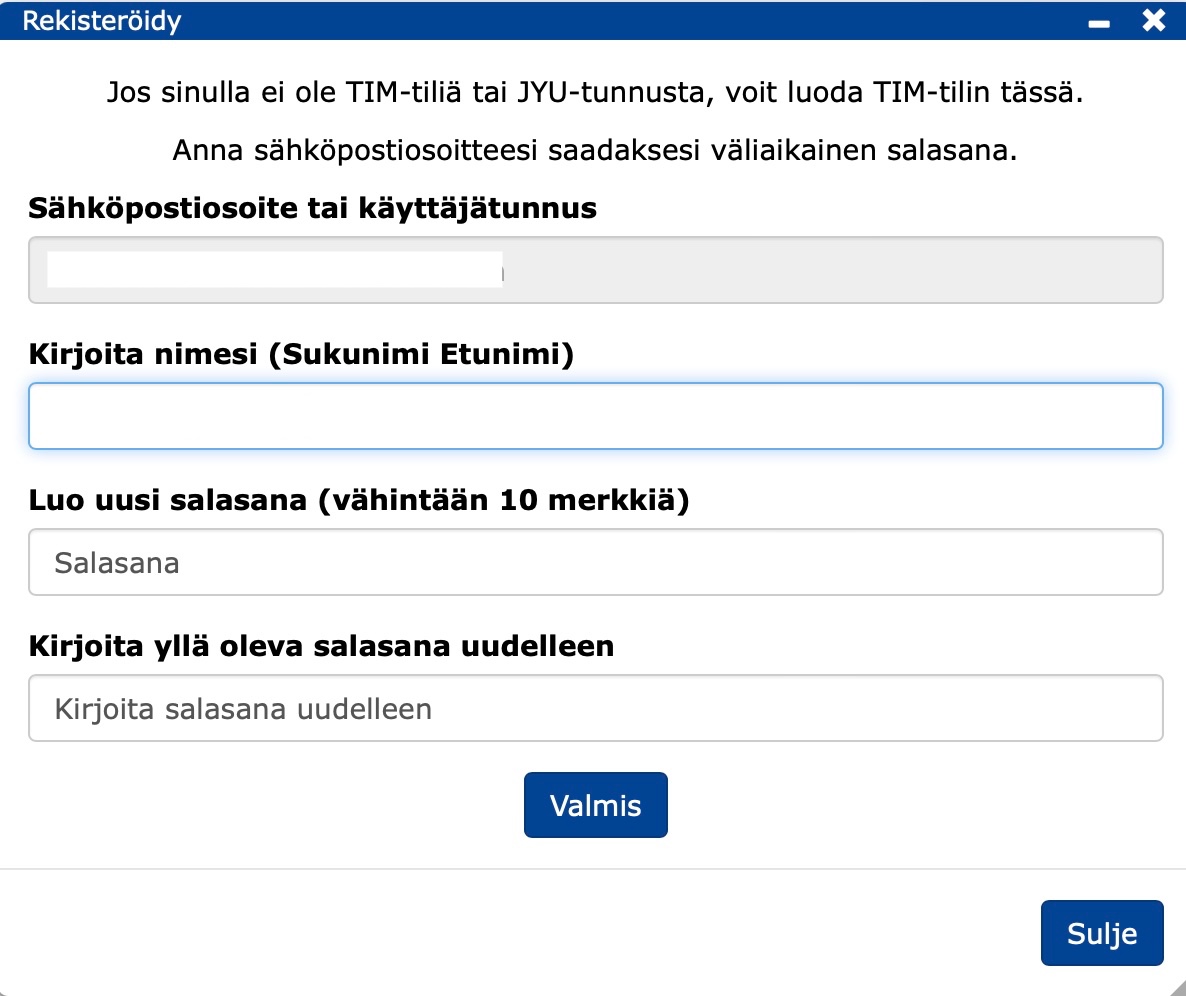
- Create a new password.
After logging in, you will be taken to the TIM welcome page.
Basic functions
- By clicking on the arrow to the right of your name, you can select:
- Omat dokumentit / My documents
- Add a user to this session (login to TIM)
- Log out / Log out.
- You can select the language (Finnish/English) under Kieli / Language:
- In TIM, some functions are always in English.
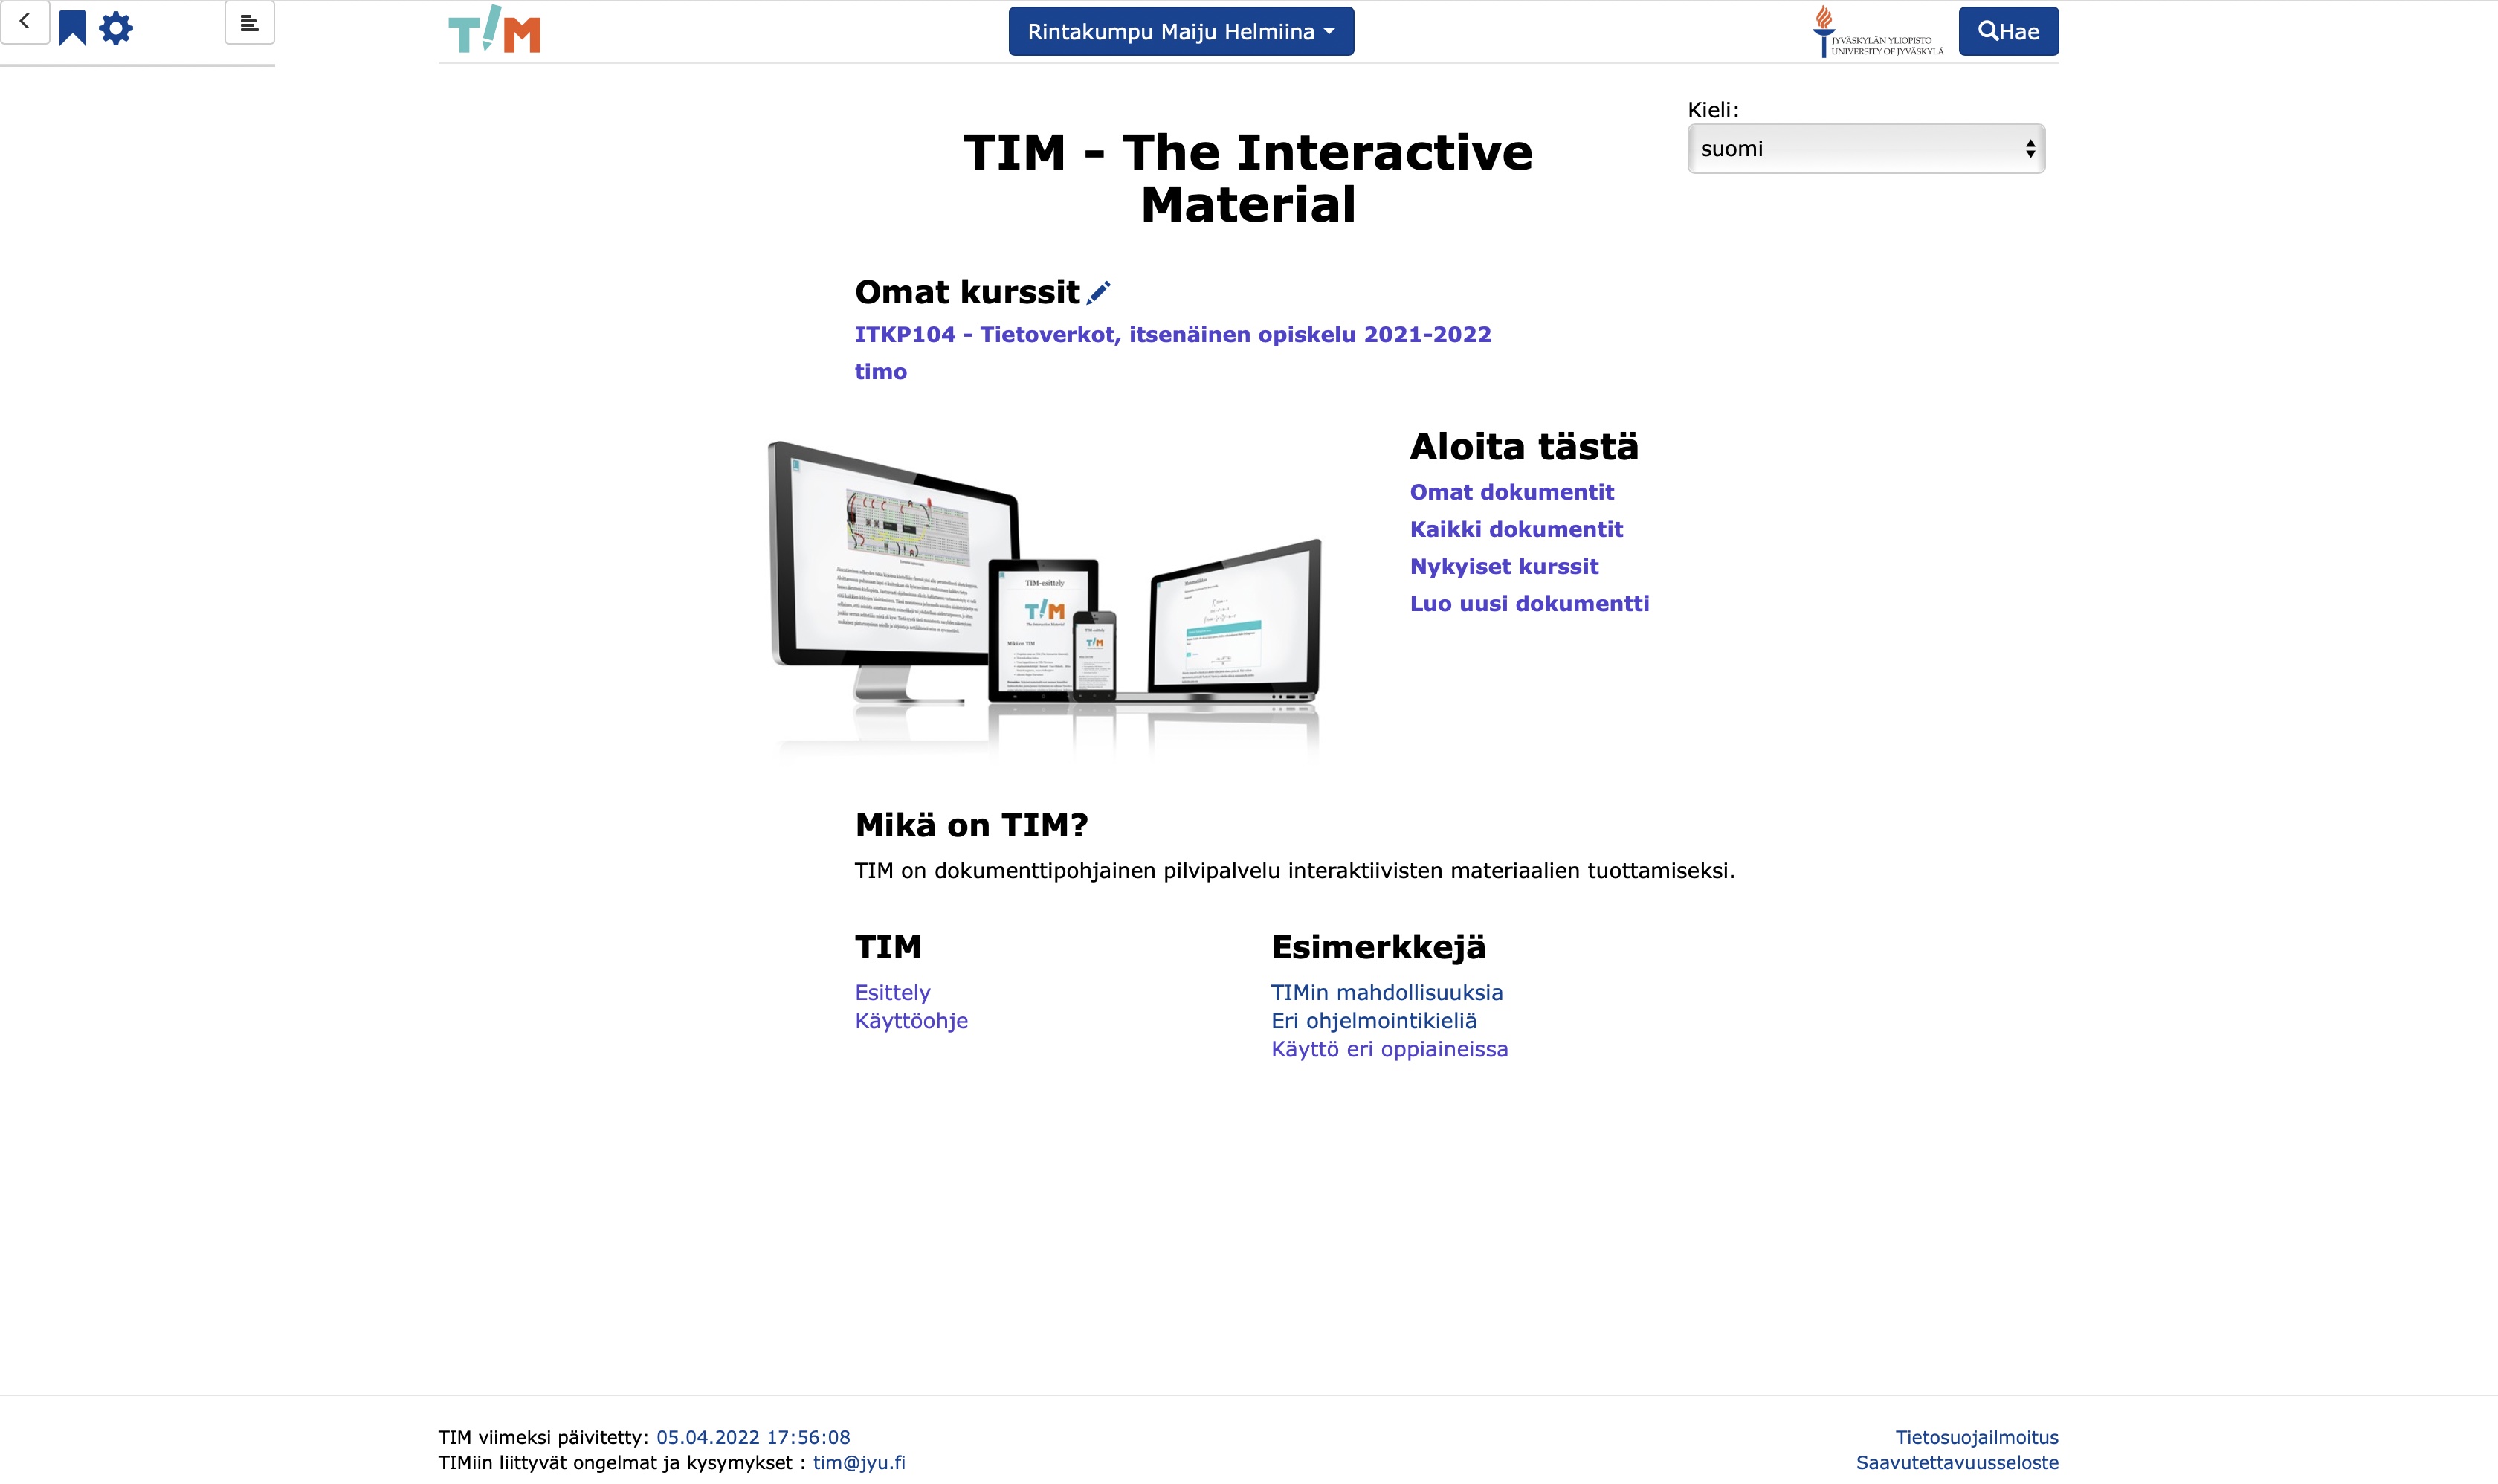
The functions in the top left corner:
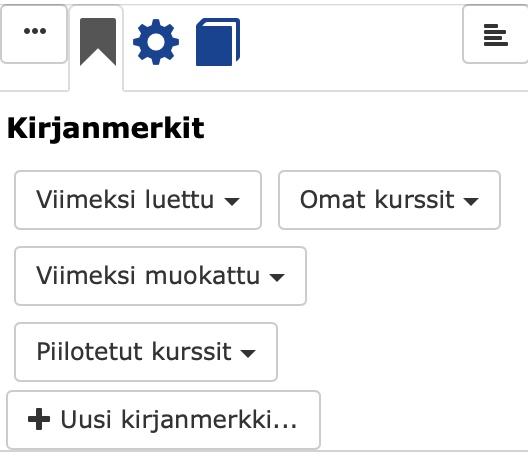
- Click on the bookmark to get a list of bookmarks and add a new bookmark.
- Click on the wheel to find different functions depending on the page you are on and the rights you have in TIM.
- The TIM logo
 appears on all TIM pages and clicking on it takes you back to the TIM home page.
  button you will find the search menu.
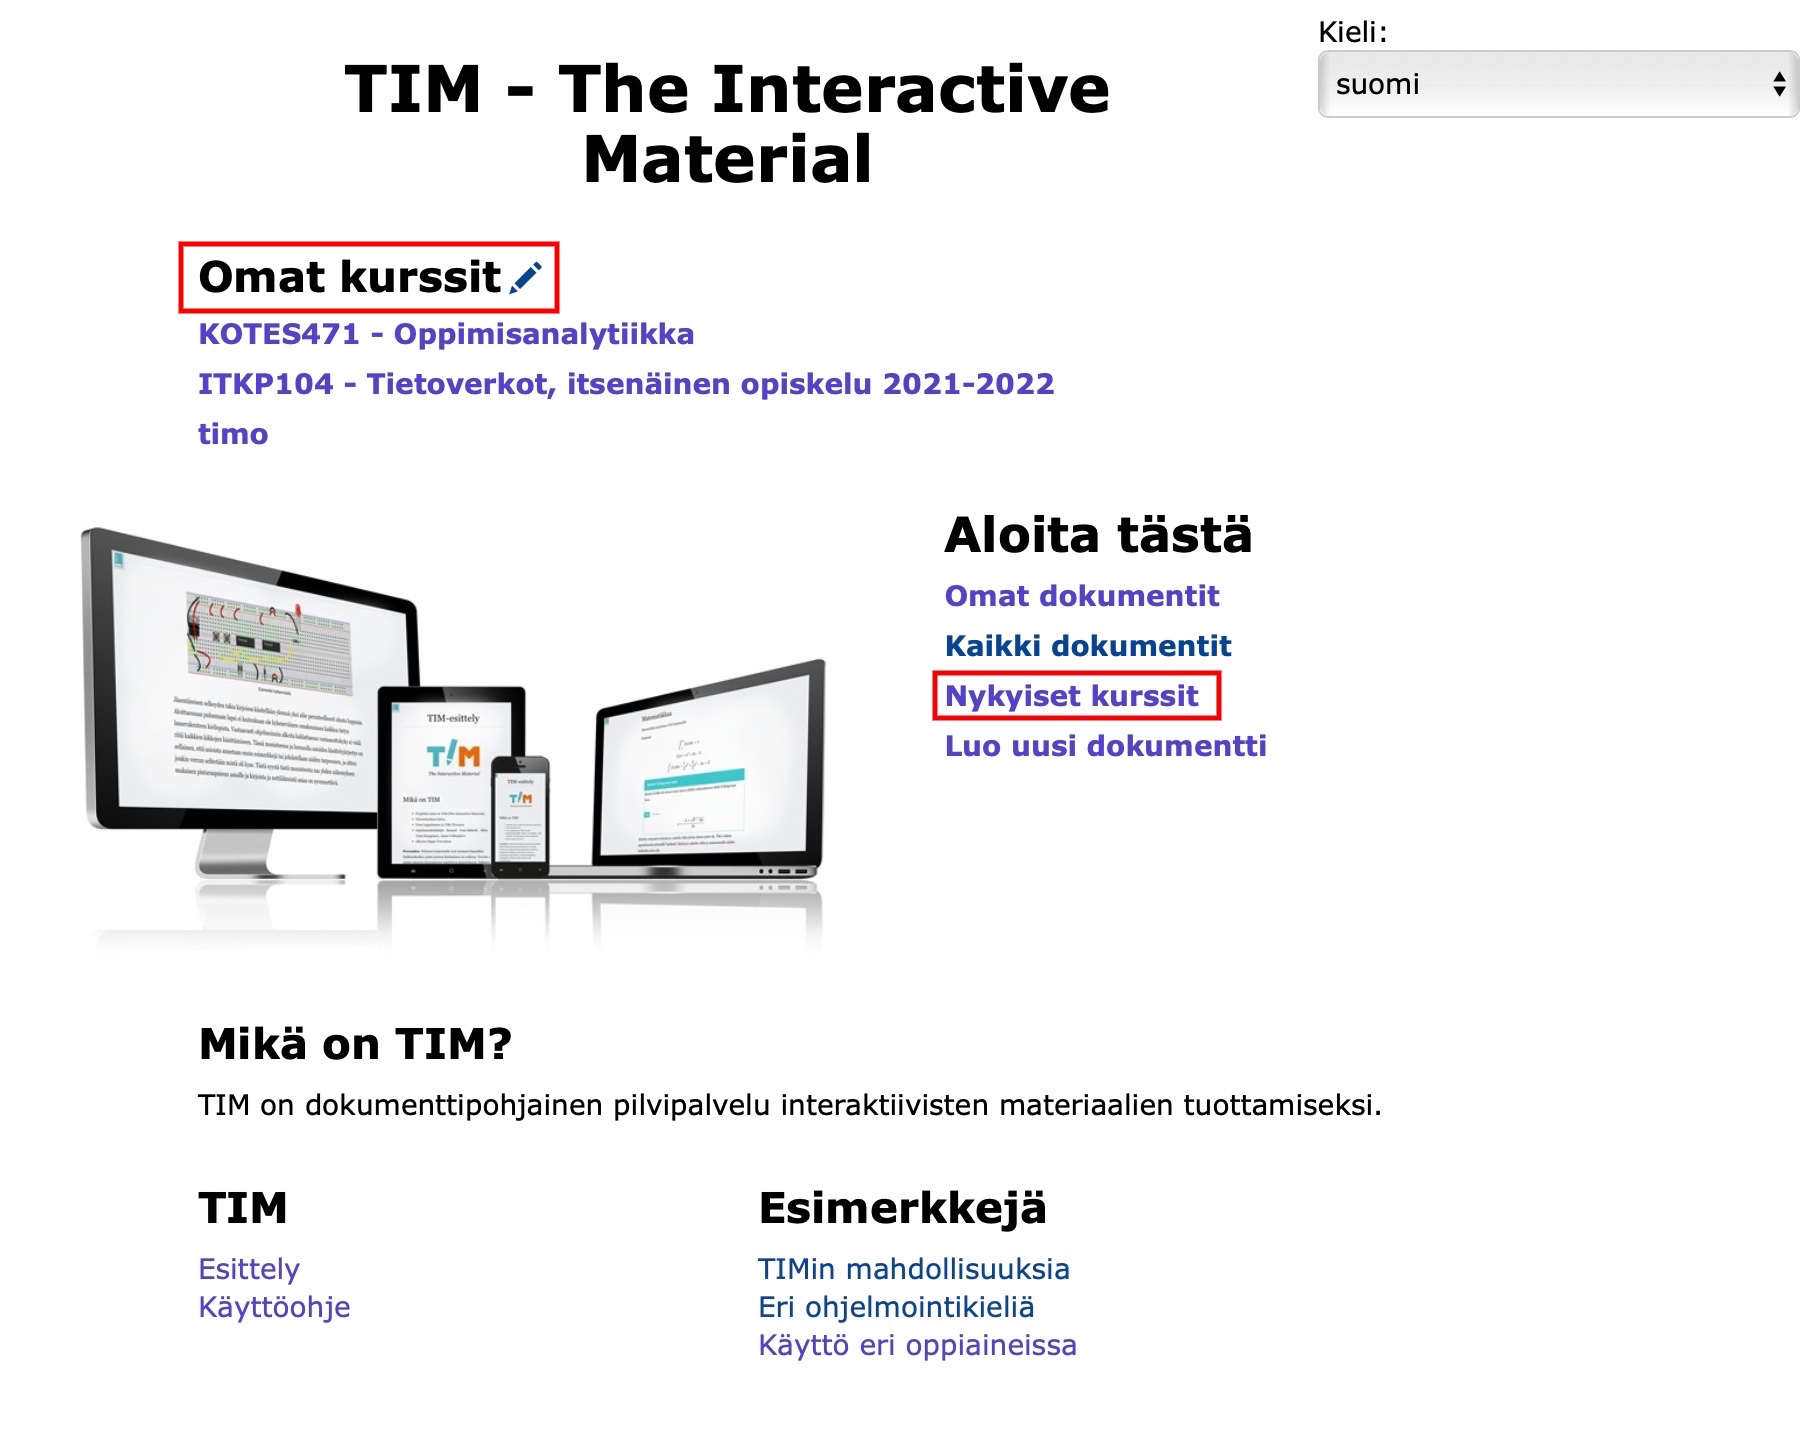
Under My courses / My courses you can see your current courses, by clicking on the pen you can remove a course from the view or edit the "bookmark".
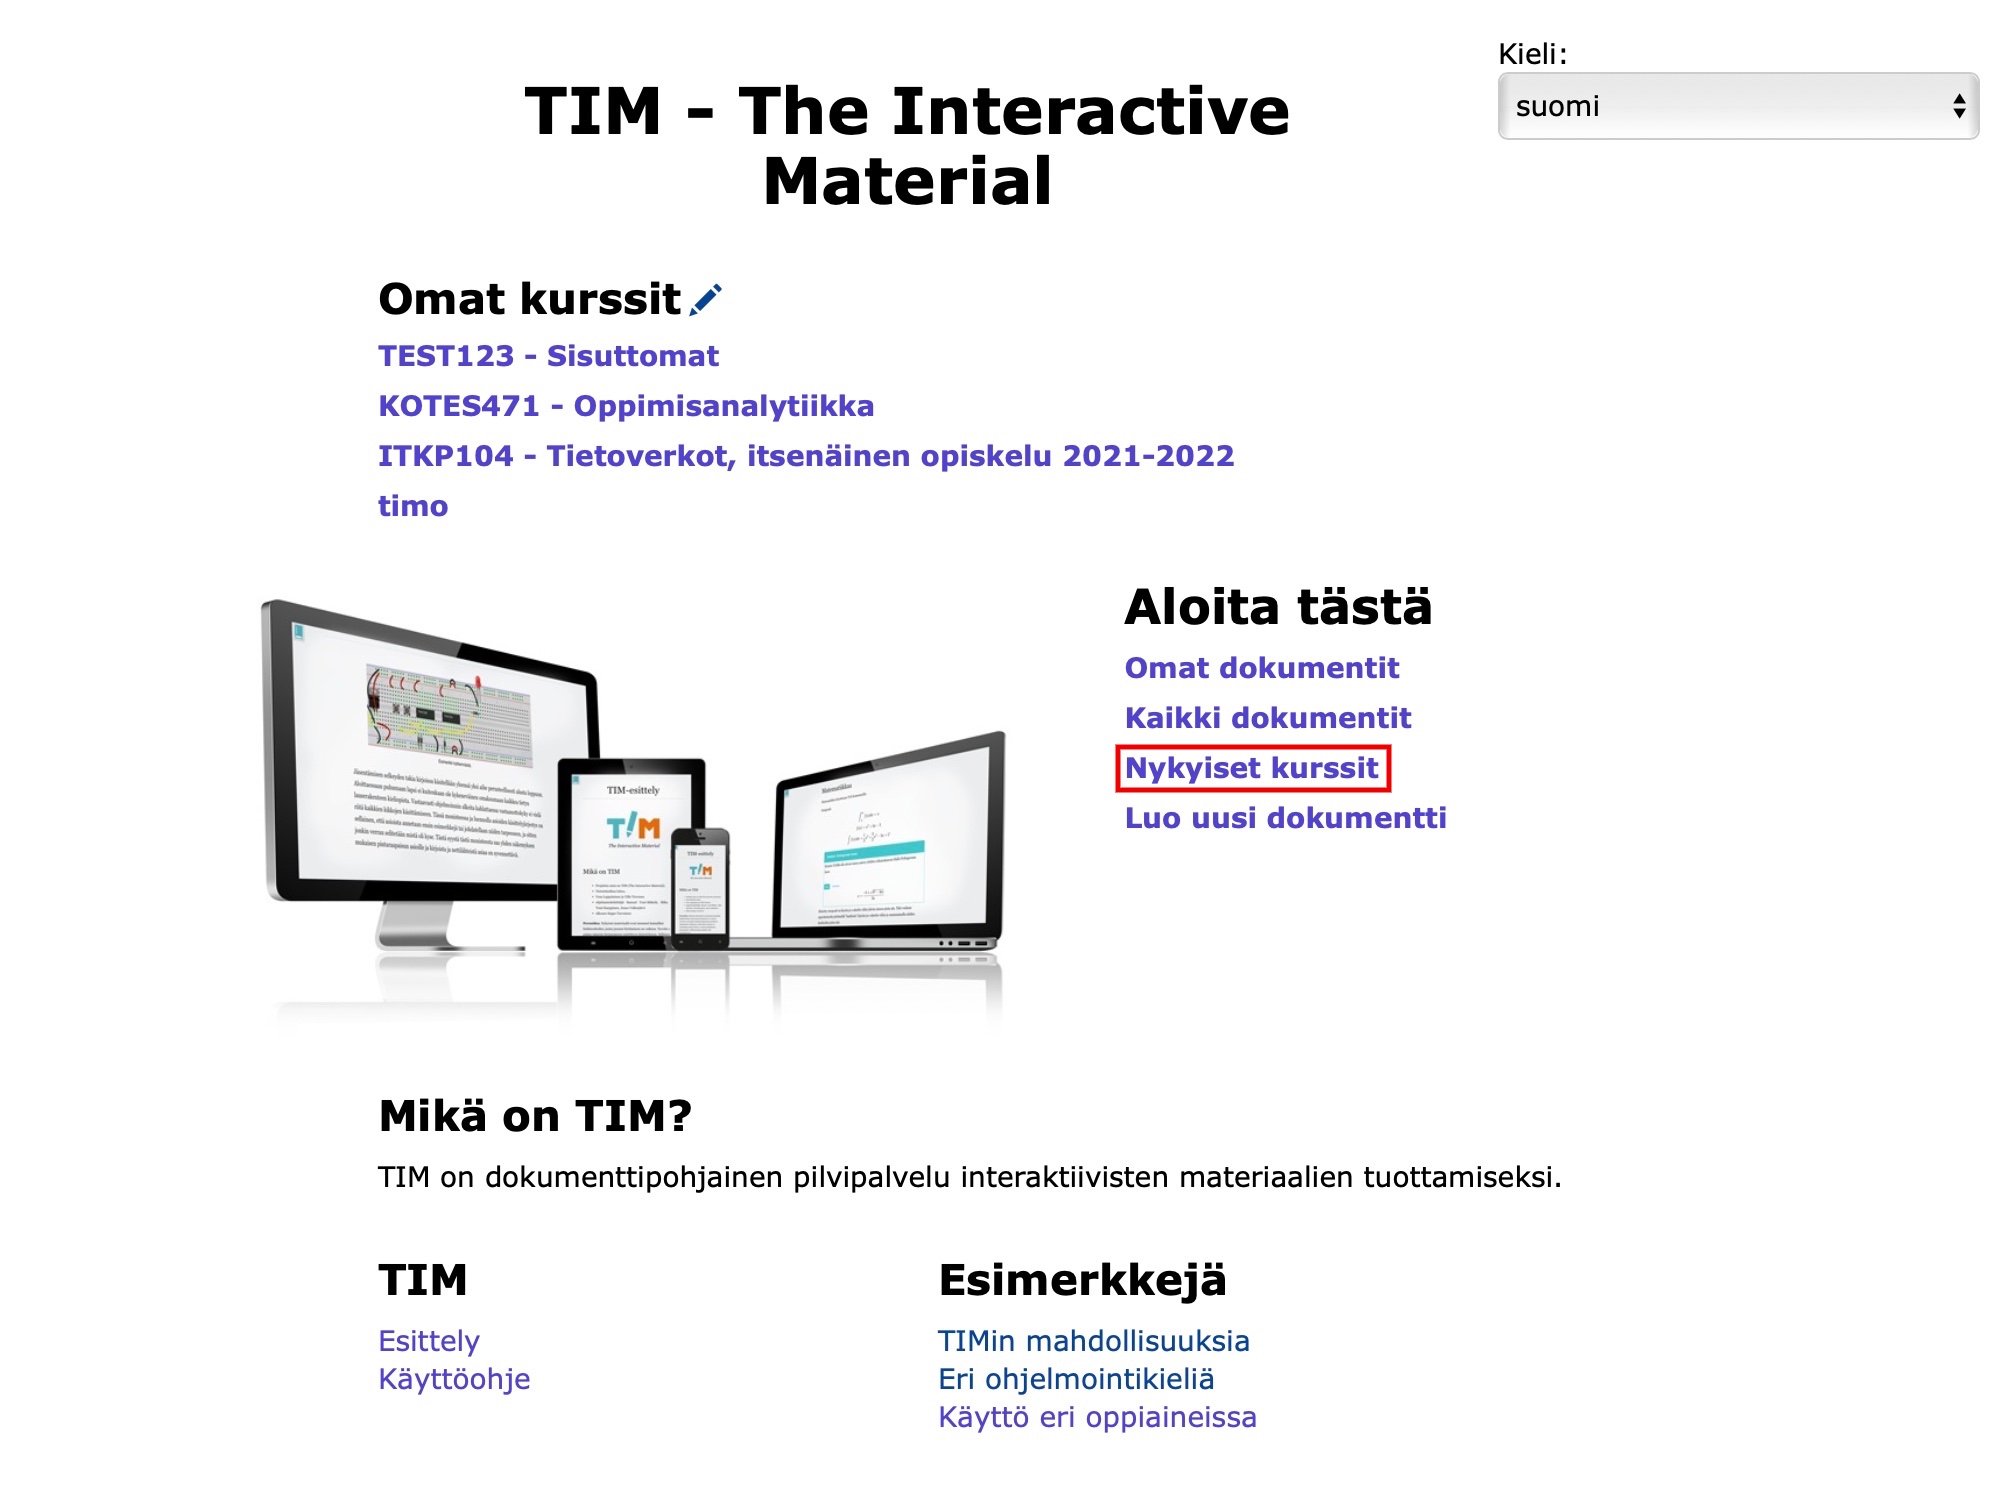
Get started here / Get started:
My documents / My documents: you will find the documents in your personal folder
All documents / All documents: you will find all the documents in TIM, to which you have rights
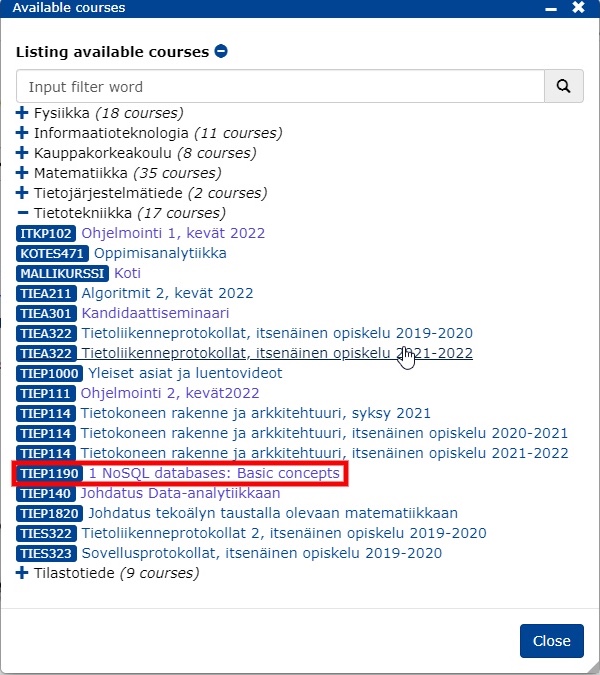
Current courses / Availabe courses: you will find the courses currently running on TIM
Create a new document: you can create a new document directly in your own folder tim.jyu.fi/view/users/surname-surname/own-document.
You will find links at the bottom of the front page:
- Introduction to the Tim system
- User manual
- Examples of how to use TIM and how to use it in different subjects.
1.2 Functions in the document
TIM document
A TIM document consists of blocks. A block can contain one or more pieces of text or one interactive component (plugin). A block is the smallest unit that can be edited and is associated with the possibility of commenting and marking as read.
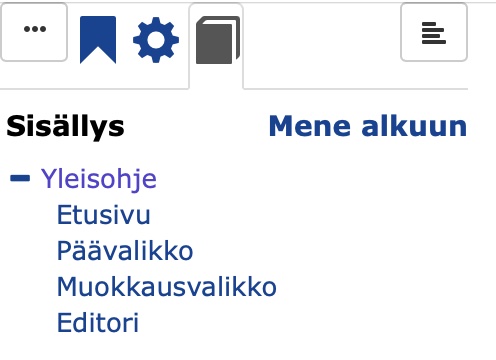
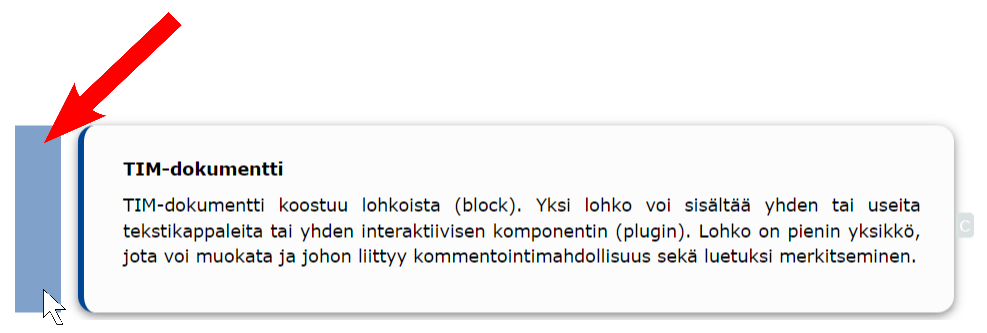
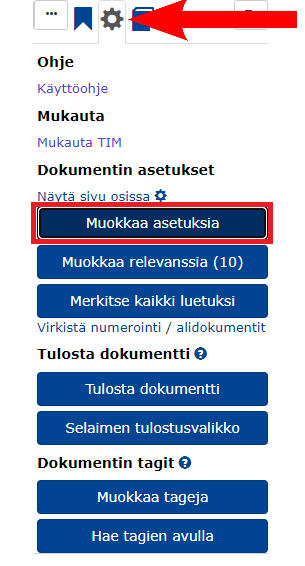
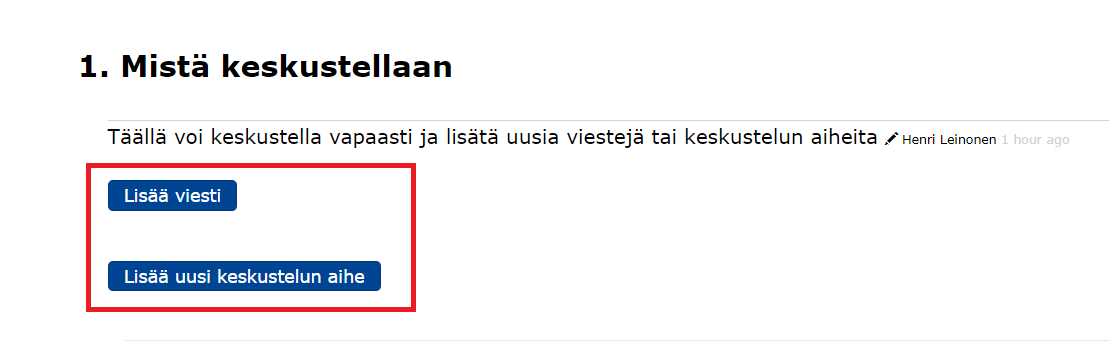
In addition to the wheel and the bookmark in the documents, clicking on the three dots ... you will find the book ![]() .
.
Clicking on
 will display the table of contents for that page.
Under the image you will find the bookmarks as on the front page.
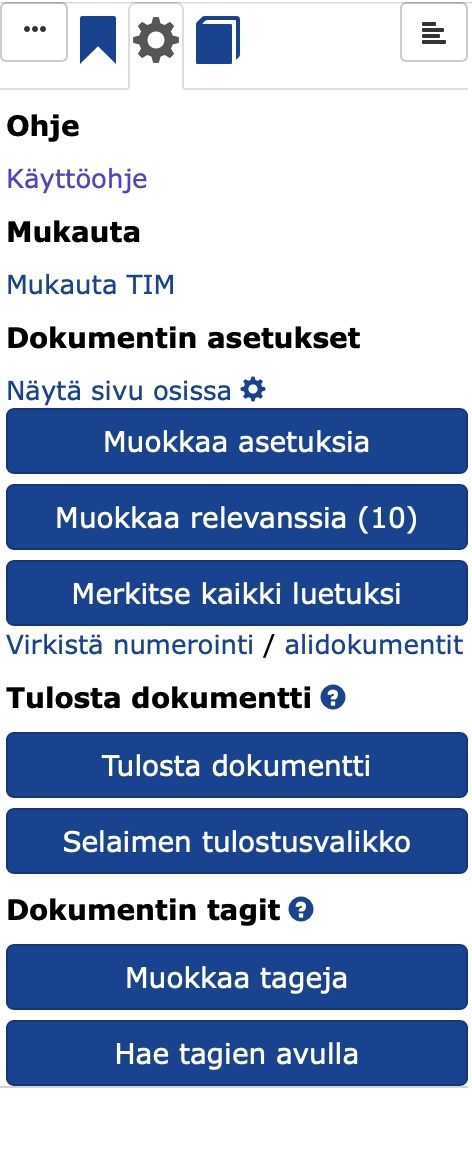
By clicking on the wheel, you will find different functions depending on the page you are on and the rights you have on TIM. Once you are in the document, the wheel will open the functions related to the document.
1.2.1 Main menu
When you are in a document, you will see the tabs in the main menu. Each tab has different functions for editing and using the document.

1.2.2 Edit menu
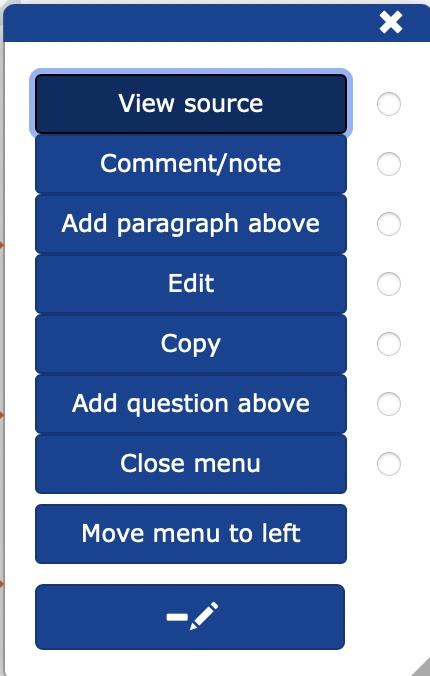
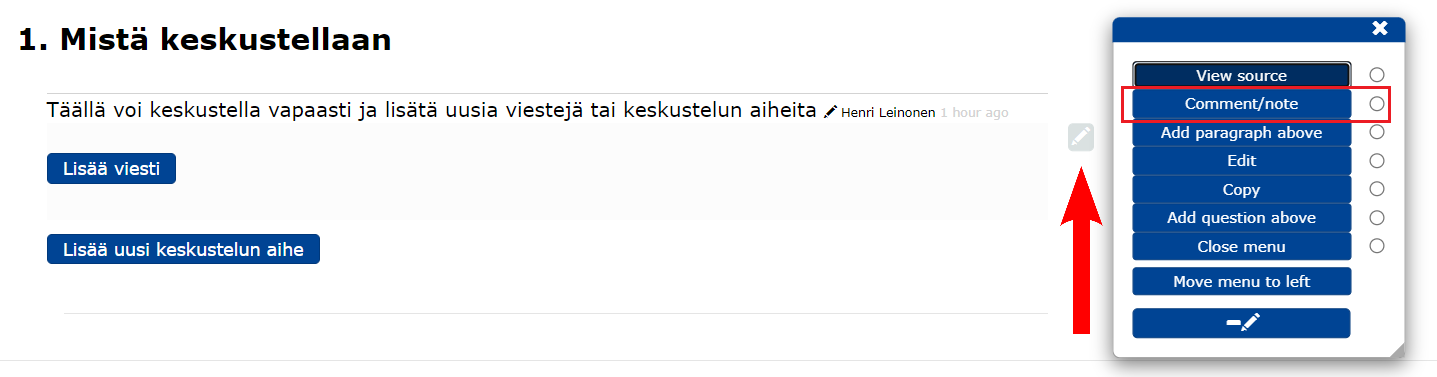
Clicking on a text or image brings up the pencil ![]() on the right-hand side of the block, from where opens the edit menu.
on the right-hand side of the block, from where opens the edit menu.
By clicking on
View source to display the source code for that block
Comment/note opens the commenting for the block you are in
Add paragraph above you add a new block above
Edit opens the editor
Copy you copy the block in question
Add question above you add a question above
Close menu you close the editing menu
Move menu to left/right you move the edit menu opening to the left/right margin
 open the edit menu for advanced users.
- If you have moved the editing menu to the left side of the screen, you can open it by dragging your mouse to the left side of the block and clicking on the bar.
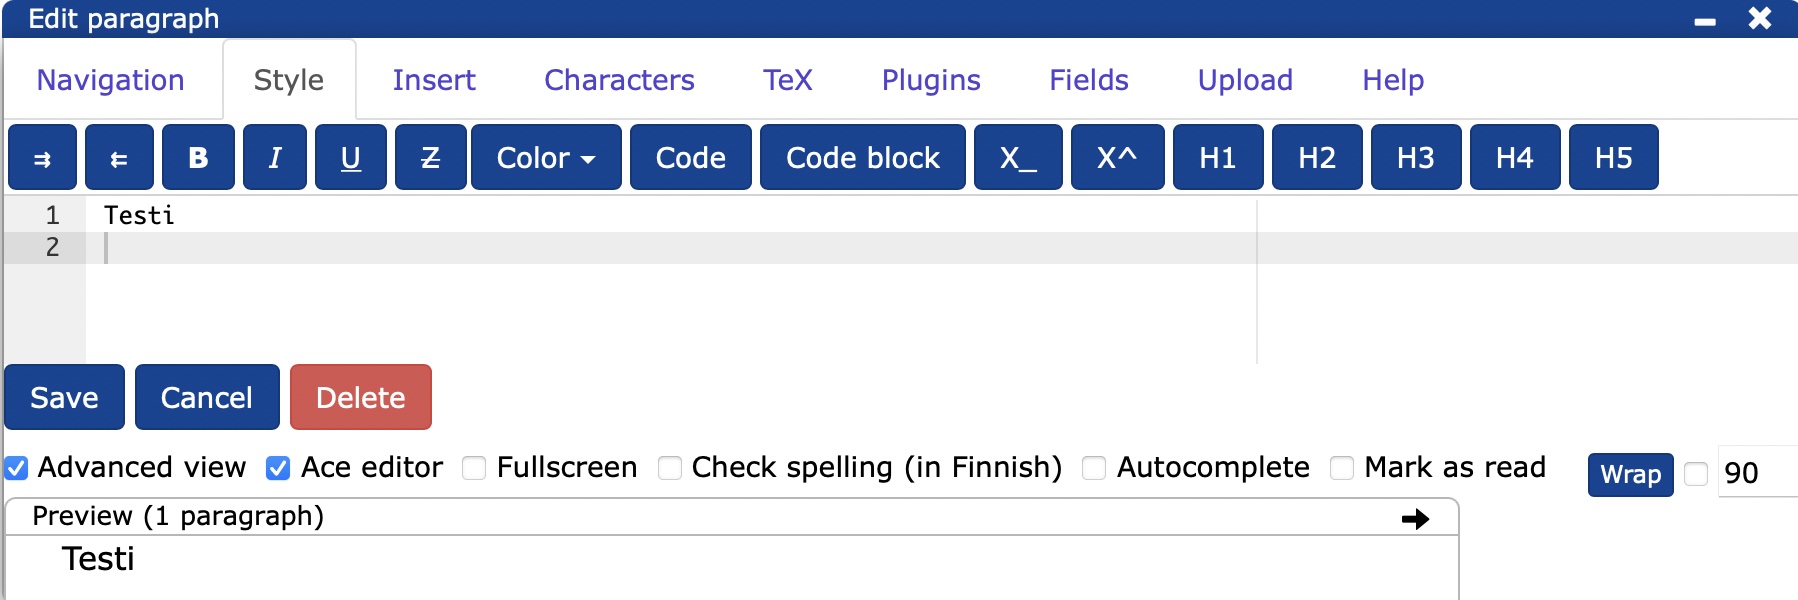
1.2.3 Editors
The editor is used to create content using the Markdown markup language.
Markdown
Markdown is a markup language that relies on simple text syntax to format a document and can be used to edit documents without the need for complex software such as word processors. Markdown uses easily recognisable markup code to indicate highlighting and document structure.
You can read about the syntax of the Markdown markup language e.g.: https://www.markdownguide.org
TIM makes use of the so-called Pandoc shortcut for Markdown, which you can read more about at: https://pandoc.org/MANUAL.html#pandocs-markdown
You can open the editor either from the edit menu () or by clicking on the button at the end of the document Add paragraph.
You can add content using the Navigation, Style, Insert, Characters, TeX, Plugins, Fields and Upload tabs, under which you can find various functions, or by typing directly with Markdown.
The Wrap button allows you to specify how many characters to write in the editor before automatic line wrapping. Wrapping does not affect the formatting of the text in the document, it just makes it easier to edit the text in the editor.
From Preview - Preview you can see how the content you have created will look when you add it to the page.
By clicking on
Save to save your changes and close the editor
Cancel to cancel your changes and close the editor
Delete to delete the entire block.
1.2.4 Marking blocks as read
- By clicking on the orange/yellow bar on the right side of the document blocks, you can mark as read.
- The yellow bar indicates that changes have been made to that block since you last marked it as read.
- Clicking on
 will mark as read up to the previous header level of the document blocks.
 - To disable the orange bars completely, click on the wheel -> Mark all as read.
More guidance
2. Creating a document
Learn how to use the TIM system to
- create a new document
- copy a document
- copy a directory.
2.1 TIM document
A TIM document is a page in the TIM system that can be edited using the TIM system.
A TIM document consists of blocks. A block can contain one or more pieces of text or one interactive component (plugin). A block is the smallest unit that can be edited, with the possibility of commenting and marking as read.
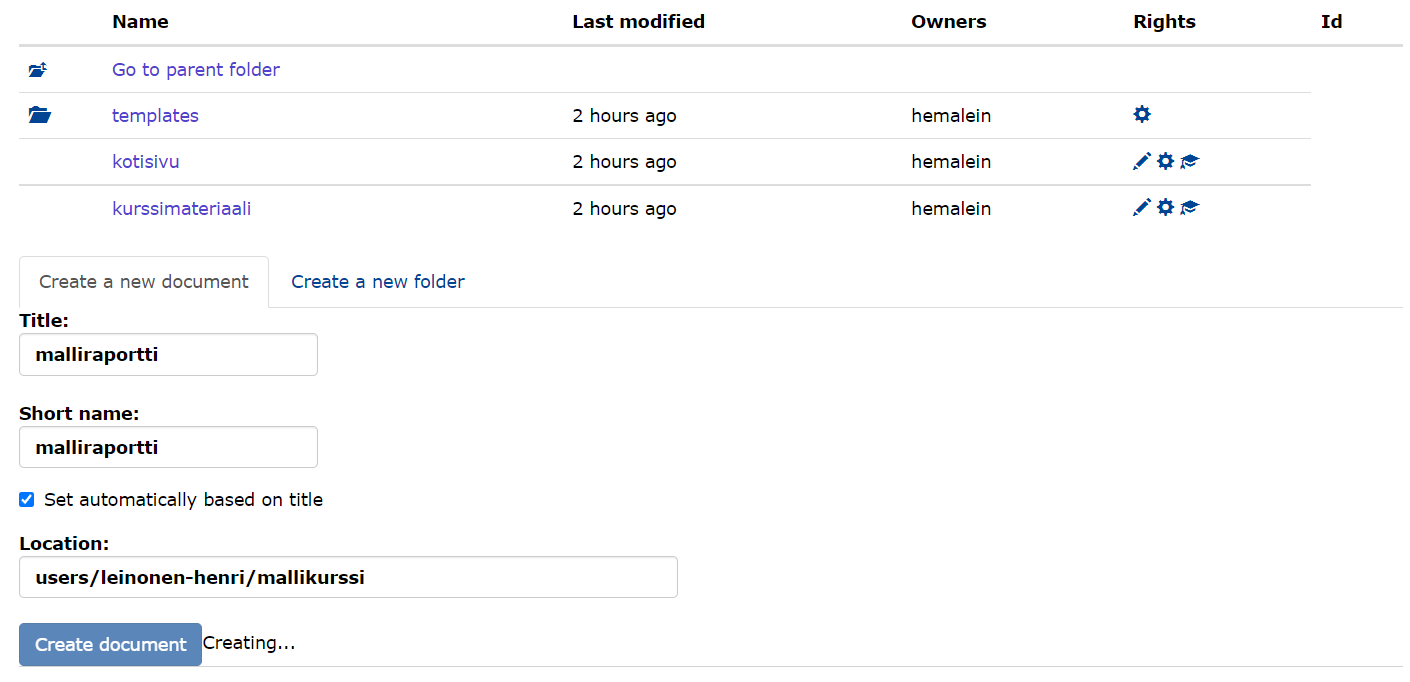
There are two ways to create a document and you must be logged in to the TIM system. The location and name of the document can be changed afterwards.
- Create a new document using My documents/My documents:
To create a new personal document, click on your name at the top of the page and select My documents/My documents.
You can create folders and documents.
Luodaan harjoituksena uusi dokumentti klikkaamalla
Create a new document
You can create a new document by typing
You can create a document by creating aTitle, which defines the title of the document
Theshort name of the document path is determined by this.
The Create document button will now create a new document at the location
/view/users/mikkihiiri/harjoitus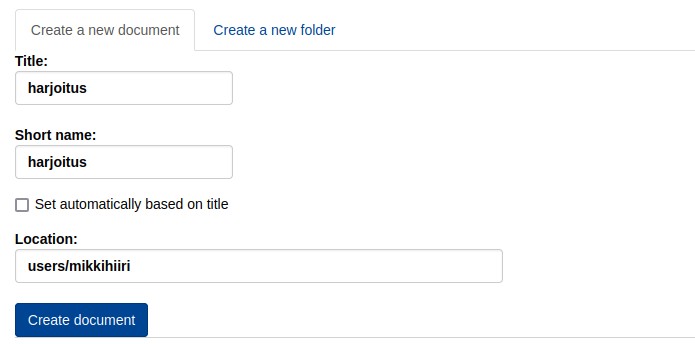
- New document in the browser address bar
Create a new document by typing the address in the address bar of your browser, and TIM will create the document and folder path directly.
You must have the necessary permissions if you create a document somewhere other than your own page.
The link below will take you to the exercise document created in the exercise above, if you have not yet created a document you will be offered the option to do so. users/Anonymous/exercise
2.2 Copying a document
On the Manage/Manage tab, the Copy this document block can be used to copy an existing document.
To copy a document, as well as to create a new document , enter the Title and Short name of the document and specify the location of the new copied document.
The Create document button now creates a new document at the location
/view/users/mikkihiiri/harjoituskopio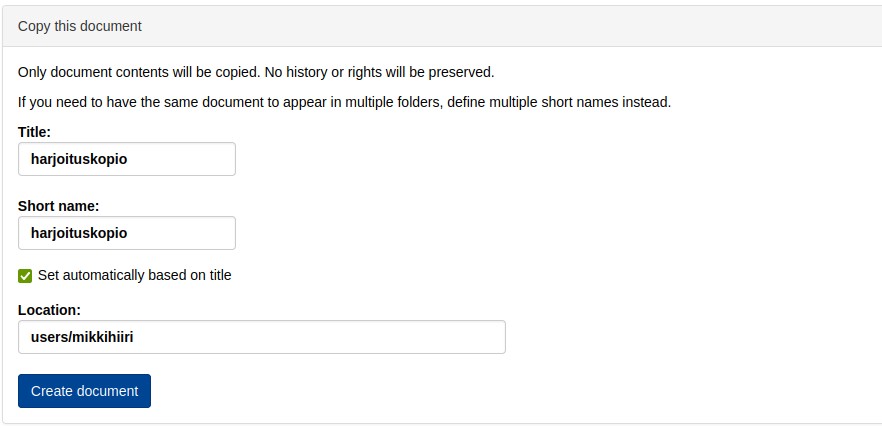
2.3 Copying multiple documents
You can copy documents from an entire directory using the Copy contents section on the Manage/Manage tab of the directory:
Destination: enter the new folder path of the documents to be copied.
Exclude documents/folders that match: enter what you do not want to copy in regular expression format.
Copy preview... button once to see a preview of what will be copied. If you click a second time, the copy will be made to a folder:
/view/users/mikkihiiri/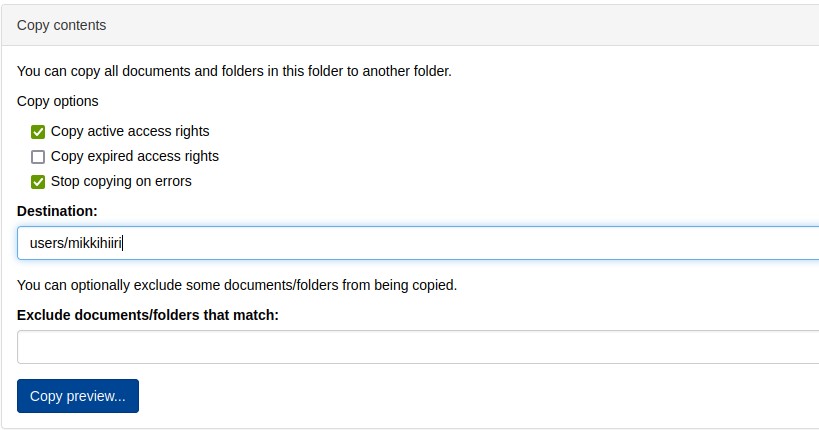
3. Creating a course
The chapter teaches
- copy the template course and edit
- home pages
- lecture pages
- material pages
- demo pages.
The instructions below show how to create (copy) a template course with multiple documents. You can choose to copy the course from the reduced version, which has a menu for the homepage, material, lectures and demos. The full version also has a menu with a place for exercises and a discussion area.
3.1 Creating a course by copying a simple template course
Before creating a course
- You need to know the target directory of your course.
- You can also create a course under your own names. For examples, see: https://tim.jyu.fi/view/kurssit.
- If you cannot find a suitable organisation, ask the administrator (tim@jyu.fi) to create one, please think of a suitable name.
- After finding out the target directory of the course, you will need the identifier of the future course. It can be for example your course code.
In the future we will assume that
- organisation: history
- course: HISP001
Let's start creating a course by copying the base of the model course:
- Go to :
https://tim.jyu.fi/manage/kurssit/tie/proj/2022/timo/tim-ohje/mallikurssi-yksinkertainen.
- In the
Copy contentsblock, typeDestinationunder: courses/history/HISP001. - Press Copy preview.
- Check again that you have entered the correct directory in
Destination. - Press Copy if everything looks good.
- You can access your new course by clicking on the link after the copy.
The video below shows how to copy a course following the instructions above.
3.2 The importance of folders and pages
- Under the folder Material is the page Course Material
- Under the folder there is also the folder templates which contains two documents that define the default permissions for folders and pages.
- templates contains two documents that define the default permissions for folders and pages.
- Theyear_term folder contains documents that may change from year to year, such as demos, homepage and lecture topics.
Assuming that the course is held several times, the course will have documents that remain the same from year to year (or change, but the same content is used each year) and documents that are different from year to year. A typical document that changes from year to year is the home page of the course, which in the example became the document:
kurssit/historia/HISP001/vuosi_lukukausi/kotisivu
In Sisu, the home page of the course for the year in question is then set to
https://tim.jyu.fi/view/kurssit/historia/HISP001/2022k/kotisivuSo the content of the course will now appear in the directories:
kurssit/historia/HISP001/ - kurssin pysyvä osuus
kurssit/historia/HISP001/2022k - vuoden 2022 kevään dokumentit
The copied folder "year_term" should be changed after copying to match the course of that year and semester. The above example uses spring 2022.
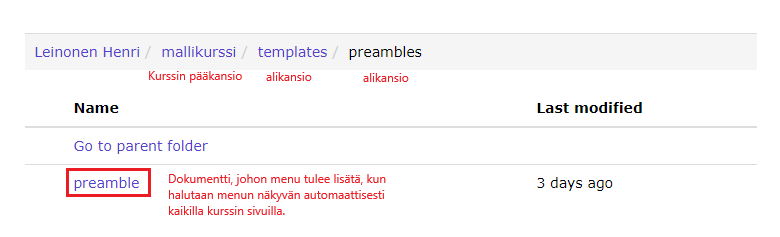
3.3 Editing the general settings of the preamble document (preamble)
Video on editing the preamble document below. Below the video you will also find textual instructions for editing the preamble.
For detailed instructions on how to create an introductory document, click here: introductory documentintroductory document
Go to the document "preamble" located at:
kurssit/historia/HISP001/templates/preambles/preambleClick on the cog -> Edit settings. An editor will open with contents that look something like the following:
macros:
 kausi: "kevät"             #Laita tähän "kevät" TAI "syksy"
 vuosik: "2018k"
 vuosip: "2018"
 ajankohta: "kevät 2018"
 homepath: ""               #Laita tähän kurssin kansion osoite
 yearpath: ""               #Laita tähän kurssin kansion osoite/vuosi_lukukausi
 coursecode: KURSSIKOODI
 coursename: KURSSIN NIMI
 coursecredits: 3 op
 #Voit kirjoittaa omia makroja tähän itse.
Change these to match your course.
The example course introductory document would look like the following:
macros:
 kausi: "kevät"             #Laita tähän "kevät" TAI "syksy"
 vuosik: "2022k"
 vuosip: "2022"
 ajankohta: "kevät 2022"
 homepath: "/view/kurssit/historia/HISP001/"        #Laita tähän kurssin kansion osoite
 yearpath: "/view/kurssit/historia/HISP001/2022k"   #Laita tähän kurssin kansion osoite/vuosi_lukukausi
 coursecode: HISP001
 coursename: Historia 1
 coursecredits: 3 op
 #Voit kirjoittaa omia makroja tähän itse.
Instructions for macros can be found here: Introductory course - MacrosIntroductory course - Macros
3.4 Editing the course homepage
Edit page
kurssit/historia/HISP001/vuosi_lukukausi/Kotisivuaccording to the needs of the course.
The macros in the introductory document above can be used as follows:
Vuoden %%vuosip%% kurssilla opiskellaan...to get the result, for example:
Vuoden 2018 kurssilla opiskellaan...3.5 Editing course material
Edit document
kurssit/historia/HISP001/materiaali/kurssimateriaalias needed.
3.6 Editing course demos
Edit a document
kurssit/historia/HISP001/vuosi_lukukausi/demotyleinento describe what is commonly said about the weekly tasks.
Retrieved from
kurssit/historia/HISP001/vuosi_lukukausi/demotis used to create a list of possible weekly assignments to be held in the course.
3.7 Editing course lecture pages
Edit document
kurssit/historia/HISP001/vuosi_lukukausi/luentojen-aiheetto describe the course lectures.
More guidance
4. Introductory document
The chapter teaches
- create an introductory document
- use an introductory document when you want to give the same settings to all pages of a course or add similar content
- change the look and feel of a course using an introductory document.
What is an introductory document?
- A document in which changes made affect all documents in the folder.
- A preamble document is also known as a preamble document.
A preamble document can be used, for example, if you want to have a specific menu on all course pages or if you want to display a specific image or text at the top of each page. The preamble document can also be used to customise the look and feel of all the pages of the course.
4.1 Creating an introductory document
You can watch the video below for instructions on how to create an introductory document. The video is followed by the same instruction in text format.
Suppose we have a course folder for a template course. Let's create an introductory document that affects all documents in this folder.
- Create a new folder in the course folder called
templates(the name must be exactly this). - Create a new folder in the templates folder called
preambles(the name must be exactly this). - Create a document in the preambles folder called
preamble(the name must be exactly this).
Now you have created an introductory document with the path
.../mallikurssi/templates/preambles/preamble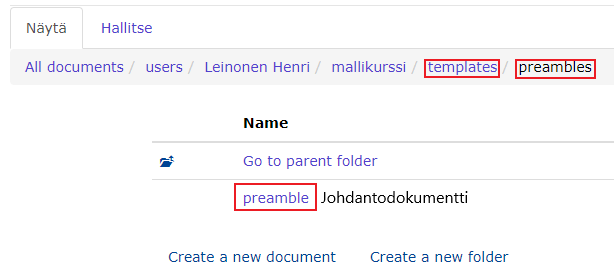
4.2 Editing the layout
You can watch the video below for instructions on how to edit the course layout. The video is followed by the same instruction in text format.
The layout of documents can be changed by editing the CSS. Changes made to the introductory document will affect all documents in the same folder.
Open the introductory document
preamble.Open the settings in the top left corner of the page by clicking on the wheel and selecting Edit settings.
- The CSS settings are written between the lines
css: |!!and!!.
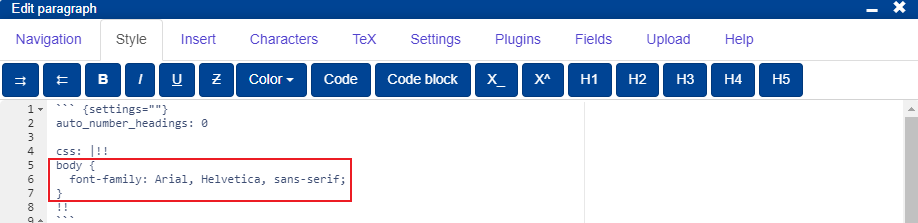
More guidance on CSS styles
4.3 Macro
You can watch the video below for instructions on how to create macros. The video is followed by the same instruction in text format.
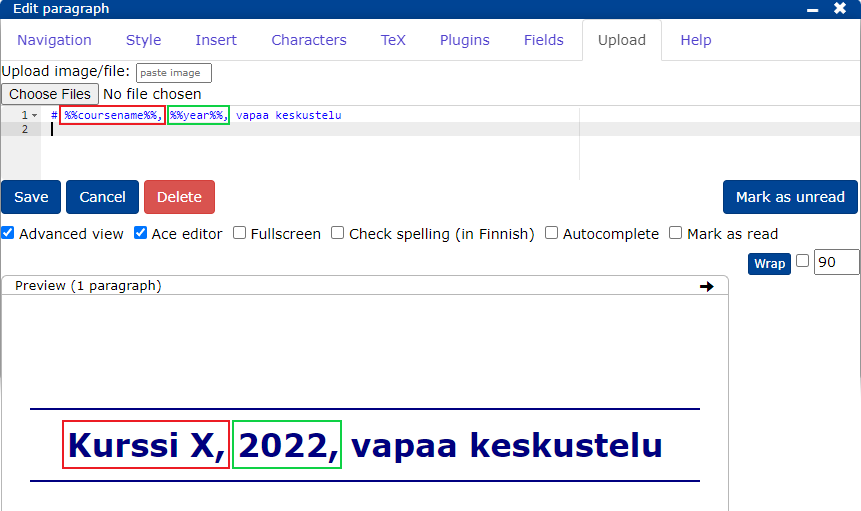
Macros are useful, for example, when documents often contain text that may need to be changed in the future. For example, the name of the course and the year of the course. By using macros, changes need only be made to a single location.
- Add the line
macros:to the settings of the introductory document and enter the desired macros under it. - Macros can be named using lower case letters, upper case letters, exclamation marks, special characters and numbers. You cannot use spaces when naming .
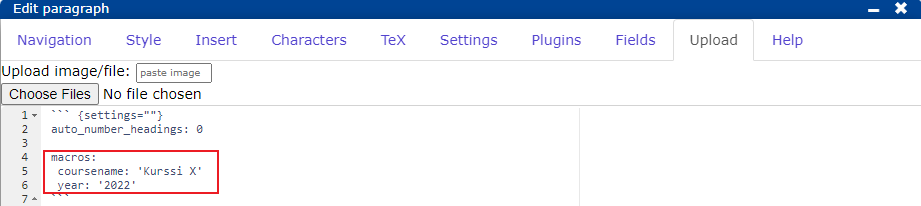
The macros defined in the introductory document are used on all pages of the course. So you can refer to the course name with the macro coursename and the course year with the macro year. Macros are referred to by typing them between the percent signs.
4.4 Adding content to all pages of the course
You can watch the video below for instructions on how to add content to an introductory document. The video is followed by the same instruction in text format.
Content added to the introductory document preamble will automatically appear on on all pages of the course. You can add any content to the document (image, text, menu...).
- For example, you can add an image to the introductory document.
- The image now appears on all pages of the course.
More guidance
4.5 Creating a menu
The introductory document is also used to create the course menu. See Course navigationCourse navigation for more detailed instructions.
5. Template bases
The chapter teaches
- create a template base to speed up the creation of similar documents.
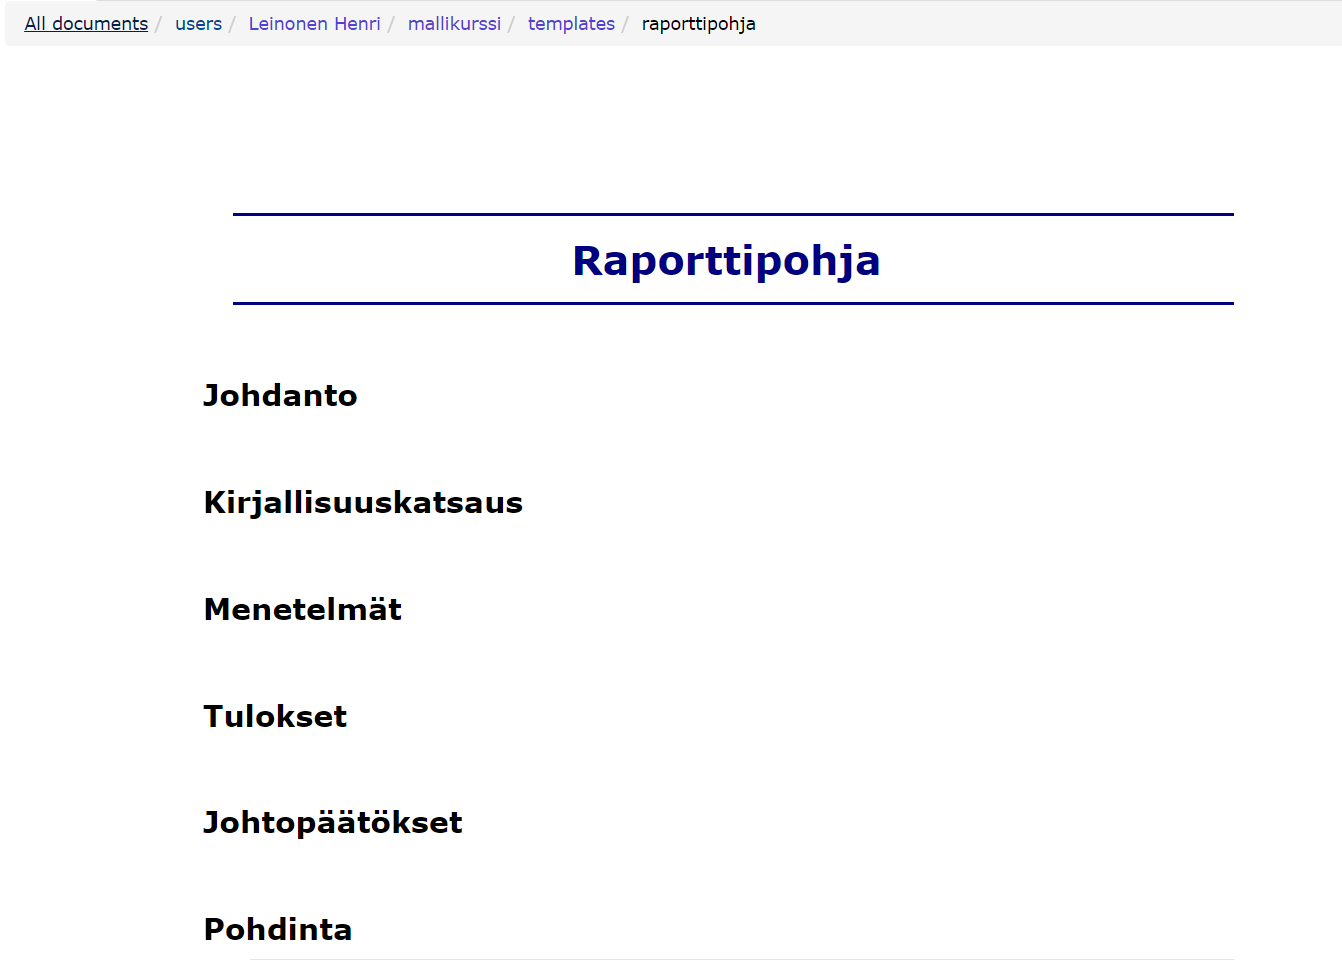
What is a model base?
In TIM, it is possible to use templates as a basis for new documents if you often need to create similar documents. A template base is a document whose content can be copied into the content of a new document.
This tutorial assumes a situation in a course where you want to create similar documents with a common base. This could be, for example, different reports.
Watch the video to see how to create and use model bases.
5.1 Creating a model base
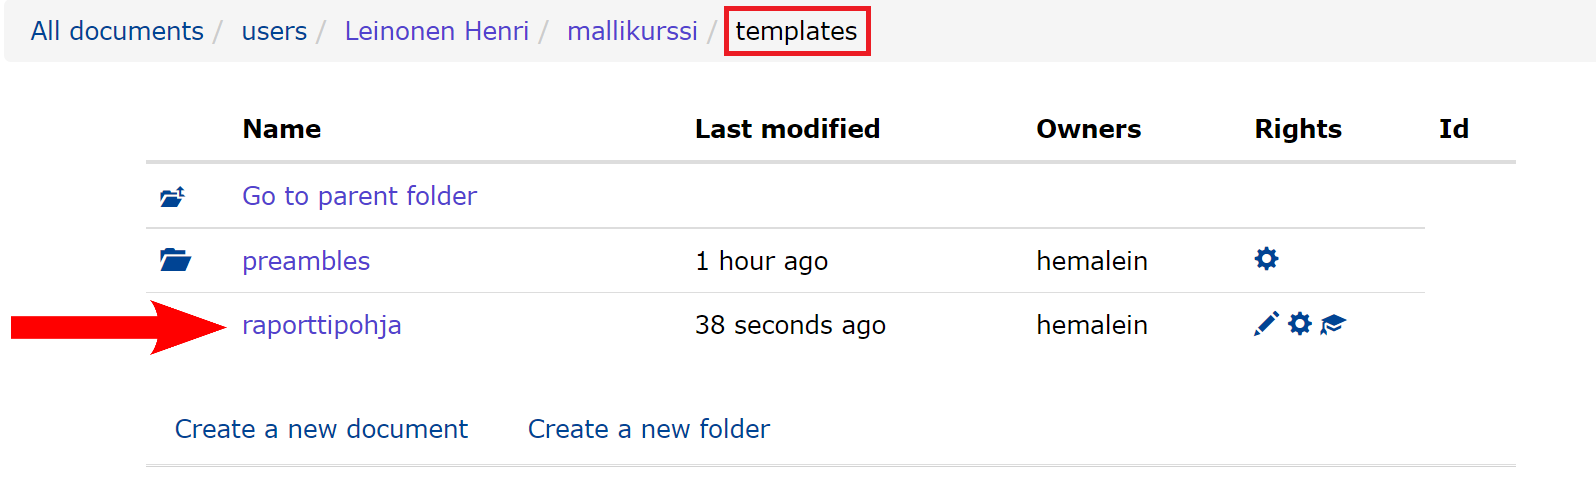
- Create a folder called templates in the folder or top folders of your new documents.
- Create the documents you want to use as a base in the templates folder.
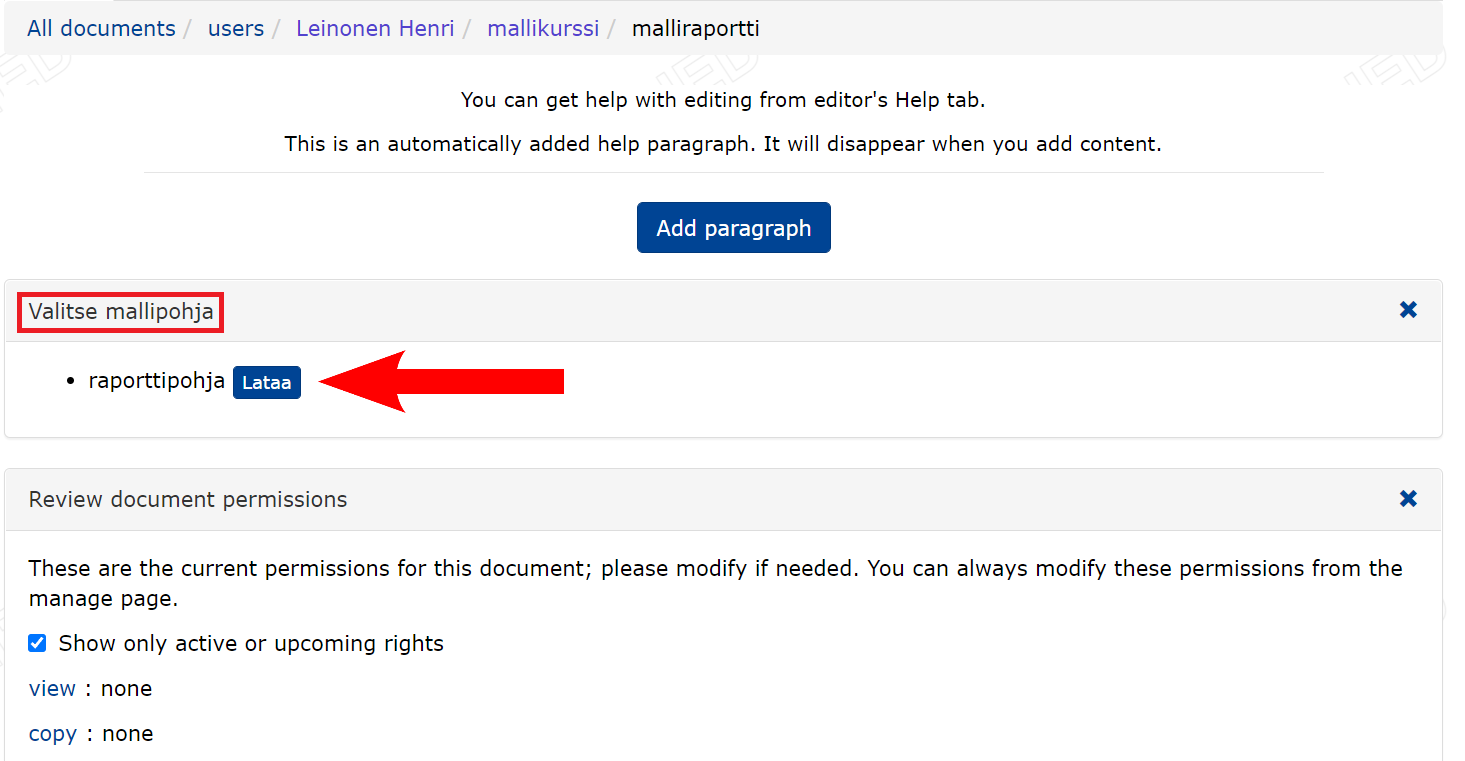
5.2 Using the template
- Create a new document in the template folder.
- Now, after creating the document, you can select the report template created above from
Valitse mallipohja.
More guidance
6. Creating and managing a group (including a student group)
The chapter teaches:
- creating a group in TIM
- importing a student group from Sisu
- managing a group
- linking a group to a course page
- evaluating a student group and exporting the evaluation to Sisu.
6.1 Managing and creating a group in TIM
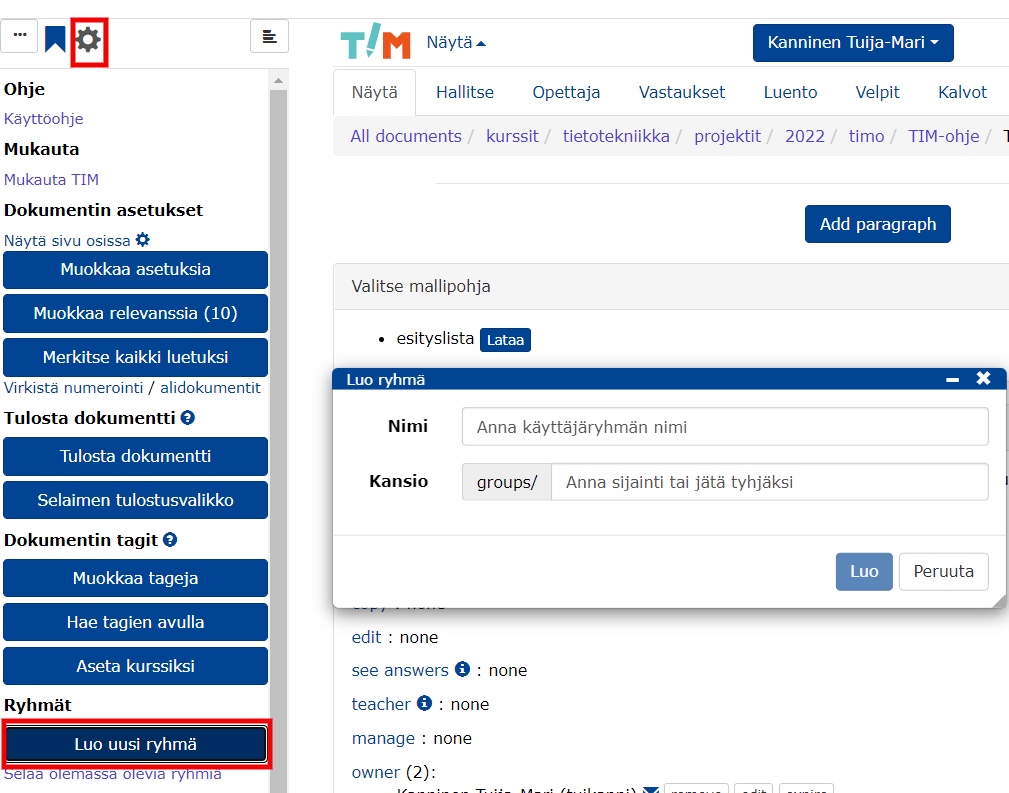
To create a group, you need group creation rights, which you can obtain by sending a request to TIM development tim@jyu.fi.
- click on in the wheel and select Create a new group.
- In the form that appears, fill in
- Name: name of the group, the name must not contain capital letters and must contain at least one number. For example (
tiep111k23opet). - Folder: select the appropriate location for your group. For example, course ID / year (e.g.
tiep111/2023k).
- Name: name of the group, the name must not contain capital letters and must contain at least one number. For example (
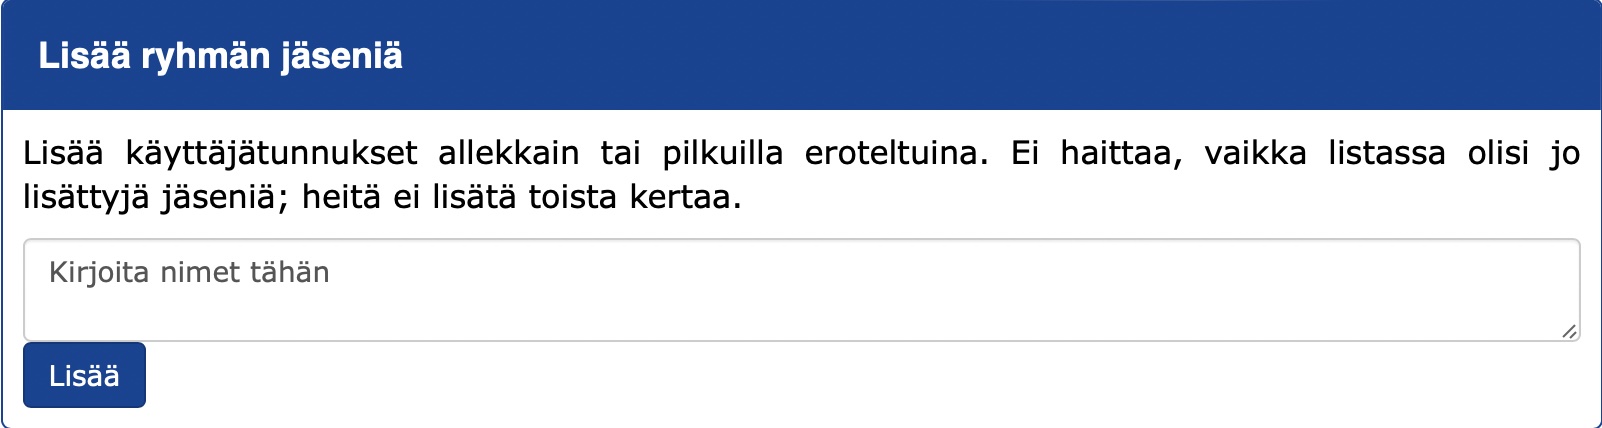
Usethe Add group members field to add new group members. Enter the information you want in the field and finally press Add.
Please note that you can only add a user after they have logged in to at least once.
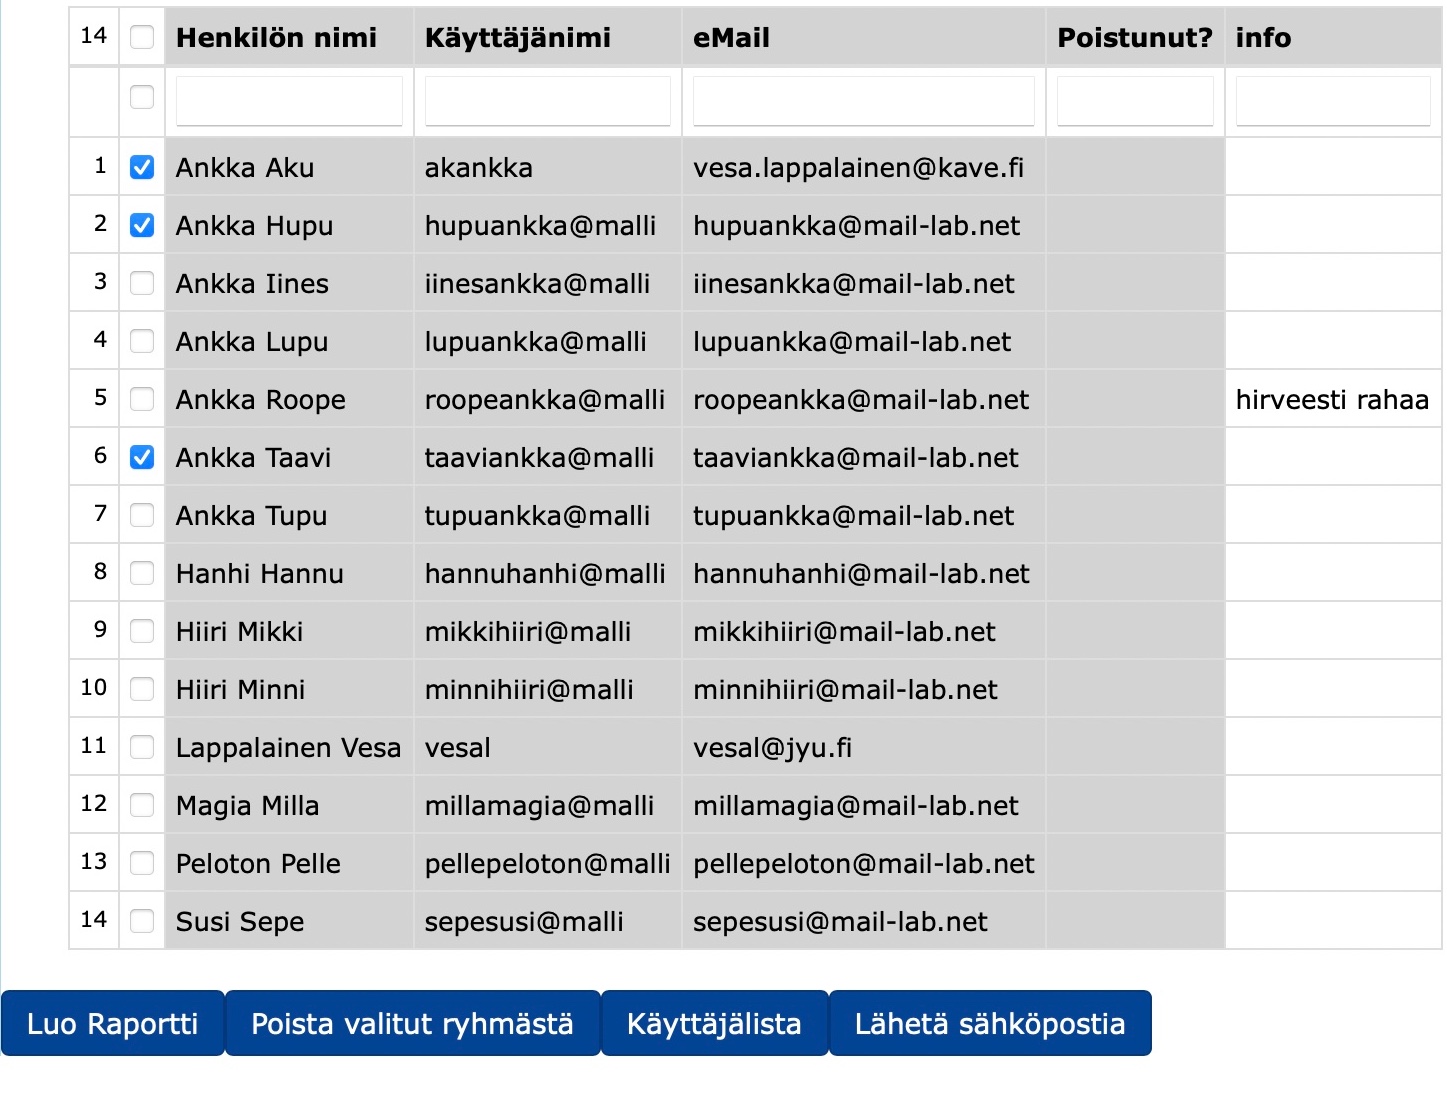
The list allows you to search for group members either by name, username or email by entering the desired information in the column at the top of the table. Once you have found and selected the group of people you want, you can click:
Create a report with a list of your selected students' data on the new tab
Remove selected students from the group to remove selected students from the course
User list a new form where you can display a list of names, usernames or email addresses of your choice
Send an email to opens a new form where you can send an email to selected students.
6.1.1 Linking a student group created in TIM to the course homepage
Add a group to the course home page:
- Go to the document from which you want to make the course home page.
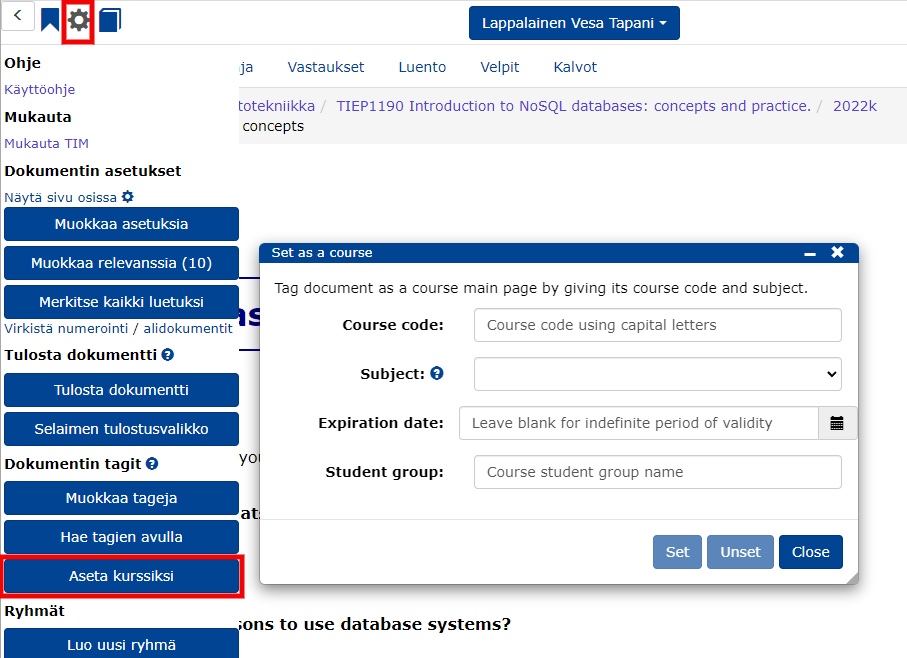
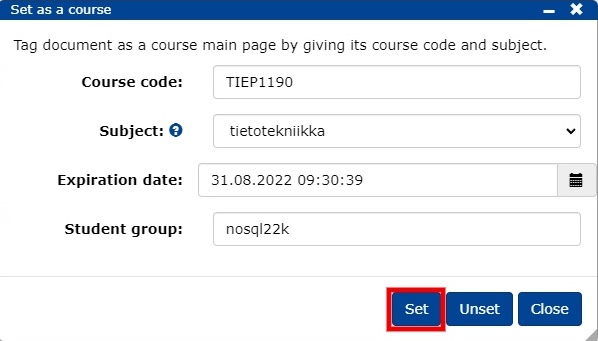
- Click on the wheel -> Set as a course/Setas a course.
- Add the course details to the form:
- Course code: course code
- Subject: subject (if you can't find your own, please contact tim@jyu.fi)
- Expiration date: the date when the course will be removed from the main TIM page
- Student group: the name of the group created in the previous step.
Once you have added a group to the course home page, you can find the course by clicking on Current Courses/Availablecourses.
Students can find a course and add it to their course list My courses
- by clicking on Current Courses
- on the TIM home page and entering either the course ID or name in the search box
- by clicking on Add to My courses.

6.1.2 Converting a group created in TIM into an open group
Students can independently join or leave open groups.
Allow independent joining or leaving:
Click on the wheel and select Browse existing groups
Find and open the student group you want to change to open
In the document that opens, click on and select Edit settings
In the settings editor that opens, add the following settings:
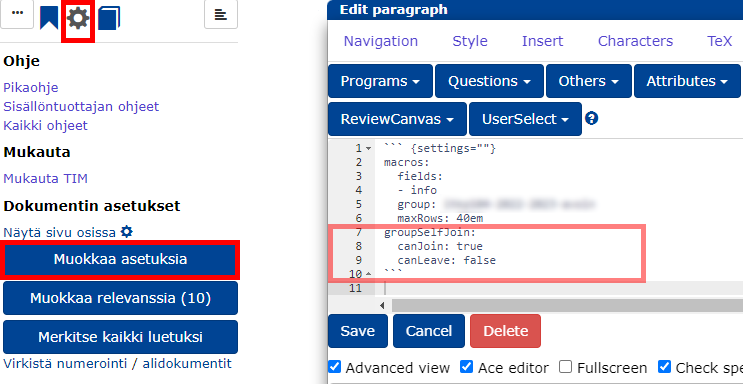
- Customize the join settings to your liking
canJoinIftrue, anyone can join the group. Please note that joining a group does not automatically give you the right to see members of other groups.canLeave: Iftrue, any member can leave the group.
Add a button on the join page or course homepage that allows group members/students to join or leave the group:
Go to the course homepage
Add a new block and open the block editing editor
Select the Plugins tab-> Others -> Group self-join

Replace
groupnamewith the name of the groupEdit the other settings and texts to your liking
join: Iftrue, a button allows you to join the groupleave: Iftrue, you can also use the same button to leave the group. So you can either make separate join/leave buttons or keep everything in one button.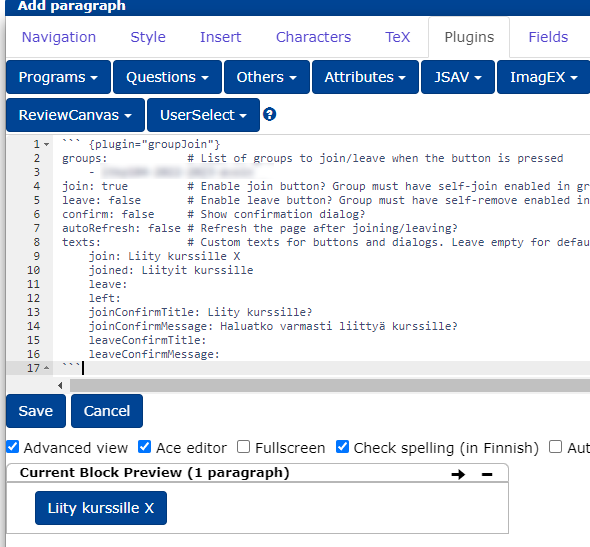
6.2 Bringing and managing a group of students from Sisu to TIM
Log in to Sisu and select the user role of teacher. In the top bar, select My Teaching -> select the desired course -> Implementation details.

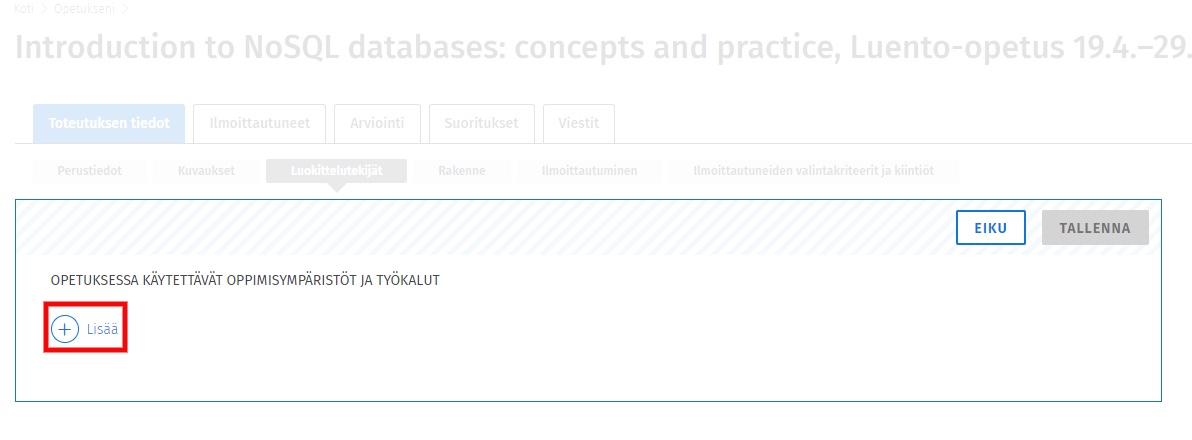
Select Classification factors and click on EDIT.
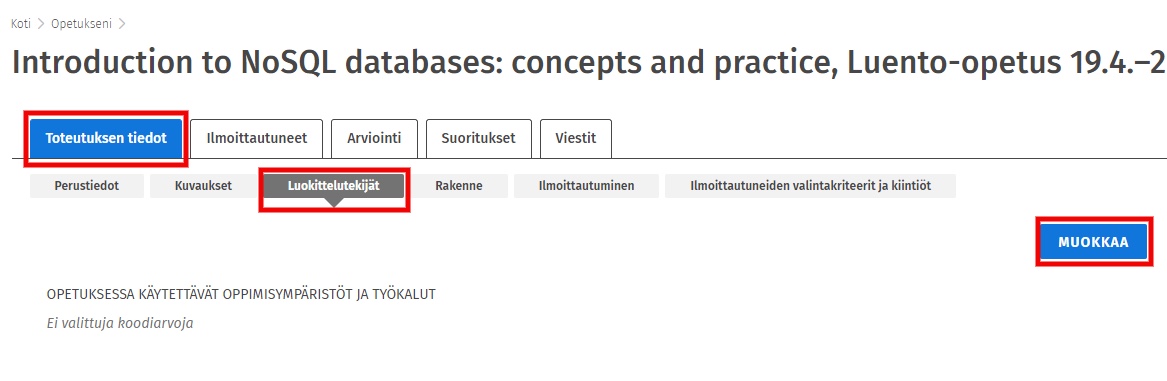
In the LEARNING ENVIRONMENTS AND TOOLS field, click on + More.
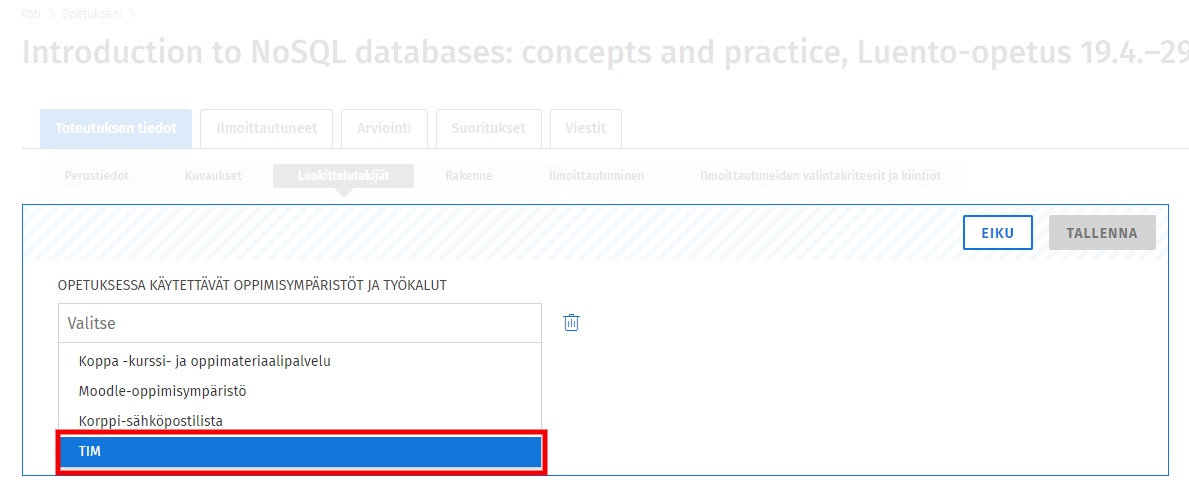
Select TIM from the options and click SAVE to see the selected learning environments and tools used for teaching at .
You will receive an email informing you about the copying of the Sisu group to TIM. Follow the link in the email to the document with instructions on how to use the group in TIM.
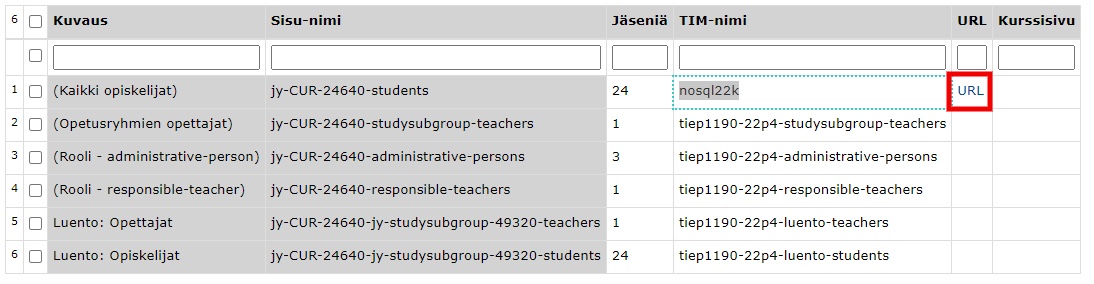
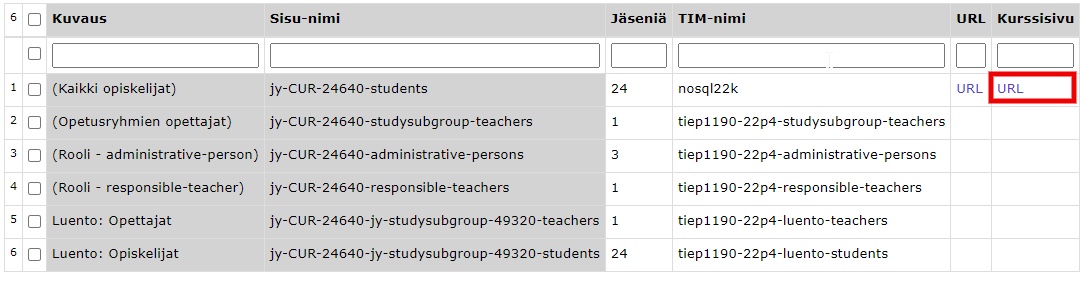
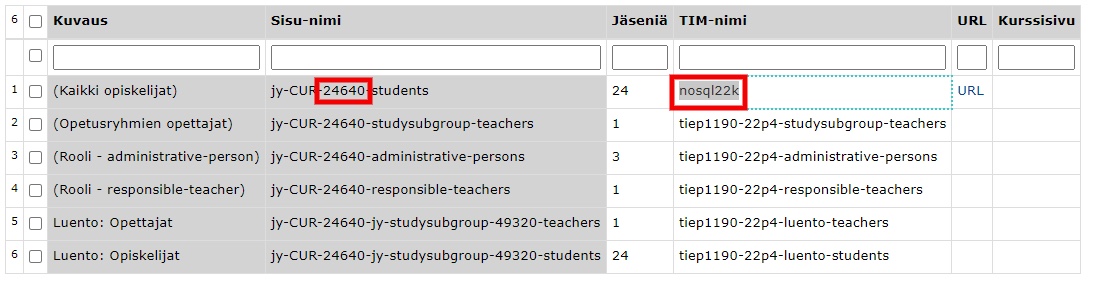
The table at the end of the document shows the groups imported from Sisusta into TIM. Select the group "All students" from . In the TIM name column, you can change the name of your course to a more descriptive . Copy this TIM name to paste the course on the course homepage. Finally, click on Confirm groups at the bottom of the table to create the group in TIM.
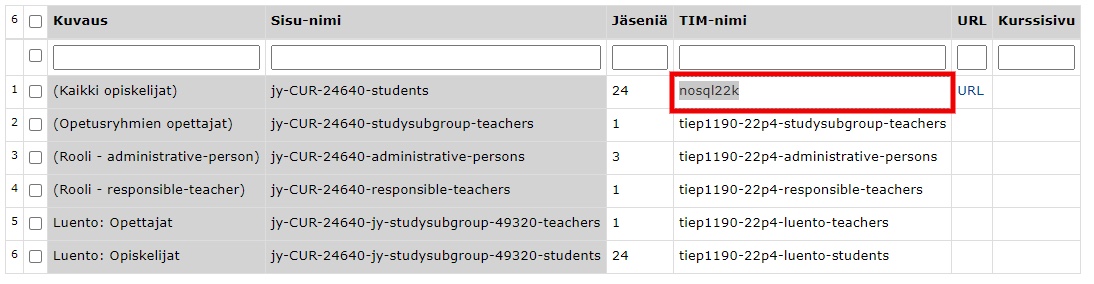
The URL column will contain a link to a page where you can manage the group.
The list allows you to search for a student, either by name, username or email by typing in the blank columns in the top row of the table. Once you have found and selected the set of students you want, click:
Create a report with a list of the students you have selected on the new tab
Remove selected students from the group to remove selected students from the course
User list a new form where you can display a list of people's names, usernames or emails of your choice
Send an email to opens a new form where you can send an email to selected students.
Use the Add group members section under the table to add new group members to the table. Add the information you want in the field and finally click Add.
6.2.1 Tervetuloviestin asettaminen opiskelijaryhmälle
Voit asettaa ryhmälle viestin, joka lähetetään opiskelijalle heti, kun opiskelija liittyy tai lisätään ryhmään.
Viestin asettaminen tapahtuu opiskelijaryhmän hallintasivulta, joka on luotu luvussa 6.2.
Viestin muokkausta varten löydät tekstilaatikon kohdasta Muita asetuksia, aikaisemmin mainitun Lisää ryhmän jäseniä -toiminnon alapuolelta.
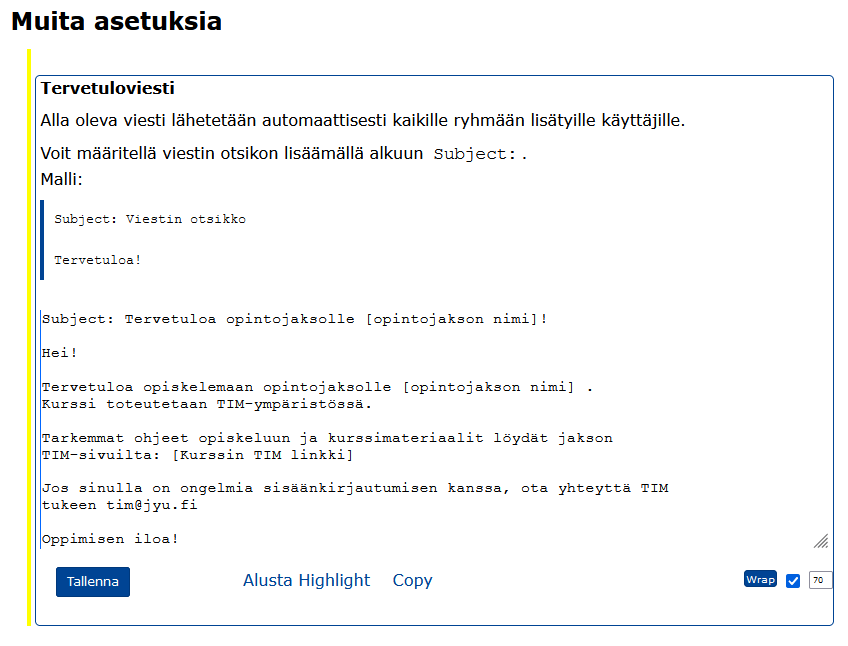
Määrittele sähköpostiviestin otsikoksi tuleva teksti avainsanalla Subject: kuten esimerkkikuvassa yllä. Kirjoita viestin leipäteksti sen alle.
Alla on yksinkertainen pohja tervetuloviestille:
Subject: Tervetuloa opintojaksolle [opintojakson nimi]

Hei!

Tervetuloa opiskelemaan opintojaksolle [opintojakson nimi].

Kurssi toteutetaan TIM-ympäristössä.

Tarkemmat ohjeet opiskeluun ja kurssimateriaalit löydät jakson TIM-sivuilta:

[Kurssin TIM linkki]

Jos sinulla on ongelmia kirjautua sisään, ota yhteyttä TIM tukeen: tim@jyu.fi

Oppimisen iloa!
Tallenna viesti sitten tekstialueen alapuolelta löytyvällä Tallenna-painikkeella.
Huomaathan, että tällä hetkellä viesti lähetetään vain uusille ryhmän jäsenille, eli sellaisille käyttäjille, jotka lisättiin ryhmään viestin tallentamisen jälkeen.
6.2.2 Adding a student group imported from Sisu to the course homepage
Please note that course homepages are usually located at:
https://tim.jyu.fi/view/kurssit/ORGANISAATIO/KURSSIKOODI/KAUSI/kotifor example:
https://tim.jyu.fi/view/kurssit/historia/HISP001/2022k/kotisivuAdd a group to the course homepage:
Go to the document from which you want to make the course home page.
Click on -> Set as a course/Set as a course.
Please add the course details to the form:
- Course code: course code
- Subject: subject
- Expiration date: the date the course will close to students
- Student group: the TIM name of the group copied from the previous step
- Click Set.
- a link to the course home page is created on the group administration page.
- group can be found by selecting All documents -> groups from the main menu.
Once you have added a group to the course homepage
- students enrolled in a group in Sisu will automatically see the coursein Mycourses/Mycourses list on the TIM home page and
- as a teacher you can find the course by clicking on Current courses/Availablecourses.
6.2.3 Evaluation of a group of students imported from Sisu and export of coursework to Sisu
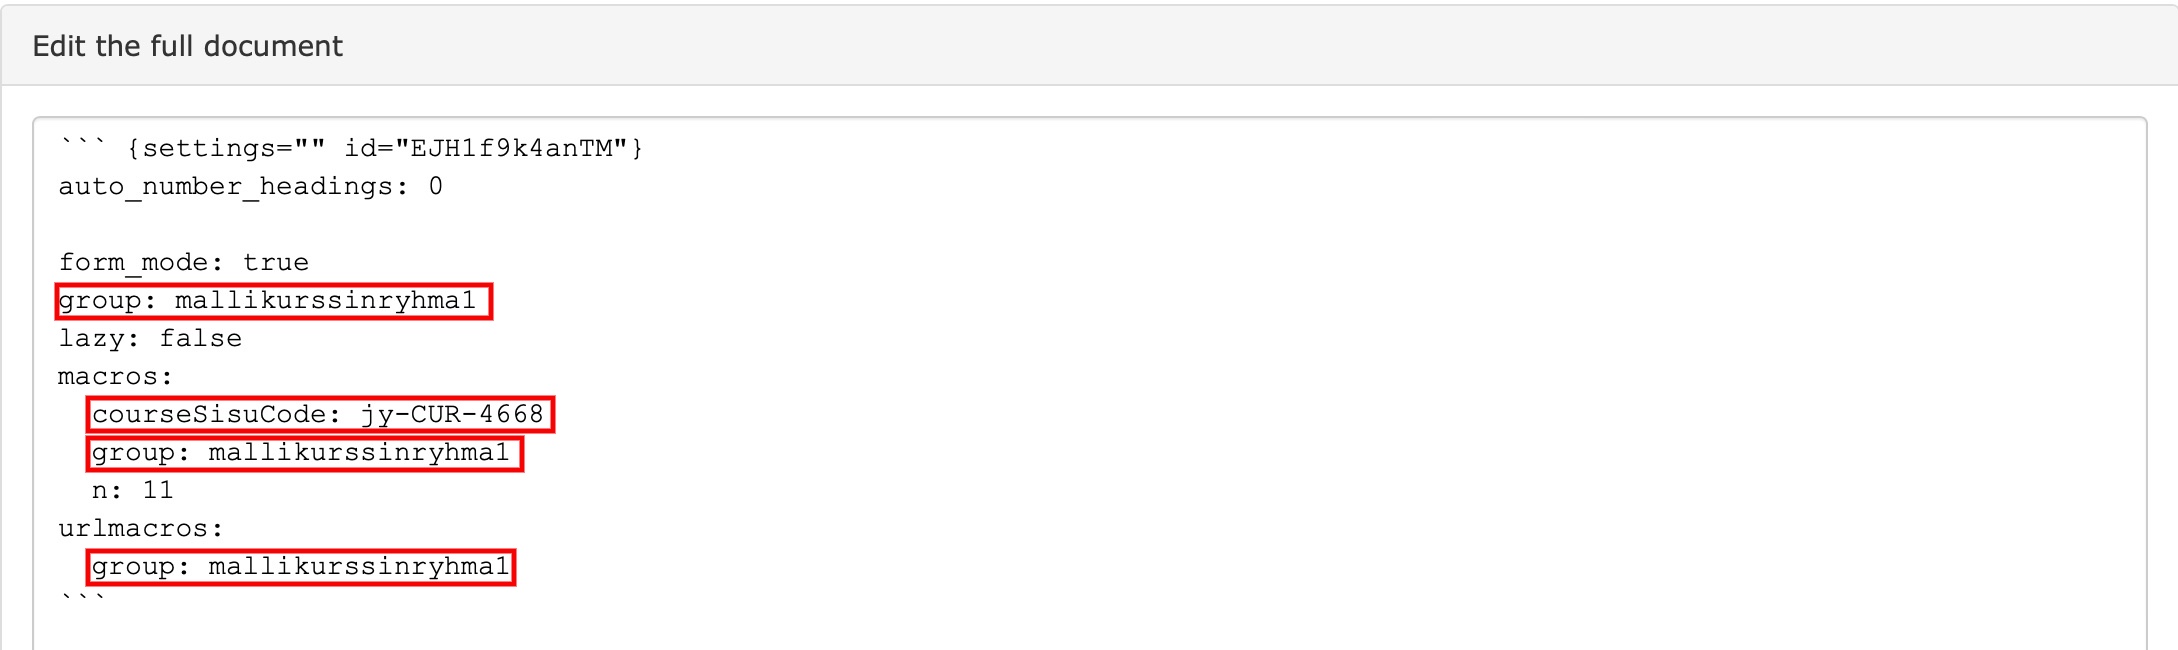
Create a folder where the course is
- a new document for group management
- select the Manage tab from the main menu
- copy the code below in full into the Edit the full document field
- finally click Save.
``` {settings="" id="4JnLiL380HUA"}
auto_number_headings: 0
form_mode: true
group: mallikurssinryhma1
lazy: false
macros:
  courseSisuCode: jy-CUR-4668
  group: mallikurssinryhma1
  n: 11
urlmacros:
  group: mallikurssinryhma1
#- {visible="True" id="EFWgSPaG5Fwv"} Tämä on opiskelijan minimaalinen näkymä. Tietoja voit opettajan syöttää kun klikkaat yläpalkista Teacher.
7. Mallikurssi, vain arvosana
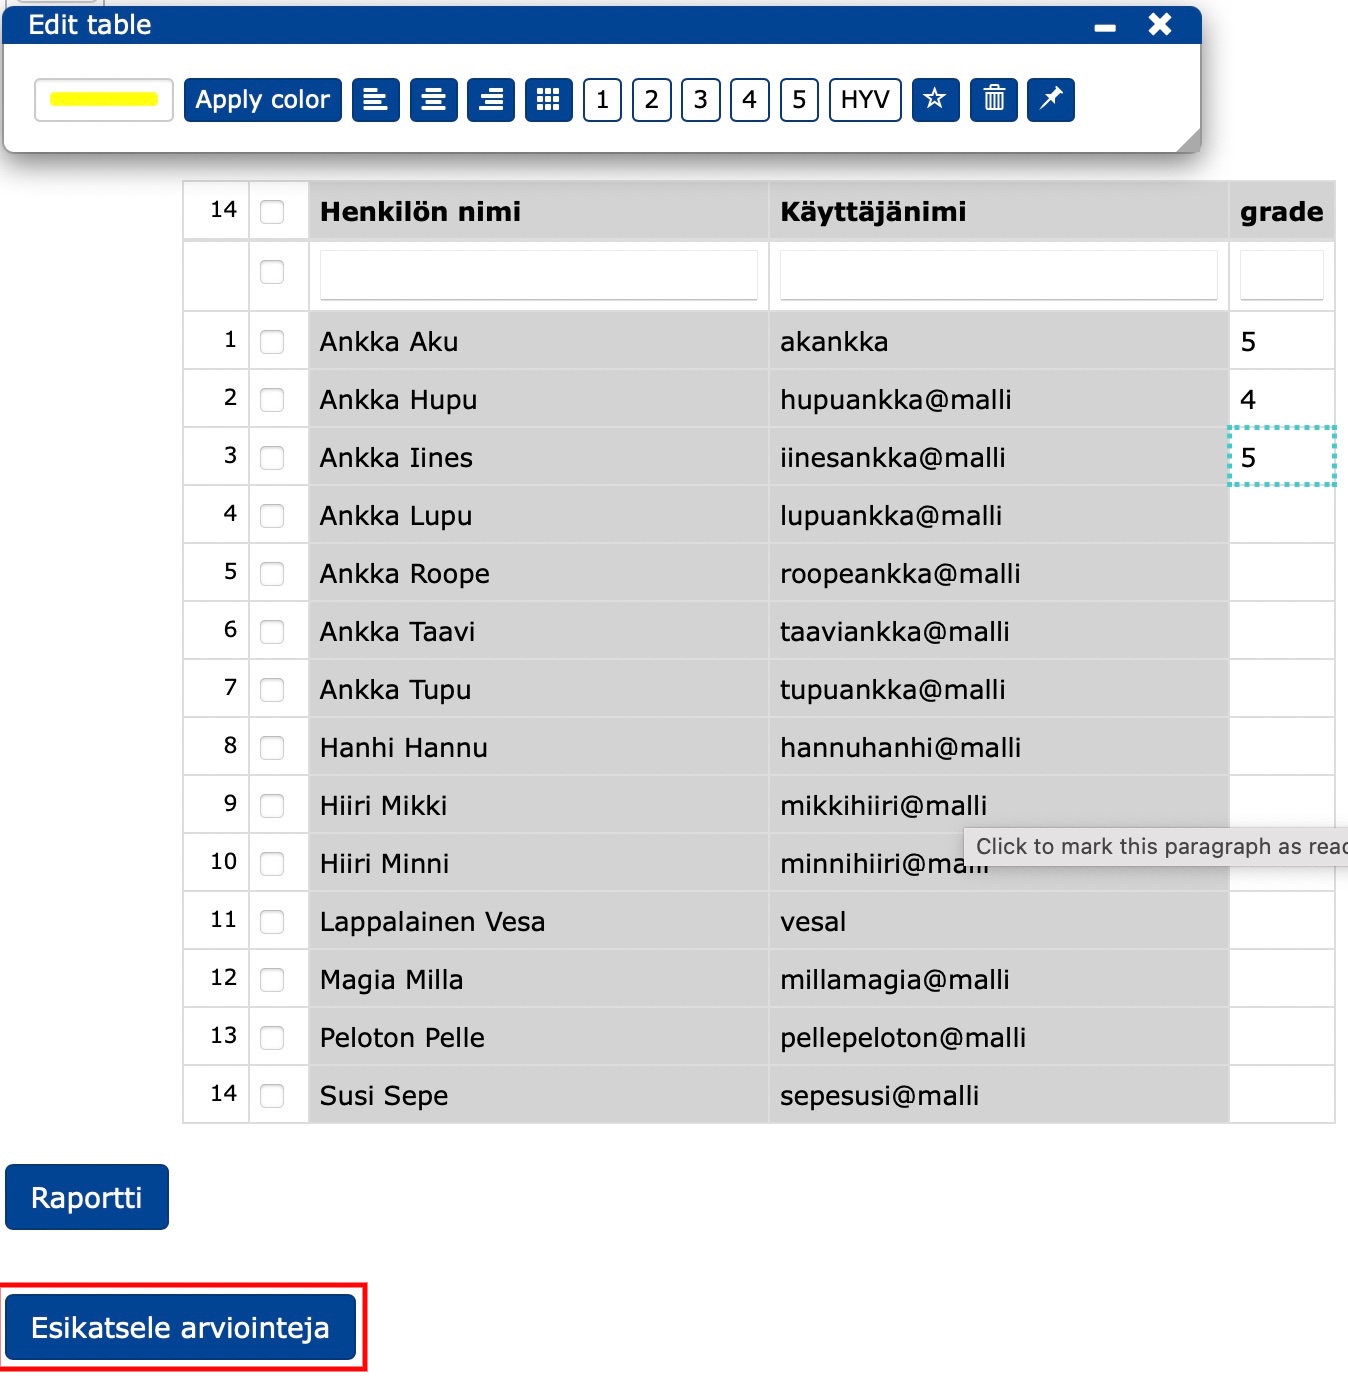
showname: 1#- {defaultplugin="textfield" readonly="view" .fieldCell id="BAILqZlbs8KR"} {#grade stem: 'Arvos', cols: 3#}
#- {visible="False" id="RMSH1qcMgNVk"}
Klikkaa kahdesti solua johon haluat syöttää.
groups:
 -
fields:
 - grade
table: true
report: true
maxRows: 40em   # max height for the table before scrollbar
realnames: true # Show full name in 2nd column, true or false
buttonText:     # Name your save table button here
autosave: true  # autosave, true or false
separator: ";"  # Define your report value separator here, ";" by default
cbColumn: true    # show checkboxes
nrColumn: true    # show numbers
filterRow: true   # show filters
singleLine: true  #
reportButton: "Raportti"
emailUsersButtonText: "Lähetä sähköpostia valituille" # jos halutaan lähettää sähköpostia
toolbarTemplates:
 - cell: '1'
 - cell: '2'
 - cell: '3'
 - cell: '4'
 - cell: '5'
 - cell: 'HYV'
#- {visible="False" .gray id="sOwgk5kGQM0v"}
buttonText: "Lähetä arvioinnit Sisuun"
destCourse:
showInView: false
group:
#- {id="UDcKWFRNxI4v"}
```
Edit the code:
group: the TIM name of your coursecourseSisuCode: the sequence of numbers in the Sisu name of your coursegroup: the TIM name of your course.
You can get the assessment done and sent to Sisu:
- by clicking on the main menu Teacher/Teacher
- by setting the grades in the table using the editor
- by clicking on Preview the assessments
- by setting the date when the grades will be exported to Sisu and
- by clicking on Send the selected ones to Sisu
- finally go to Sisu to confirm the grades.

More guidance
7. Rights to documents
The chapter teaches
- adding rights to a document
- adding rights to a group in a document
- setting default rights for new documents and folders
- assigning a specific right to only one block in the TIM system
- mass changing rights.
7.1 Rights to documents
When a new document is created, the default permissions are assigned to the document and are displayed when a new document is created and can be edited as desired.
The permissions can be edited from the Manage tab of the document.

The default permissions set the document as the author's property.
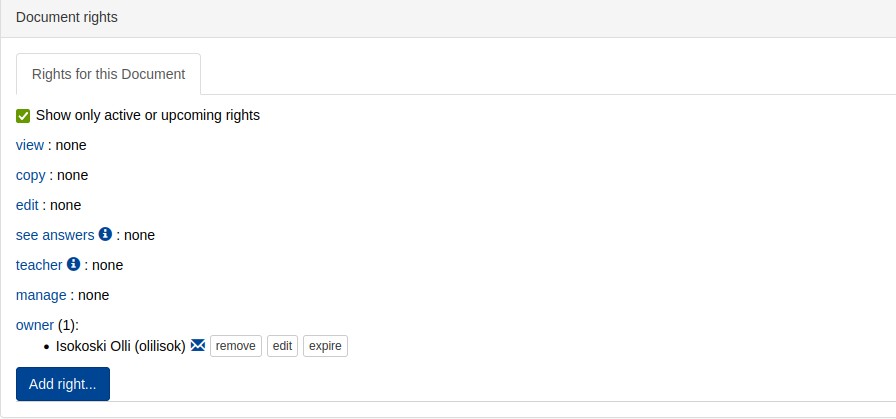
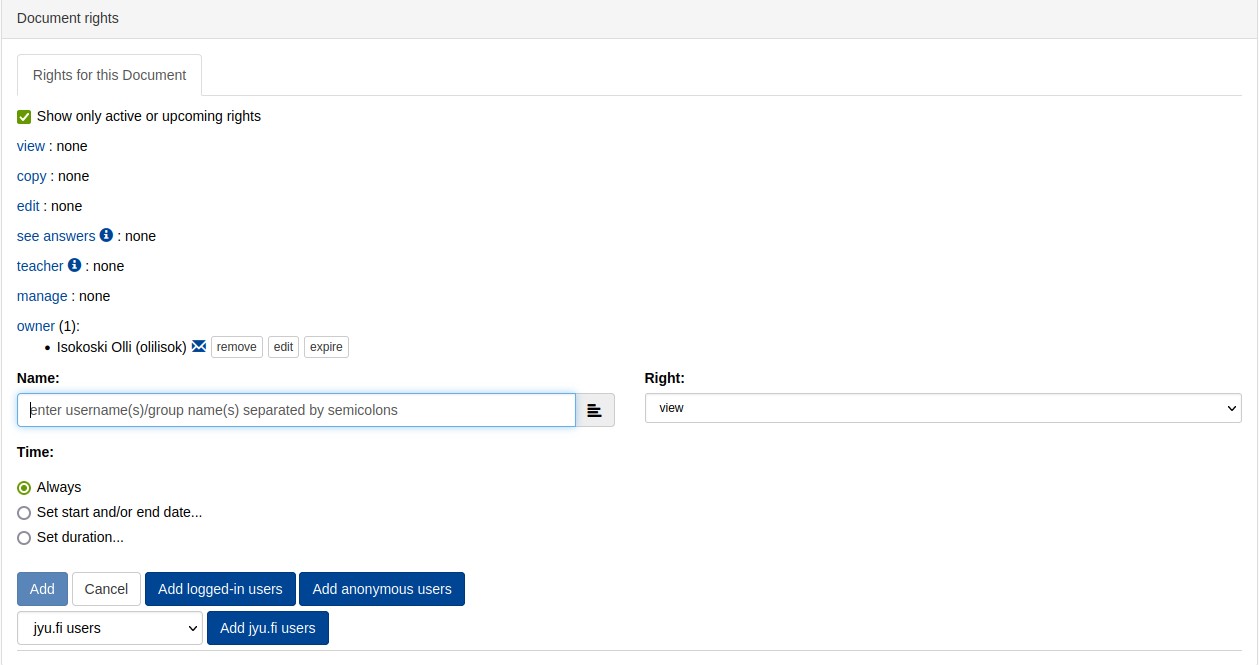
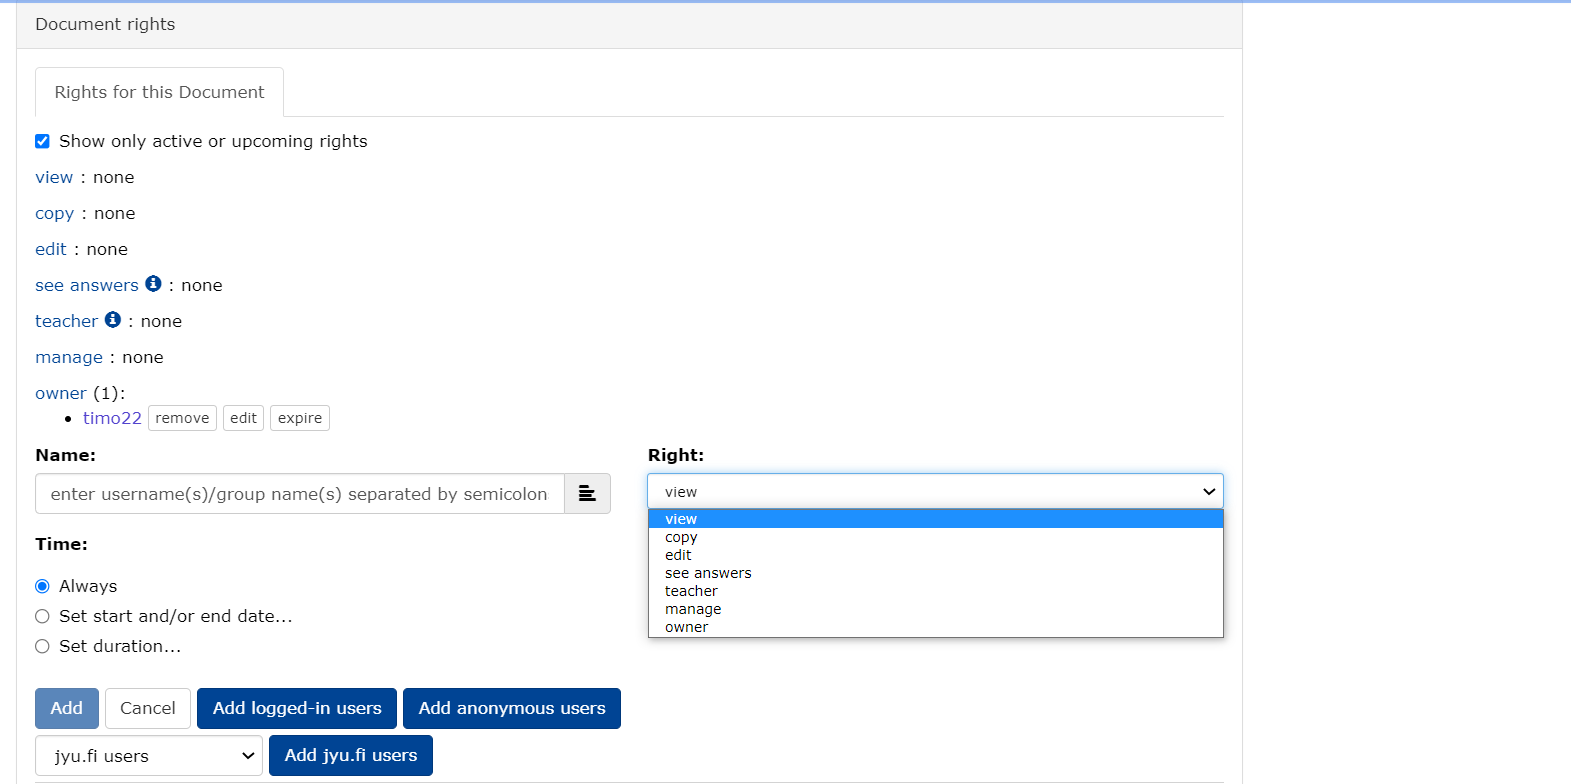
Clicking on any permission will open a menu that allows you to set permissions for users or groups.
Name:Enter user names or groups separated by a semicolon;.Right:select the right you want to grant from the drop-down menu.Add: add the selected right to the specified usernames or groups.
Add logged in-users: add rights for all logged in users.
Add anonymous users: add rights for all guests. Use with caution, especially when editing permissions.
Add jyu.fi users: add permissions for all users of the jyu.fi organization . From the pull-down menu on the left of the button, you can select other organisations.
7.1.1 Available rights levels
view: the right to view the document and perform tasks on if you are logged in. If the tasks are given the right to do without logging in, even non-logged in users can do the tasks, but the results are not saved anywhere. In addition, there is the right to view the markdown of non-plugin blocks via View source.
copy: the holder of this permission can view the markdown of the document also for plugins (View source) and copy the document (via the manage view) to himself. In this case, any answer or scoring criteria in the plugin will be shown with it, so this permission should not be granted if the answers are to be encrypted.
edit: right to edit the document. Does not include the rights that the teacher permission allows. This should be given to the group that develops the document. For general-purpose (wiki) documents,
jyu.fi usersmay also be a useful alternative to . Why not evenLogged-in users.see answers: the right to view (but not modify) the answers of others. The names of respondents are displayed anonymously. This right should usually only be given to the group to which the tasks belong, once the deadline for the tasks has passed. For example
ohj2k16.teacher:
- no right to edit the document, so edit permission must be given separately
- right to create lectures related to the document and to add lecture questions
- right to view all answers to the document
- right to change the scores of the answers
- right to give feedback to the student on the answersThis right should be given carefully, because then you will see the names and usernames of the users. Note: the teacher permission does not automatically grant the edit permission.
manage: the right to change the permissions of the document except for the owner. Includes of course all previous permissions including edit and teacher.
owner: the highest level of rights, which includes all rights.
If no rights are assigned to a document, the document will be displayed with the text UNPUBLISHED in the background. If you are disturbed by the text and do not want to assign rights to anyone yet, you can assign the view right to the document to yourself, after which the background text will be removed.
7.1.2 Rights preferably for groups
While rights can be granted to individuals, it is preferable to grant rights to groups.
Ready-made larger groups include:
jyu.fi users. These are users who are reliably logged in to and these accounts cannot be easily created by just anyone. These users can often be given more rights, because in case of abuse it is easier to put their account on the banned list or to contact them.
logged-in users: people who are logged in. This category includes also those who have created an account for themselves from
Sign inusing . These persons have at least a working e-mail account, because have been assigned a TIM account. These people can also be denied access in case of abuse, but they can always create a new account with another email address, so they are not as reliable as the Raven logged in.anonymous users: users who are not logged in at all. This group can often be given read access, but care must be taken with edit access.
TIM's ideology would be that if possible, anonymous should be given read access, so should be made as public as possible. If there are tasks in the document, they are not stored for the unlogged, so then the recommendation is logged-in users.
In the TIM system it is also possible to create new-groupsnew-groups and give them descriptive names. For example, a group could be students in a particular course or teachers.
For example, for the teachers and instructors of the Programming 1 course, a group ohj1 is created for the teachers and instructors of the course manage or owner. By assigning access to the course document or to that group, then by changing the members of the group each year, it is possible to control at once who can edit what. Either the same or a different group can be given teacher access, which for example entitles them to give feedback on students' answers.
If there is more than one administrator , it is advisable to create a group of potential document administrators at once. Even if there is only one person, you should make a group if there is even a small chance that there will be more administrators.
If the owner of a read-only account is not one of the general Logged in, Anonymous or one of the Haka groups, then it is also worth making a group of the owners of the read-only account.
The group can be created from Luo uusi ryhmä behind the wheel. The groups needed for courses can be obtained from via-insuvia-insu.
Creating your own groups requires a permission, which can be requested from the administrator at by sending an email to: tim@jyu.fi For groups automatically generated from Sisu, teachers already have sufficient rights to create them.
Another advantage of a group is that it can be created email listemail list.
7.2 Setting default permissions for new documents and folders
Useita dokumentteja luotaessa oikeuksien asettaminen kullekin erikseen on aikaa vievää, ja se voi myös unohtua helposti. Siksi on mahdollista asettaa kansiokohtaisesti oletusoikeudet uusille dokumenteille ja kansioille.
Jos esimerkiksi haluat, että kansioon harjoitustyot luotuihin dokumentteihin tulee automaattisesti katseluoikeus ryhmälle jyu.fi users, etene seuraavasti:
- Mene kansion
harjoitustyothallintasivulle (Manage). - Klikkaa välilehteä Default rights for new documents.
- Lisää view-kohtaan oikeus ryhmälle
jyu.fi users.
Vastaavalla tavalla voit asettaa oletusoikeuksia uusille kansioille (välilehdeltä Default rights for new folders).
Huomaa, että ylempiin kansioihin asetetut oletusoikeudet periytyvät myös alempiin kansioihin.
7.2.1 Granting a specific right to only one block
If necessary, a right may also be granted for only one block. Often the permission is restrictive, e.g. the right to edit a document is granted to a large number of people, but only people with manage permission can edit a particular block. In this case, a block can be started
#- {edit="manage"}7.3 Mass migration of rights
When there are many folders/documents whose permissions need to be changed, the Manage/Manage tab for a single item is a slow solution. Then to change , you should go to the top folder of the set to be changed, (directory), and its Manage/Home tab. There, select Rights of subitems:
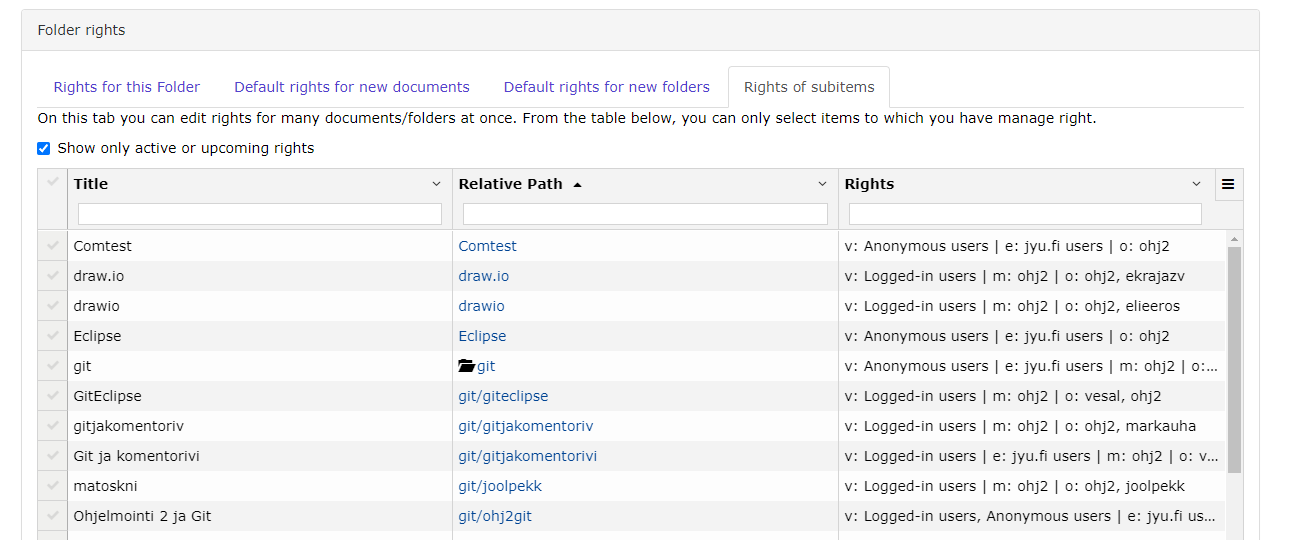
Here you can use the Title box of the table to filter the desired rows and then select the required or all those displayed and add/remove the desired rights. Adding and removing rights is done as described in the document-rightsdocument-rights header.

More guidance
8. Email list and discussion page
The chapter teaches
- create an email list
- copy the course discussion page to your own course
- give students permission to edit the discussion page
- subscribe to emails about changes to the discussion page
- add topics, messages and comments to the discussion page.
8.1 Email list
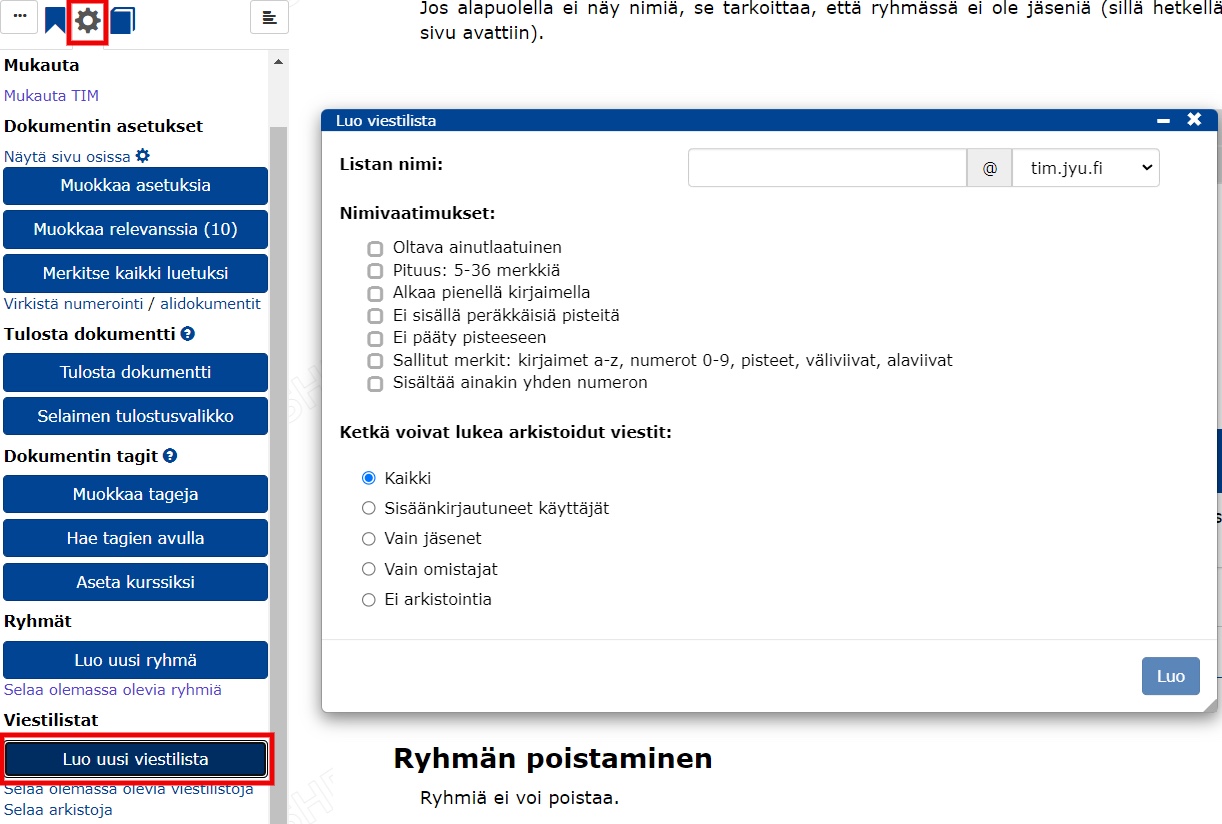
To create an email list, you need the right to create groups. To get the rights please contact TIM Development tim@jyu.fi. To start creating an email list, click on on the wheel and select Create a new mailing list.
In the form that appears, fill in
- length between 5 and 36 letters
- can contain lower case letters a-z, numbers 0-9, dashes -, dots . and underscores _
- must start with a lower case letter
- cannot contain several dots in a row and cannot end with a dot
- must contain at least one number
- if the list is to represent, for example, the course group ohj1s22, then this is a good name for the list
- archiving type
- click create.
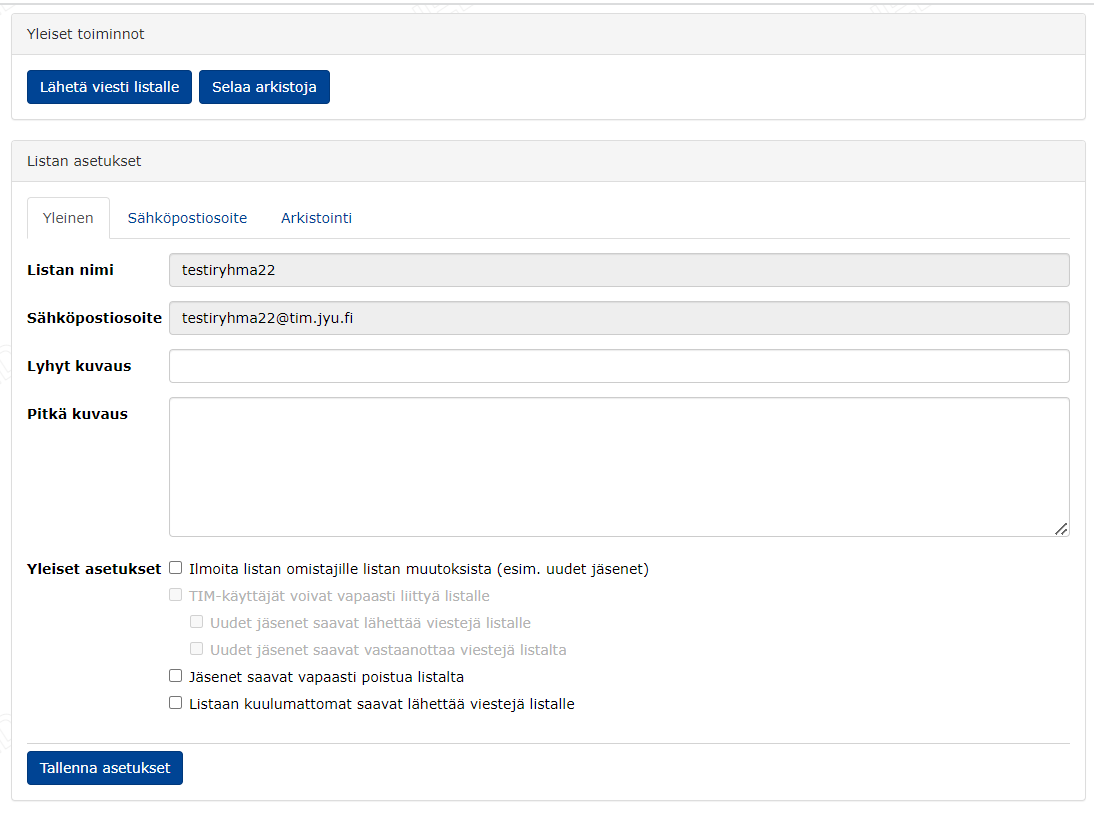
Fill in the list settings, which are valid for the whole mailing list and for all channels. The tab also lists general information such as the list name and email address.
- List name
- The email address of the list to which messages going to the mailing list will be sent
- Short description to inform users of the purpose of the mailing list
- Long description to specify the target group, purpose or use of the list
- General settings.
Click Save settings.
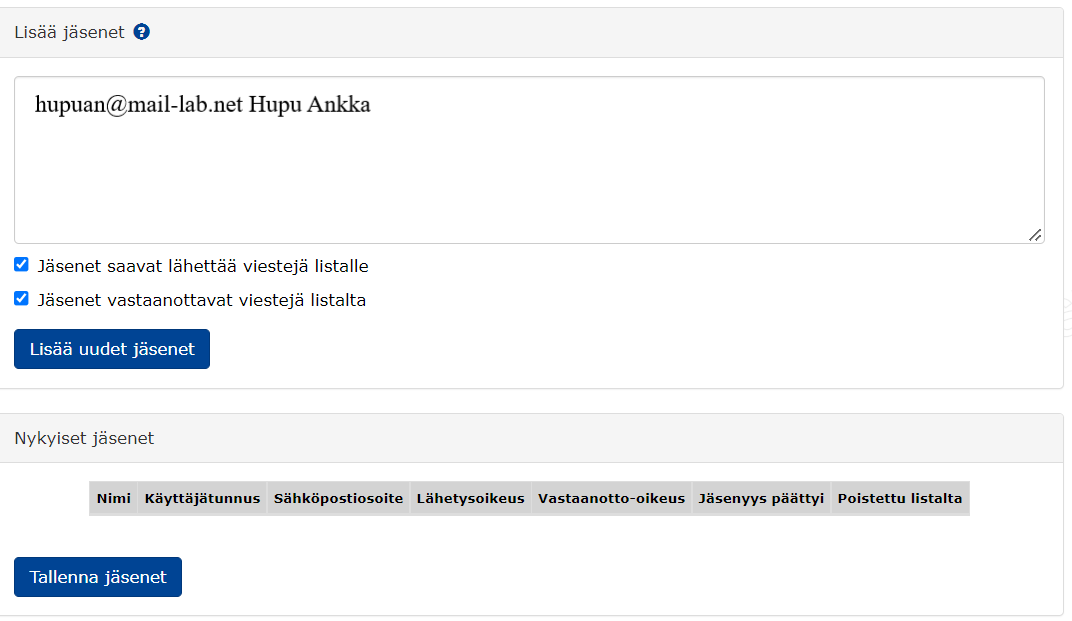
Adding members to the mailing list
- A TIM user is added to the mailing list by entering his/her username in the
Lisää jäsenetfield. The user will be granted the rights that are selected in the checkboxes below the text field at the time of the addition. The rights can be changed afterwards. - A TIM group is added in the same way as a TIM user, i.e. by entering the name of the group.
- An external member is added by entering the details in the
Lisää jäsenetfield. For the details of an external member, the e-mail address is mandatory, but not the name. You can enter the information in two different ways:- hupuan@mail-lab.net Hupu Ankka
- Hupu Ankka hupuan@mail-lab.net.
- You can add several members at the same time by entering the information in the text field and by separating them with a line break.
Finally, click Add new members.
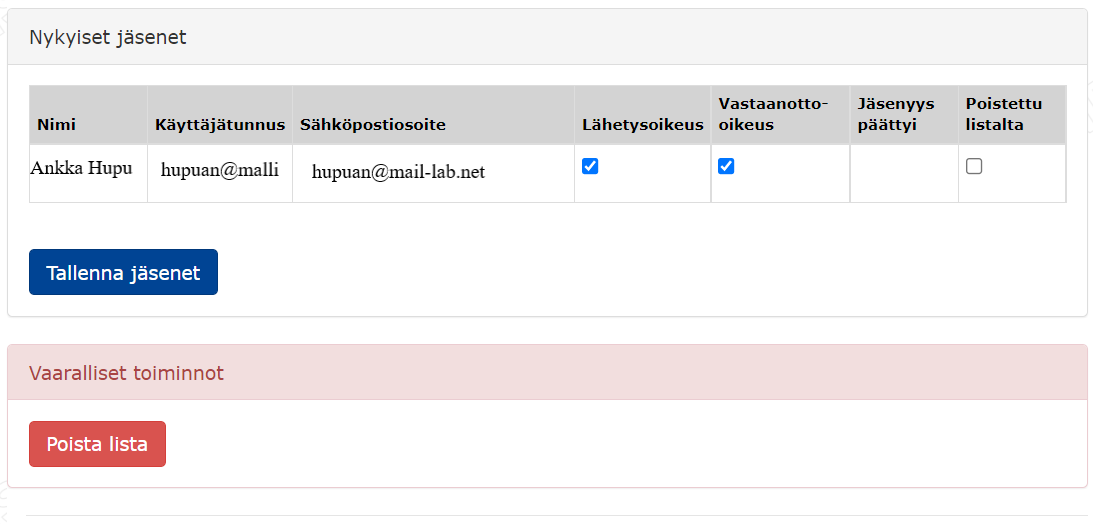
- Members added to the list are displayed in the
Nykyiset jäsenetfield. - Members can be edited, removed from the list or reinstated.
Deleting a member
- Select the member to be deleted from the checkbox in the
Poistettu listaltacolumn. - Save by clicking Save members.
- The deleted member will not disappear from the members table, but the time of the deletion will appear in the
Jäsenyys päättyicolumn . You can return a deleted member to the list by selecting the member again in thePoistettu listaltacheckbox and saving the change by clicking Save members.
An email list can be deleted by clicking Delete list, which means the email list is disabled and will not accept messages from members of the list. This way the mailing list will not be accidentally deleted.
8.2 Course discussion page
On TIM, any document can be commented on and thus the discussion can be carried out on , for example in lecture material. However, courses often want to create a separate discussion area . The following are instructions on how to create and use a separate discussion page.
8.2.1 Copying a chat page
Copy the bottom of the document to your own folder from
view/courses/tie/proj/2022/timo/tim-guide/course-discussion-base
Watch the video to see how to copy the discussion page.
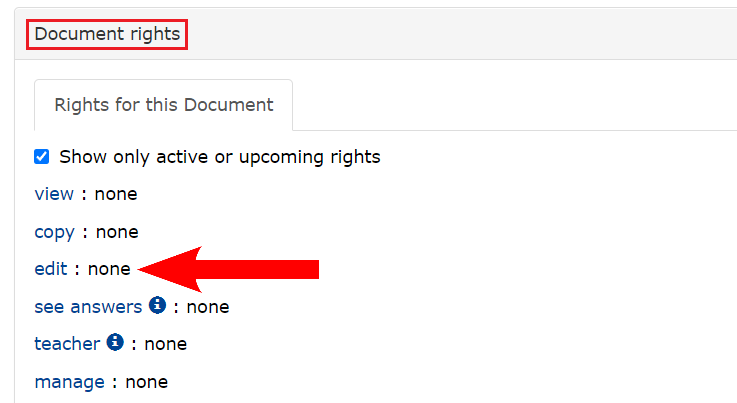
After creating the page, the students must be given editing rights to the discussion page. This is done from the Manage/Manage tab of the main menu under Document rights. Students are given editing rights by adding them to the edit section.
Watch the video to see how to add students to the chat page.
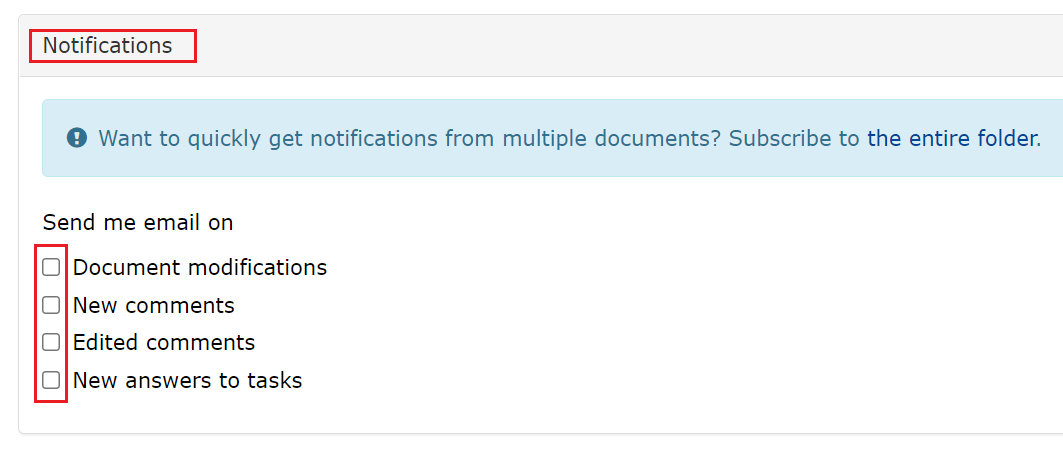
It is always a good idea for the course teacher to order the changes to the page by e-mail. This is done via the box at the top of the discussion page .
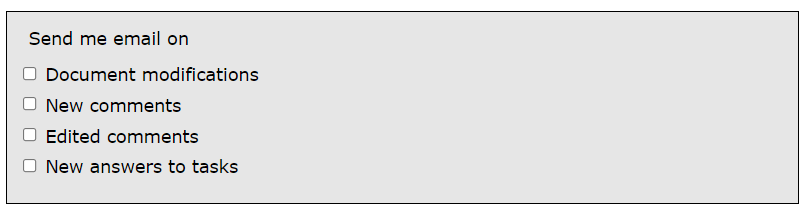
Options for email notifications
Document modifications: the user receives an email when a document is modified.
New comments: the user receives an email when a new comment is added to the document.
Edited comments: the user receives an email when an existing comment is edited.
New answers to tasks: the user receives an email when new answers to tasks are added.
Notifications of changes can also be subscribed to at from the Manage/Manage tab under Notifications.
8.2.2 Use of the chat page
You can watch the video below for instructions on how to use the chat page. The video is followed by the same instructions in text format.
- You can add a message to a specific discussion by clicking on Add message.
- To add a new topic, click on at the bottom of the page and add a new topic to .
- You can comment on a particular message by clicking on the message and then selecting from the edit menu Comment/note.
More guidance
The chapter teaches
- add a menu to a course page
- edit the content and layout of the menu
- edit the functionality of the menu.
What is the menu?
In TIM, a menu is a navigation bar anchored at the top of the page . The menu is used to navigate between the different pages of the course.

The menu can be created with the timMenu plugin. In the template courses, the menu is pre-built and you only need to modify the menu to suit your course.
A course website usually consists of several pages and you want the menu to be the same for all pages of the course . This is done by adding the menu to a preamble document created in the course directory templates/preambles. This way the menu will automatically appear on all pages of the course. If you are building a course based on a template course, the menu is edited by editing the preamble document.
Watch the video to see how to add a menu to multiple course pages using a preamble document.
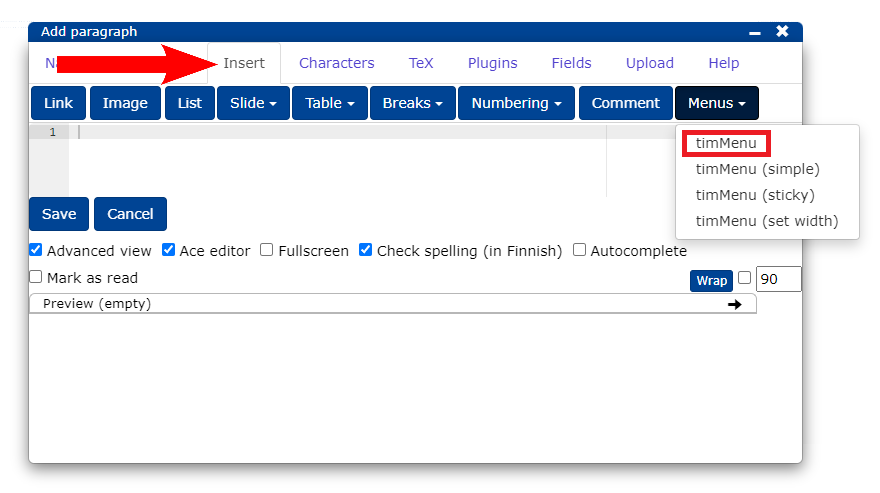
9.1 Adding a new menu
- From the Insert tab, click the Menu button and select timMenu.
9.2 Editing the menu
You can watch the video below for instructions on how to edit the menu. The video is followed by the same instruction in text format.
TimMenu comes with a variety of predefined submenus and formatting that you can use to build your own menu.
What is a menu slide?
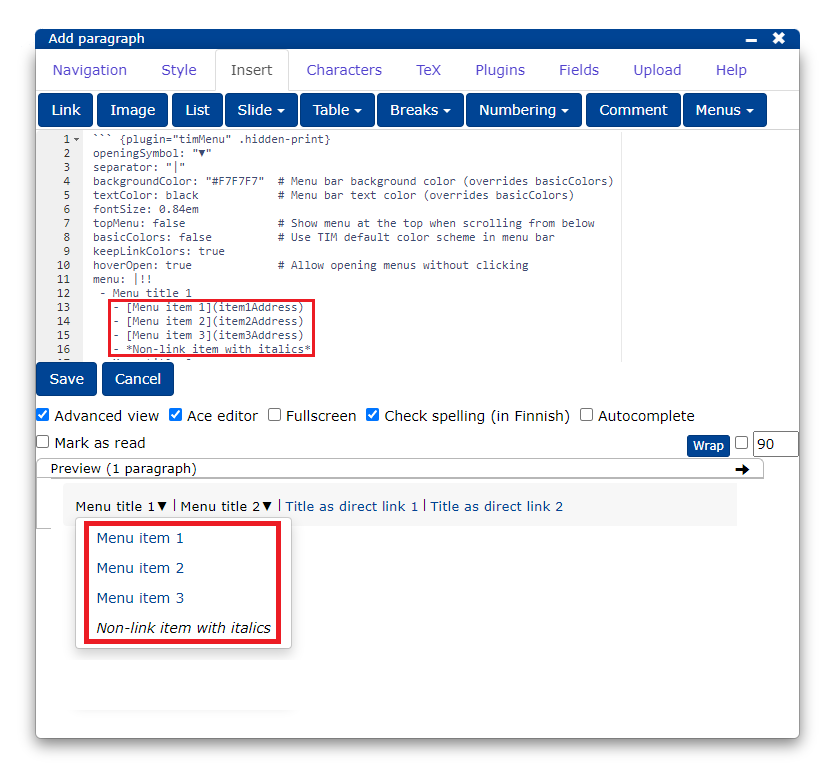
A menu item is a single element displayed in a menu. In the menu below, menu items are the menu headings "Materials" and "Tasks" and the link "Home".
Expenditure debits are marked with (-).
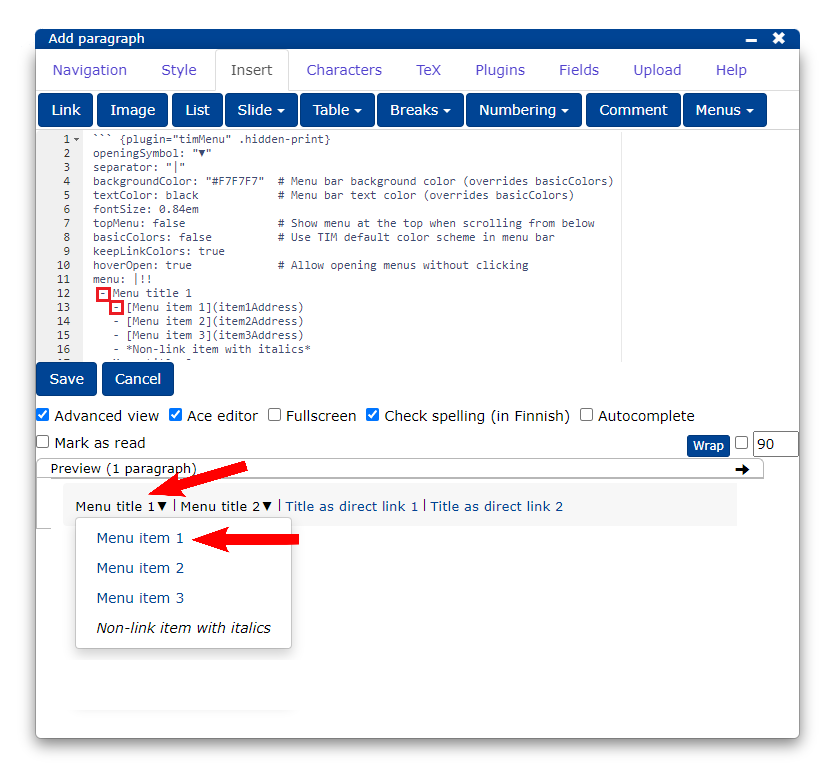
Placing a menu drawer in a submenu is done by nesting.
To make drop-down menus, type the menu title in normal text.
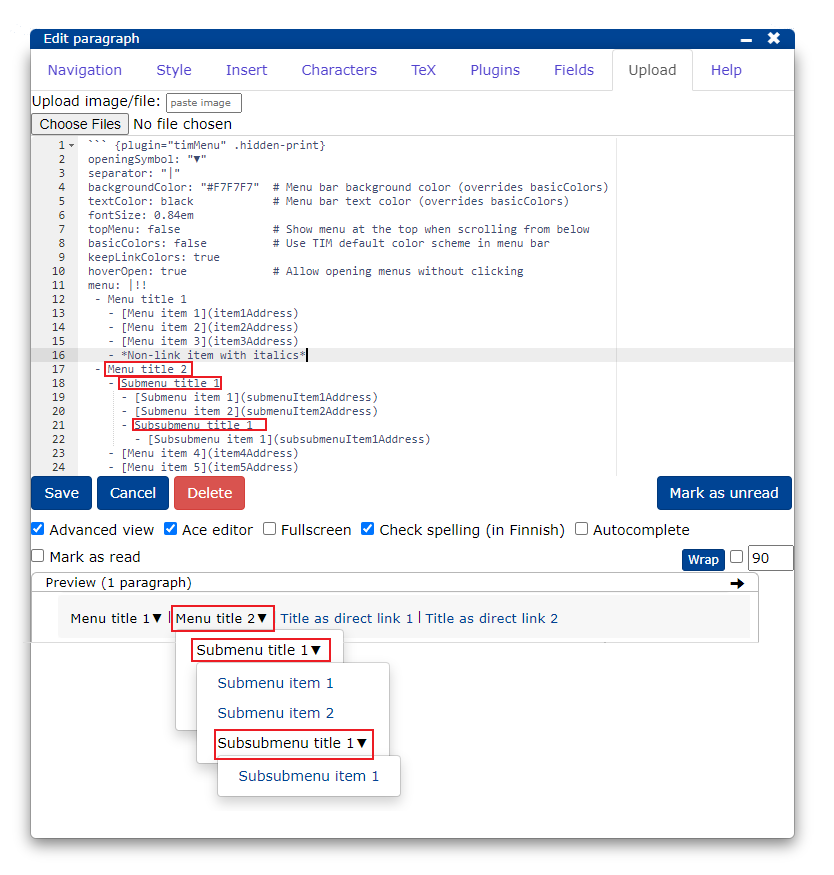
If you want to make a link to another page in the menu, enter the text as a link.
[linkkiteksti](linkki)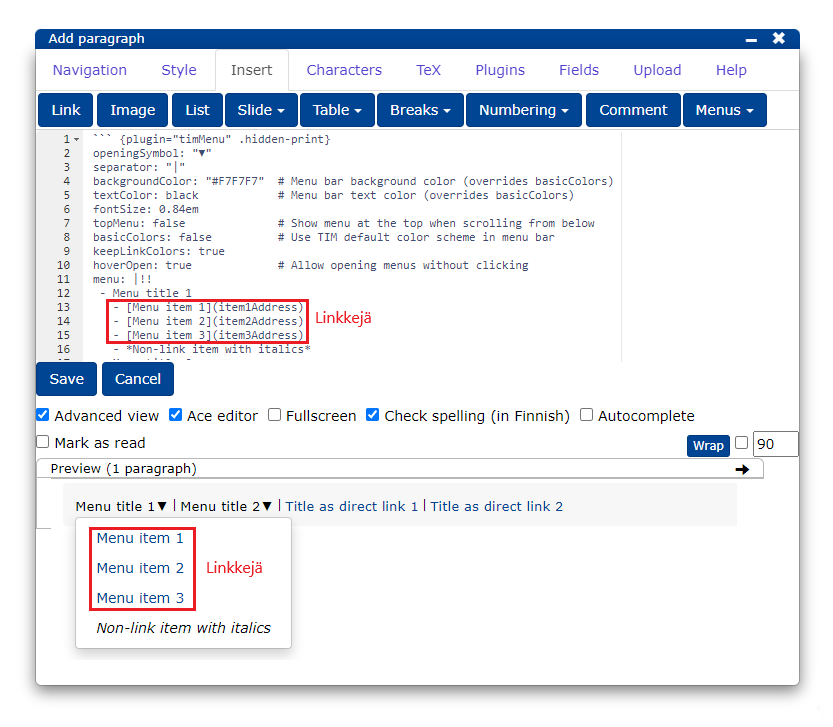
If you want to make a menu text that is neither a link nor a new submenu, type between the (**) characters.
9.3 Menu settings
Menu attributes allow you to customise the layout and some functionality. Menu attributes are written in the plugin right at the beginning, before the actual menu content.
What are attributes?
In TIM, plugin settings are controlled by attributes. An attribute has a name and a value. The name tries to describe what kind of setting is controlled by the attribute. The value depends on the attribute in question. The attribute name and value are separated by a colon. In plugins, attributes are placed at the beginning of the code.
nimi: arvoExample of attribute usage
In the timMenu plugin, if you set the topMenu attribute to true, the menu will appear at the top of the current view when the page is scrolled up. This is a very handy feature if the page is long.
topMenu: trueWatch the video to see how to customize the menu using the attributes.
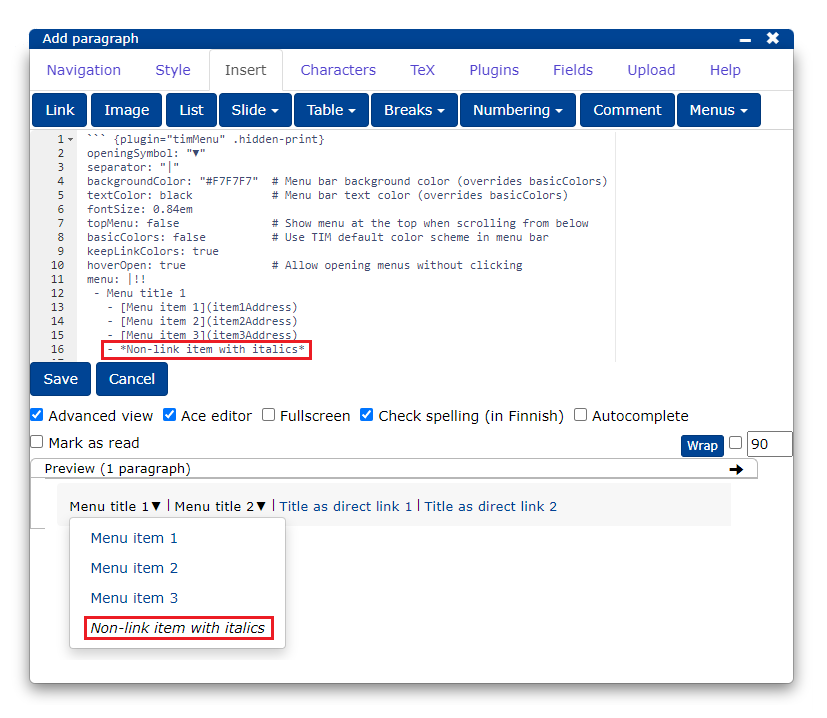
Menu attributes:
  openingSymbol : symboli joka näytetään avautuvissa valikoissa
      separator : merkki joka erottaa valikon otsikot toisistaan
backgroundColor : taustaväri
      textColor : tekstin väri
       fontSize : fonttikoko
        topMenu : kertoo ilmestyykö valikko sivun yläreunaan, kun sivua selataan ylöspäin
    basicColors : kertoo käyttääkö valikko TIMin perustyyliä
 keepLinkColors : kertoo näytetäänkö linkit sinisellä värillä
      hoverOpen : kertoo avautuuko valikko ilman klikkaamista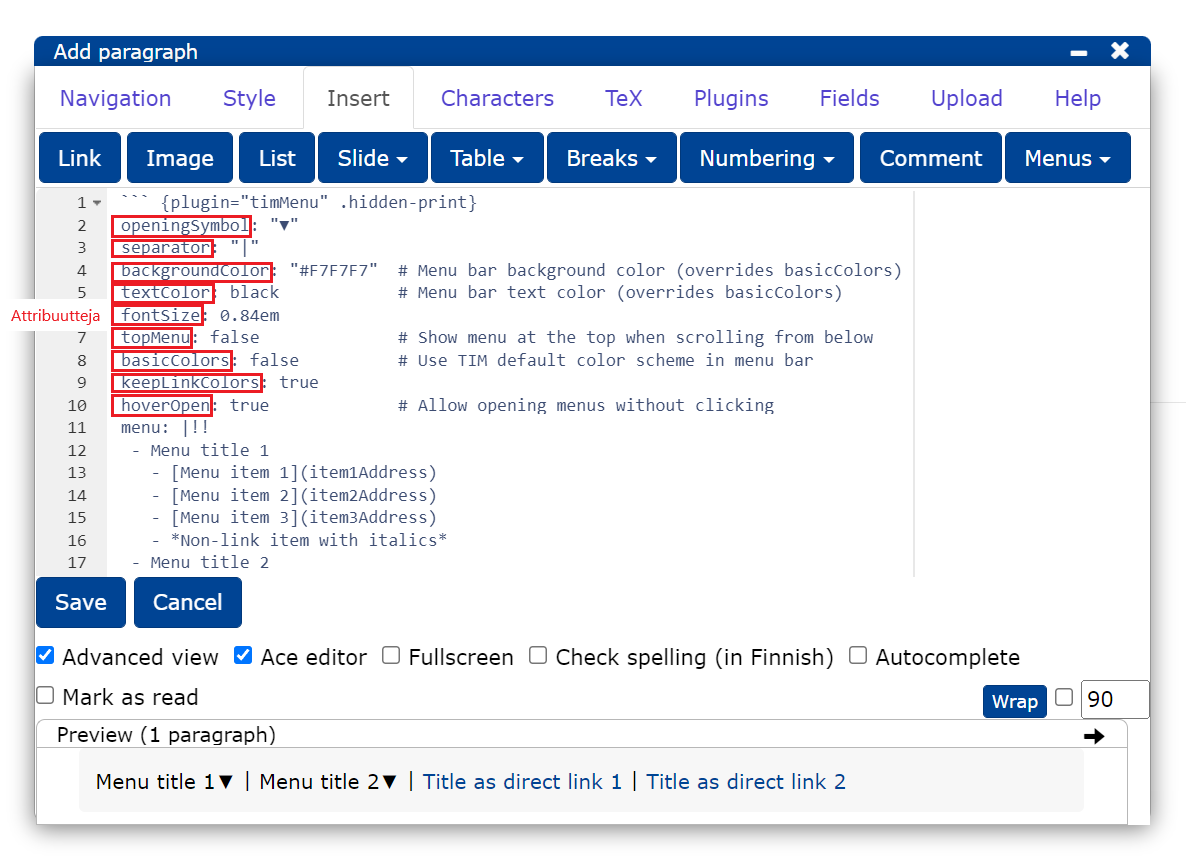
More guidance
10. Text formatting
10.1 Headlines
The chapter teaches
- how to create different levels of headings.
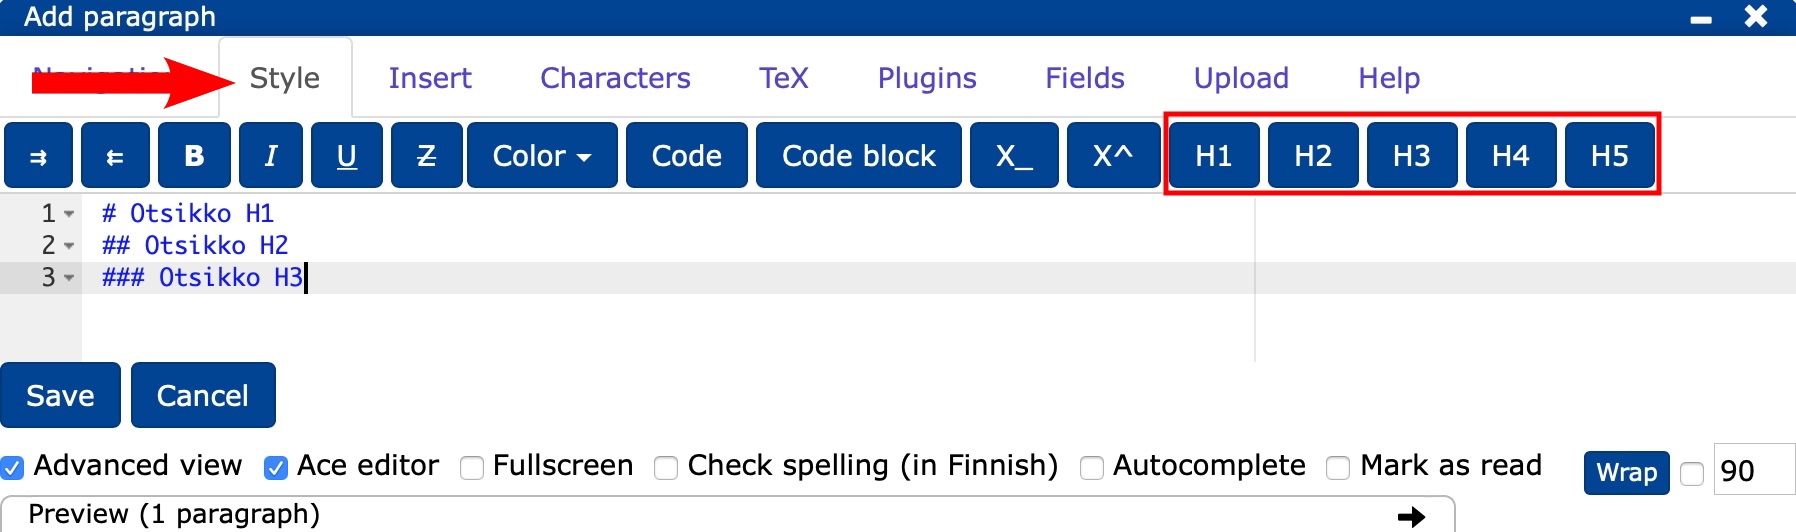
- In the editor, select the Style tab.
- On the Style tab you will find headline buttons from largest to smallest H1-H5.
- You can create headlines
- by first selecting the desired headline size and then typing the headline or
- by using
#, for example a H3 level headline would be typed###Headline or - by pressing -1(H1), -2(H2) etc.
- To enable automatic numbering of document titles, from the top left corner of the page, click on the wheel image -> Edit settings -> change
auto_number_headingsto 1. - Automatic numbering of titles only works for levels H1-H3.
10.2 Text styles
The chapter teaches about text styles
- italics
- bold
- text colour and background colour
- note
- underline underline
- strikethrough.
You can highlight text or parts of text by specifying highlighting marks around the part of the text you want to highlight
- by typing them in manually, or
- by specifying a highlight in the Style tab of the Editor, or
- by using the buttons that appear when you hover over a highlight in the Style tab .
If any text or text part is selected, clicking on the highlight button will place highlight marks around the selected area. If you click the button a second time, the highlights disappear. If no area is selected, the highlighters will appear around the blank and the cursor will remain between them.
If you want to use a particular style for the whole block, specify the style at the beginning of the block on the #- line, and the style will continue to the end of the block.
10.2.1 Course
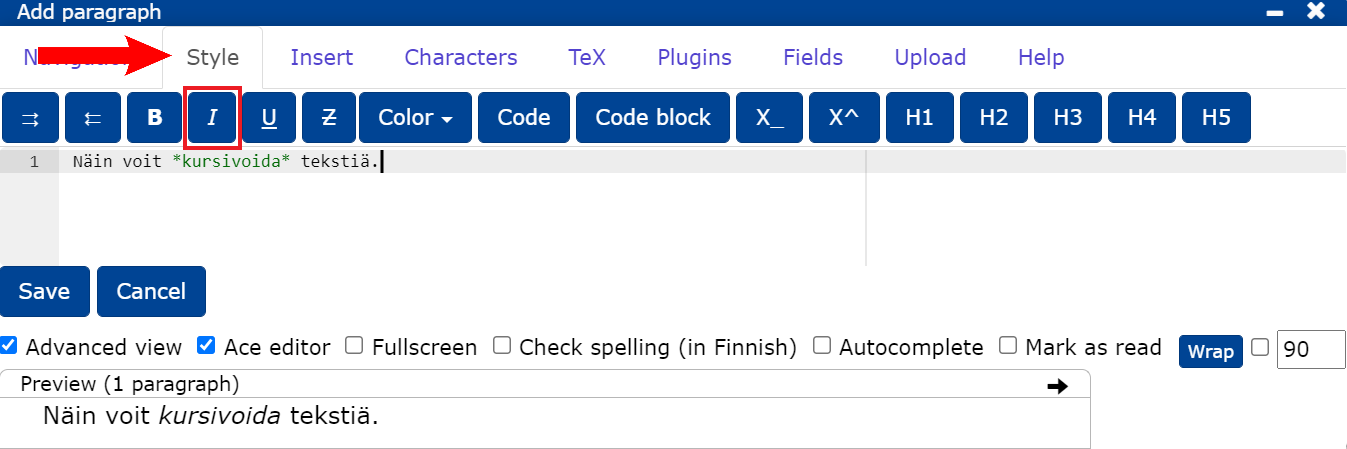
You can italicise text
- by selecting italics from the Style tab or
- by selecting the key combination + I italics after the desired word/selected text part or
- by adding * characters around the text part to be italicized.
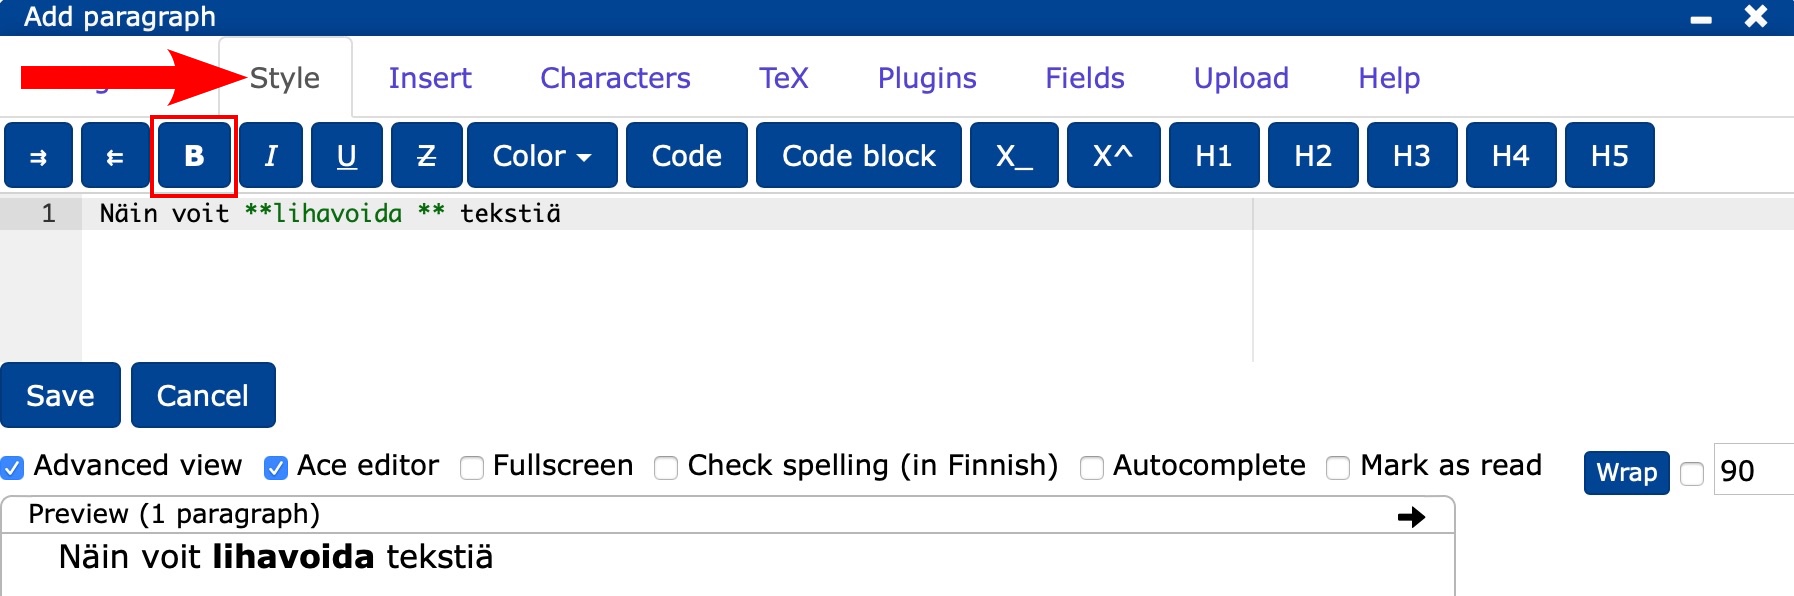
10.2.2 Bold
You can bold text
- by selecting bold from the Style tab or
- by selecting the key combination + B with bold after the desired word/text or
- by adding ** characters around the word as shown in the image below.
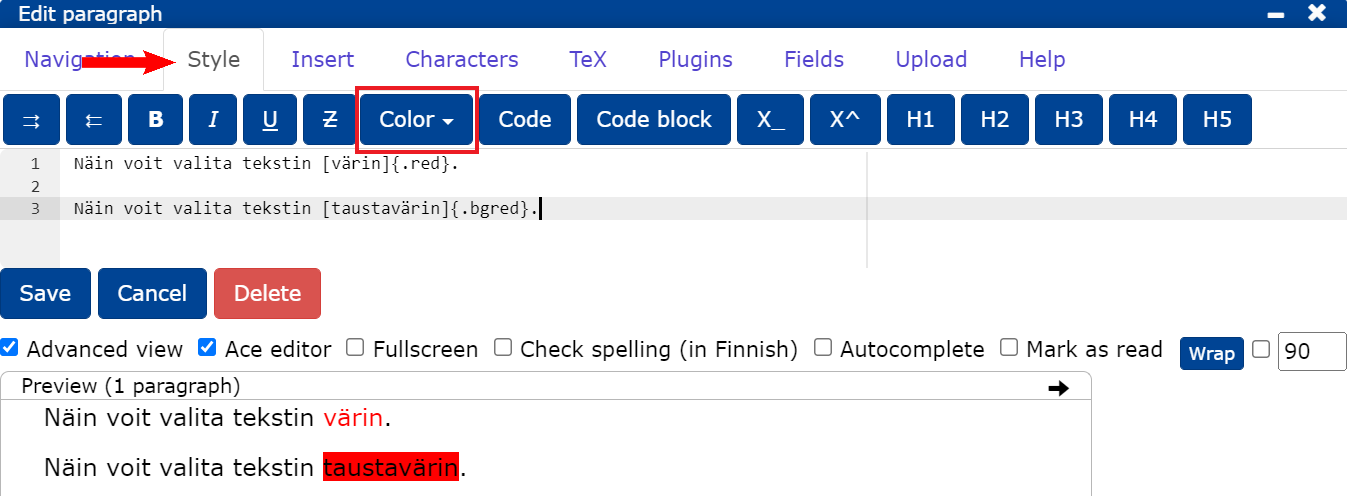
10.2.3 Text colour
- You can change the colour of the text in the Style tab by clicking Color.
- You can also put the text you want between [ ] and type the colour you want in curly brackets in English, for example
[Tekstiä]{.red}. - You can change the background colour of the text by adding
bg(backgroud) in front of the colour.
10.2.4 Note
To highlight a text or part of a text, type the part of the text to be annotated in square brackets and add the annotation style [Tekstiä]{.huomautus} after the square brackets. If you want to specify an annotation style for the whole block, add {.huomautus} to the line #- that starts the block.
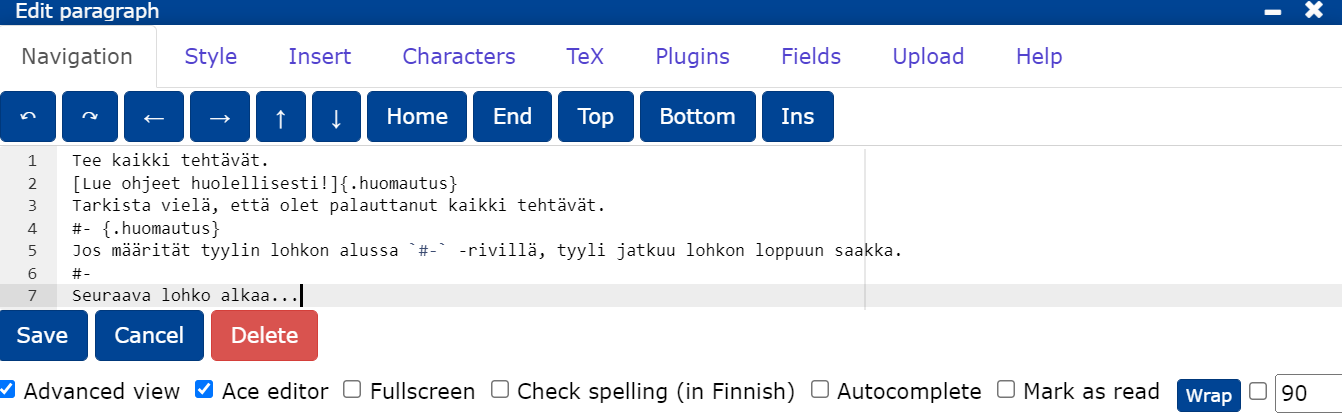
Do all the exercises. Read the instructions carefully! Check again that you have returned all the exercises.
If you specify a style at the beginning of a block on the #- line, the style will continue until the end of the block.
The next block starts...
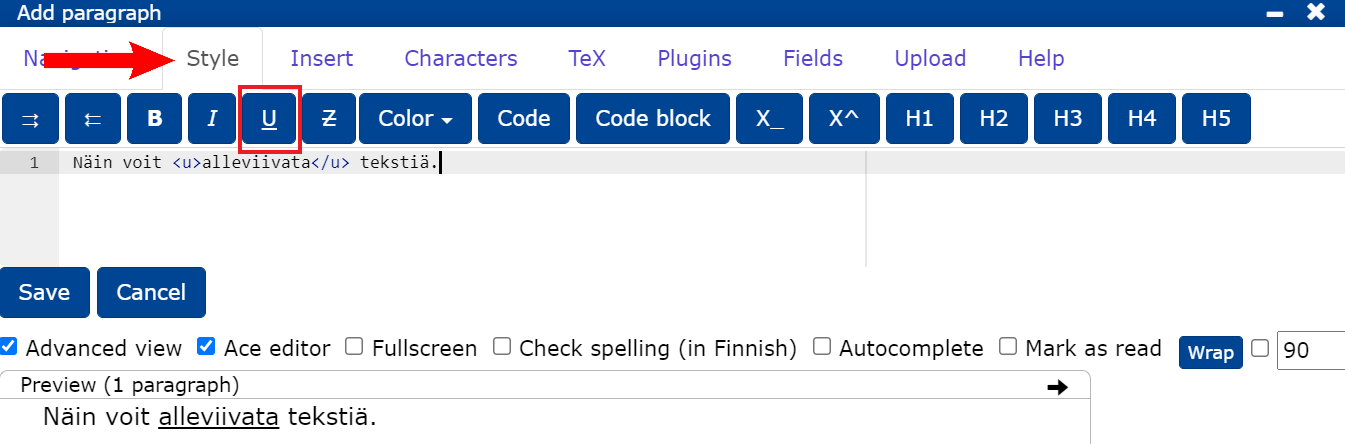
10.2.5 Underline
- You can underline text by selecting underline from the Style tab.
- You can also underline text by placing at the beginning of the text to be underlined.
<u>and at the end</u>.
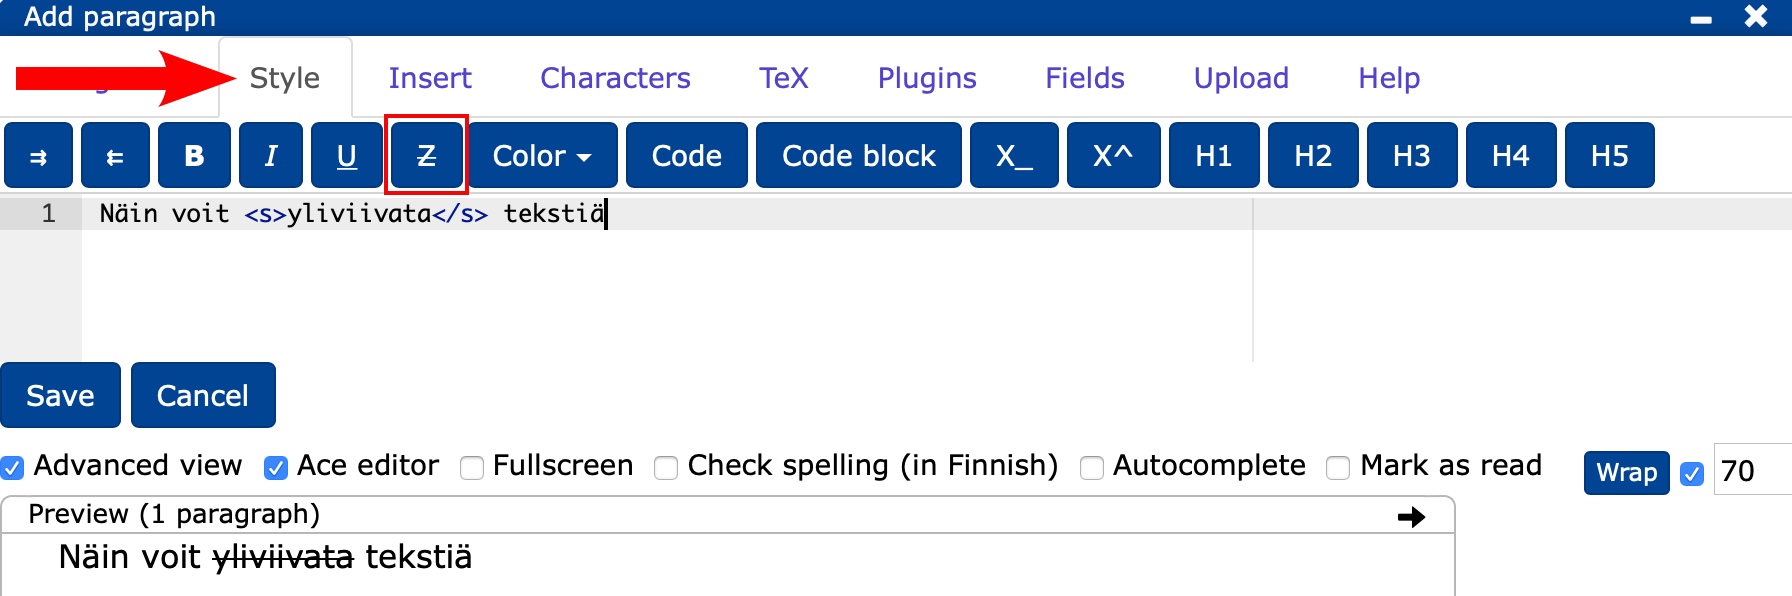
10.2.6 Overwrite
- You can cross out text by selecting the cross out option from the Style tab.
- You can also cross out text by placing the part of the text to be crossed out at the beginning of
<s>and end</s>.
10.2.7 Mission
10.3 Inclusion
The chapter teaches about text formatting
- indentation
- specific types of lists
- line and spacing
- paragraph
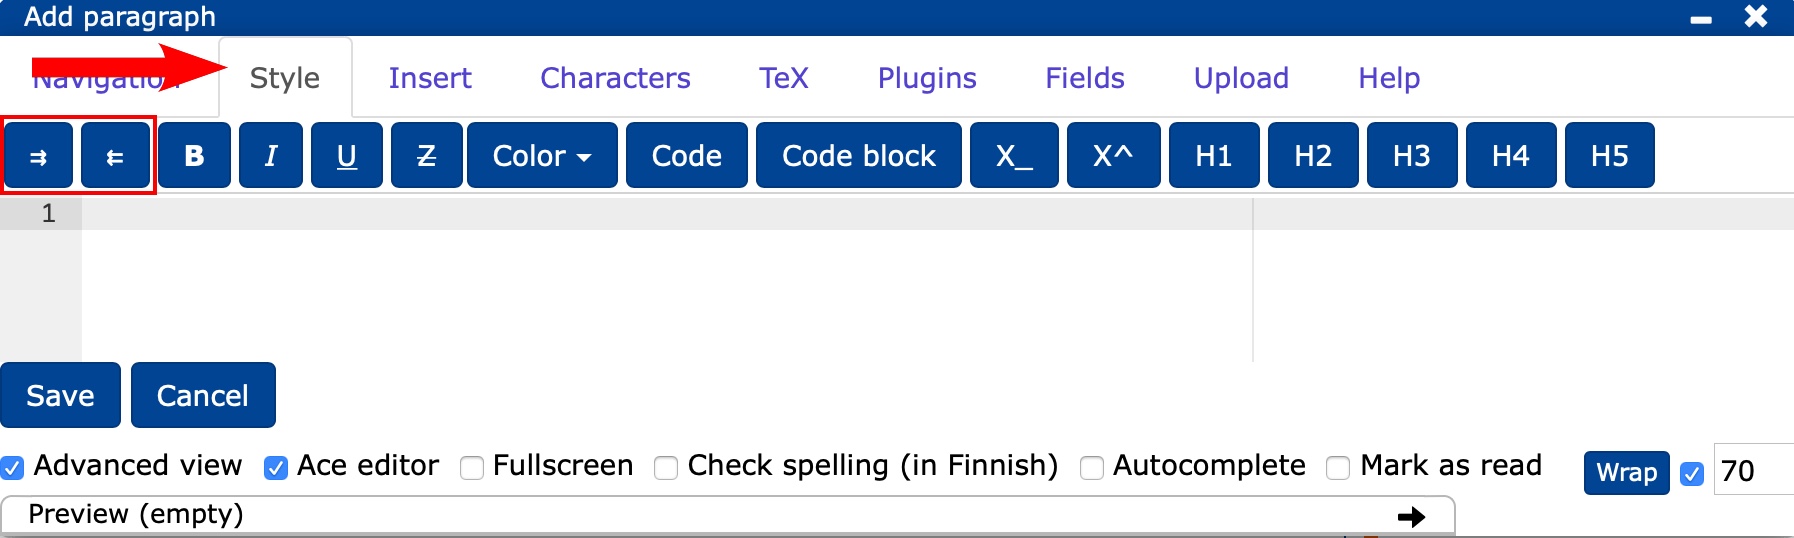
- You can indent:
- using the arrow buttonson the Style tab, as shown below, or
- by pressing key.
10.3.1 List of
When you start making a list, separate the list from the rest of the text with at least one blank line .
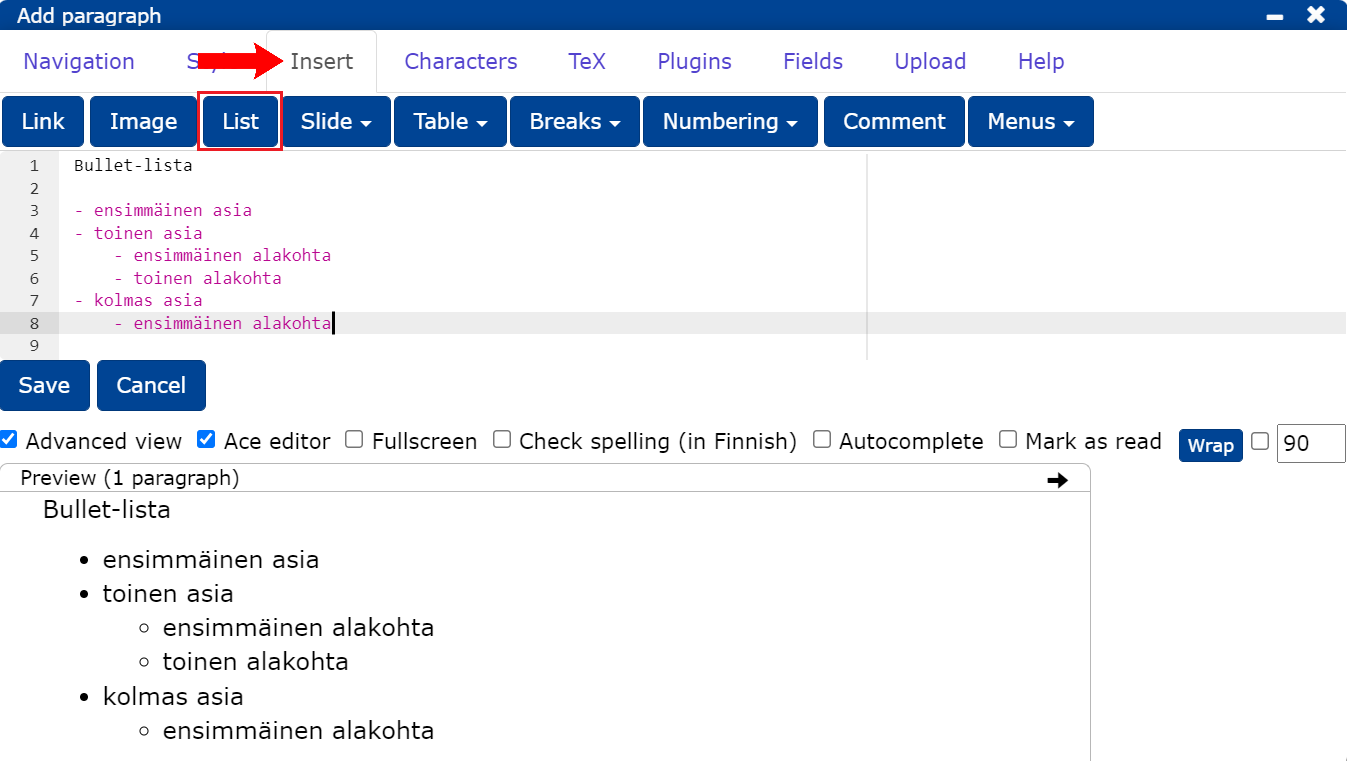
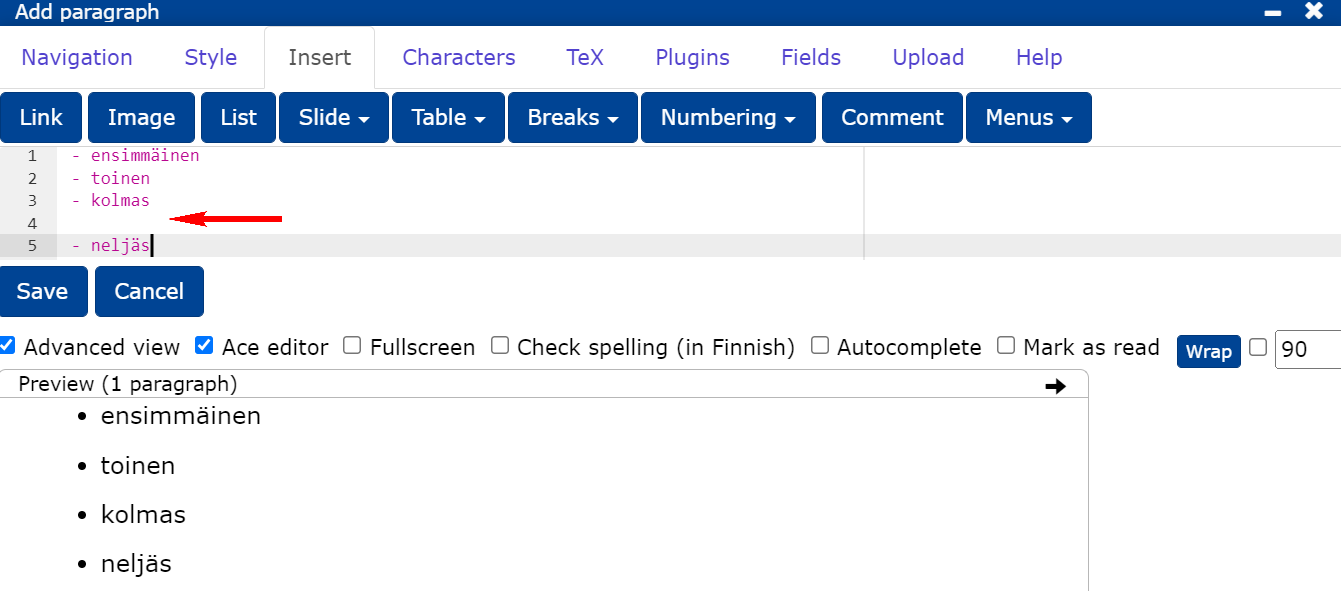
You can createa bullet list:
- by selecting Insert -> List or
- from the navigation bar by typing a hyphen (-) at the beginning of the line.
To get aninserted list
- by indenting the sub-list by clicking once on and List or
- by clicking on and inserting a hyphen or
- by indenting the sub-list with at least four spaces.
Numbered and alphabetical lists
A numbered list is created when you start creating a list with a number, the numbering starts from the given number. Similarly, a letter list starts with the given letter.
In a list, the number/letter is followed by either . (dot) or ) (close bracket).
An indented list is obtained by indenting a line with a column or by adding at least four spaces at the beginning of the line.
Remember to separate the list from the text with at least one blank line.
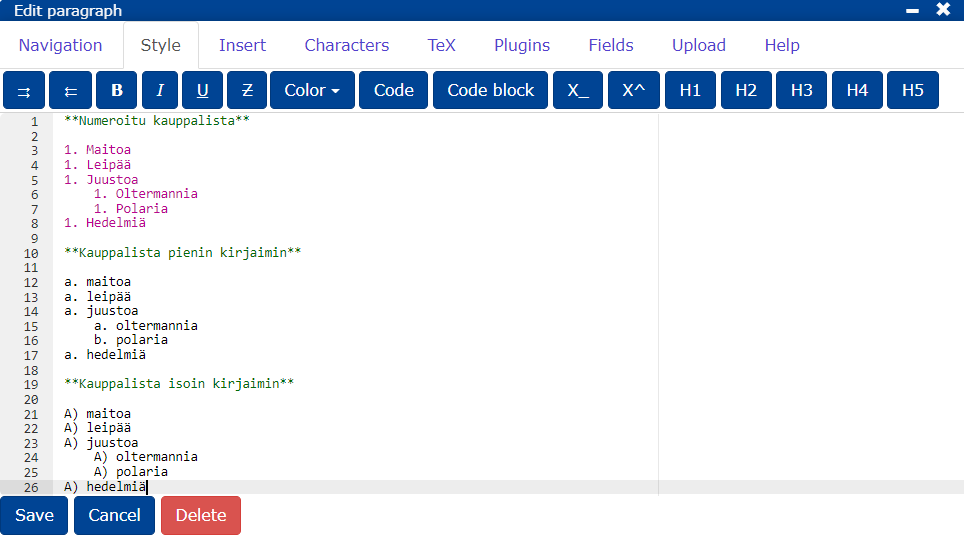
Numbered shopping list:
- Milk
- Bread
- Cheese
- Oltermann
- Polar
- Fruit
Shop list in lower case:
- milk
- bread
- cheese
- oltermann
- polaria
- fruit
Shopping list in capital letters:
- milk
- bread
- cheese
- oltermannia
- polaria
- fruit
Numbering of nested lists
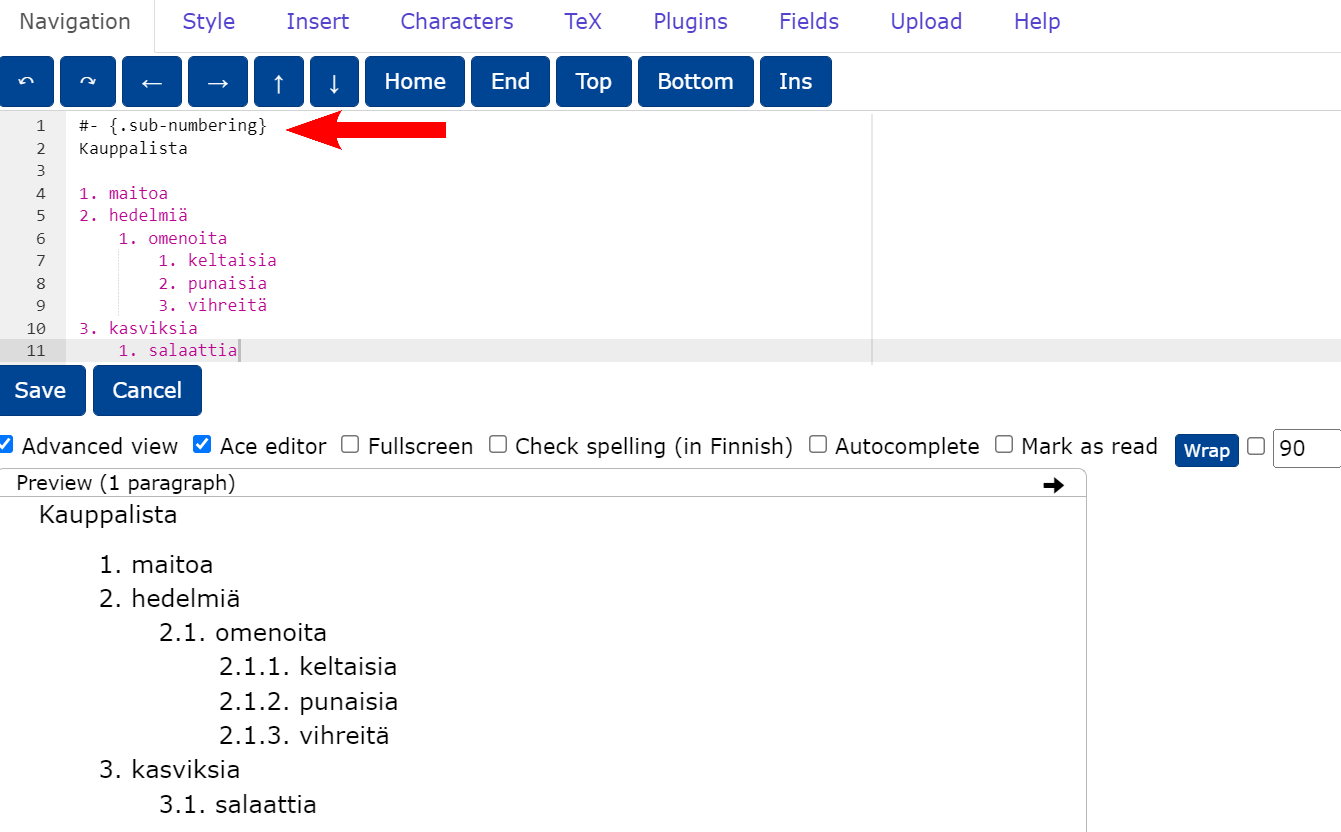
For numbering of nested lists, add the attached CSS tab to the document settings. To enable numbering in a block, add the class
#-{.sub-numbering} to the beginning of the block.
``` {settings=""}
css: |!!
.sub-numbering {
  ol { counter-reset: item; }
  li {
    display: block;

    &:before {
      content: counters(item, ".") ". ";
      counter-increment: item;
    }
  }
}
```
10.3.2 Row spacing and line spacing
When writing text, you don't have to worry about line spacing, it's taken care of by the device you're using to read the text. However, to make it easier to read the text, it is recommended to change the line break after about 70 characters, which makes it easier to read the text in the editing editor .
You can get a forced line break when
- you put
\as the last character of the line or - you select Breaks from the Insert tab End line or
- you click + .
If there is a single blank line in the source text of the list, the entire list is made with a sparse line spacing.
10.3.3 Clips from
- The idea of TIM is to create easily editable and commentable paragraphs.
- You can always create a new paragraph by clicking Add paragraph at the bottom of page.
- Alternatively, you can break up the finished paragraph
- by selecting Insert -> Breaks -> Paragraph break from the navigation bar or
- by adding #- as shown below.

More guidance
11. Links
The chapter teaches
- add links to pages
- create in-page links, also known as jump anchors.
You can watch the video below for instructions on how to add links. The video is followed by the same instruction in text format.
A normal link without a separate title, can be written between the <> signs.
<http://fi.wikipedia.org/wiki/Koira> If you want a separate title for the link, you can type the title between the [] characters and the link () between the characters.
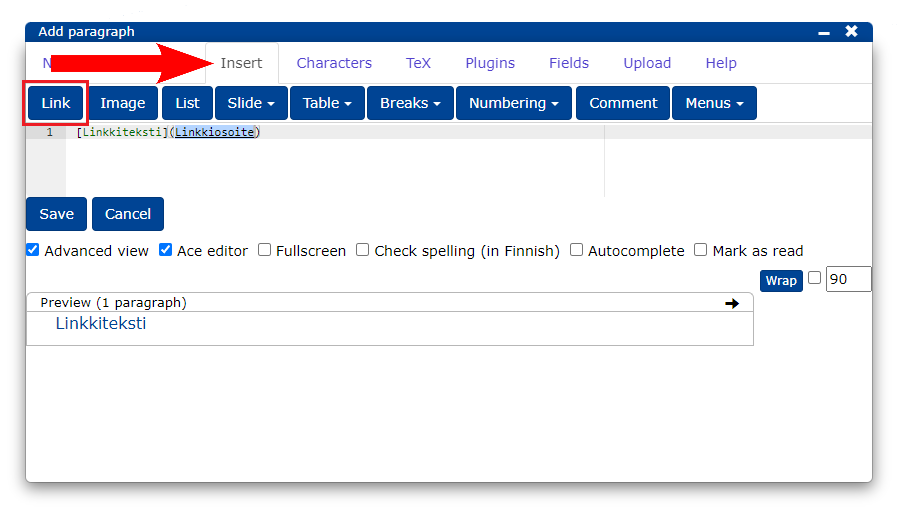
[Katso wikipediasta](http://fi.wikipedia.org/wiki/Koira)You can also insert a link in the editor from the Insert tab by clicking Link.
11.1 Internal links on the page
You can watch the video below for instructions on the links within the page. The video is followed by the same instruction in text format.
You can use on-page links, known as "jump anchors", when you want a link that takes you to another point on the same page.
- A jump anchor at the beginning of a block is added by typing:
#- {#omalinkkiteksti}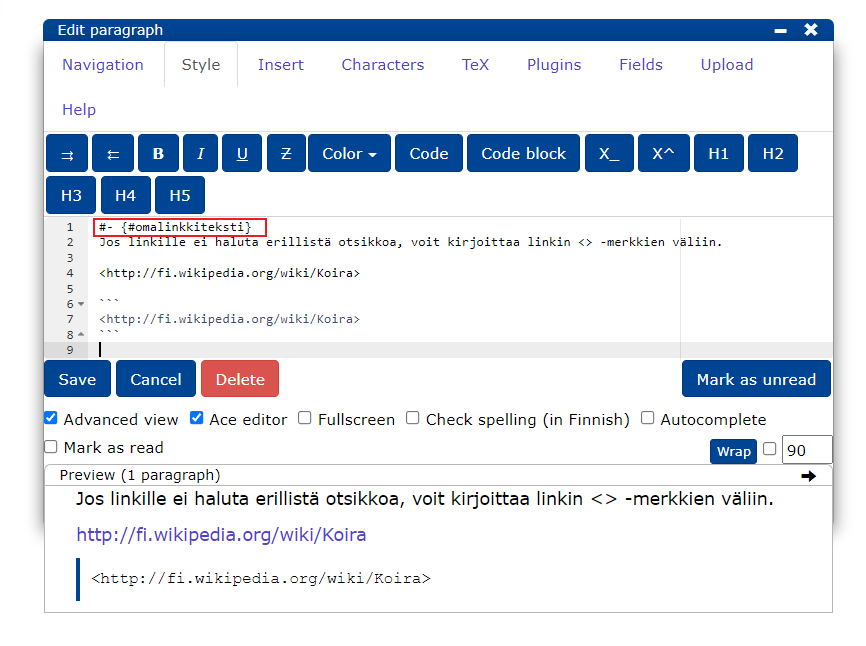
- A jump anchor can be referred to by writing:
[linkki lohkoon](#omalinkkiteksti)You will see link to the block
- You can also add a jumping anchor to the title by typing after the title:
{#omaotsikkolinkki}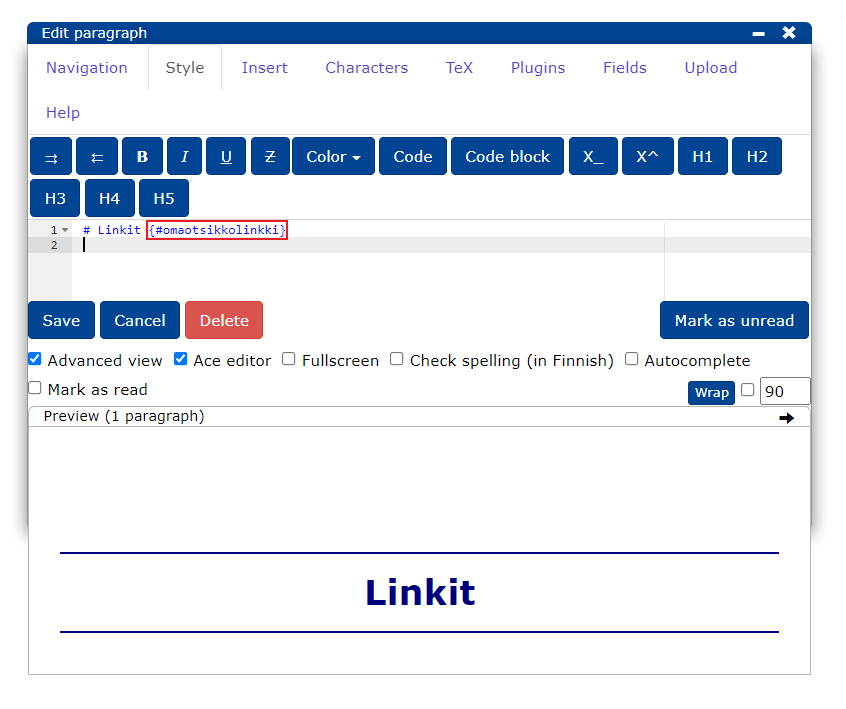
You can refer to the jump anchor you created by typing:
[linkki otsikkoon](#omaotsikkolinkki)This will display with a link to the title
NOTE: You can define the name of the jump anchor yourself, which best describes the link.
11.2 Links to TIM documents
In document links, avoid using the initial part https://tim.jyu.fi or https://tim.education/ , so that the links do not depend on the TIM address. For example, a link to this page can be created by typing the address without the initial part as a semi-absolute reference:
[linkki tähän dokumenttiin](/view/tim/ohjeita/ohjeet/en-US)This will display link to this documentlink to this document.
More guidance
12. Photos from
The chapter teaches
- how to add an image.
You can watch the video below for instructions on how to add an image. The video is followed by the same instruction in text format.
To add an image, add it to the editor
or- Insert -> Image.
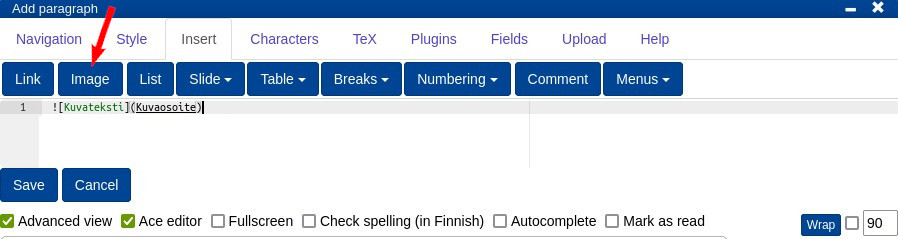
If you want, you can add a picture from your own device
- by pasting an image from your clipboard directly into the editor, or
- by dragging an image or file from your device's file system into the text editor.
You can also upload a file from the Upload tab in the editor.
Select the Upload tab and click the Browse/Save button.
- Select an image from your device's file system or in the case of a phone/tablet you can also take an image.
You can also drag and drop an image file onto the Browse/Save button.
Try adding an image:
More guidance
13. Videos from
The chapter teaches how to add
- videos in different styles
- videos from different sources (computer, YouTube, multimedia).
13.1 Styles for embedding videos
TIM offers a few different ways to embed videos. From the instructions below a YouTube video has been added using the "small video" style and a Multimessage video has been added using the "big video" style. You can use the style you prefer to add videos regardless of where they are stored.
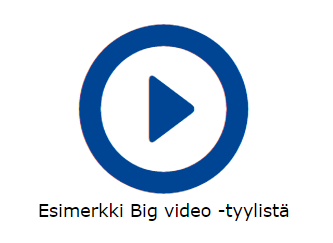
Big video
In the big video style, a large play icon is displayed on the page, which can be clicked to open the video.
List video
In List video style, videos appear in a list, from which they can be opened by clicking on them. If you wish, you can link to related material by following the video at .
Small video
Also in Small video style, videos open by clicking on the text.
13.2 Videos from YouTube
You can watch the video below to see the instruction video on YouTube. The video is followed by the same instruction in text format.
- Select the Plugins tab.
- Select Video from the Small video button (you can use any style you like).
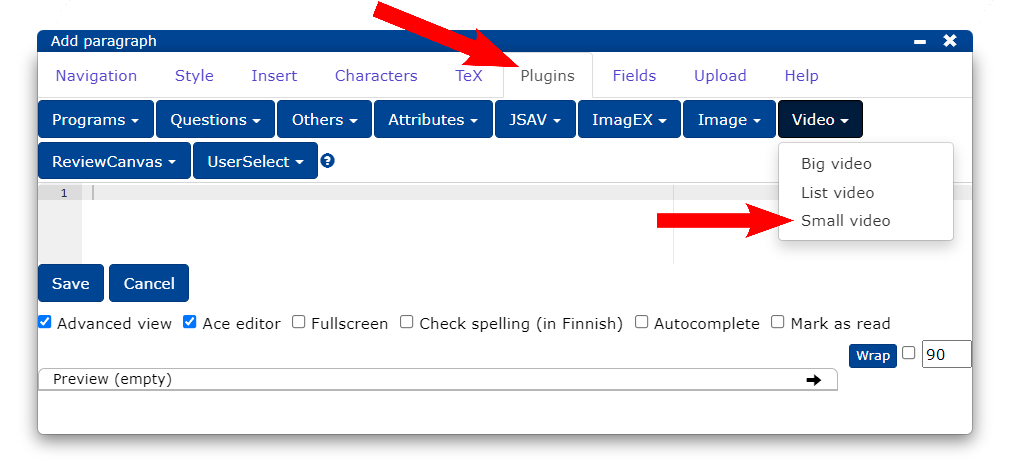
Now the video plug-in is displayed in the editor and its settings are modified as follows:
     stem:  teksti joka näytetään ennen videolinkkiä
videoname:  videolinkin teksti
  doctext:  videoon linkitetyn materiaalin otsikko
  doclink:  videoon linkitetyn materiaalin osoite
    start:  videon aloituskohta
      end:  videon lopetuskohta
    width:  videon leveys
   height:  videon korkeus
     file:  videon osoite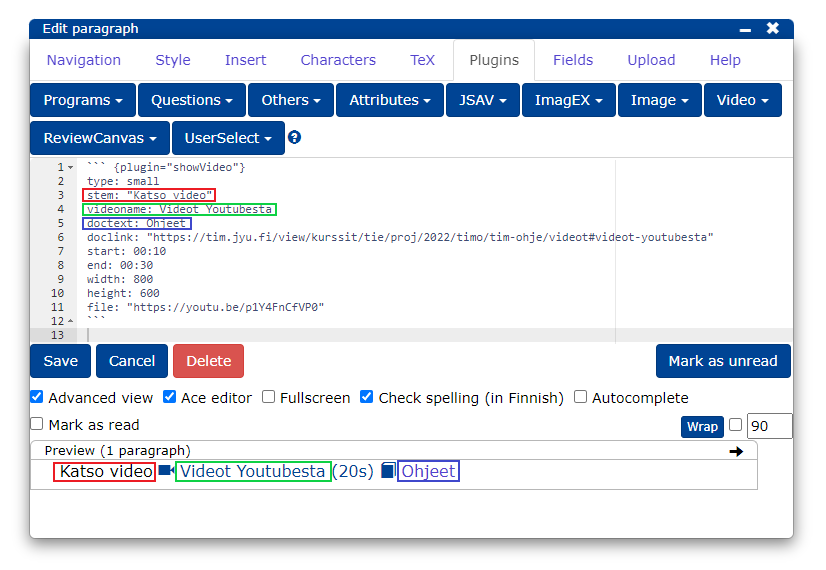
If you don't need all the settings, you can leave out the extra ones.

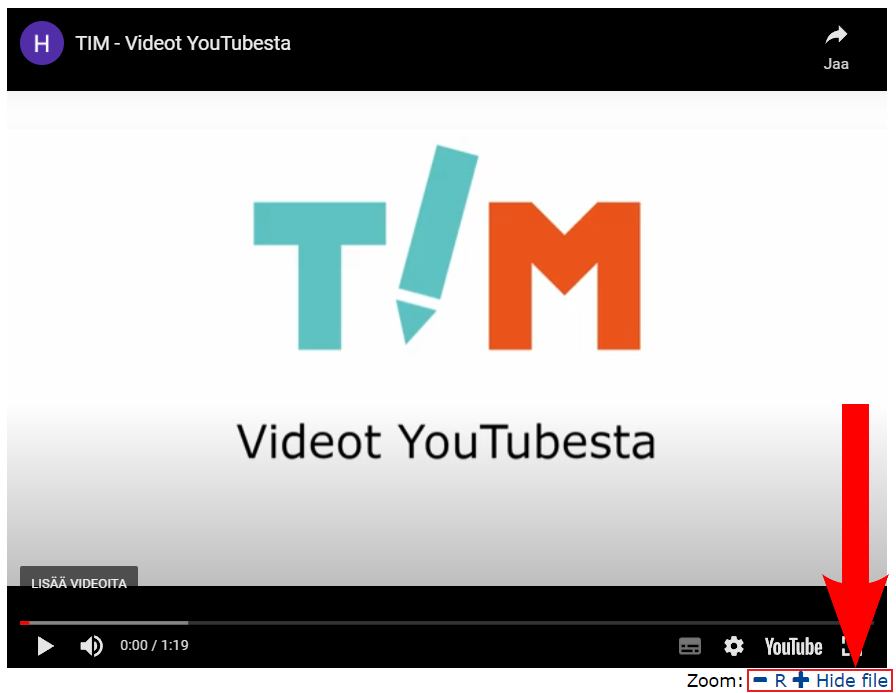
Watch the video at
- can be opened by clicking on the text Videos from YouTube
- can be hidden by clicking on Hide file
- can be resized using the +/- buttons.
13.3 Videos from Multicommunicator
From you can import videos with and without subtitles. Let's first go through to import videos without subtitles.
13.3.1 Videos without subtitles
You can watch the video below for an instructional video on Multicommunicator without subtitles. The video is followed by the same instruction in text format.
- Select the Plugins tab.
- Select Video from the Big video button (you can use any style you like).

Now the video plug-in is displayed in the editor and its settings are modified as follows:
   footer:  teksti, joka näytetään videon alapuolella
   iframe:  asetus joka otetaan käyttöön, jos tuodaan osoite upotuskoodista.
            Tätä tarvitaan tekstitetyn videon yhteydessä.
    width:  videon leveys
   height:  videon korkeus
     file:  videon osoite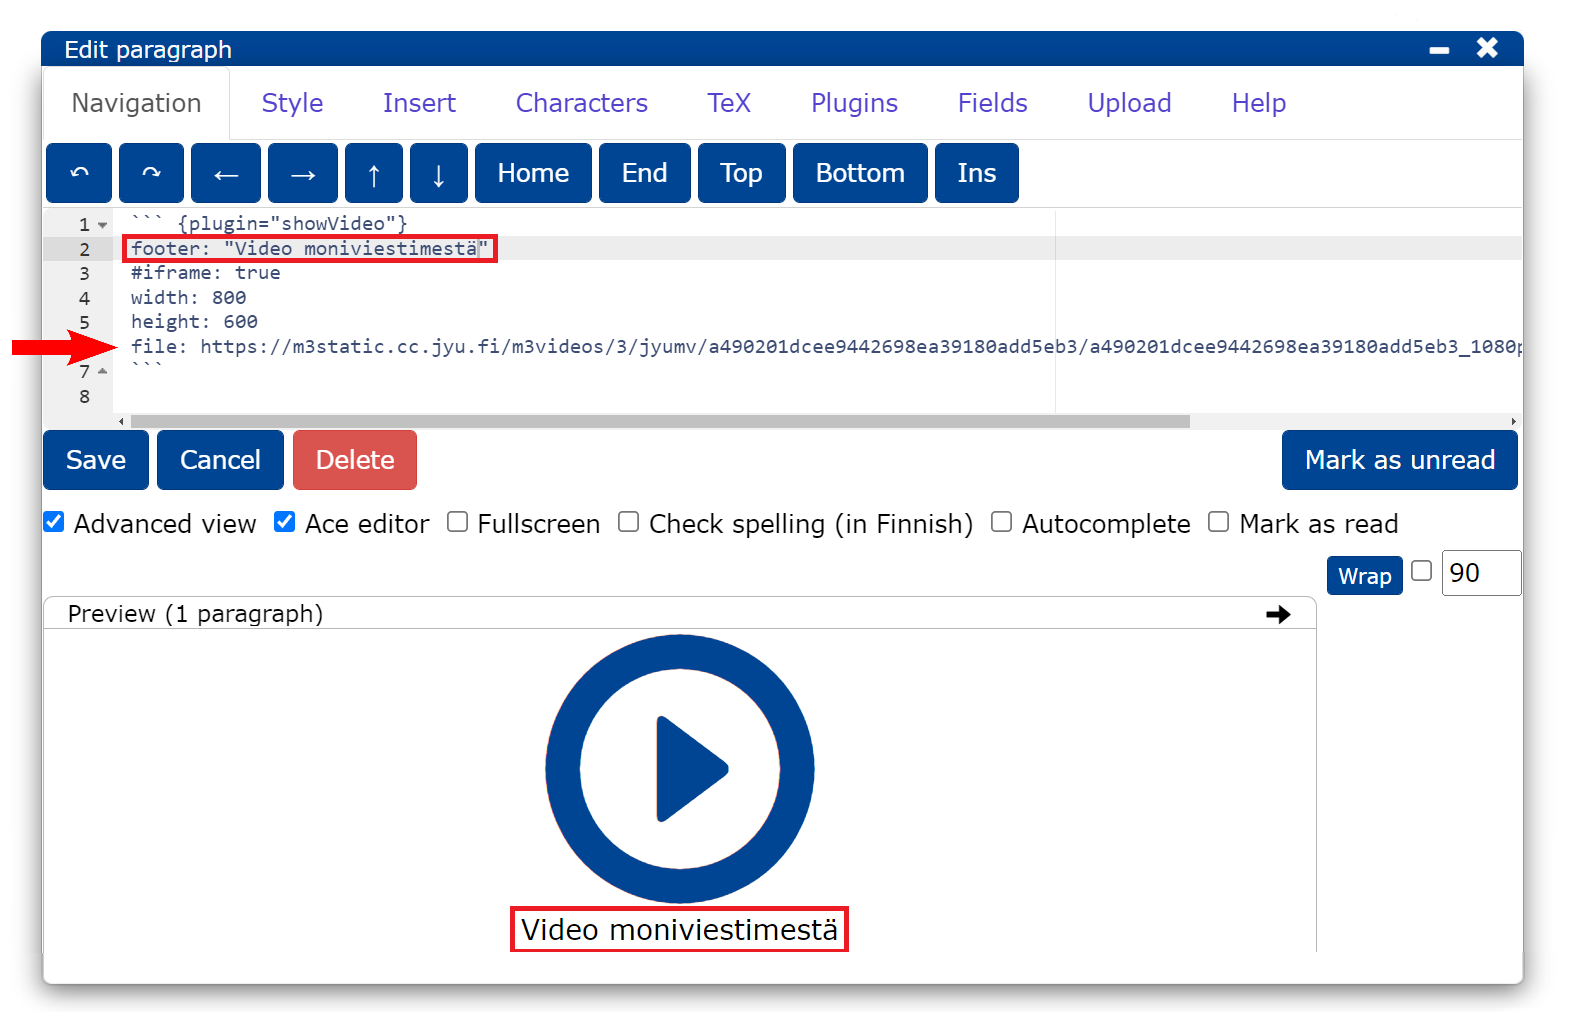
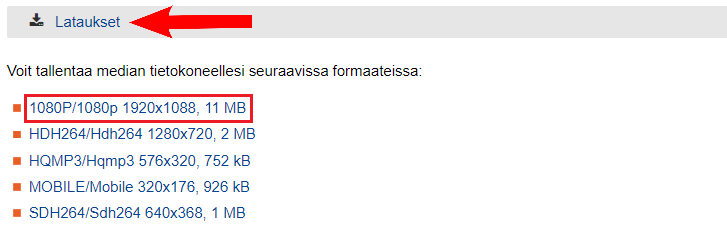
The link to the video can be found in the Downloads tab of Multicast. Select the link for the best resolution (1080p) and add it to file in the editor.
Watch the video at
- can be started by clicking on the icon
- can be hidden by clicking on Hide file
- can be resized by using the +/- buttons
- can be resized by using the +/- buttons in the Speed section
- can be changed by clicking onthe Adv button to display a menu that allows the user to jump around in the video, for example.
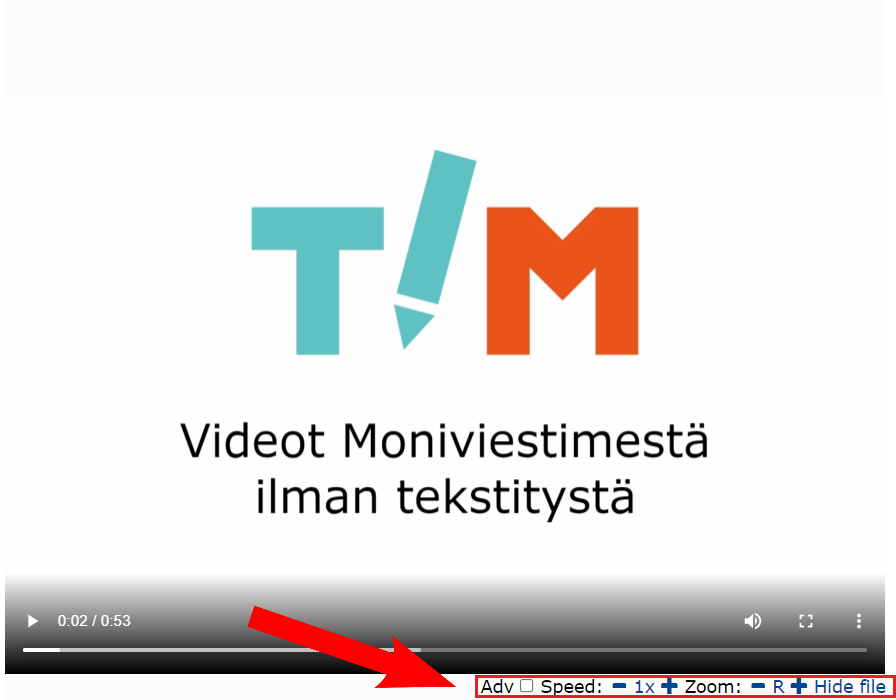
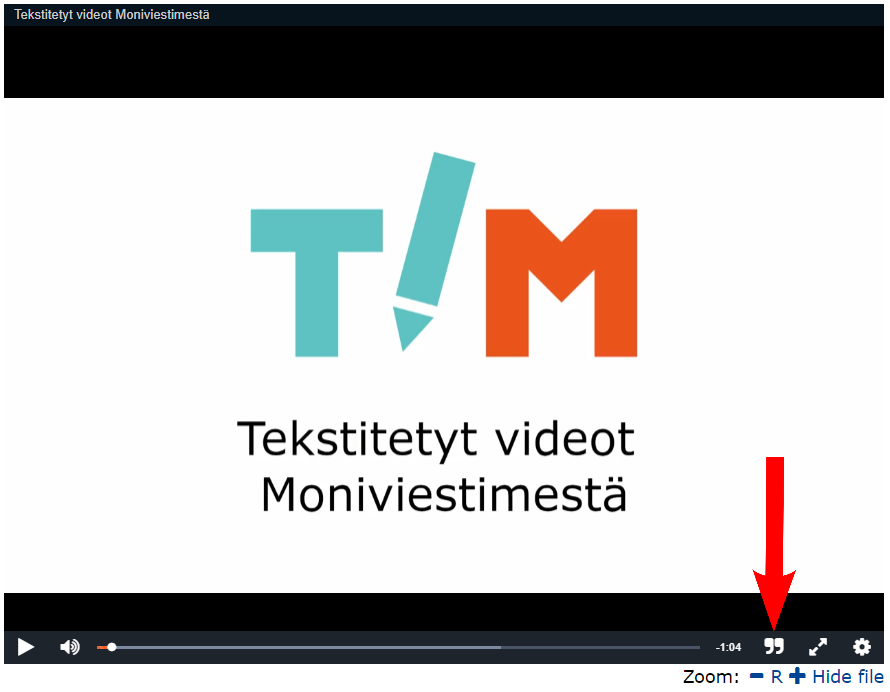
13.3.2 Videos with subtitles
You can watch the video below to see how-to subtitled videos from Multicommunicator. The video is followed by the same instruction in text format.
If you have subtitled your videos in Multimessage, you can see them in TIM when you.
- adding the video in the style you want and
- copying the link to the video from the Upload tab in Multicast, which can be found in the code under src.
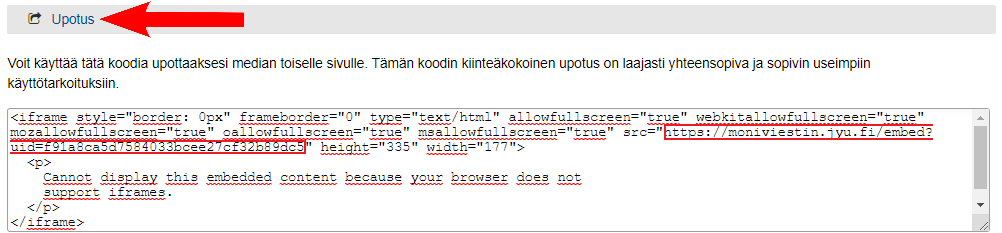
Add the link to the
filesection of the plugin.Make sure that the plugin's settings are set.
iframe: true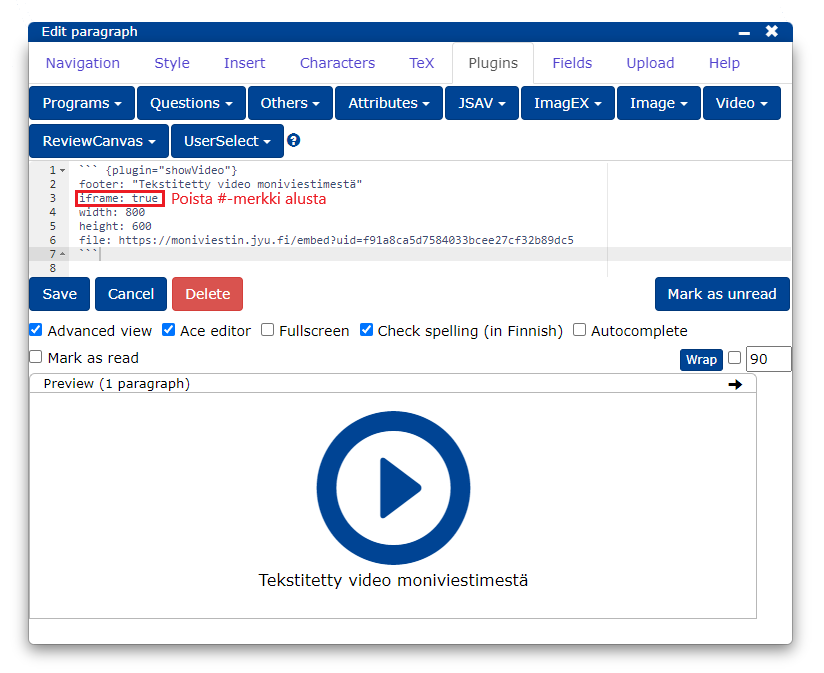
Now there is a button in the video player to enable the subtitles created in Multicast.
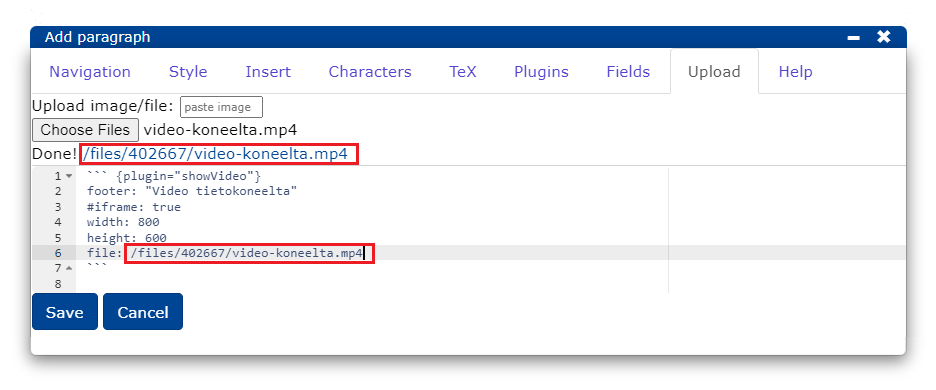
13.4 Videos from your computer
You can watch the video below for instructions on how to watch videos from your computer. The video is followed by the same instruction in text format.
You can also add a video directly from your computer.
- From the Plugins tab, select the video style you want.
- Select the Upload tab and add the video to
file:by clicking .
Note: You can also drag and drop the video file button.
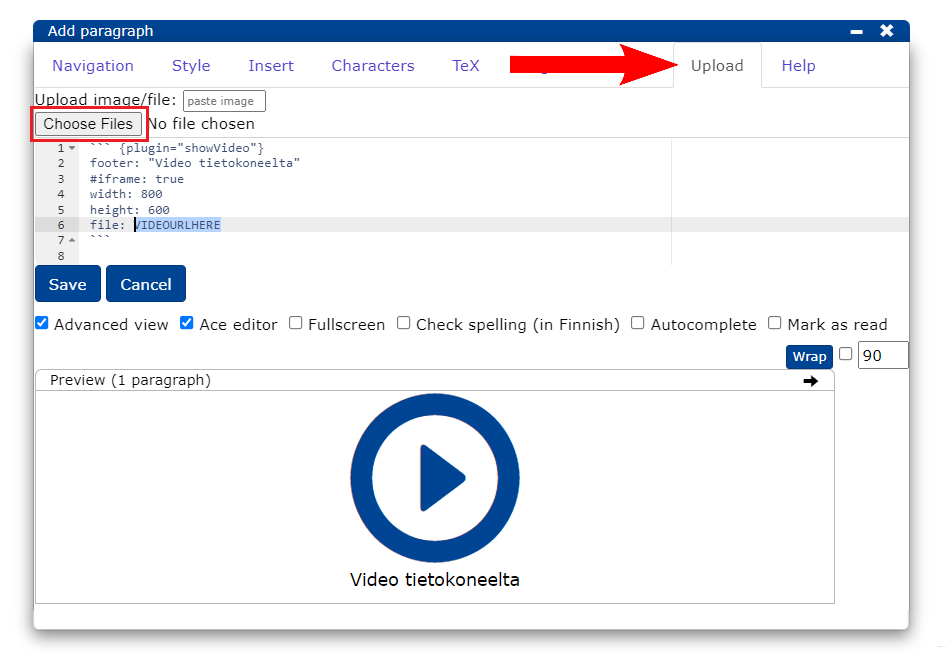
- Once the video has been uploaded, the file address will automatically appear in the editor.
More guidance
14. Tables
The chapter teaches
- adding a timTable table
- editing a table.
TIM includes many ways to add tables. The simplest and most expressive way is to use a so-called timTable.
In the video below, you will learn how to use timTable.
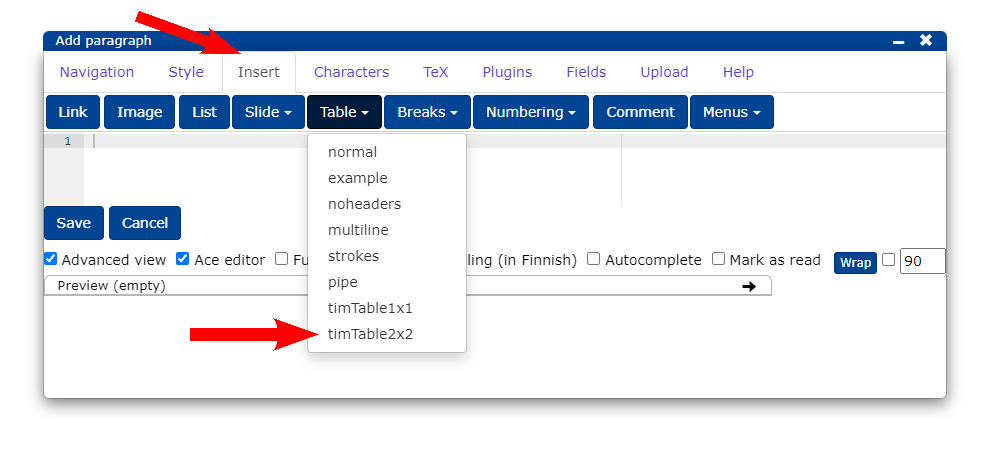
14.1 Adding a table
Select the Insert tab and Table button timTable2x2.
14.2 Editing with a text editor
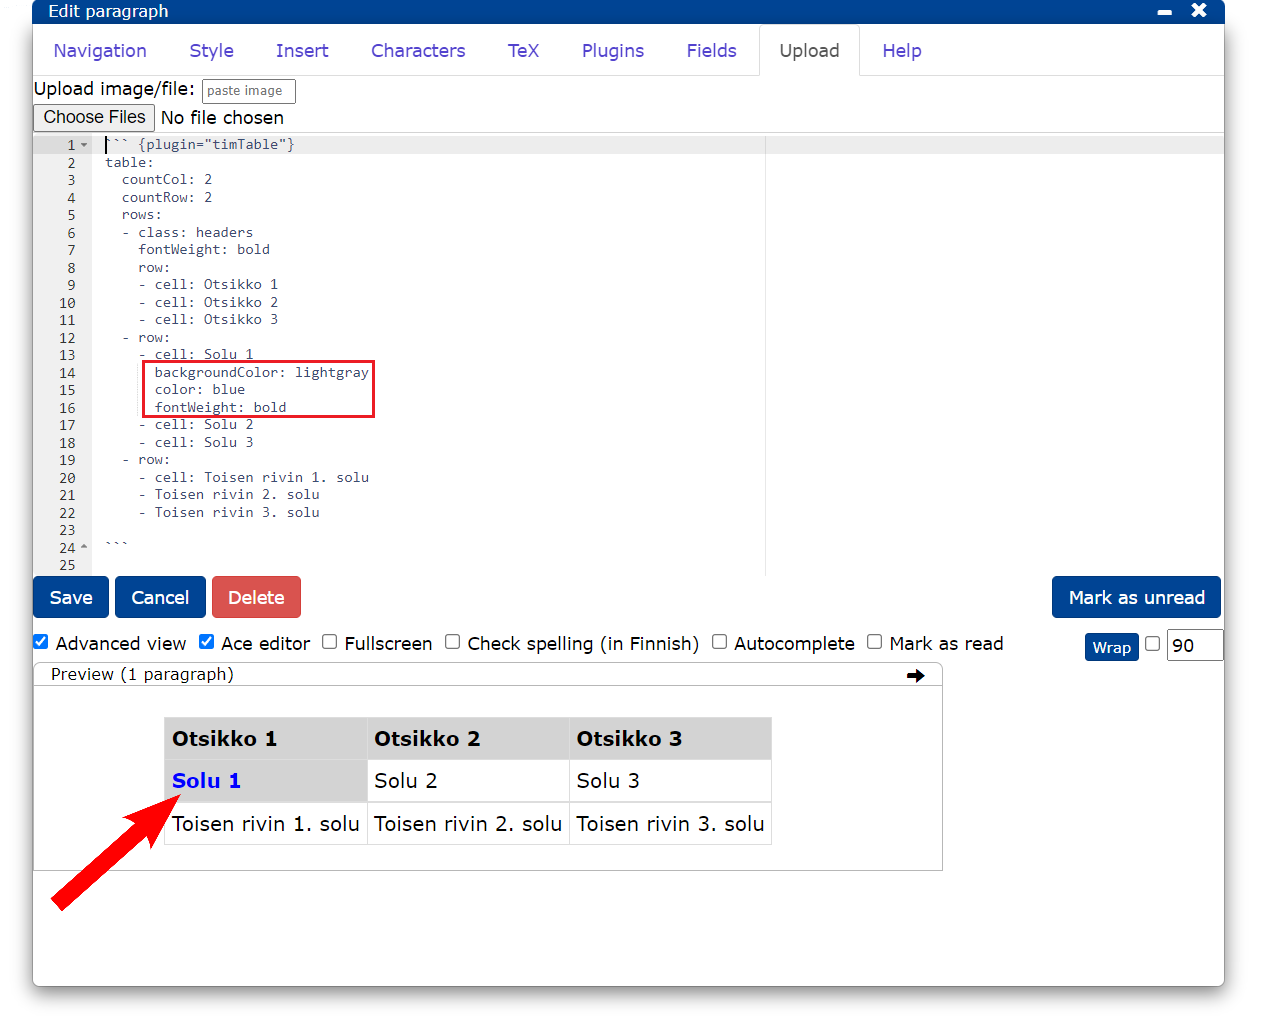
You can add individual cells by typing in the editor
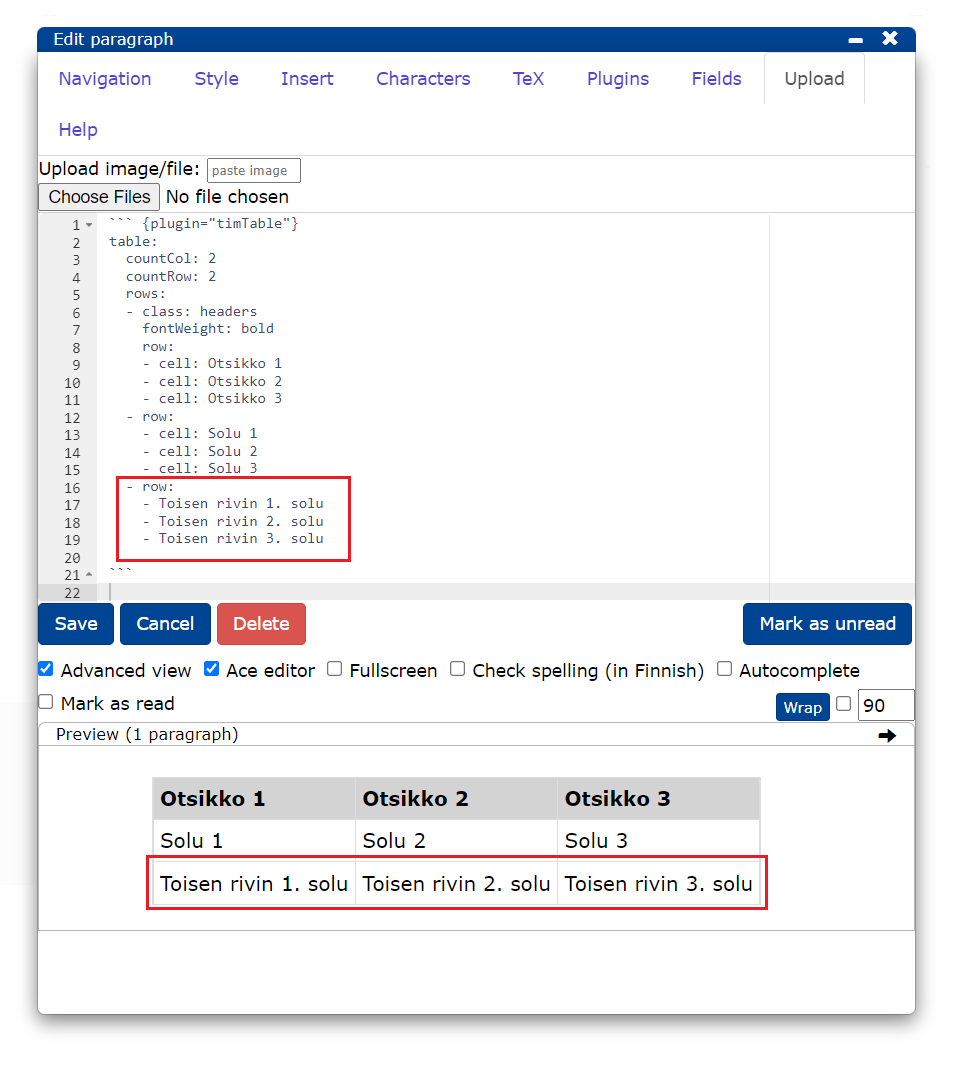
`- cell: 'sisältö'`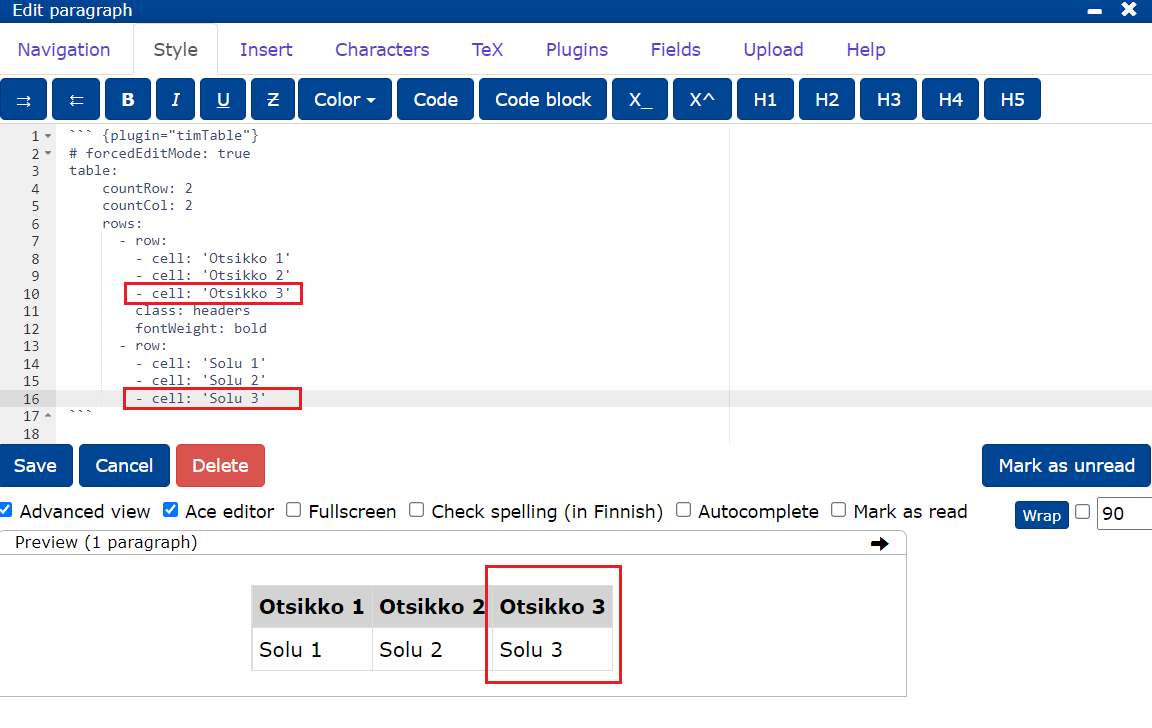
Add a new row
- To add rows, type
- row:and list the new cells below. - Note that the rows in the cell must be nested at the same level in the editor. The indentation of cells is 2 spaces. The
cellattribute does not need to be entered if the appearance of the cells is not to be edited.
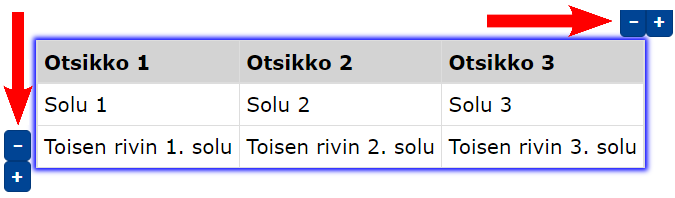
14.3 Editing with a table editor
You can also use a table editor to edit the table.
You can watch the video below for instructions on how to use the table editor. The video is followed by the same instruction in text format.
NOTE! If you cannot access the features of the table editor, please refresh the page.
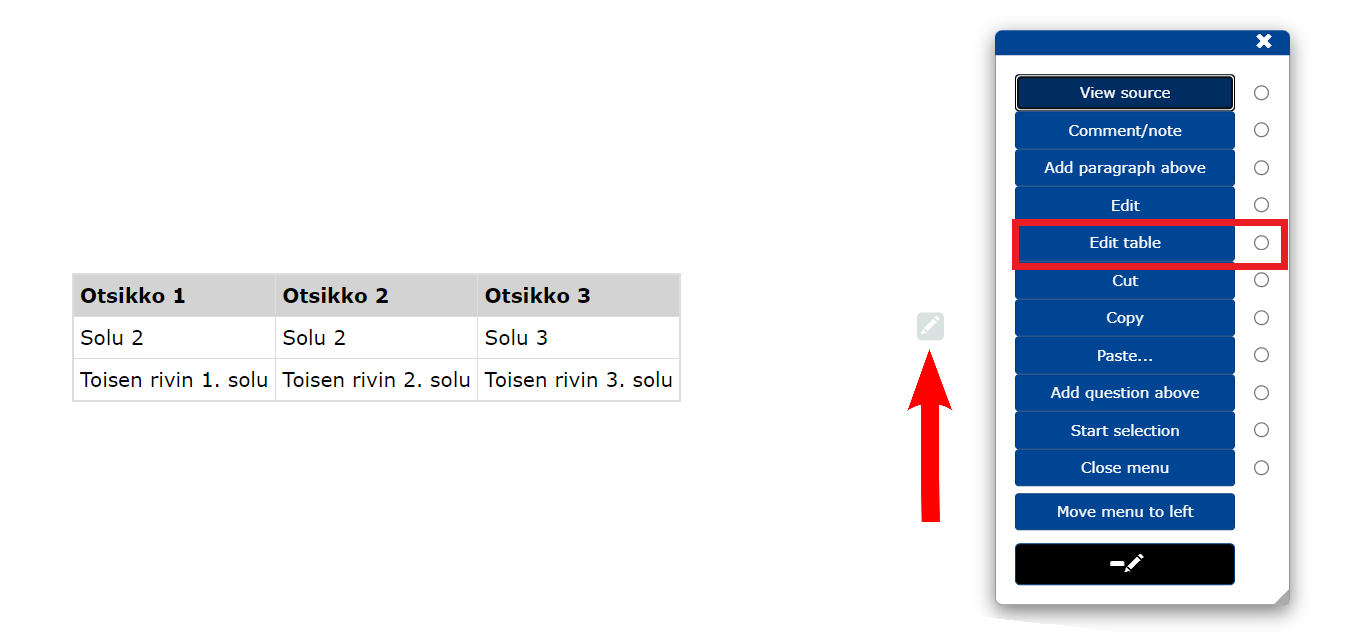
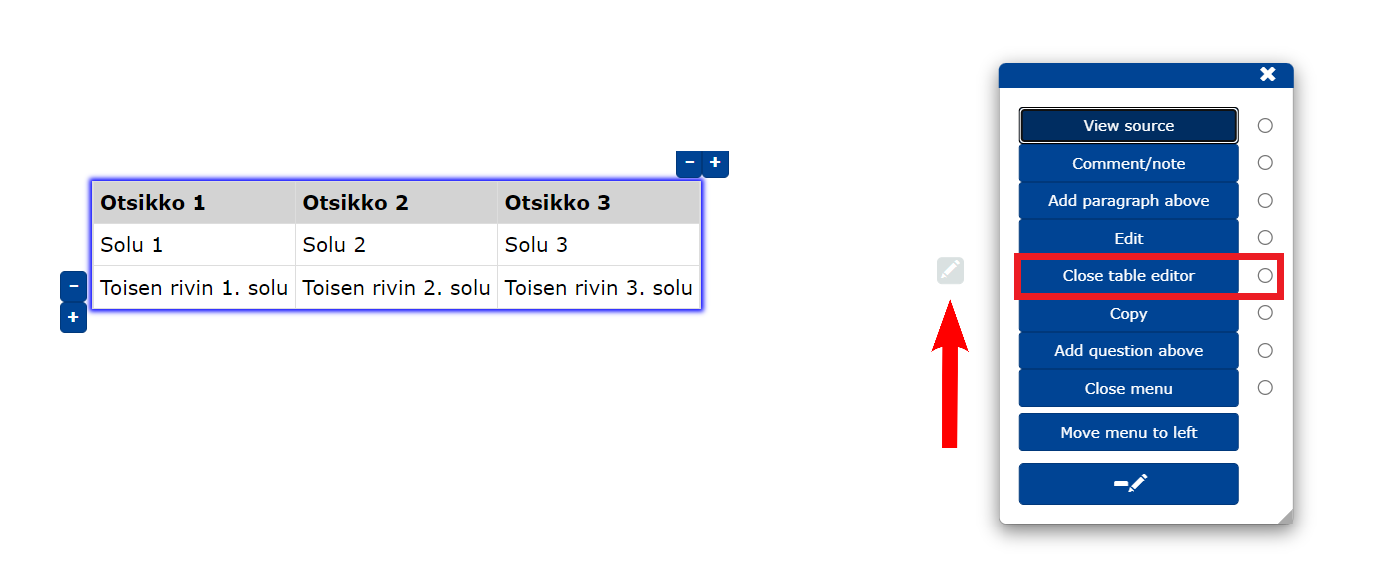
- Open the table editor from the edit menu at Edit table.
Now you can edit the table directly on the main page.
- Use the mouse to select the cell you want to edit and enter new text.
- You can also move around the table using the arrow keys while holding down .
- to move to the next cell.
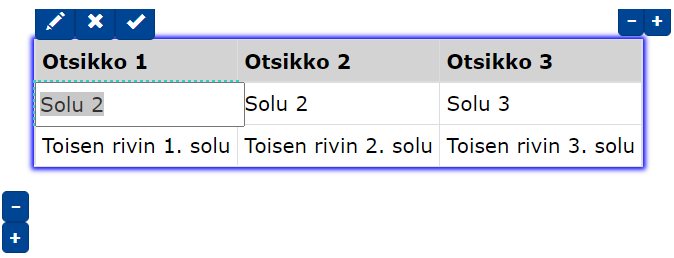
- You can add/remove rows and columns using the +/- buttons.
- To close the editor, select Close table editor from the edit menu.
14.4 Editing the cell style
cell-The style of cells written with the attribute can be modified by adding style attributes below.
Alla esitelty taulukko kuvaa käytössä olevat tyylimääritykset kullekin elementille.
X = määrite on käytössä.
14.5 Example table used in the guidance
Open plugin
More guidance
15. Tasks
The chapter teaches the following types of tasks
- true/false
- multiple choice
- Likert scale
- text question
- arrangement task
- gap task.
TIM allows you to create many types of tasks and questions and check them . You can create tasks and questions
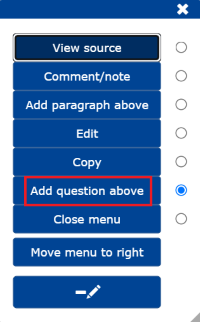
- by selecting the question editor Add question above from the menu.
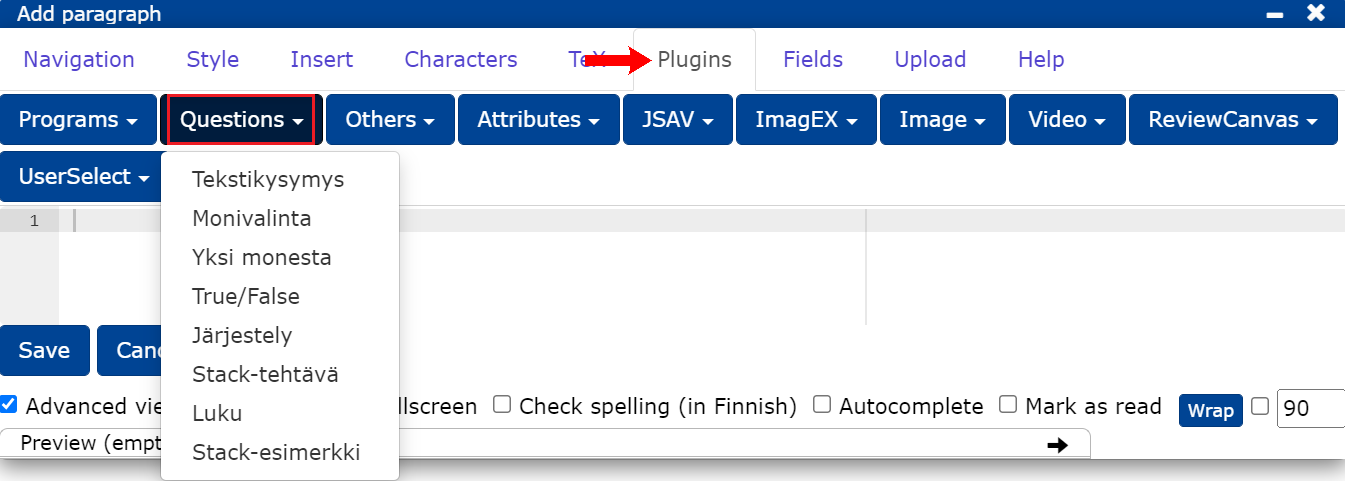
- By selecting Plugins -> Questions, from the editor you can edit the question in text format.
- By writing the task/question directly as text, but initially it may be easier to add questions using an editor. As you edit the questions, you will also learn to write them in text format.
15.1 Questions and tasks in the editing menu
Watch the video to see how to create questions and tasks using the edit menu ().
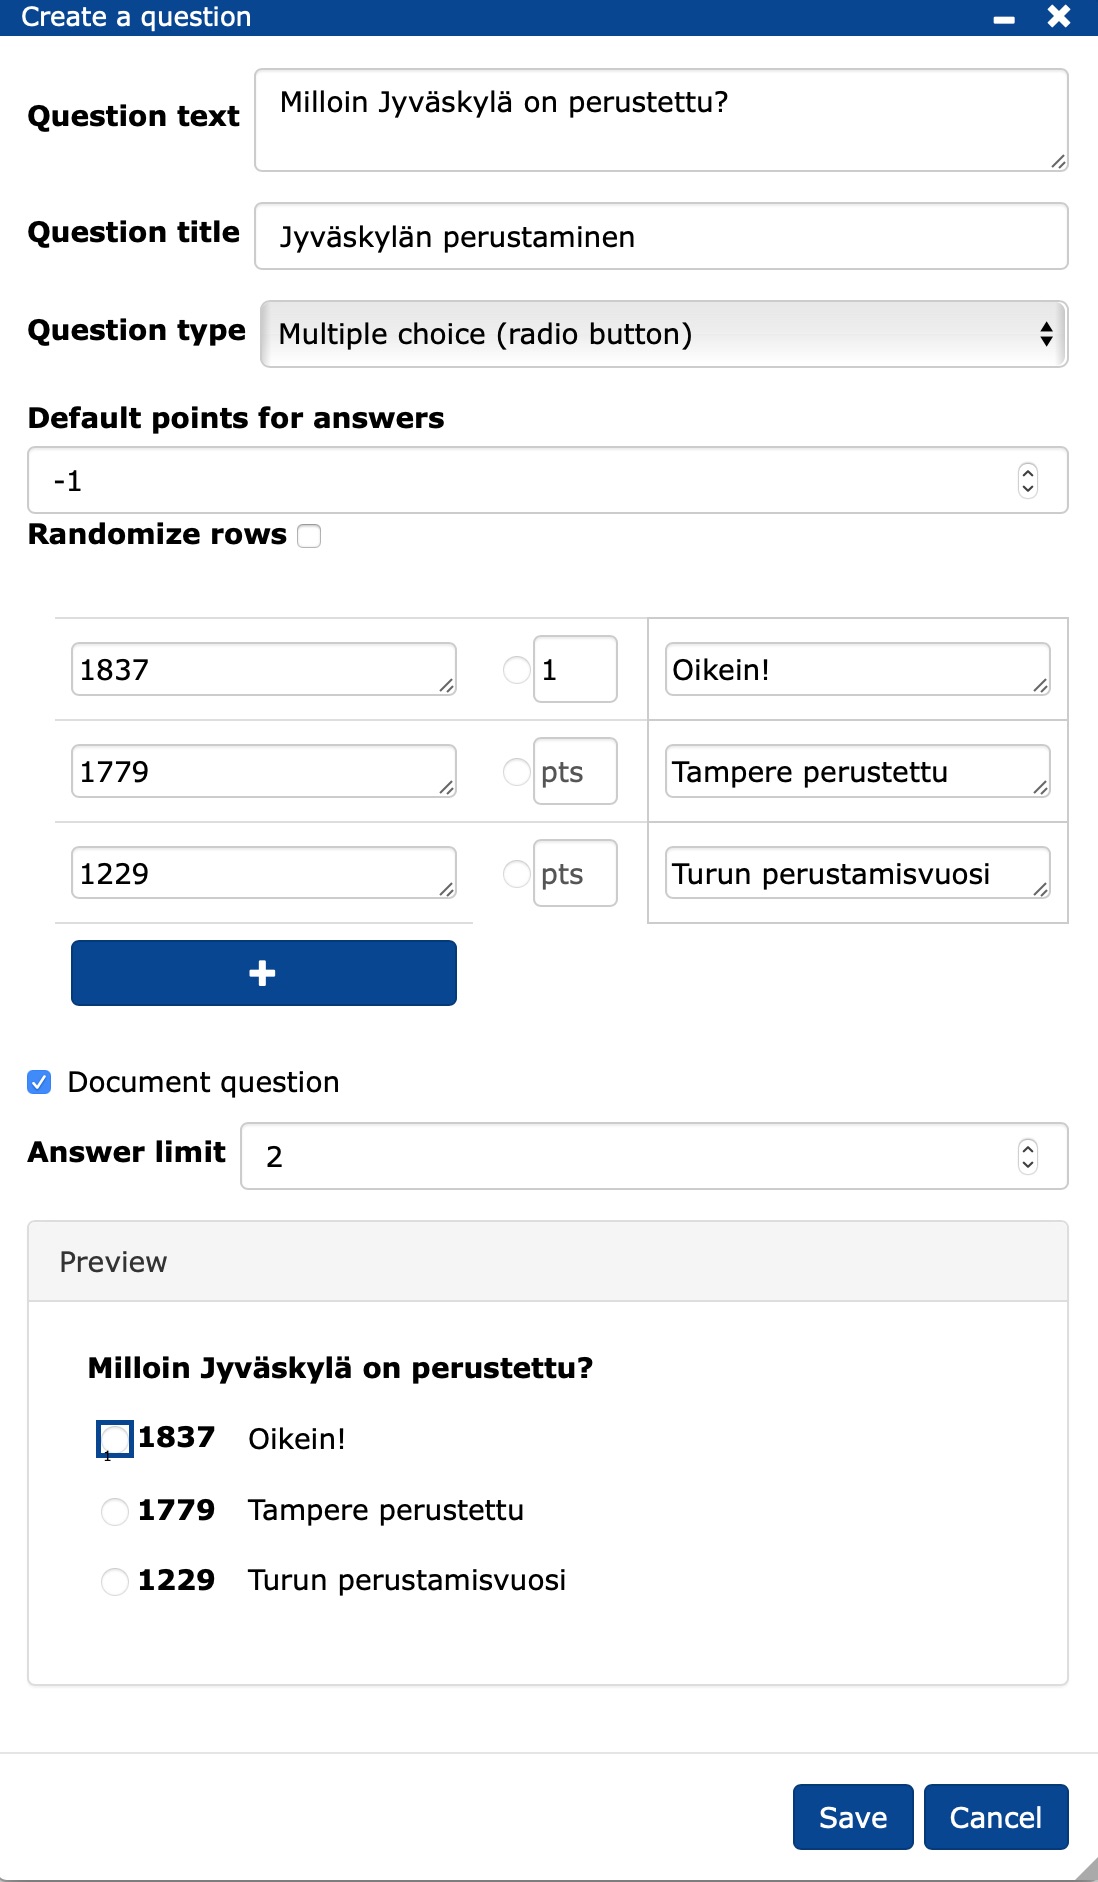
From the edit menu (), select Add question above, which opens the Create a question form, where you can fill in the question details. The editing menus allow you to create the following question types: true/false, multiple choice, Likert scale and text response.
Question text: enter the name of the question.
Question title: enter the abbreviation of the question that will be used to store the question in the database and will be displayed as a lecture question title for the teacher.
Question type: select the type of question you want.
Default points for answer: add here the number of points that will automatically be assigned to those answer options for which you have not specified a value (pts) in the answer options.
Randomize rows: shuffle the answer choices.
- If you wish, you can lock the position of the answer(s), e.g. in polls the option "I don't know" is usually last.
Enter the answer options, you can remove (-) or add (+) the options.
- You can specify the score for the answer in the field after the option, if you are limiting the number of answers, Answer limit, you can also write an explanation for the answer, which will appear when the number of answers is reached.
The question can be changed in your lecture question by clicking "Document question" off, you can also specify the answer time for the question if you wish. You can ask the completed question as a lecture question on by clicking on the question mark .
In the preview you can see what the question will look like.
Save the question data -> Save.
You can edit the finished question by selecting Edit question from the edit menu ().
The image above shows a column where you could have entered feedback for each option, which will be displayed when the number of times the question has been answered is reached. The location of the feedback will be displayed when you move the cursor to the right of the option line . You can then enter feedback there.
Try the multiple-choice activity
Open plugin
15.2 Questions and tasks from the navigation bar
Watch the video to see how to edit a question on a form in the editor.
15.2.1 Text question
Watch the video to see how to make a text question in the editor.
In the editor, select Plugins -> Questions -> Text question
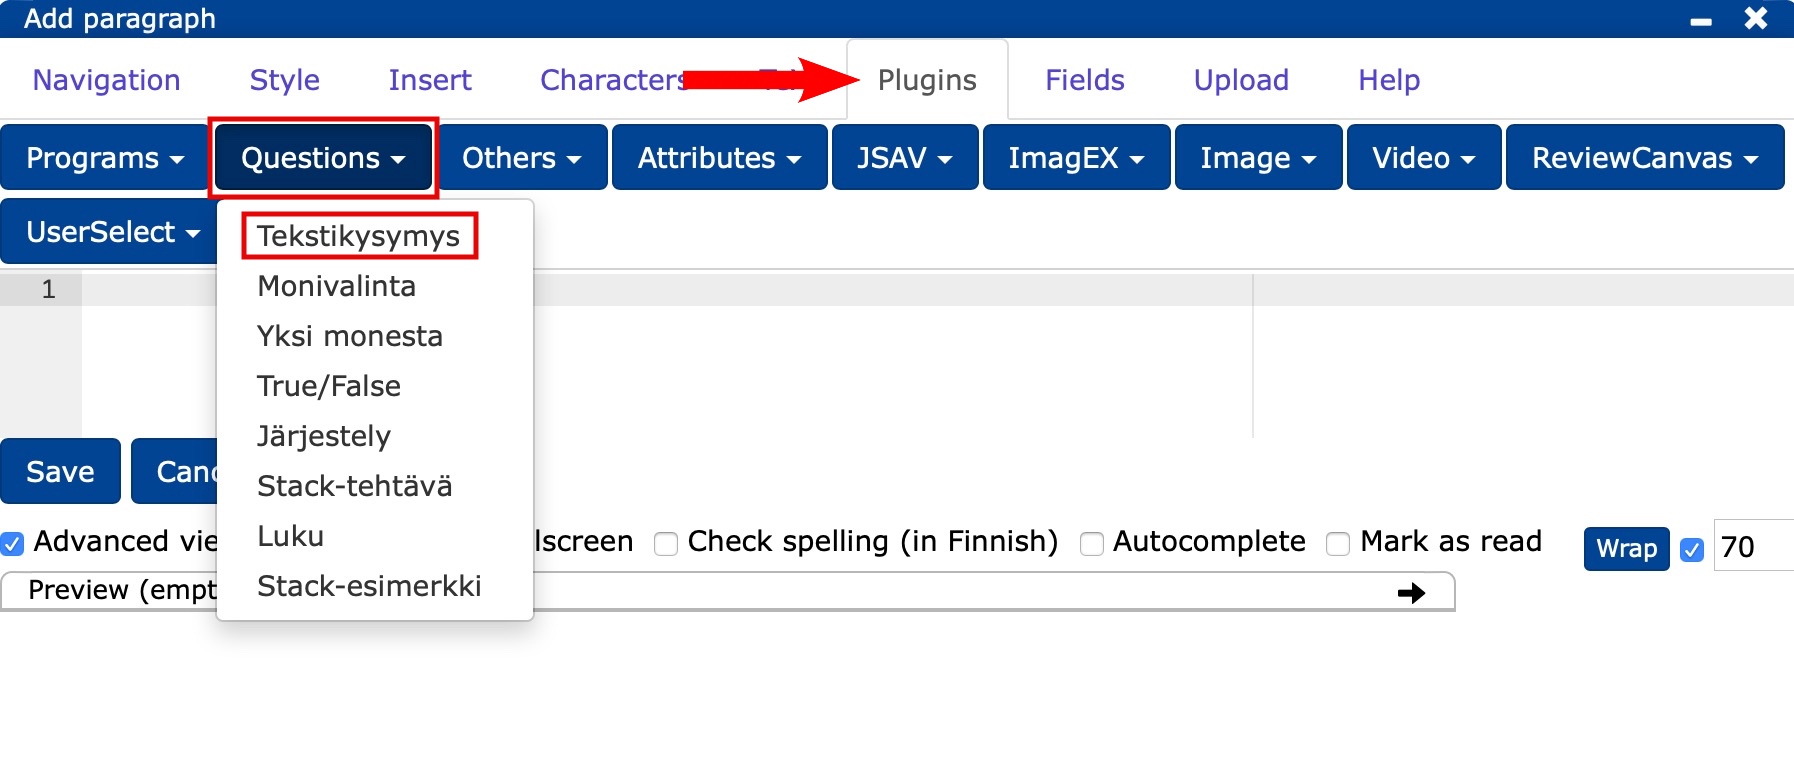
Customise the task by changing the finished base
PLUGINNAMEHERE: the abbreviation of the question, with which the question is also stored in the database and is displayed as the lecture question title for the teacher (cf. Question title).placeholder: you can write here e.g. "Write your answer here." or leave blank.stem: question text.
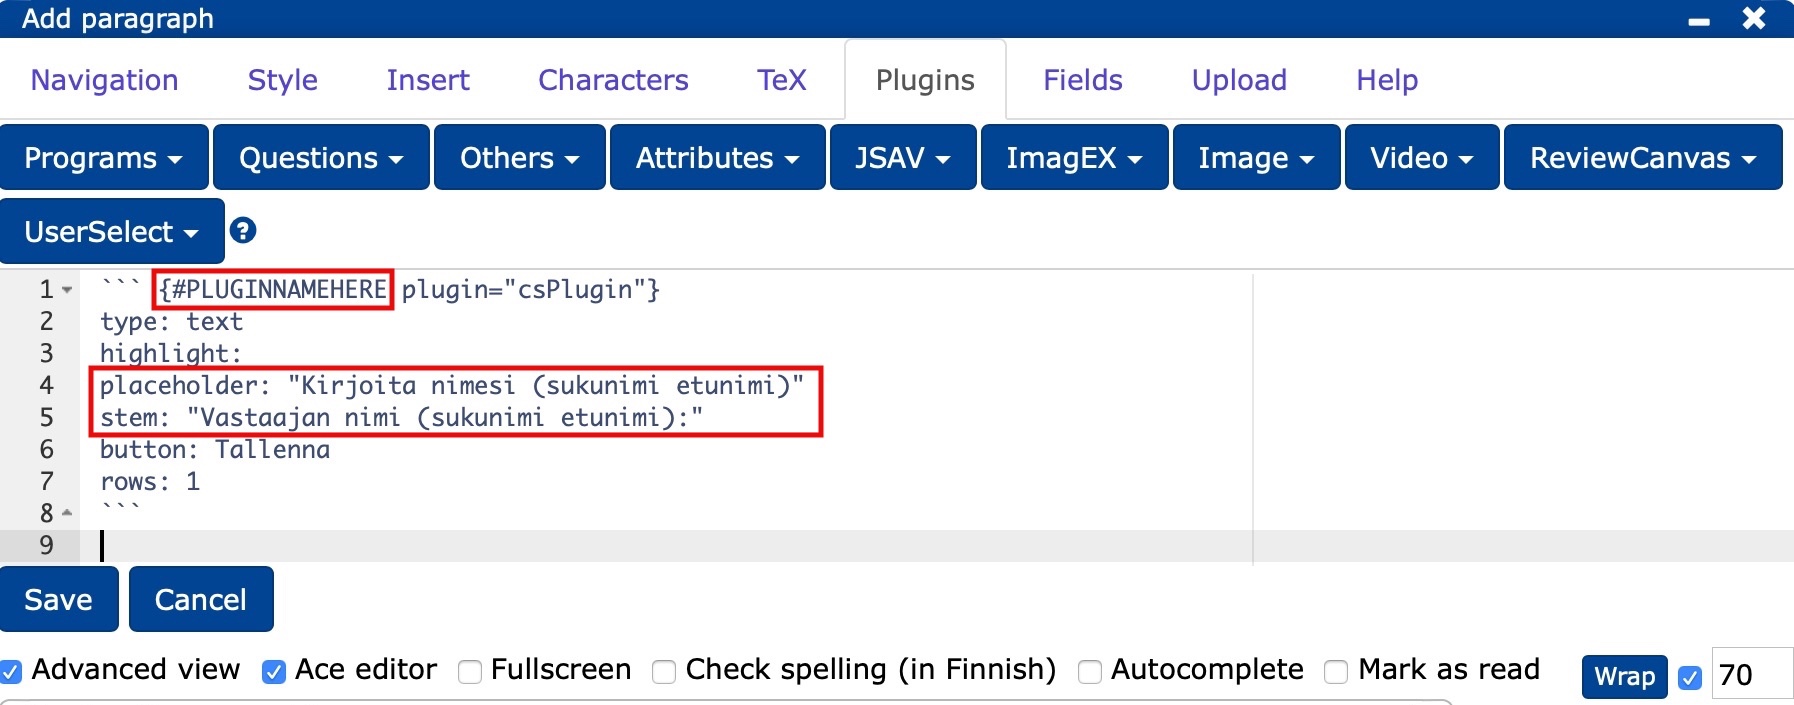
```{#PLUGINNAMEHERE plugin="csPlugin"}

type: text
highlight:
placeholder: "Kirjoita nimesi (sukunimi etunimi)"
stem: "Vastaajan nimi (sukunimi etunimi):"
button: Tallenna
rows: 1 ```
```
Try how text input works
15.2.2 Organizational function
Watch the video to see how to do the organising.
In the editor, select Plugins -> Questions -> Arrangement.
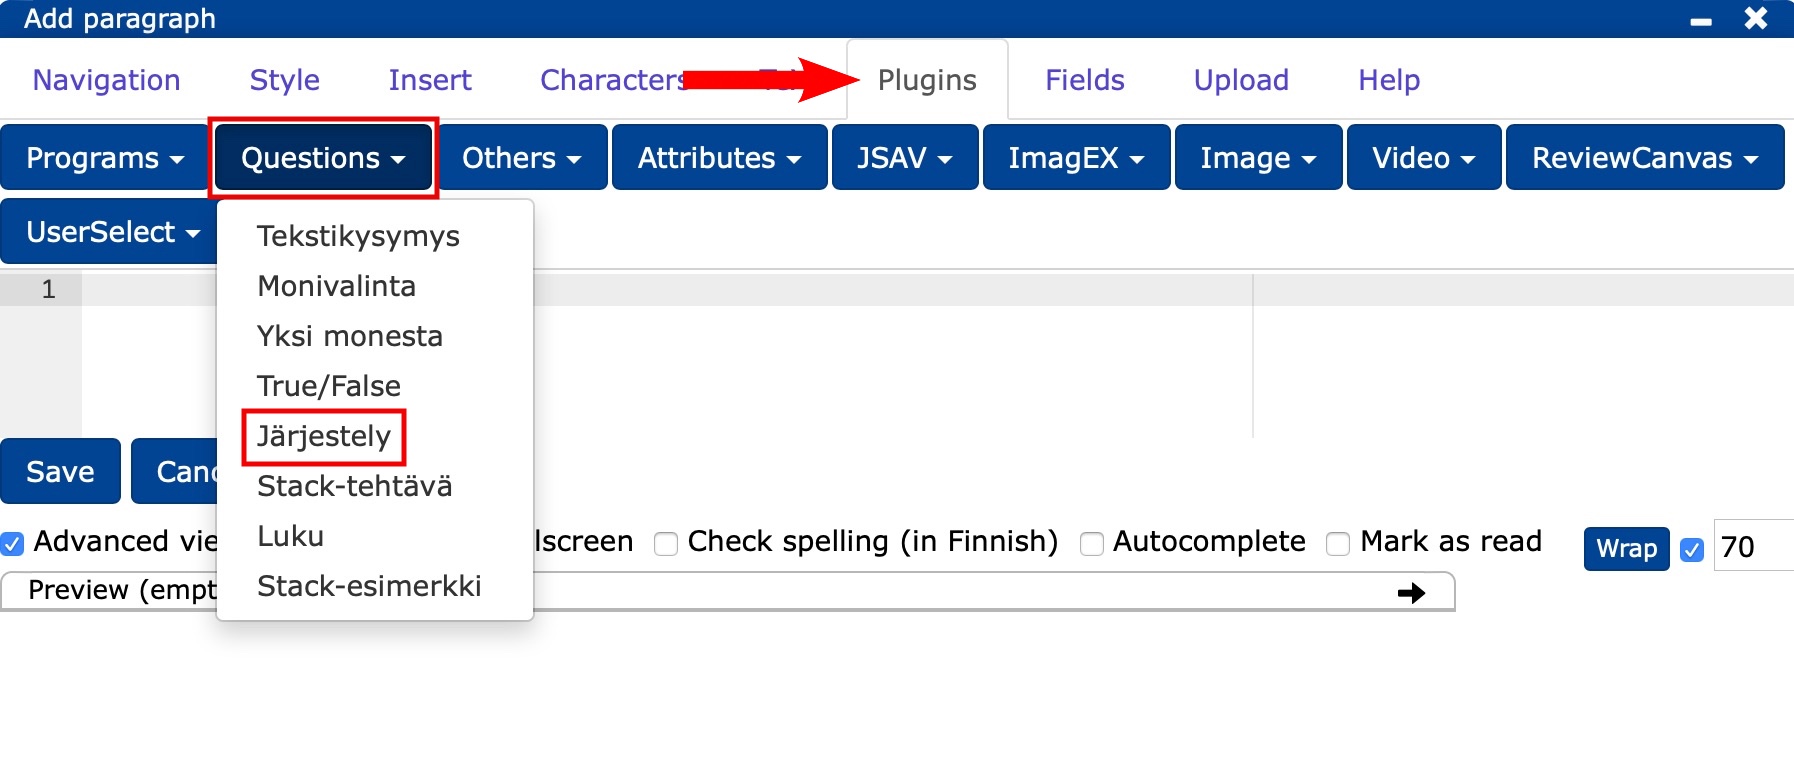
Modify the task by changing the finished base:
PLUGINNAMEHERE: the abbreviation of the question, with which the question will also be stored in the database and displayed as a lecture question title for the teacher (cf. Question title).header: you can write here e.g. "Write your answer here." or leave it blank.stem: question text.- In place of
Pieni, Keskikokoinen, Suuri, Jättimäinen, type the texts you want in the correct order.
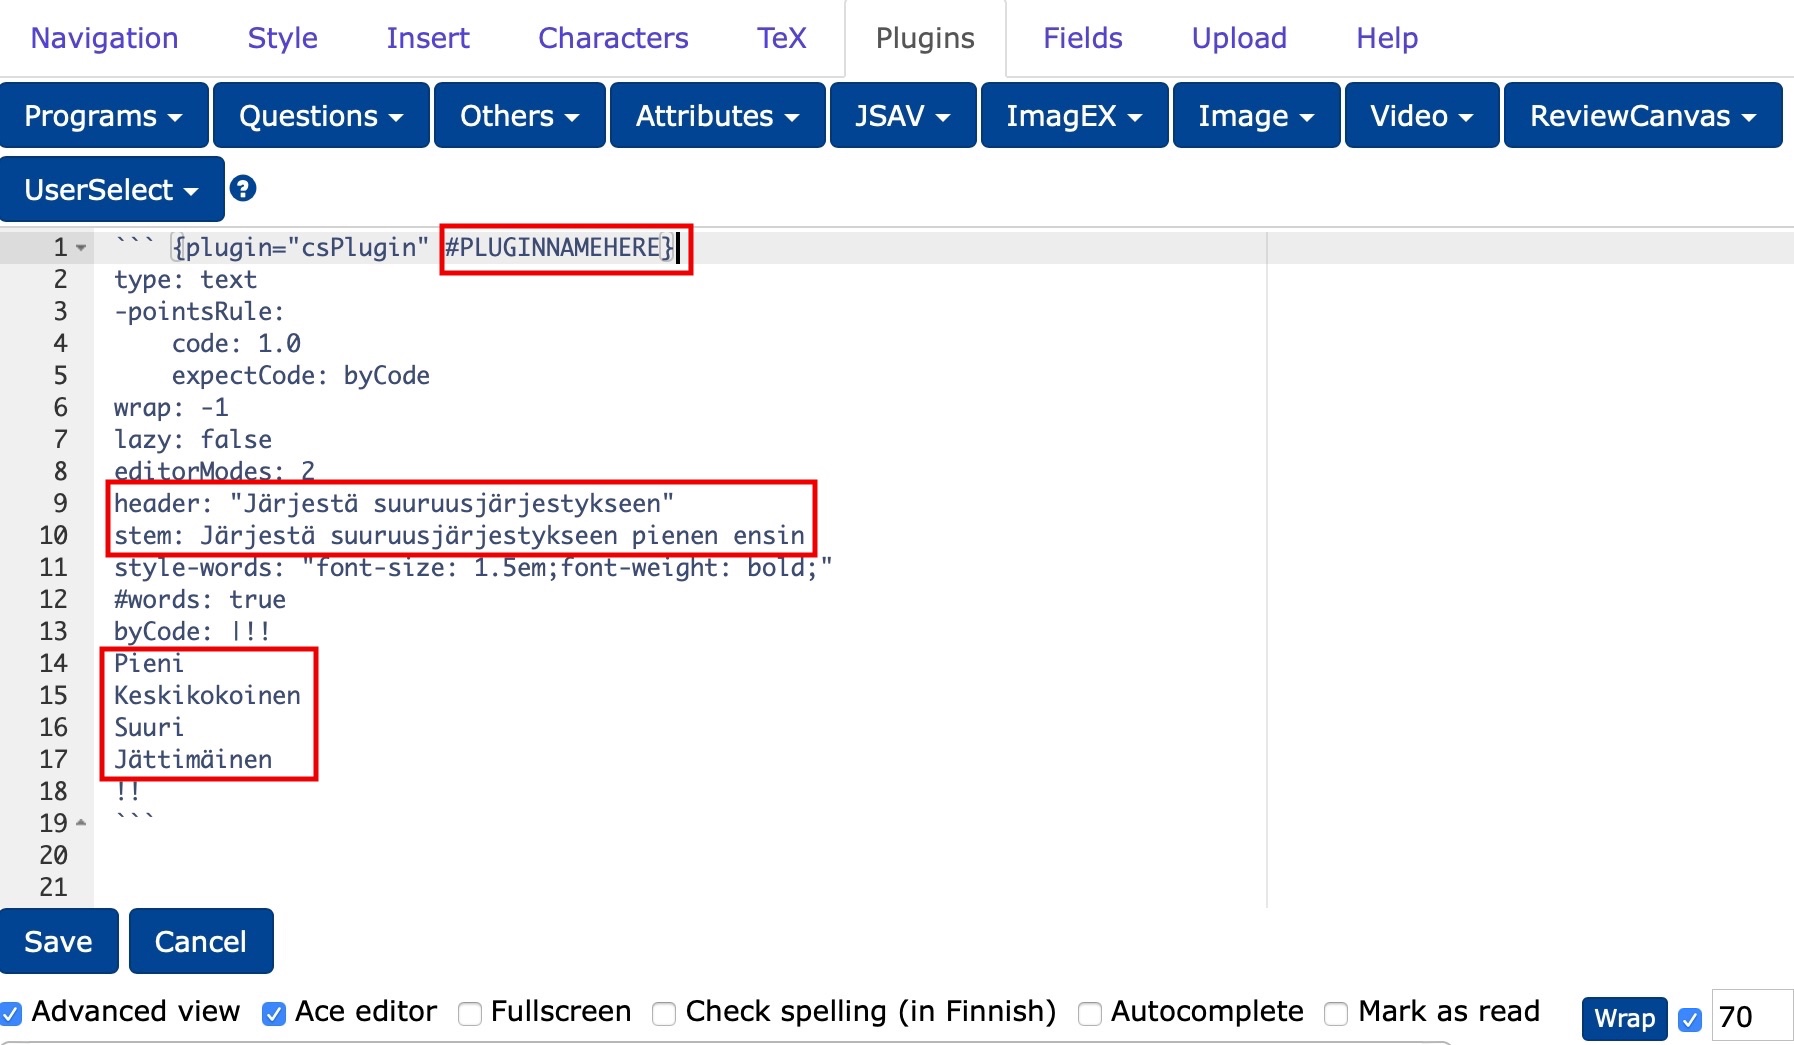
``` {plugin="csPlugin" #Plugin2}

type: text
-pointsRule:
    code: 1.0
    expectCode: byCode
wrap: -1
lazy: false
editorModes: 2
header: "Järjestä suuruusjärjestykseen"
stem: Järjestä suuruusjärjestykseen pienen ensin
style-words: "font-size: 1.5em;font-weight: bold;"

#words: true
byCode: |!!
Pieni
Keskikokoinen
Suuri
Jättimäinen
!!
```
Try how the organising task works
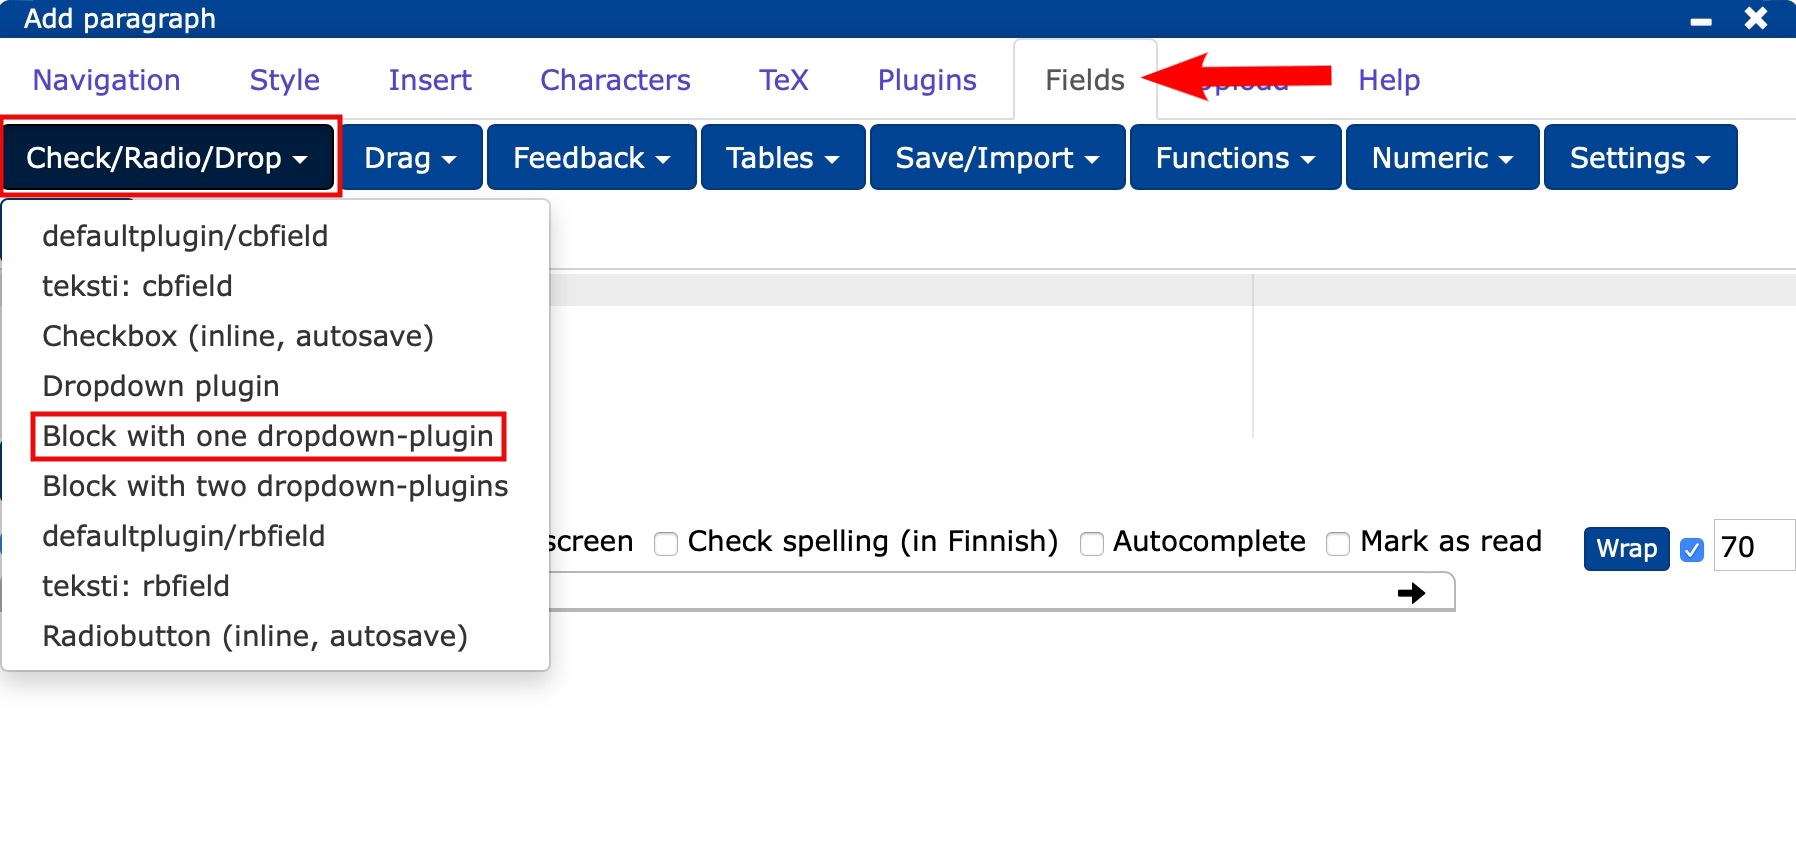
16.0.1 Gap task
Watch the video to see how to do the gap task.
- in the editor, select Fields -> Check/Radio/Drop -> Block with one dropdown-plugin (one slot) or Block with two dropdown-plugin (two slots).
- create your own assignment by editing the prepared text base (outer red box) and the answer options (inner red box).
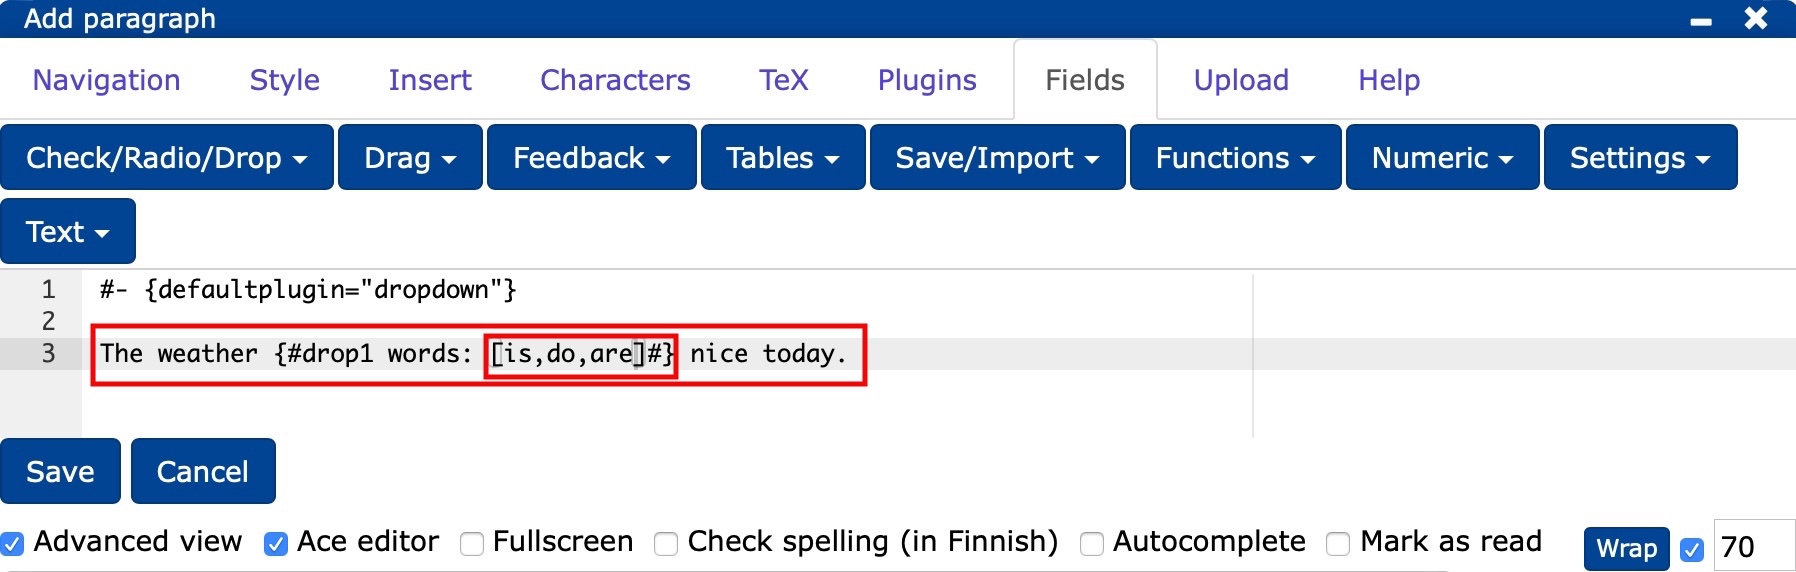
#- {defaultplugin="dropdown"}
The weather {#drop1 words: [is,do,are]#} nice today.
The weather
Please
More guidance
17. From mission to exam
The chapter teaches you how to
- how to make the task an exam
- schedule the exam
- set the duration of the exam
- collect the exam score.
17.1 Increasing rights
Exercises and questions also work as tests and exams when you set them up with timed permissions.
- From the main menu, select Manage/Manage.
- Change the viewing rights - view by clicking Add right....

Specify the rights you want to grant to users in the Right field. You can give permissions:
For an individual person and for groups in the TIM
- by entering the username of the individual in the
Namefield, the name of the group in the group field and - by clicking on Add
- by entering the username of the individual in the
For users logged in to TIM Add logged-in users
for anyone with a link to the exam Add anonymous users
University of Jyväskylä users Add jyu.fi users.
17.2 Timing of the exam
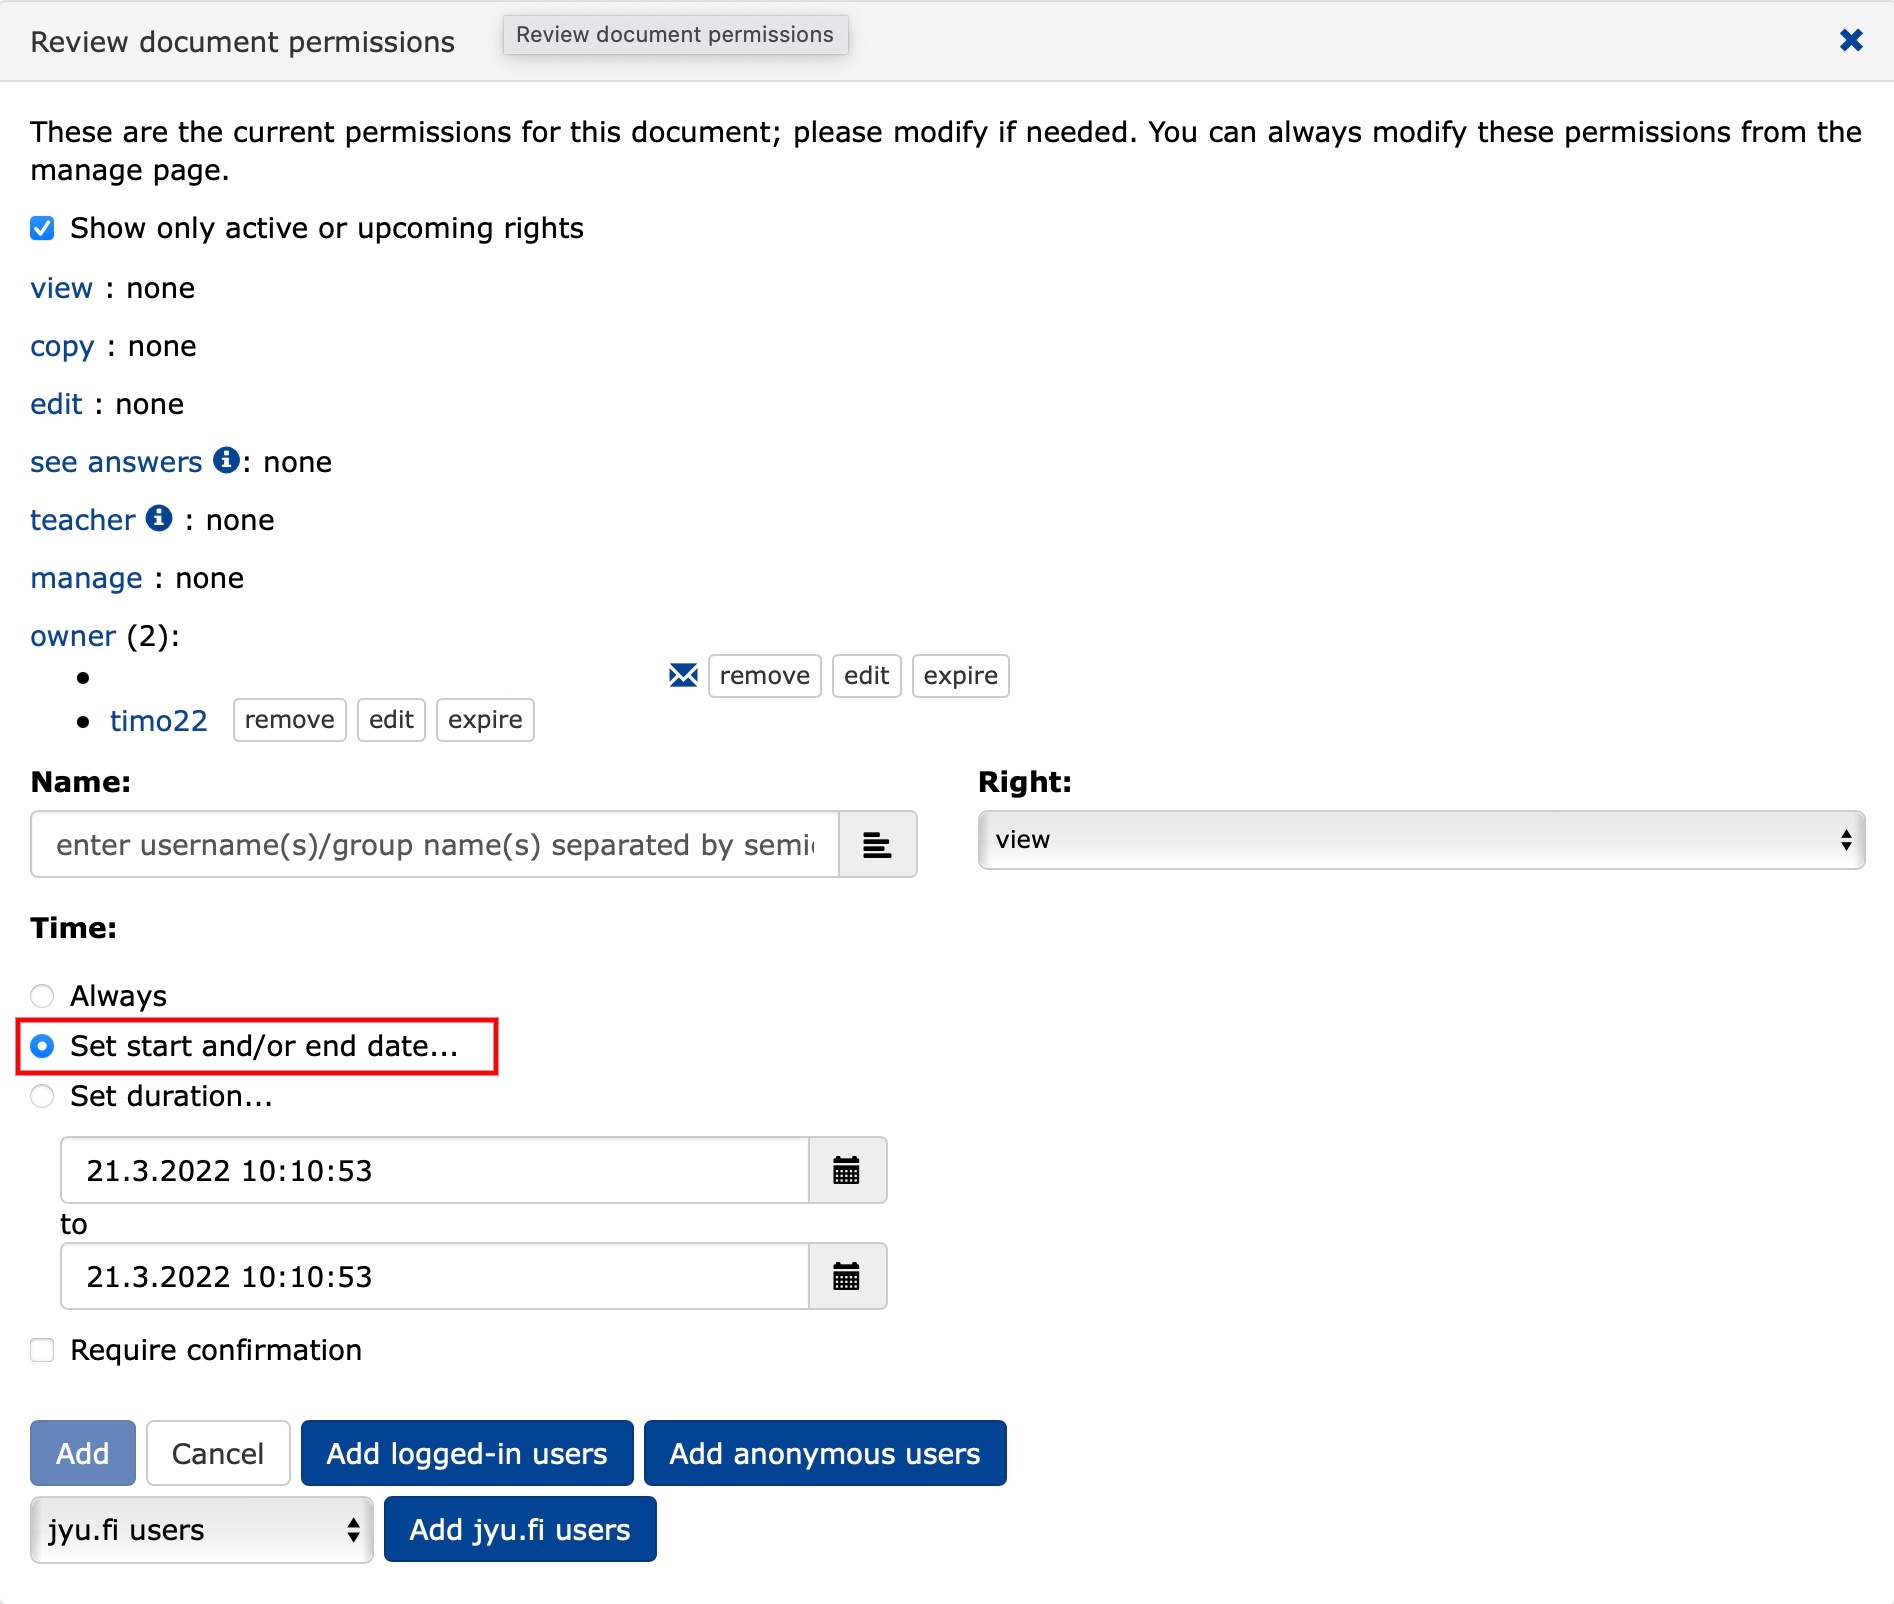
You can schedule a start and end time for the exam.
- Click
Set start and/or end date. - Set the time when the exam opens and closes for students.
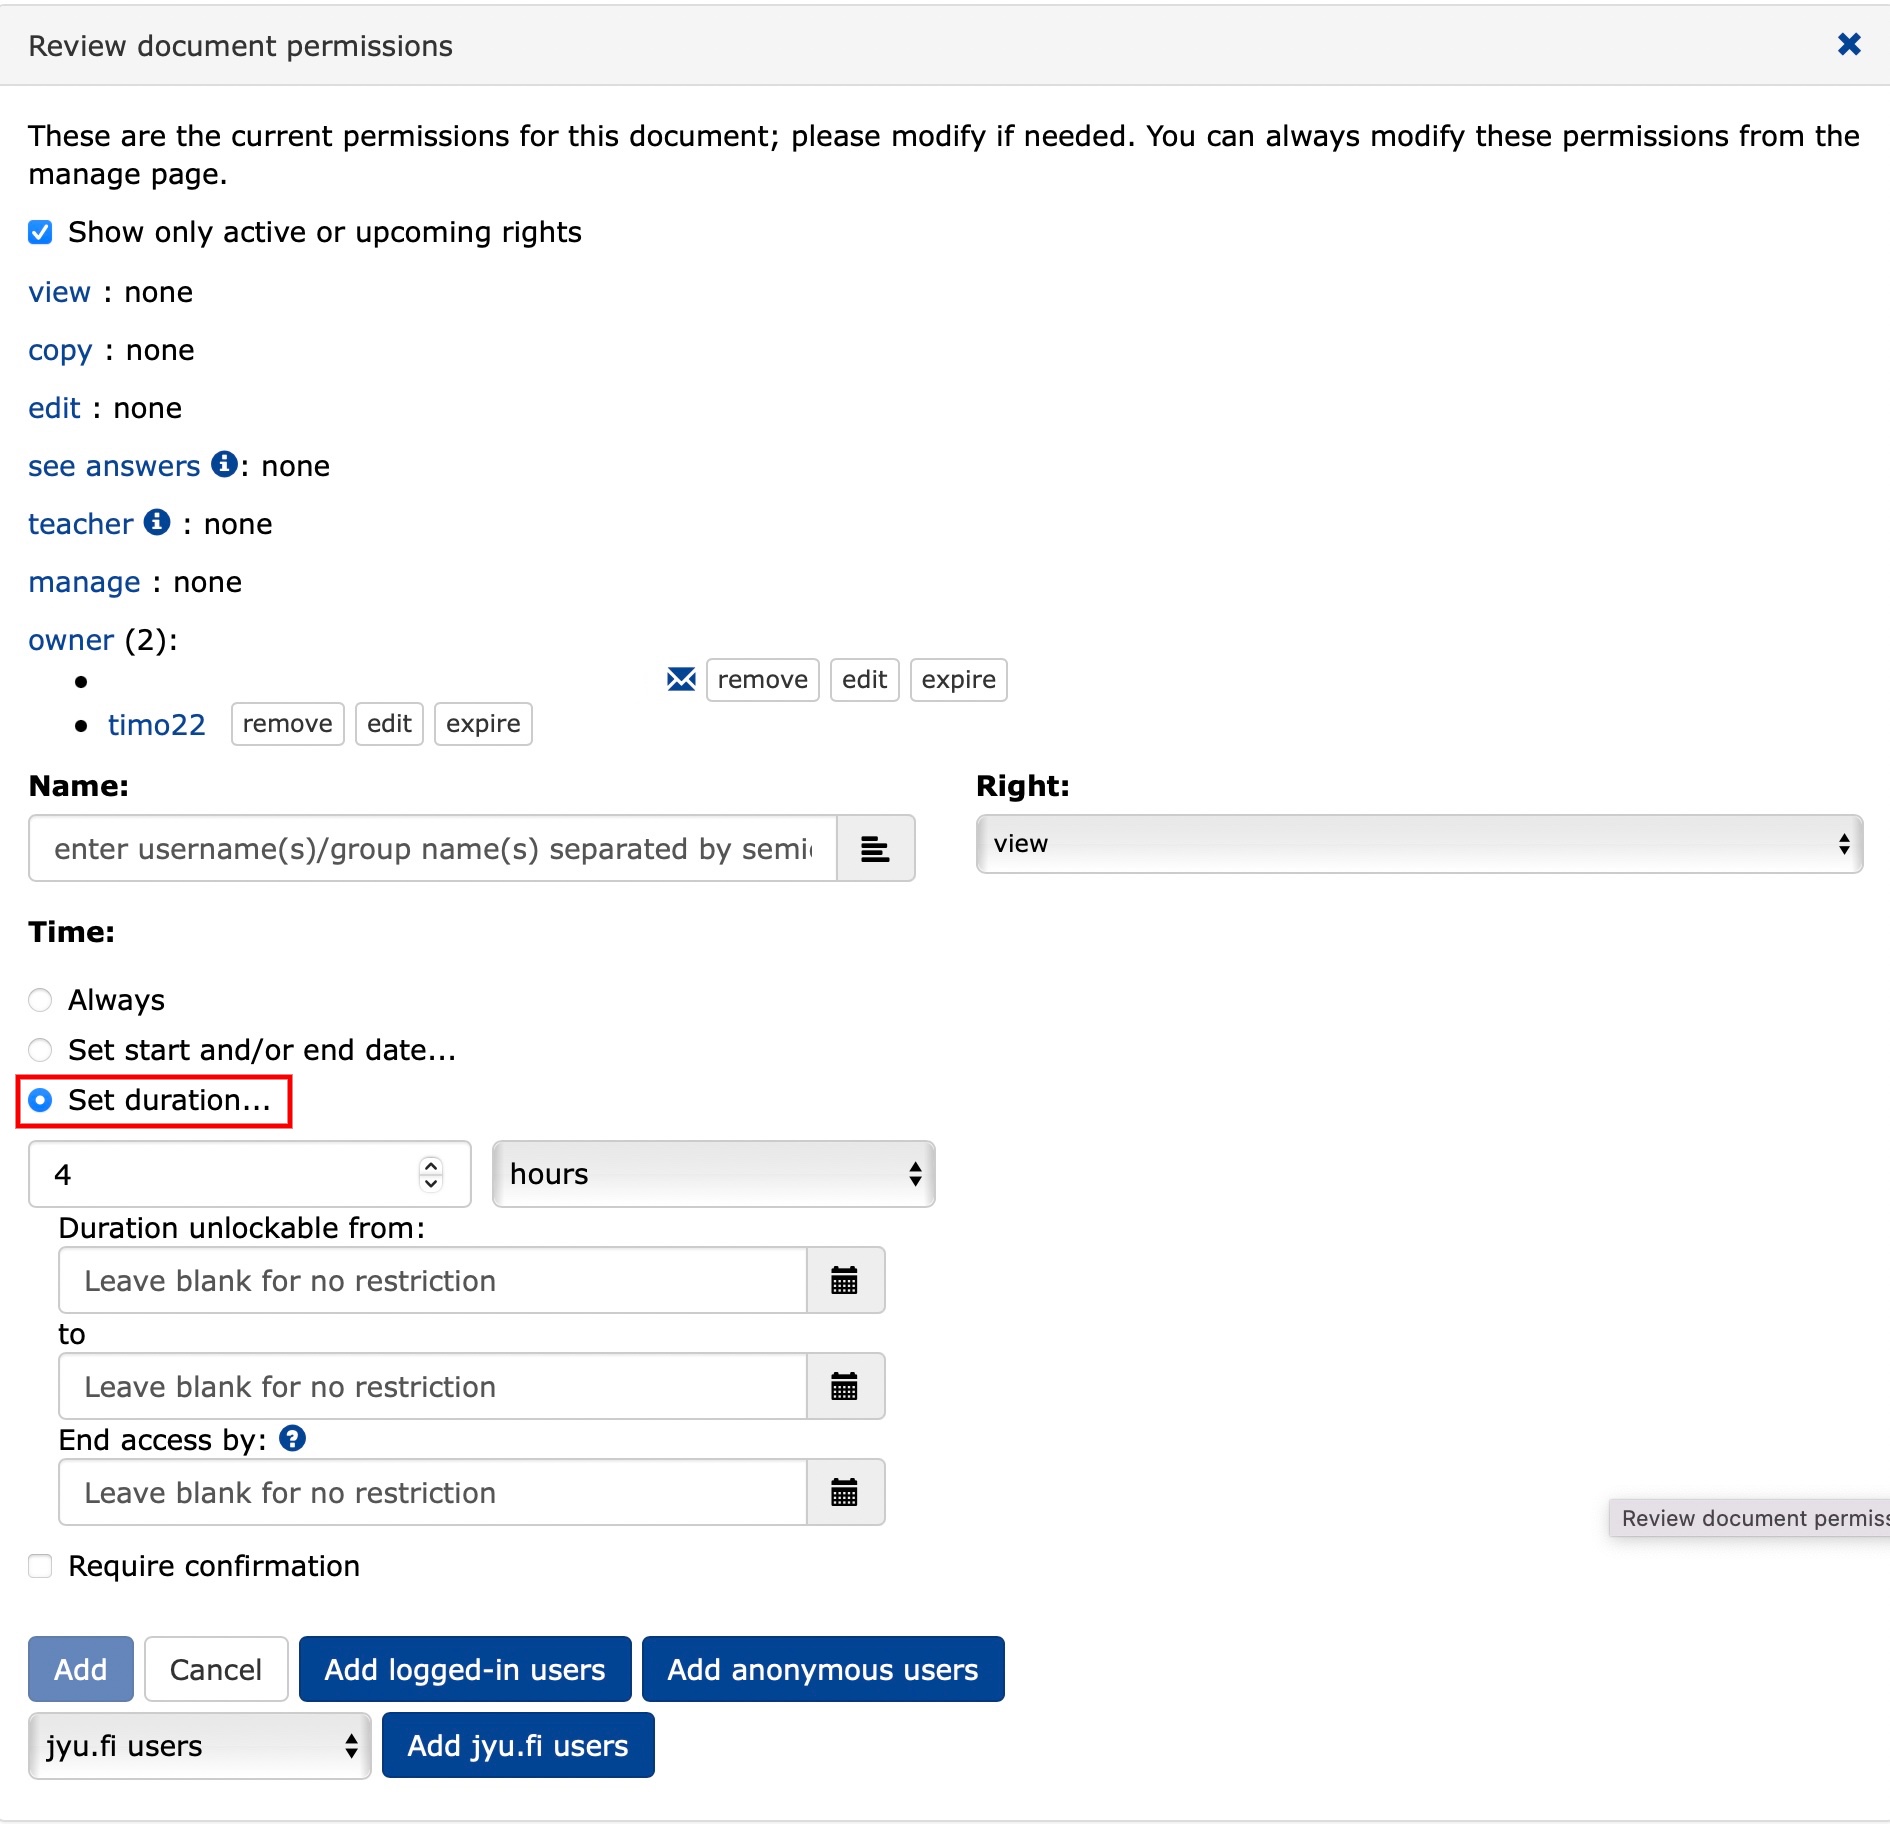
You can schedule a window of time for the exam to be taken and specify the time available to take the exam from the moment it is opened.
Click on
Set duration....Specify the time available to take the exam.
Specify the time window for the exam when you can start taking the exam.
Specify the deadline for closing the exam.
Require confirmationmeans that the authorization has been completed, but the instructor must confirm from the Manage/Manage tab underDocuments rightswhen the person arrives for the exam. It is not necessary to use this function.Add permissions for the person/group of your choice according to the Adding permissions guide .
Review document permissions in the view section of the document permissions window:
- You can see the permissions you have selected and the duration of the exam.
- You can edit/remove the permissions and duration of the exam.
- You can see who is currently taking the exam.

17.3 Points obtained from tasks
You can see the points accumulated from the assignments for the student when you
click on the wheel, Edit settings and
adding the text below to the document settings.
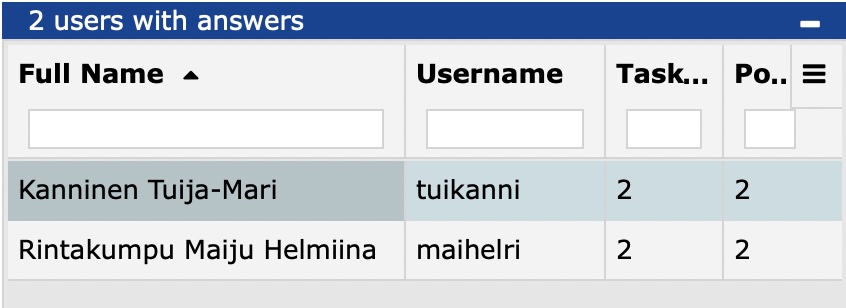
show_task_summary: trueTo view the results of the exam, select Answers/Answers from the main menu, and a summary of the students who have taken the exam will appear on the right-hand side of the page.
- Tasks: the number of tasks completed.
- Points: the total score obtained on the exam.
TIM records the answers/scores of the registered students per task when the task is saved.
Syntax error in macro template: Expected an expression, got 'end of print statement'
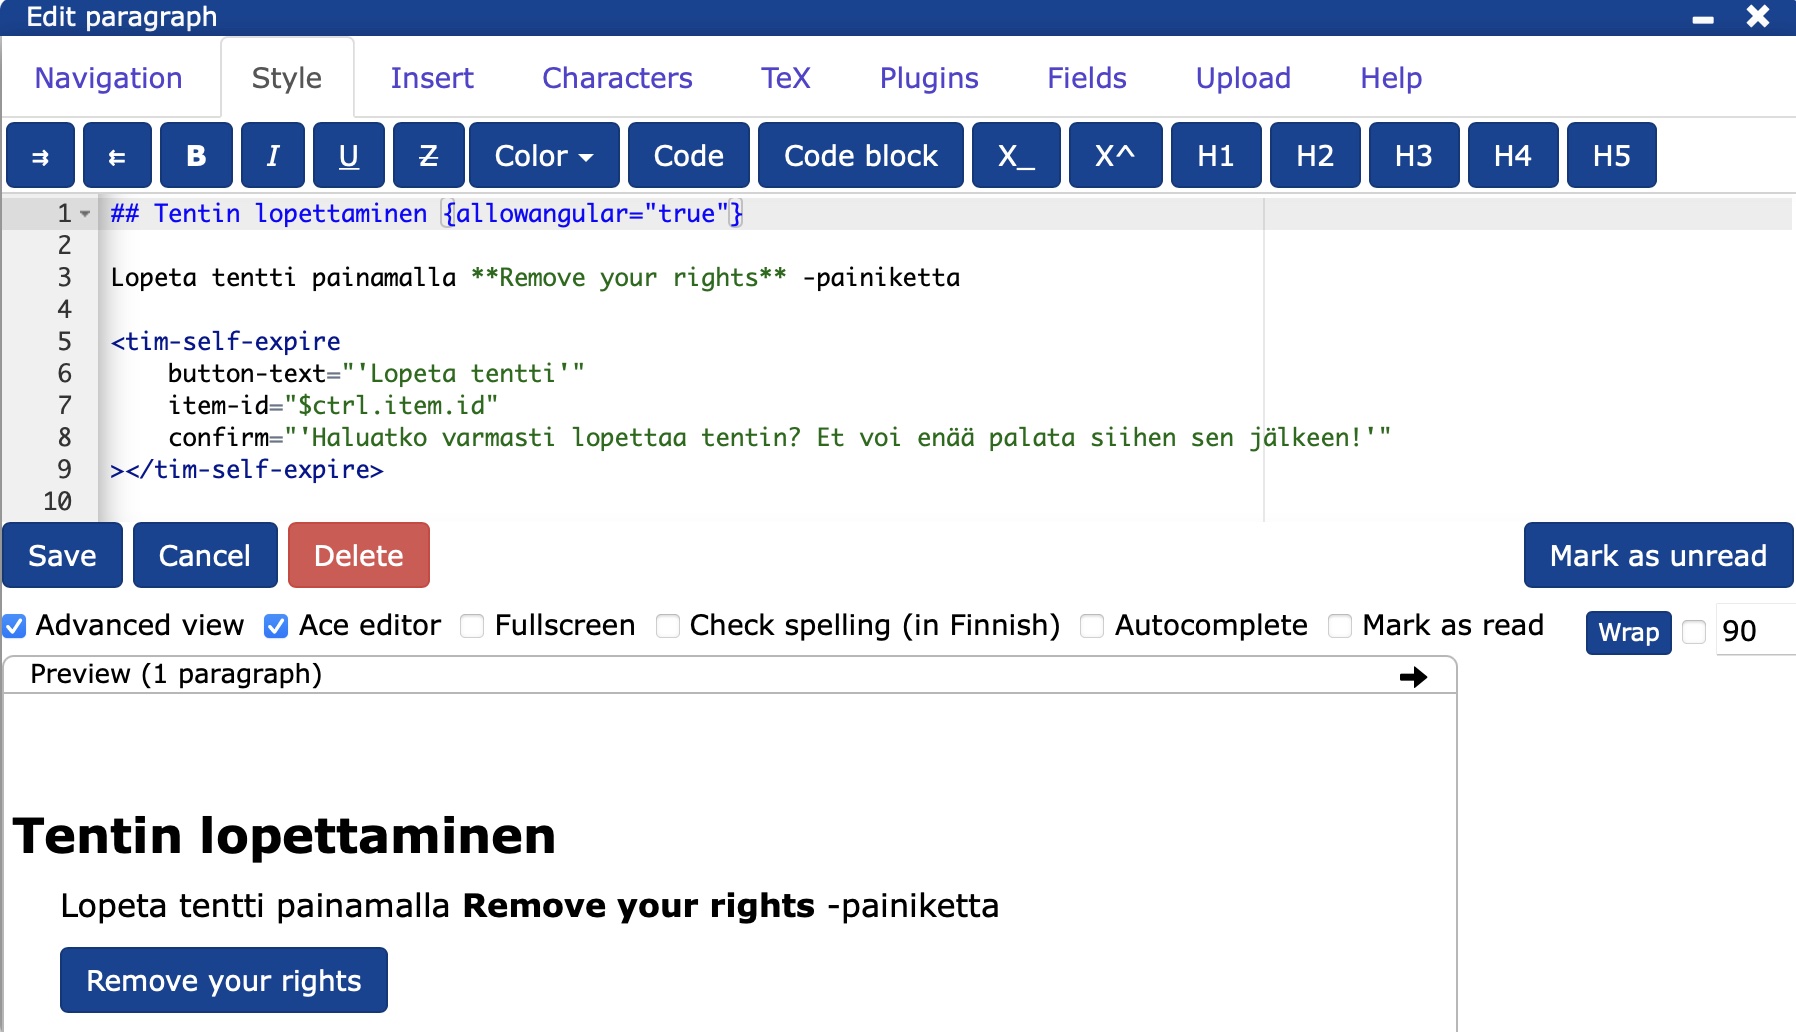
- At the end of the document, add the code below in a new block.
## Tentin lopettaminen {allowangular="true"}

Lopeta tentti painamalla **Remove your rights** -painiketta

<tim-self-expire
    button-text="'Lopeta tentti'"
    item-id="$ctrl.item.id"
    confirm="'Haluatko varmasti lopettaa tentin? Et voi enää palata siihen sen jälkeen!'"
></tim-self-expire>
More guidance
18. Lecture and lecture question
The chapter teaches
- how to display lecture slides
- how to create a lecture
- how to create a lecture question.
18.1 Showing lecture slides
- Select the document you want to show in a lecture.
- To open a document in lecture mode, select Slides/Slide from the main menu.
- By default, TIM makes slide breaks for titles.
- If you think there is too much content on one slide, you can make a forced slide break to the desired point in the original document
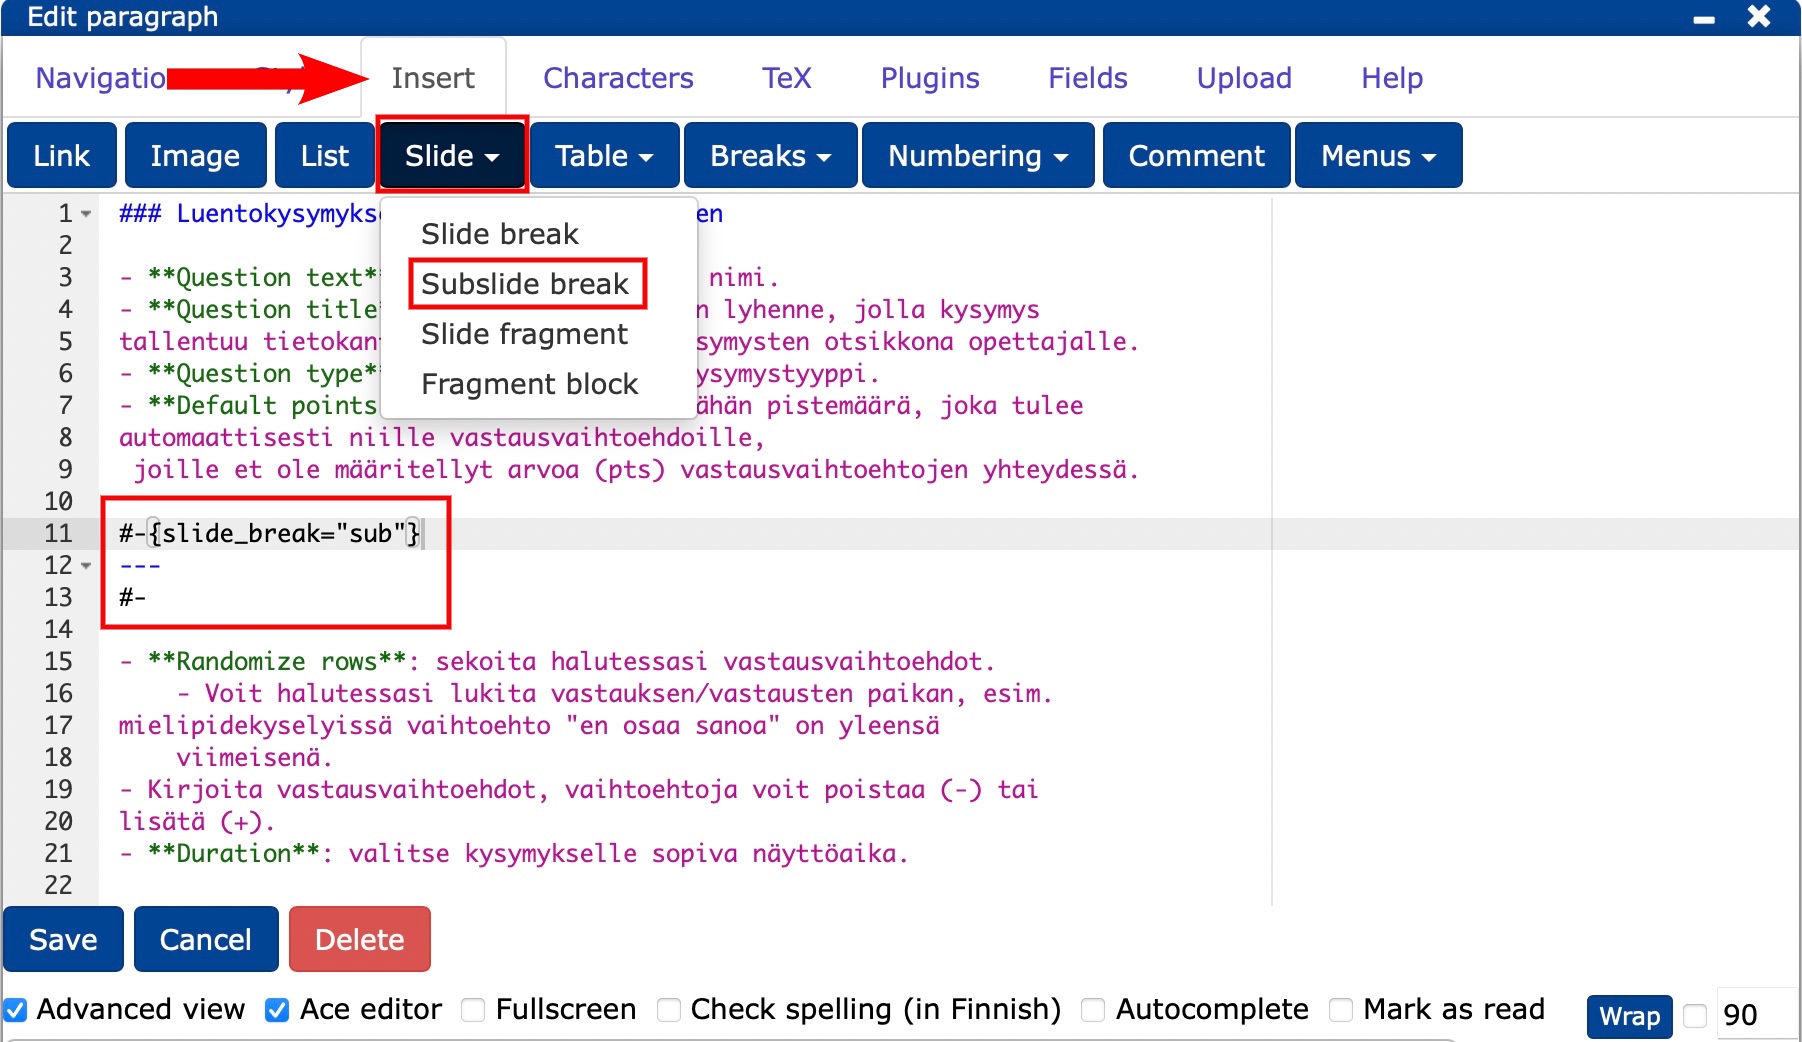
- by selecting Insert -> Slide -> Subslide Break from the editor or
- by typing in the text editor:
#- --- #-
18.2 Creating a lecture
Lecture questions allow you to make lectures more interactive and engage students during lectures. In order to ask a lecture question, you must have a lecture running. However, you can create lecture questions in advance without having a lecture running or already created.
Watch the video to see how to create a new creation.
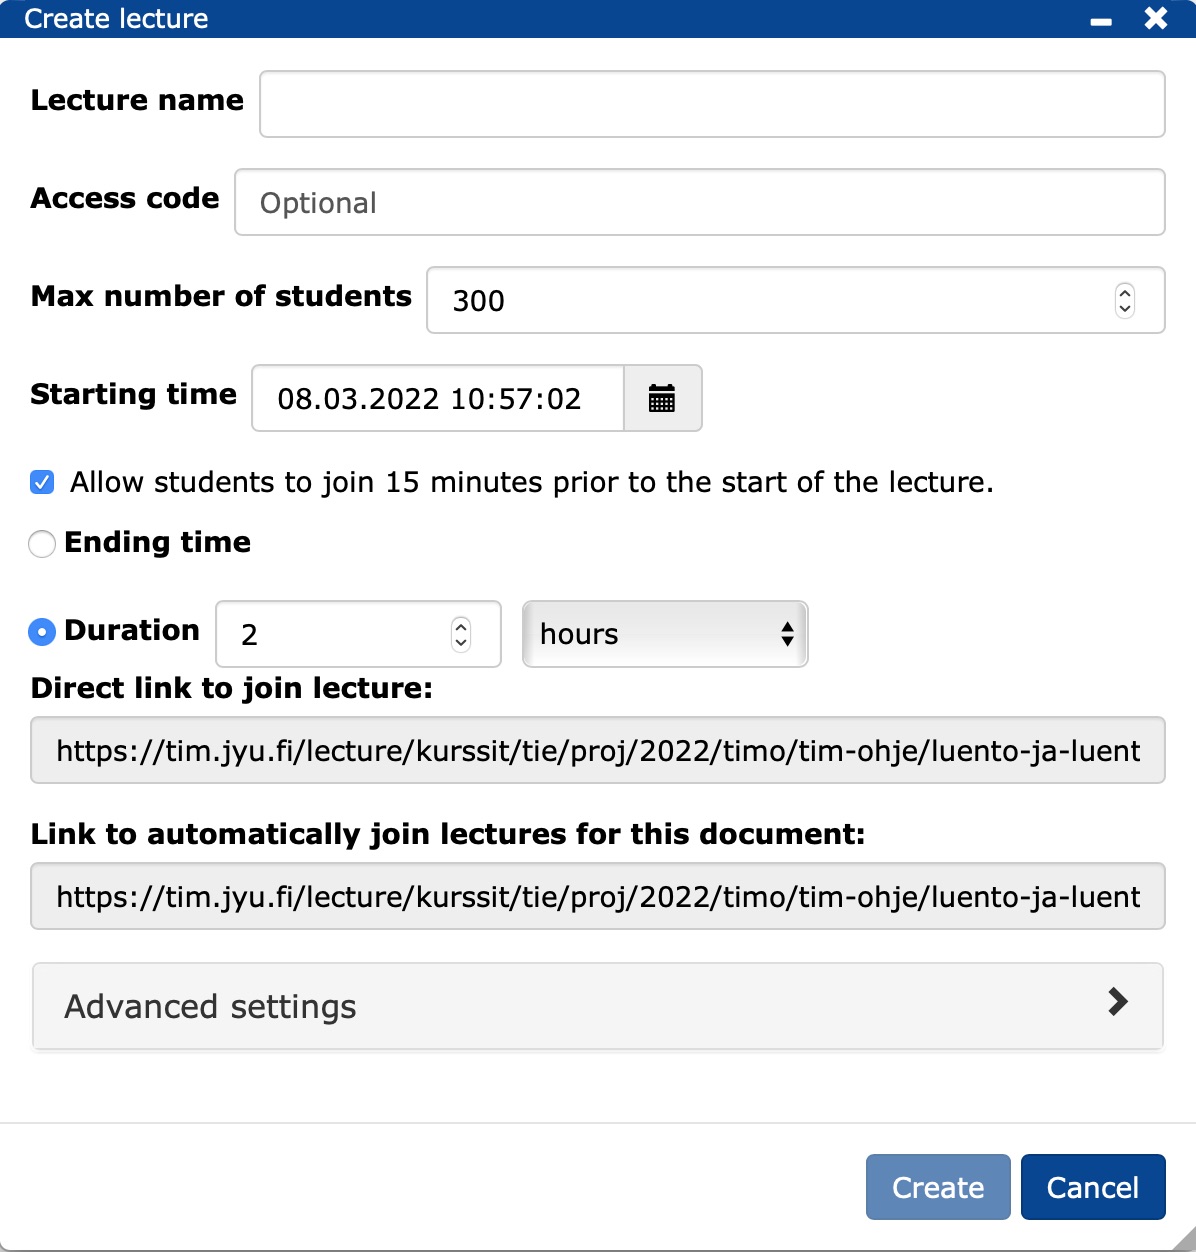
From the main menu, select the Lecture tab and press Show lecture info.

Click the + button to create a new lecture.

Creating a new lecture
- Give the class a name.
- Set the access code for the class if you wish.
- Choose the maximum number of students.
- Set the start time of the class.
- Choose whether students can join the class 15min before it starts.
- Choose either the end time or the duration of the class.
- Copy the link below to the clipboard.
- Finally, press Create.
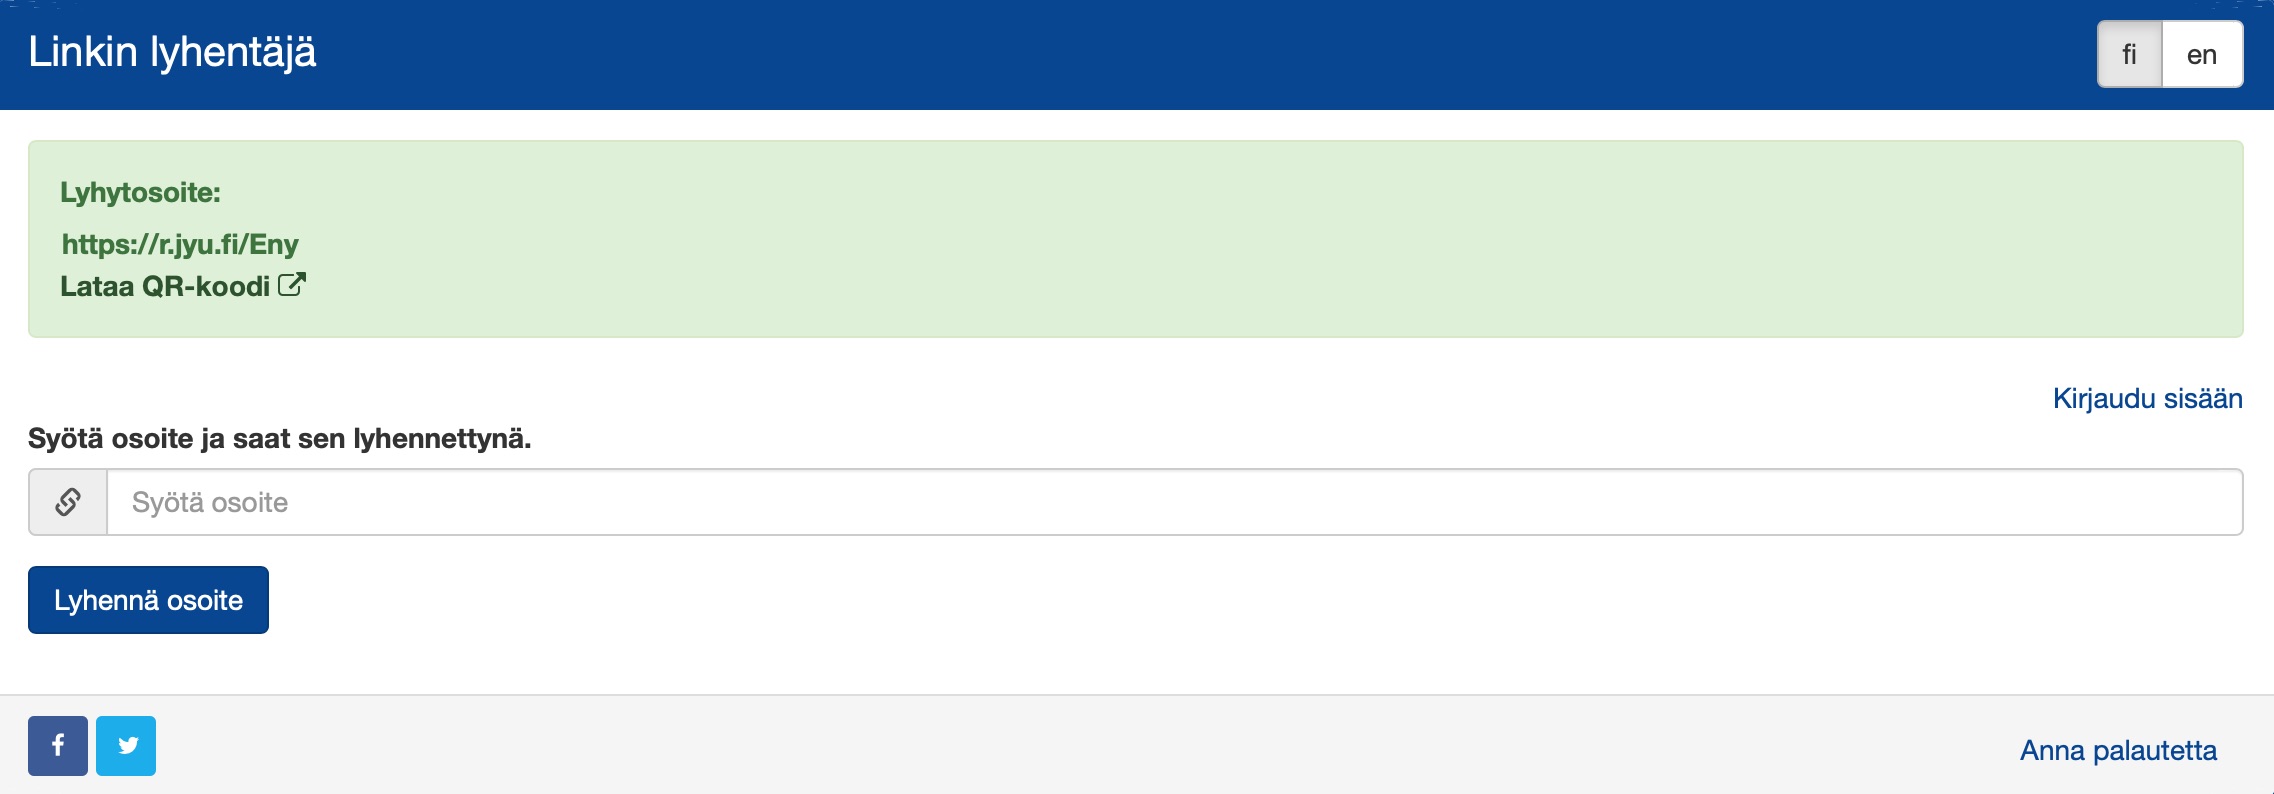
You can inform students of the link you have copied or you can shorten the link and/or make it a qr code at r.jyu.fi.
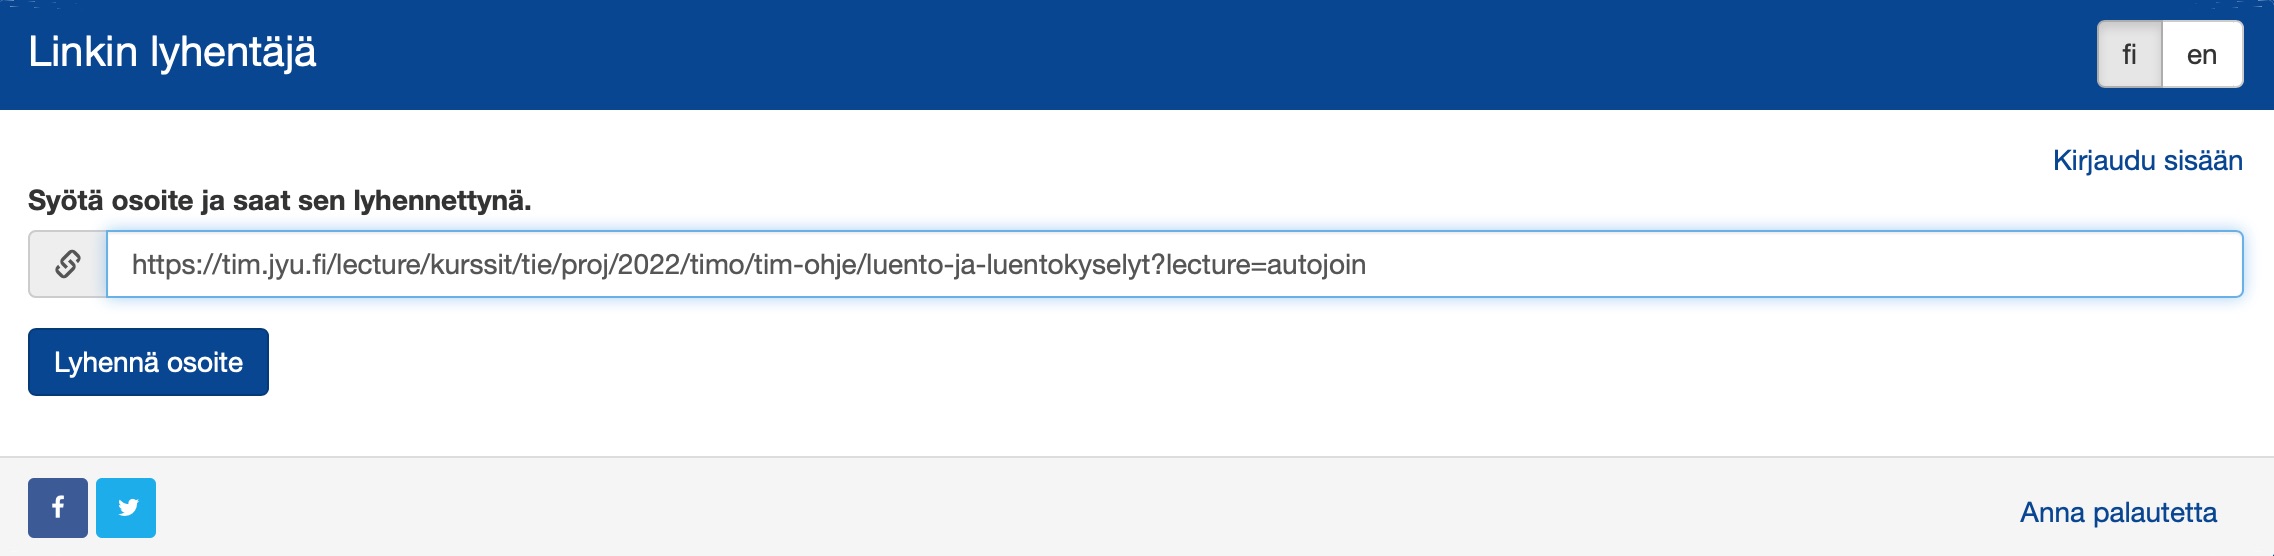
When you click on the button Shorten address you will see the shortened link. Press download to open the QR code in a new tab. Copy the image for the lecture wall.
From the lecture wall, select Add paragraph.
In the editor, select the Upload tab.
Copy the address of the image into the Upload image/file field:
Put the short address of the link as the caption.
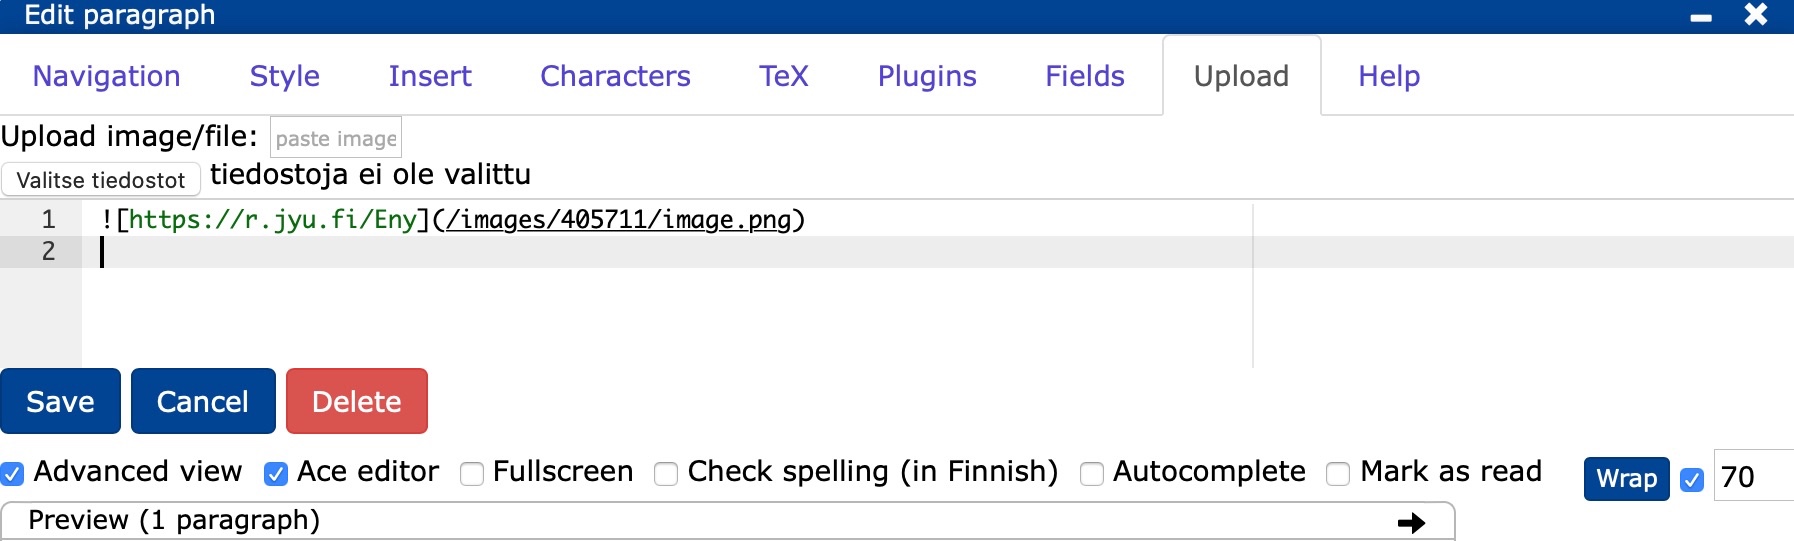
Ready link abbreviation and QR code:

18.3 Lecture question
InLecture/Lecture mode, you can create lecture questions either before or after creating a lecture at .
Watch the video to see how to ask a lecture question.
Start creating a question by selecting Add lecture question above from the edit menu ().
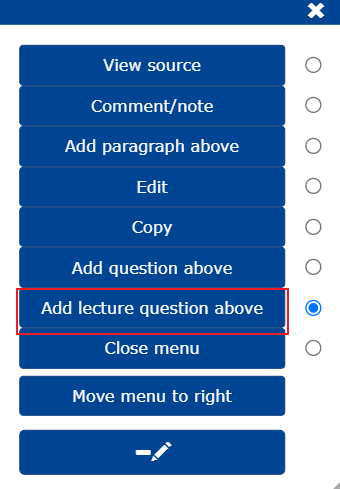
Fill in the details of the question in the form that appears.
Question text: enter the name of the question.
Question title: enter the abbreviation of the question that will be used to store the question in the database and be displayed as a lecture question title for the teacher.
Question type: select the type of question you want to use.
Default points for answer: enter here the number of points that will automatically be assigned to the answer options for which you have not specified a value (pts) in the answer options.
Randomize rows: shuffle the answer choices if you wish.
- You can lock the position of the answer(s) if you wish, e.g. in polls the option "don't know" is usually last.
Enter the answer options, you can remove (-) or add (+) the options.
Duration: select the appropriate display time for the question.
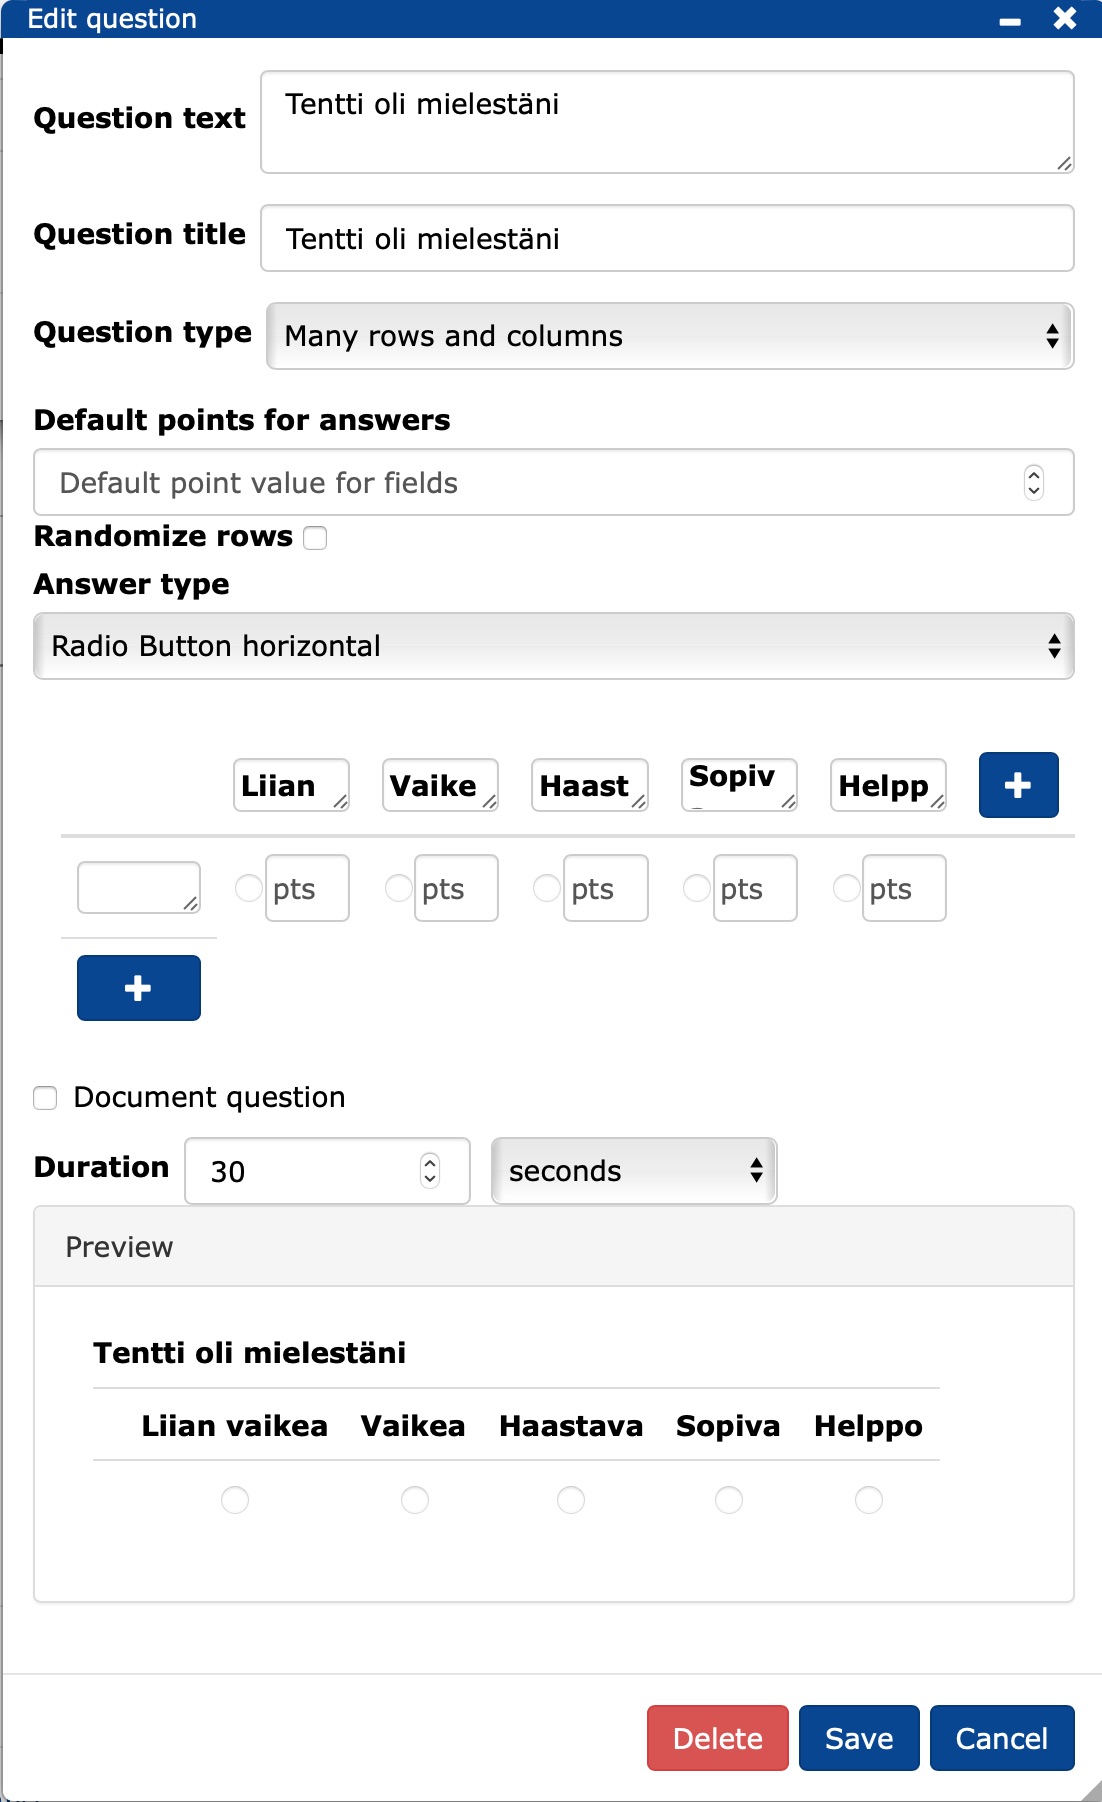
- The question appears in the document as a small question mark block.
- You can edit a question in
- by clicking on the question mark or in
- in the text editor by selecting Edit from the edit menu ().
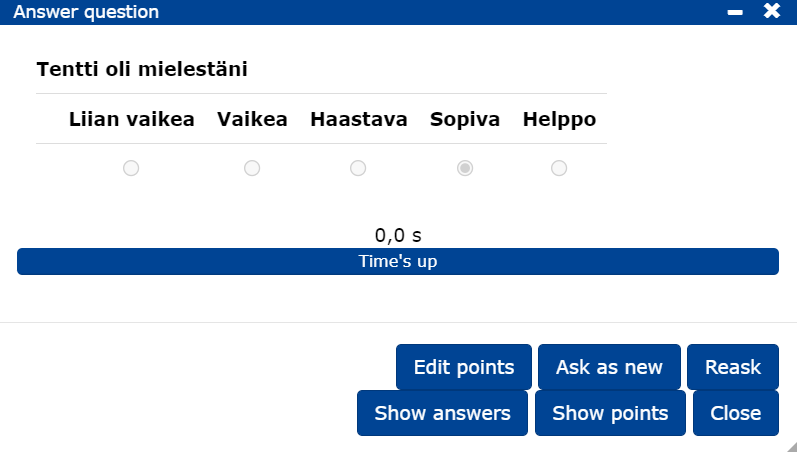
18.3.1 Asking a lecture question and the answers to the questions
Watch the video to see how to ask the lecture question.
- While the lecture is in progress, the question is asked by clicking on the question mark , and the question will appear for the logged in students and the time set for the question will start.

To see the distribution of answers, click on Show answers.
By clicking on Show points you can send students to see the scores and comments received.
You can ask the same question again by clicking Reask, and the answers will be cumulated or ask the question as a new question Ask as new.
To change the scoring of a question, go to Edit points.
More guidance
19. Programming
The chapter teaches
- add programming blocks that can be run directly in the document.
csPlugin is a tool that also allows you to perform programming-related tasks in TIM. The advantage of TIM over many other systems is that programs can be run directly in the document. Thus, programming tasks can be easily embedded in various materials, and a separate programming development environment is not necessarily needed at all. TIM also allows for automatic checking of tasks and feedback.
19.1 Adding a programming block
You can see the textual instructions below for adding programming blocks. After the text, the same instruction is in video format.
On the Plugins tab of Programs, select the programming language you want to use.
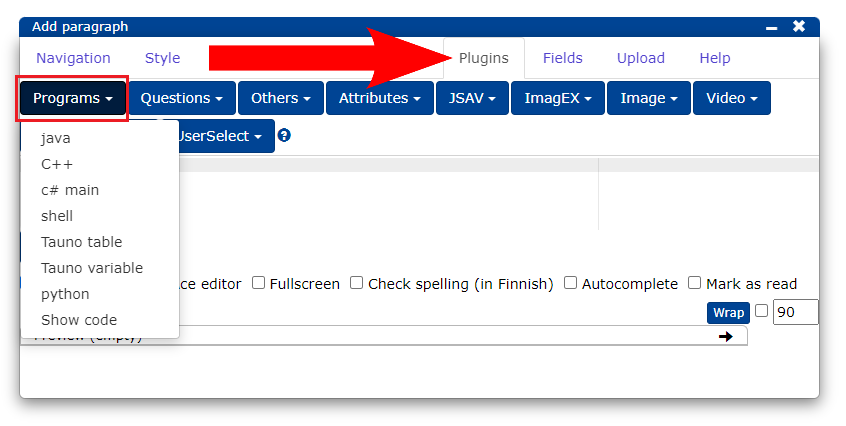
If the desired programming language is not displayed in the menu, select from the list, for example Java. You can then change the programming language by entering a new value in type.
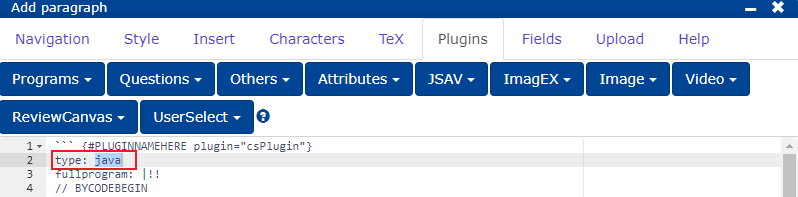
Programming languages and environments and corresponding values ofthe attribute type
Python     : py
Java       : java
C          : c
C++        : c++
C#         : cs
F#         : fs
JavaScript : js
TypeScript : ts
SQL        : sql
Go         : go
Rust       : rust
Swift      : swift
Kotlin     : kotlin
HTML       : html
CSS        : css
Pascal     : pascal
Elixir     : elixir
Lisp       : clisp
Scala      : scala
Fortran    : fortran
NodeJS     : nodejs
WeScheme   : wescheme
Processing : processing
GlowScript : vpython
You can test the different languages with the task at the end of the chapter.
19.2 Programming block settings
Enter a unique name for the programming block to replace the text PLUGINNAMEHERE.
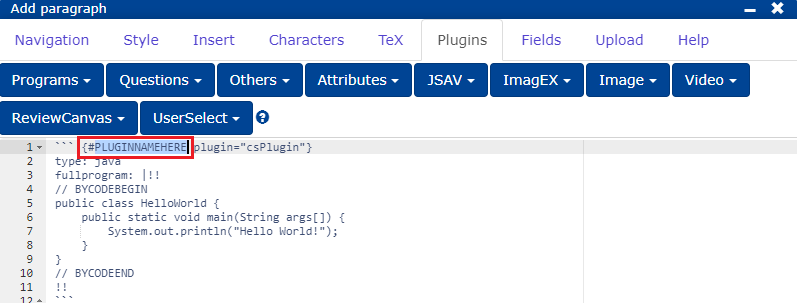
By default, a programming block does not have a task or a title. They can be added to the block afterwards. The mission statement is added to the beginning of the block using the stem attribute.
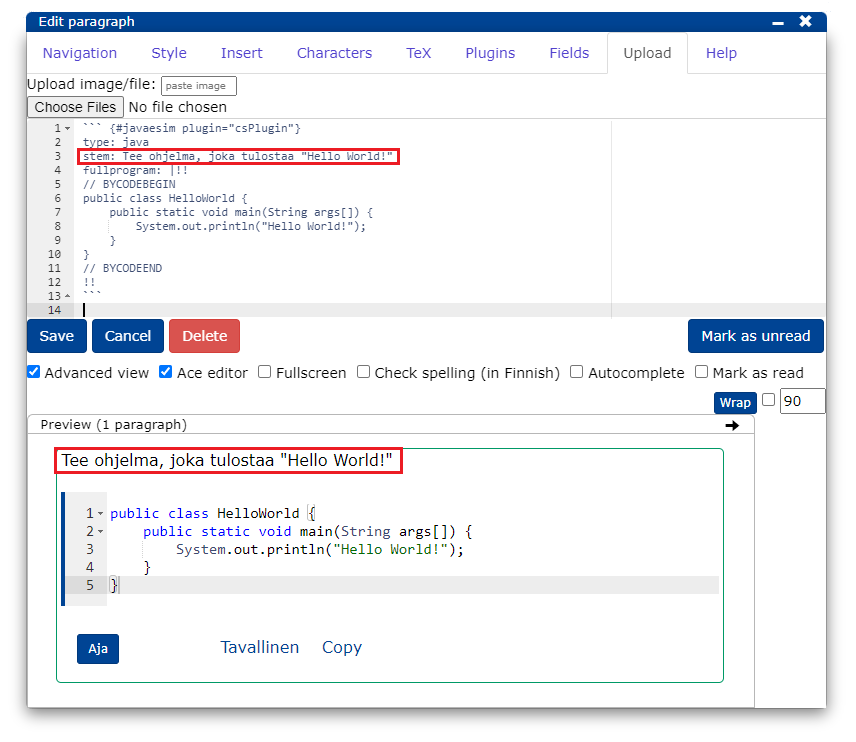
The title is added to the beginning of the block using the header attribute.

The actual program code is written between the line fullprogram: |!! and the line !!.
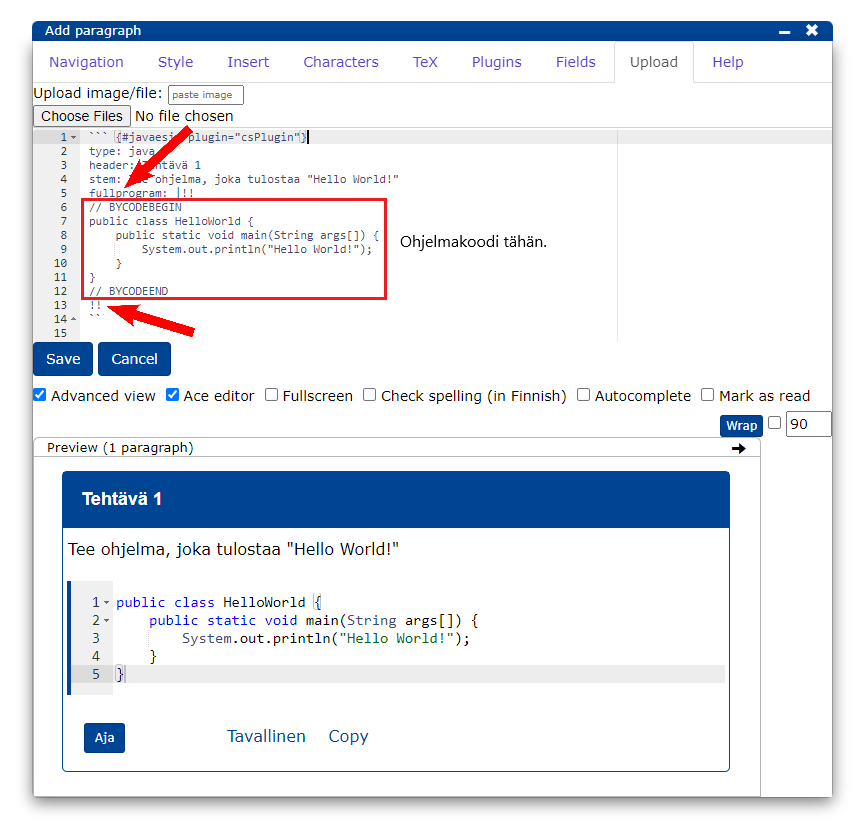
The comments BYCODEBEGIN and BYCODEEND are used to mark an area in the program code that can be edited by the block user .
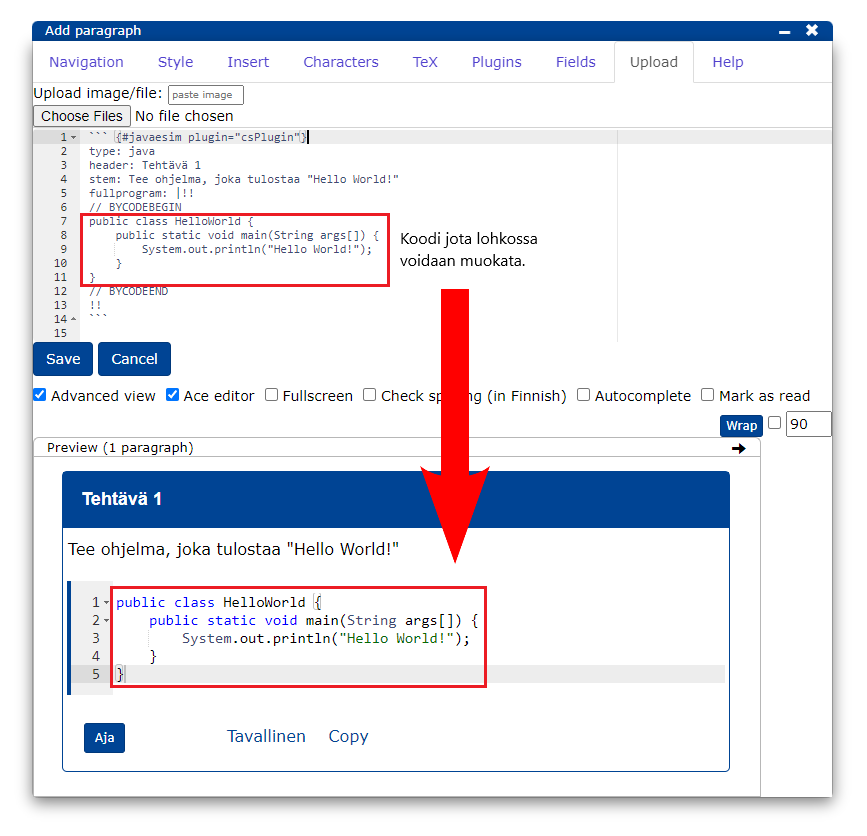
BYCODEBEGIN and BYCODEEND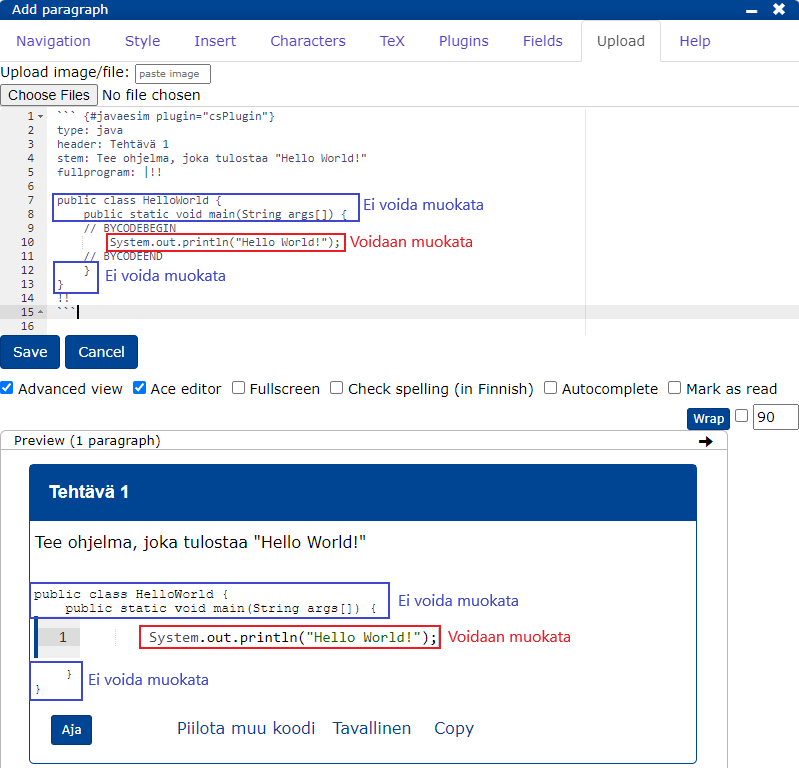
BYCODEBEGIN and code outside BYCODEEND cannot be edited in the block19.3 Using the programming block
The Highlight/Table button displays/hides the line numbers. Highlight also highlights the code with colours.
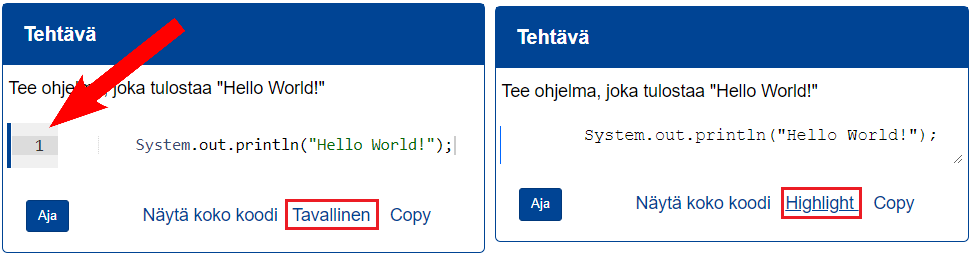
The Start button returns the task to the way it was at the beginning.
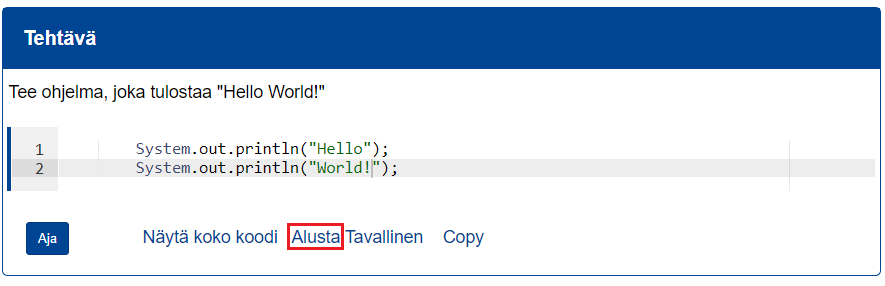
The Show full code button displays the full program code for the block in question .
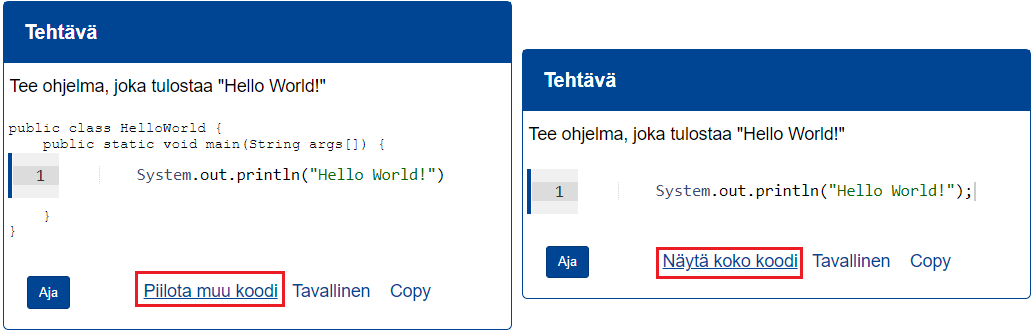
Watch the video to see how to add a programming block and what settings are involved.
19.4 Grading of exercises
Automatic grading of tasks can be built, for example using JavaScript. You can learn more about automatic checking via the link below.
19.5 All TIM languages
19.6 Examples of programming blocks
19.6.1 Java
19.6.2 C
19.6.3 Python
These are the current permissions for this document; please modify if needed. You can always modify these permissions from the manage page.