User Manual for Creating Adaptive Feedback Test in the TIM
Hanna Alatalo
Jarkko Kuivanen
Elisa Nauha
Jere Ojala
Kimmo Urtamo
Version 1.1.0
Public
3.6.2019
University of Jyväskylä
Faculty of Information Technology
Change History
| Versio | Date | Changes | Author |
|---|---|---|---|
| 0.0.1 | 25.3.2019 | The document was created. | JK |
| 0.0.2 | 24.4.2019 | The rest of the document was created. | JK |
| 0.0.3 | 24.4.2019 | Chapters 1-3 were edited. | EN |
| 0.0.4 | 25.4.2019 | Errors were fixed. | JK |
| 0.0.5 | 26.4.2019 | Chapters 4-5 were edited. | EN |
| 0.1.0 | 29.4.2019 | Chapter 3 was edited. | JK |
| 0.1.1 | 4.5.2019 | The document was edited according to the suggestions. | JK |
| 0.1.2 | 6.5.2019 | The structure of the document was changed. | JK |
| 0.2.0 | 21.5.2019 | The structure of the document was changed and typos were fixed. | JK |
| 0.3.0 | 29.5.2019 | The document was edited according to the suggestions. Examples were added. | JK |
| 1.0.0 | 31.5.2019 | Typos were fixed. | JK |
| 1.0.1 | 2.6.2019 | The document was edited according to the suggestions. | JK |
| 1.1.0 | 3.6.2019 | Typos were fixed. | KU |
Concepts
The concepts of TIM are presented in the following table.
The concepts of the adaptive feedback are presented in the following table.
How to Read the Manual
The document contains instructions for creating a test with adaptive feedback. The instructions contain the following sections:
- Creating a Folder for a Test,
- Creating a Task Using Templates,
- Editing Markdown of the Blocks of Task and
- Creating a Report
- Examples
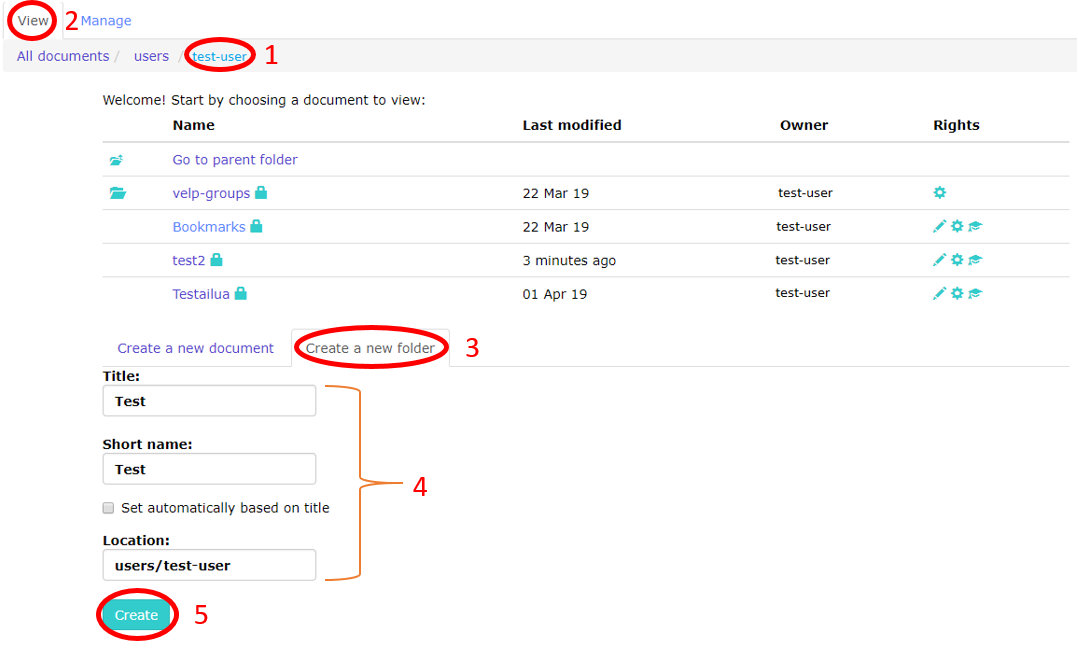
Every step is explained both in words and via screenshots in which the relevant parts are numbered. The places of action are inside of red circle or curly brackets. Figure 1 gives an example of the used markings.
1. Introduction
TIM is an interactive learning environment containing documents with WWW address. A TIM document consists of TIM blocks which can contain, for example, text, images, or plugins containing questions. Additional information about TIM can be found in
- review of the TIM in Finnish
(https://tim.jyu.fi/view/tim/koulutus/TIM-tutustuminen), - instructions for using TIM in Finnish
(https://tim.jyu.fi/view/tim/TIM-ohjeet), or - by addressing questions to tim@jyu.fi
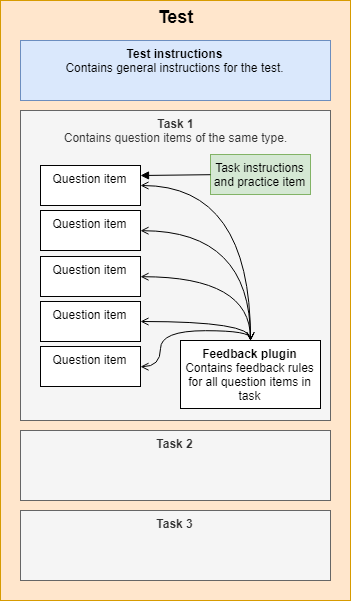
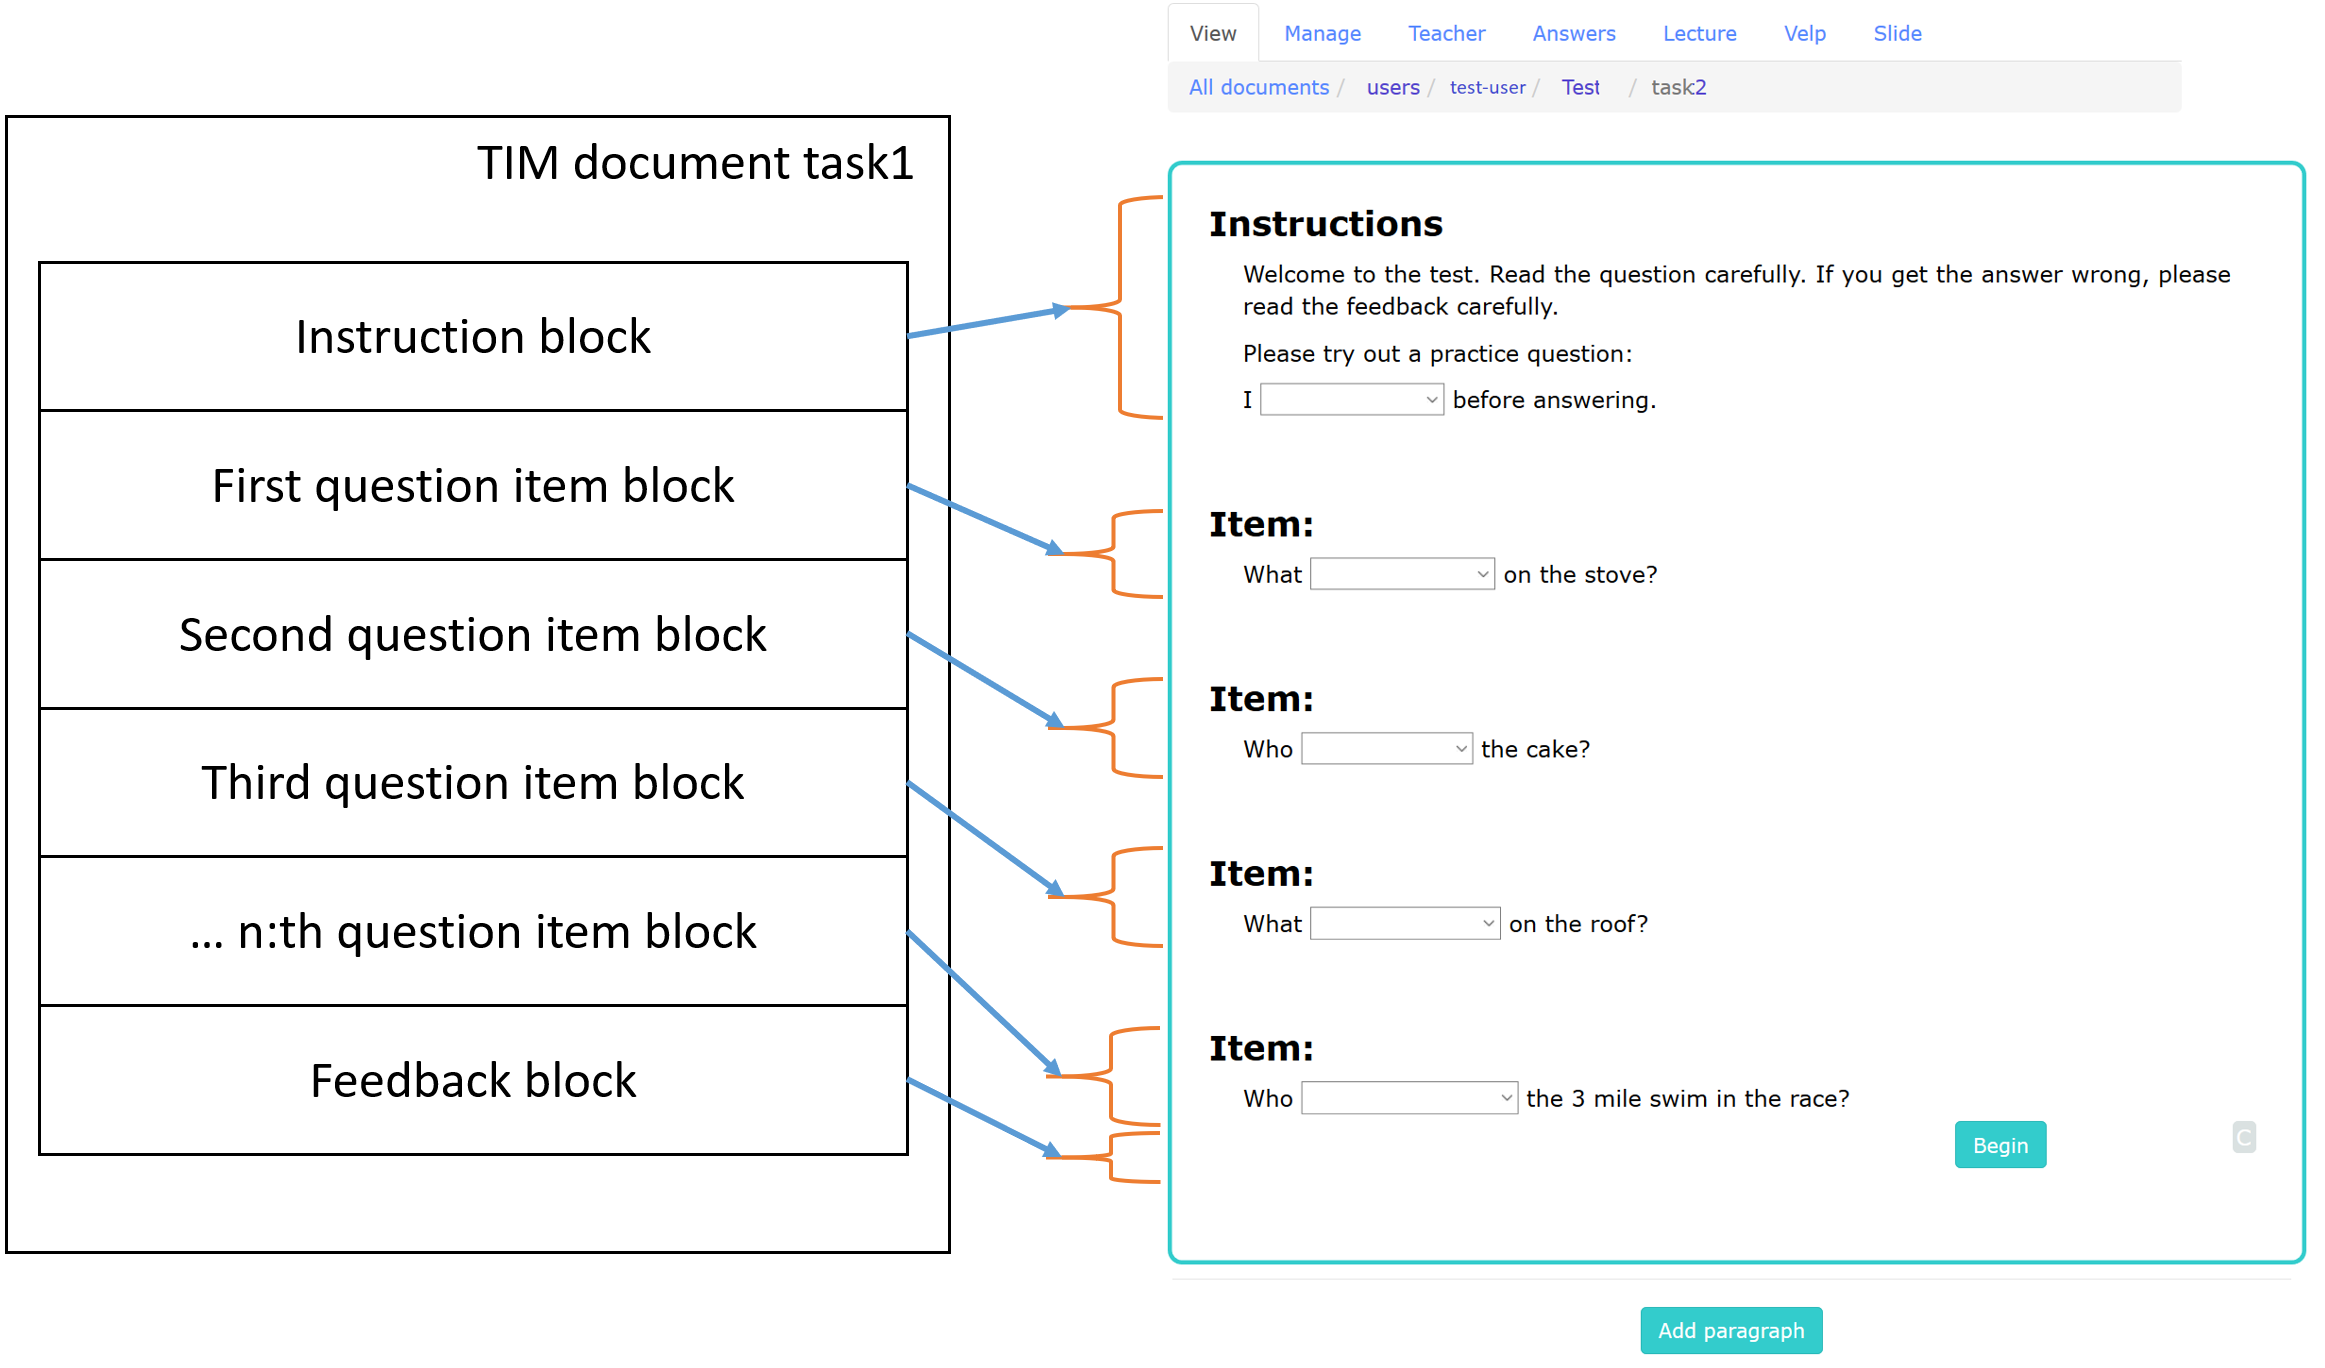
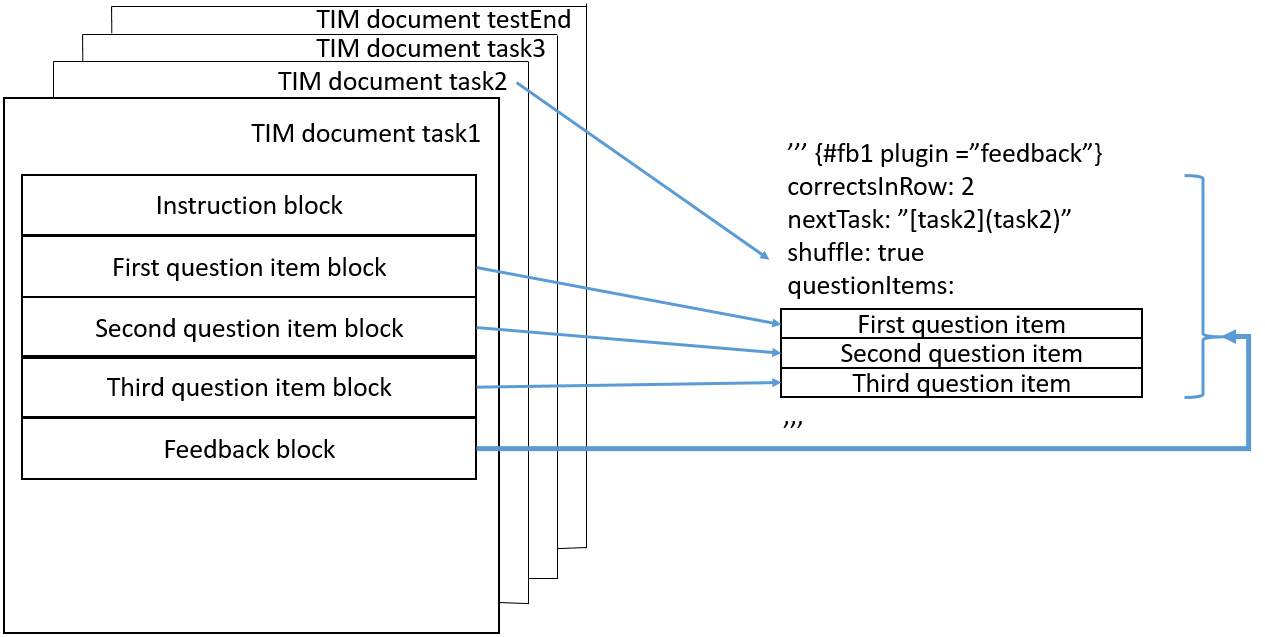
A test containing adaptive feedback is a feature of TIM. A test consists of multiple tasks, and a task consists of multiple question items. Question items in a task are similar to each other, which serves the basis for adaptive feedback. The structure of the test is presented in Figure 1.1.
A test containing adaptive feedback keeps track of the number of wrong answers given by a learner. The feedback on a question item depends on the how many wrong answers a learner has made. The feedback guides the learner more and more every time the learner answers incorrectly.
2. Creating a Test Folder
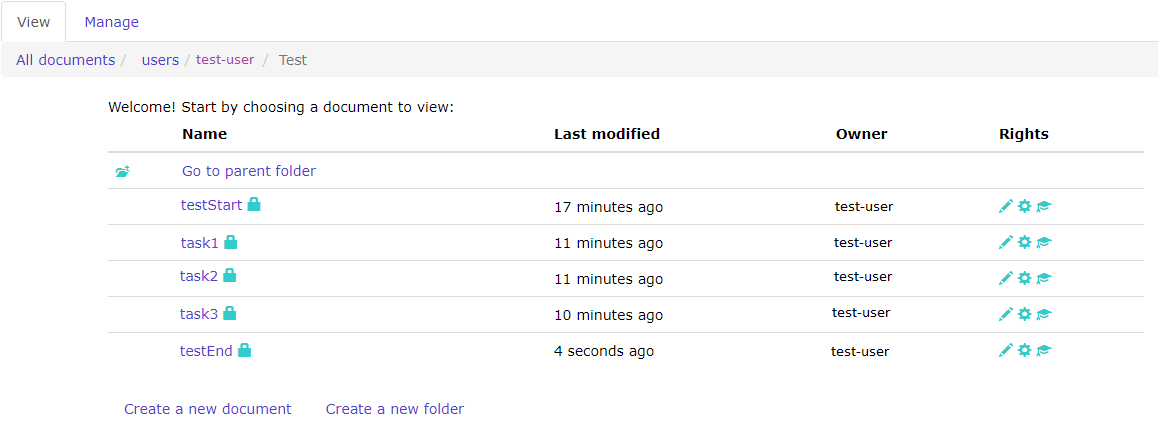
For a test, you need to create a TIM folder that contains the test documents. In practice, one task is one TIM document. Figure 2.1 shows an example of the documents of a single test folder. An example test includes three documents for tasks and a separate document for starting a test and for ending a test. The documents for starting a test and ending a test are not necessary, but a test must contain at least one task document. The document for the start of the test can be a normal TIM document containing a link to the first task. The end of the test document can be normal TIM document containing text.
2.1 Copying an Existing Test Folder
If you would like to use a whole previously created test as a starting point for a new test, then the easiest way is to copy the whole folder along with all the settings.
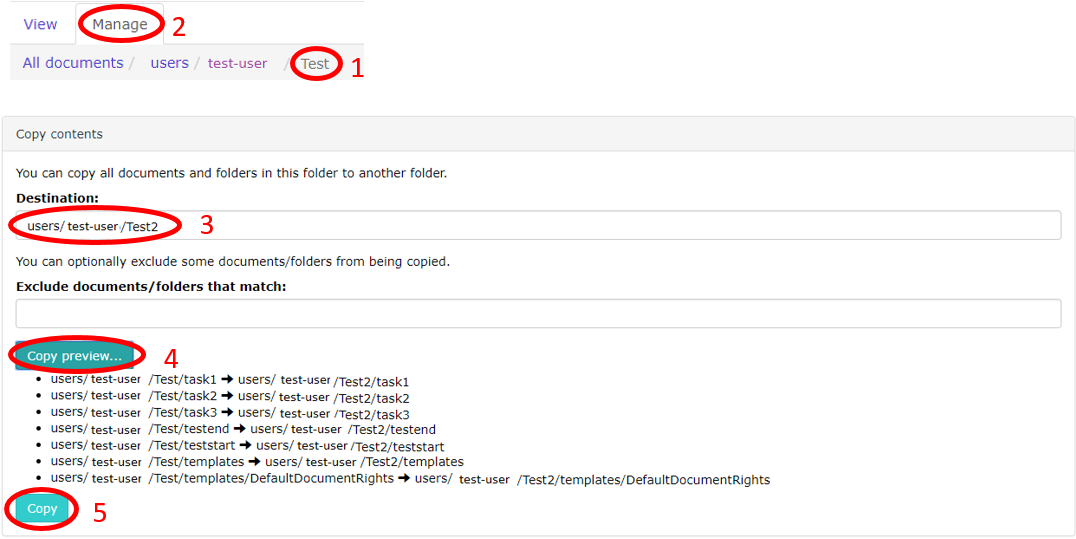
Follow the steps described below to copy an existing test folder. The numbers of the steps correspond to the numbers in Figure 2.2.
- Go to the folder you want to copy.
- Open Manage tab to manage folder.
- Scroll to the Copy contents section and define in the field Destination where the folder is copied.
- Click Copy preview to see all the documents you are about to copy.
- Click Copy to complete the copying process.
2.2 Creating a Test folder from Scratch
The following subsections introduce the process of creation of a test folder from scratch.
2.2.1 Creating an Empty Folder
Follow the steps described below to create an empty folder. The numbers of the steps correspond to the numbers in Figure 2.3.
- Select the folder where the test folder will be created.
- Open the View tab to set view.
- Click Create a new folder to open the menu for creating a new folder.
- Enter a descriptive name for the folder in the Title text field. The Location text field defines the location of the folder that you are about to create. The default location is the current folder.
- Click the Create button to create the folder.

2.2.2 Granting View Rights to Logged-in Users
The view rights to logged-in users should be granted because without the view rights, only the owner of the document can execute the test. The steps described in the section should be carried out after the creation of an empty test folder.
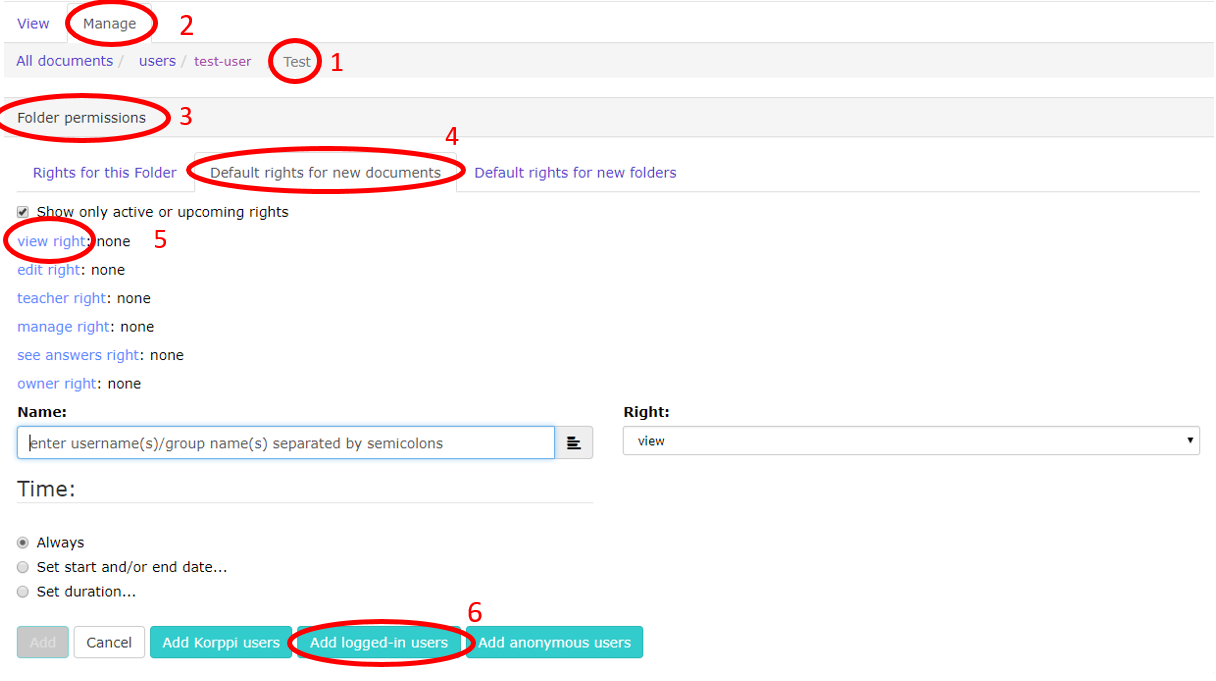
Follow the steps described below to grant the view rights for logged-in users. The numbers of the steps correspond to the numbers in Figure 2.4.
- Go to the folder for which you want to define the rights.
- Click the Manage tab to manage folder.
- Go to the Folder permissions section of the page.
- Click Default rights for new documents to open menu for rights.
- Click view right to open options for defining the view rights.
- Click Add logged-in users to give the view rights to all logged-in users for all new documents to be created in the current folder.
2.2.3 Creating a Document
All the documents in the test folder are created in the same way. Creation of the documents should be done after the rights have been defined.
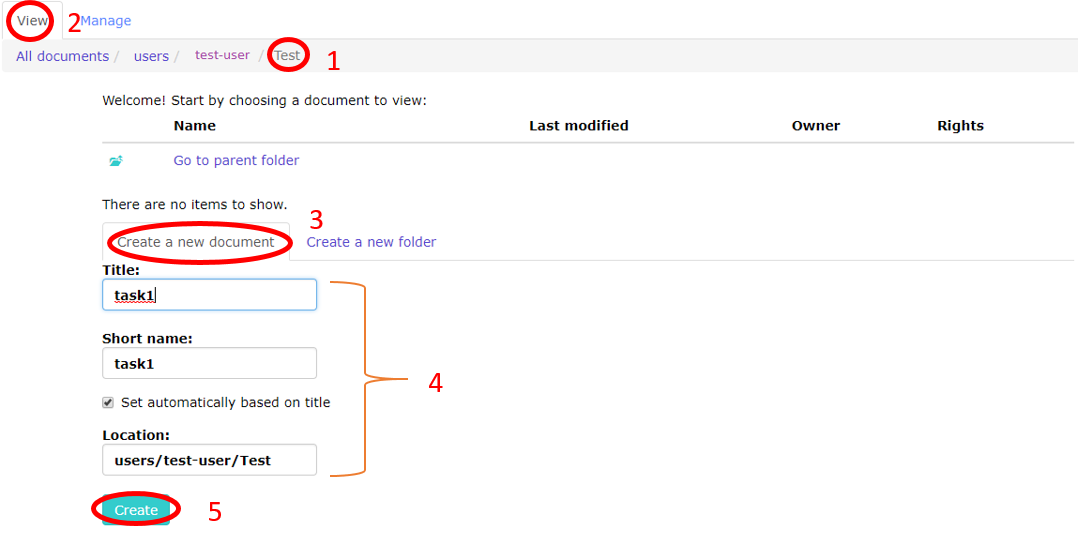
Follow the steps described below to create a TIM document. The numbers of the steps correspond to the numbers in Figure 2.5.
- Select the folder where you want to create the document.
- Choose correct tab by clicking View.
- Click Create new document to open the menu for creating a document.
- Enter a name for the document in Title text field. The Location text field defines the location of the document that you are about to create. The default location is the current folder.
- Click the Create button to create your document.
2.2.4 Setting the Test View for the Test Documents
The test view for a test taker is different from the view of the test creator. The section describes how to set the test view for the test documents. The documents with the view rights should be created before this.
View for the start and the end documents
Follow the steps described below to set a test view for the start and the end documents of the test. The numbers of the steps correspond to the numbers in Figure 2.6. Do this both for the start and end documents.
Select a blank start/end document from the test folder to edit.
Open the View tab to set view.
Click gear icon to open settings.
Click Edit settings to edit setting of the document.
Enter the following text to the text field to set the test view for document:
``` {settings=""}
hide_links: view

css: |!!
.readline {
    display: none;
}

.headerlink {
    display: none;
}

.note {
    display: none;
}

.note-badge {
    display: none;
}

.glyphicon-align-left {
    display: none;
}

.glyphicon-ok {
    display: none;
}
!!
```
Click Save to save Your editing.

Setting the Test View for Task Documents
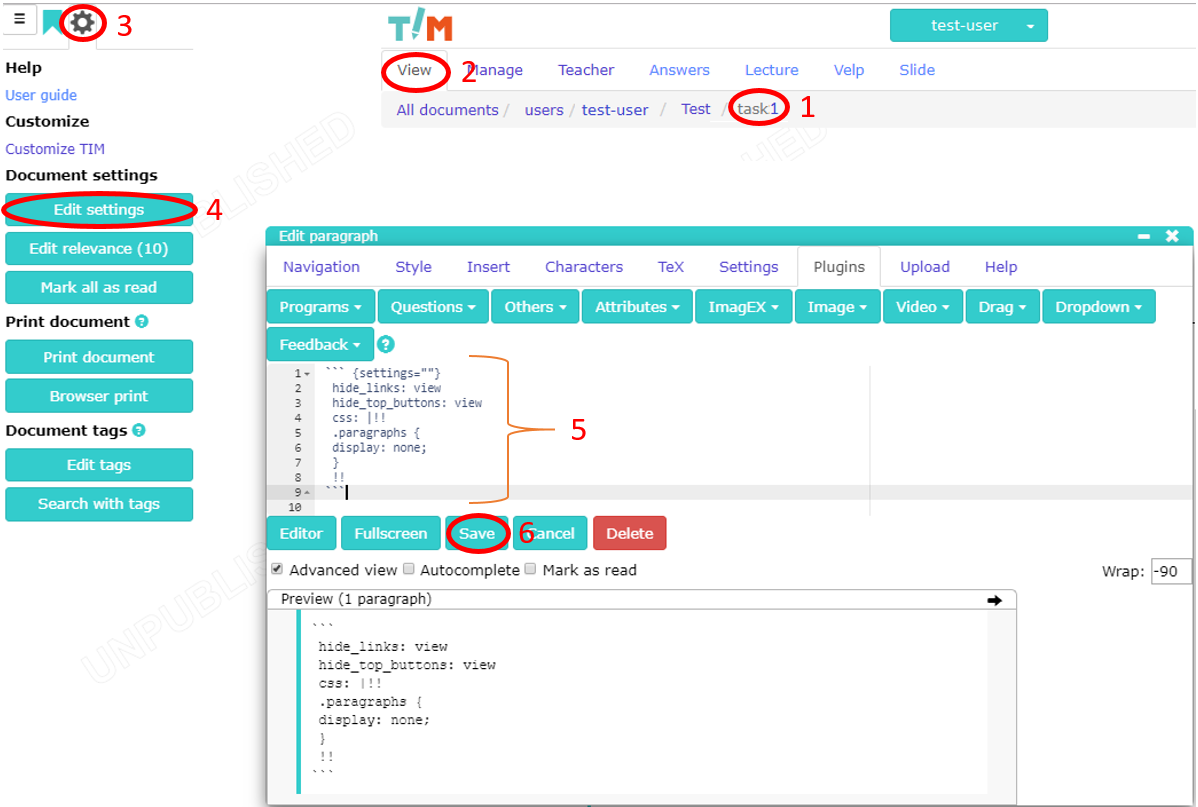
Follow the steps described below to set the test view for a task document. The numbers of the steps correspond to the numbers in Figure 2.7. Do this for all task documents of the test.
Select a blank task document from the test folder to edit the view.
Open the View tab to set view.
Click gear icon to open settings.
Click Edit settings to edit setting of the document.
Enter the following text to the text field to set the test view for document:
``` {settings=""}
 hide_links: view
 hide_top_buttons: view
 css: |!!
 .paragraphs {
 display: none;
 }
 !!
 ```
Click Save to save Your editing.
3. Creating a Task Using Templates
A single TIM document contains a single task. Figure 3.1 shows the structure of an individual task document. The first block of the document should be an instruction block followed by question item blocks. There must be at least one question item block. The feedback block should be the last block of the document. The easiest way to create a task is to use existing templates. If you want to edit an existing task, see Chapter 4.
3.1 Creating a Whole Task Using a Template
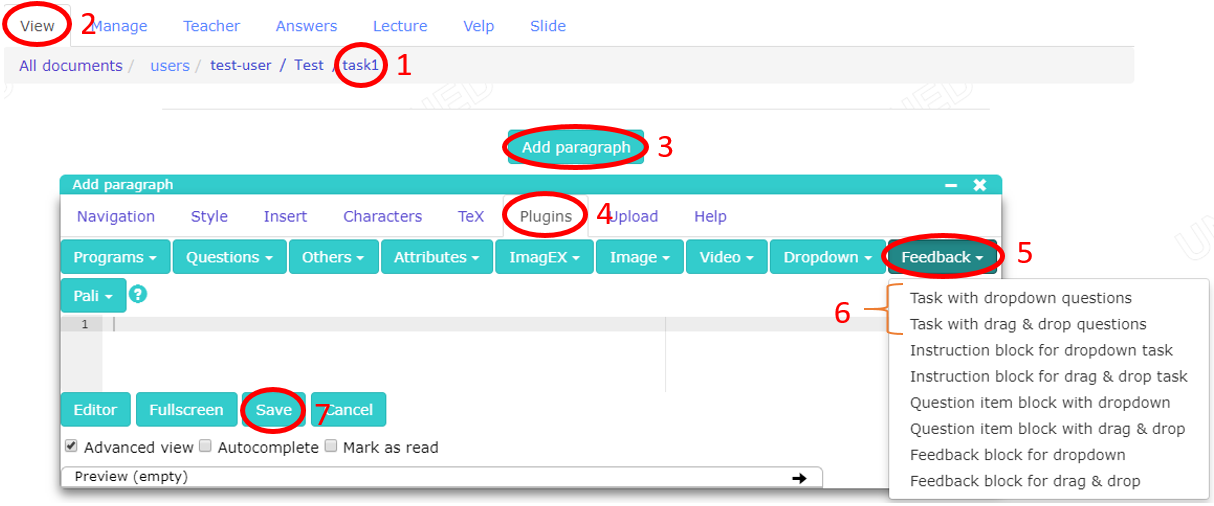
The easiest way to create a task is to create one using an existing template and modifying it. Follow the steps described below to create a TIM task using a template. The numbers of the steps correspond to the numbers in Figure 3.2.
- Select a blank document from a test folder to create a task.
- Open the View tab to set view.
- Click Add paragraph to open the window for adding a paragraph.
- Click Plugins to open the plugins tab.
- Click Feedback to select your template.
- Click Task with dropdown questions if the task should contain dropdown question items OR
click Task with drag & drop questions if the task should contain drag & drop question items. - Click Save to save your editing.
To edit the TIM block see Chapter 4.1 and Chapter 4.2.
To edit the markdown of the instruction block see Chapter 4.3.
To edit the markdown of the question item block see Chapter 4.4.
To edit the markdown of the question item block see Chapter 4.5.
3.2 Creating a Task from Scratch Using Templates
A task can be created from scratch using the templates for instruction block, question item block, and feedback block. Creation of a single block from a template is described in the chapter. If a task is created from scratch the last thing to do after creation of the blocks is to define the area of the task described in Chapter 3.2.4.
3.2.1 Creating Instruction Block Using Templates
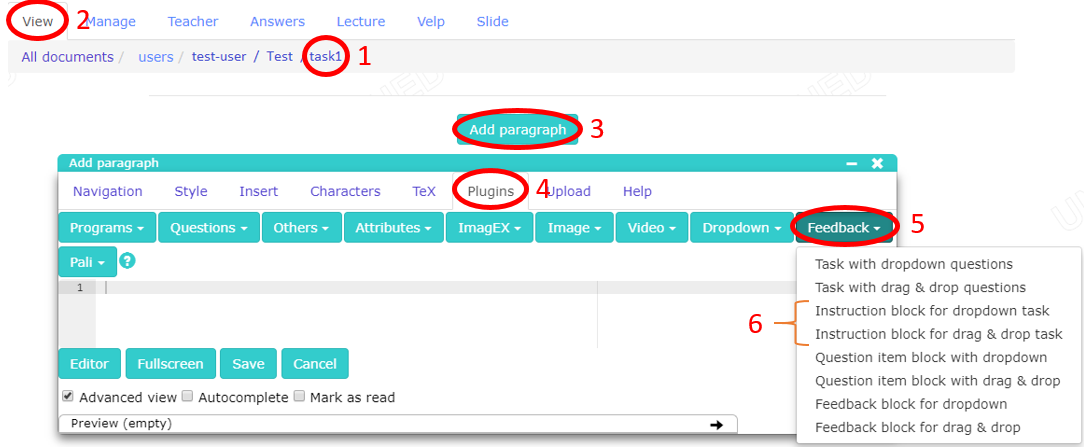
This template provides a general model content which is edited into the task. Follow the steps described below to create the instruction block. The numbers of the steps correspond to the numbers in Figure 3.3.
- Select a blank task document from the test folder to create a task.
- Open the View tab to set view.
- Click Add paragraph to open the window for adding a paragraph.
- Click Plugins to open the plugins tab.
- Click Feedback to choose the templates.
- Click Instruction block for dropdown task if the task should contain dropdown question items OR
click Instruction block for drag & drop task if the task should contain drag & drop question items.
To edit the TIM block see Chapter 4.1 and Chapter 4.2.
To edit the markdown of the instruction block see Chapter 4.3.
For a dropdown question, the following markdown template is created:
## Instruction header {.instruction defaultplugin="dropdown"}

Here you can write your general instructions for the test. Pictures can also be inserted. The
"Instruction header" can also be changed, but **do not** change the `.instructions` in the
brackets.

Next comes a practice question. It can be edited or deleted.

I {#practice words: ["will think", "won't think", "might think"]} before answering.
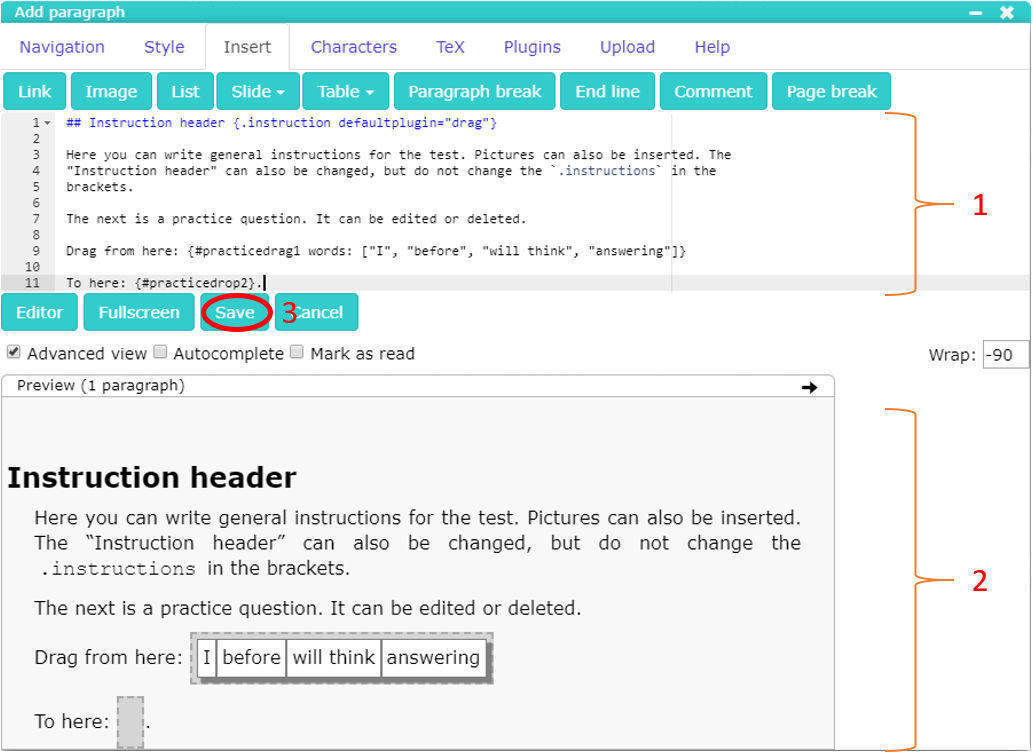
For a drag & drop question, the following markdown template is created:
## Instruction header {.instruction defaultplugin="drag"}

Here you can write your general instructions for the test. Pictures can also be inserted. The
"Instruction header" can also be changed, but **do not** change the `.instructions` in the
brackets.

Next comes a practice question. It can be edited or deleted.

Drag from here: {#practicedrag1 words: ["I", "before", "will think", "answering"]}

To here: {#practicedrop2}.
3.2.2 Creating a Question Item Block Using a Template
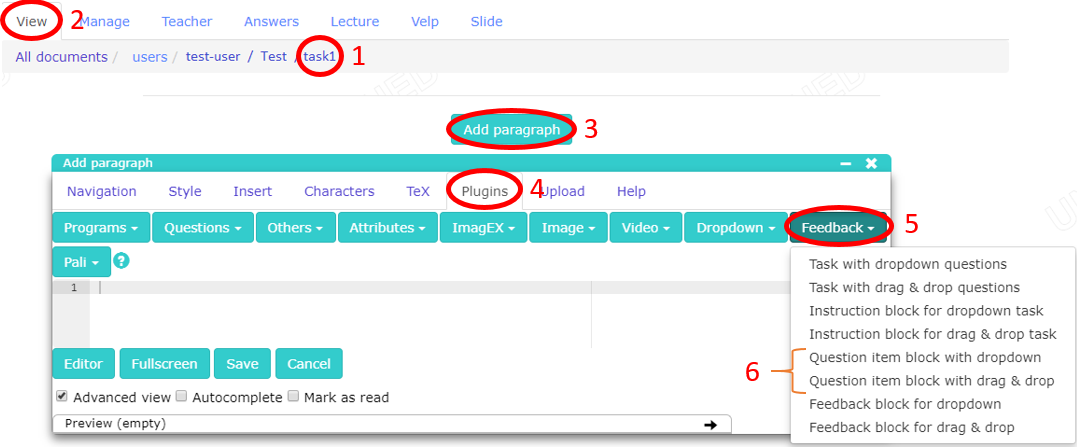
Follow the steps described below to create a question item block using a template. The numbers of the steps correspond to the numbers in Figure 3.4.
- Select a document containing the instruction block to create a question item.
- Choose the correct tab by clicking View.
- Click Add paragraph to the window for adding a paragraph.
- Click Plugins to open the plugins tab.
- Click Feedback to choose the templates.
- Click the Question item block with dropdown to create a dropdown question item block OR
click the Question item block with drag & drop to create a drag & drop question item block.
To edit the TIM block see Chapter 4.1 and Chapter 4.2.
To edit the markdown of the question item block see Chapter 4.4.
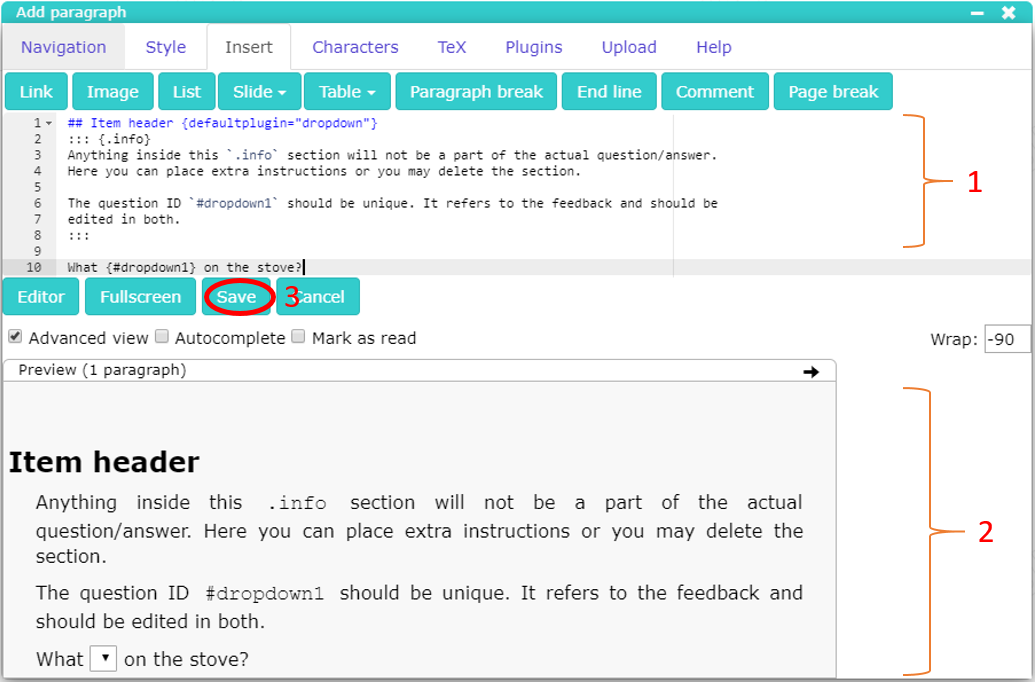
In case of dropdown question item the following template is created:
## Item header {defaultplugin="dropdown"}
::: {.info}
Anything inside this `.info` section starting with `::: {.info}` and ending with `:::`
will not be  a part of the actual question/answer. Here you can place extra instructions
or you may delete the section.

The question ID `#dropdown1` should be unique to the task. It refers to the feedback and
should be edited in both the question item and feedback plugins.
:::

What {#dropdown1 shuffle: true} on the stove?
For a drag & drop question item, the following template is created:
## Item header {defaultplugin="drag"}
::: {.info}
Anything inside this `.info` section starting with `::: {.info}` and ending with `:::`
will not be  a part of the actual question/answer. Here you can place extra instructions
and the draggable words in "drag1".

{#drag1 shuffle: true , words: ["I", "when", "around", "come"]}

The question ID `#drop1` should be unique to the task. It refers to the feedback and
should be edited in both the question item and feedback plugins.
:::

You know where I'll be found {#drop1}.
3.2.3 Creating a Feedback Block Using a Template
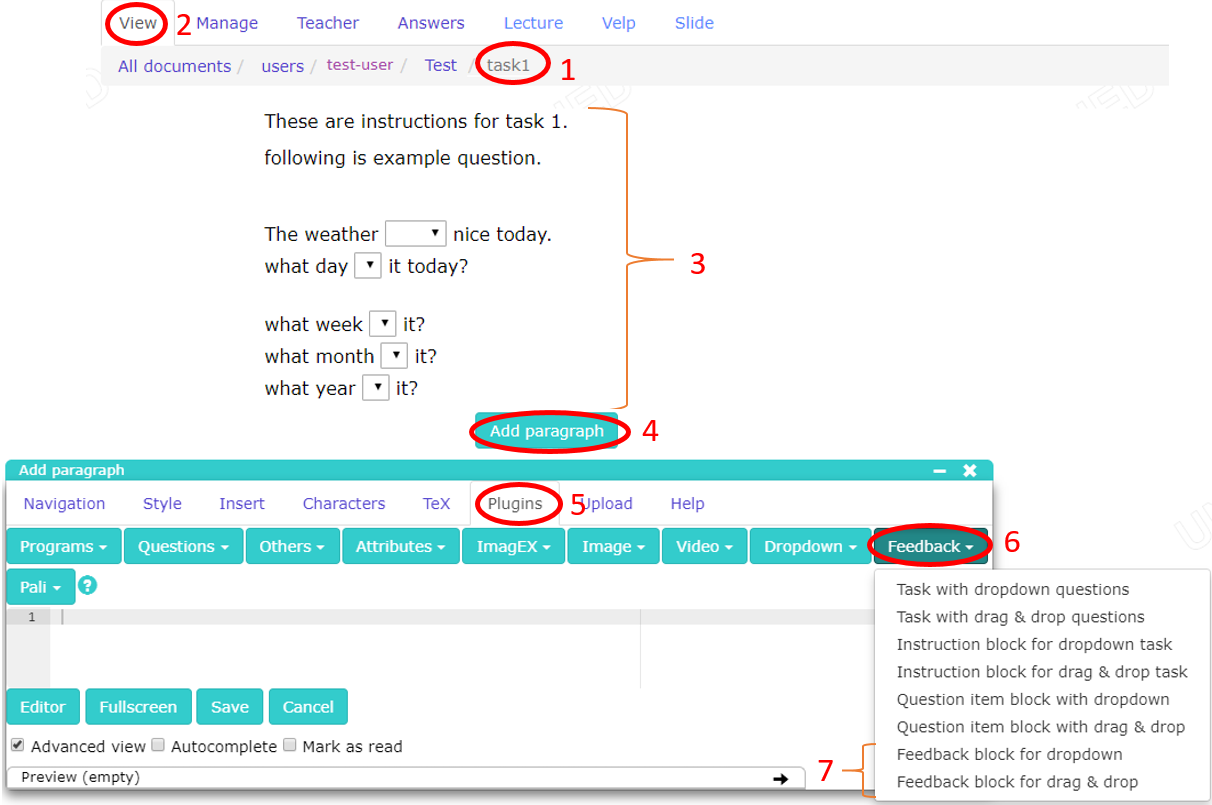
Follow the steps described below to create a feedback block using template. The numbers of the steps correspond to the numbers in Figure 3.5.
- Select a document containing both an instruction block and at least one question item block to create a feedback block.
- Open the View tab to set view.
- The instruction block and the question item blocks must be defined before creating a feedback block. If you have not defined them, see Chapters 3.2.1 and 3.2.2.
- Click Add paragraph to open the window for adding paragraph.
- Click Plugins to open the plugins tab.
- Click Feedback to choose the templates.
- Click Feedback block for dropdown to create a feedback block for the dropdown tasks OR
click Feedback block for drag & drop to create a feedback block for the drag & drop tasks.
To edit the TIM block see Chapter 4.1 and Chapter 4.2.
To edit the markdown of the feedback block see Chapter 4.5.
For the dropdown feedback the following template is created:
``` {#fb1 plugin="feedback"}
# Quick reference for feedback options:
#  correctsInRow: number of correct answers in a row to advance to next task.
#  nextTask: the address of next task in the TIM file system.
#  shuffle: (true or false) whether question items are given in random order.
#  questionItems: contains the question items and the feedback for them.
#  - pluginNames: names of the target question item plugins.
#    words: list of words to be set as choices to the plugin(s) in pluginNames.
#    choices: defines the possible match choices and the feedback for each.
#     - match: defines a choice to match to trigger the defined feedback.
#       correct: true, indicates that the choice is the correct answer.
#       levels: defines the feedback levels for the matching choice.
#
# Using & + word (example: &match1) after "levels:" you can create a reference.
# You can later refer to the defined reference levels with * + word (*match1).
#
correctsInRow: 2
nextTask: "[Click here](next_task_document_name) to move to the next task."
shuffle: true
questionItems:
- pluginNames: ["dropdown1"]
  words: [["is cooking", "do cooking", "are cooking"]]
  choices:
    - match: ["is cooking"]
      correct: true
      levels: &rightmatch
        - "**Correct!** You answered: *|correct|*."
    - match: ["do cooking"]
      levels: &match1
        - "You can write the level 1 feedback for the match choice here."
        - "You can write the level 2 feedback for the match choice here."
        - "You can write the level 3 feedback for the match choice here."
        - "You can write the level 4 feedback for the match choice here."
    - match: ["are cooking"]
      levels: &match2
        - "Level 1: |answer| is a placeholder for the given answer."
        - "Level 2: |part[0]| refers to the 1st part of the answer."
        - "Level 3: |match[0]| is a placeholder for the current match choice."
        - "Level 4: |correct| is a placeholder for the correct answer."
    - match: []  # Empty brackets for default feedback.
      levels: &defaultmatch
        - "*Level 1 default feedback* in italics with *"
        - "**Level 2 default feedback** in bold with **."
        - "<u>Level 3 default feedback</u> now underlined."
        - "[Level 4 default feedback]{.red} now in red color."
- pluginNames: ["dropdown2"]
  words: [["is baking", "do baking", "are baking"]]
  choices:
    - match: ["is baking"]
      correct: true
      levels: *rightmatch
    - match: ["do baking"]
      levels: *match1
    - match: ["are baking"]
      levels: *match2
    - match: []
      levels: *defaultmatch
- pluginNames: ["dropdown3"]
  words: [["is jumping", "do jumping", "are jumping"]]
  choices:
    - match: ["is jumping"]
      correct: true
      levels: *rightmatch
    - match: ["do jumping"]
      levels: *match1
    - match: ["are jumping"]
      levels: *match2
    - match: []
      levels: *defaultmatch
- pluginNames: ["dropdown4"]
  words: [["is swimming", "do swimming", "are swimming"]]
  choices:
    - match: ["is swimming"]
      correct: true
      levels: *rightmatch
    - match: ["do swimming"]
      levels: *match1
    - match: ["are swimming"]
      levels: *match2
    - match: []
      levels: *defaultmatch

```
In case of drag & drop feedback the following template is created:
``` {#fb1 plugin="feedback"}
# Quick reference for feedback options:
#  correctsInRow: number of correct answers in a row to advance to next task.
#  nextTask: the address of next task in the TIM file system.
#  shuffle: (true or false) whether question items are given in random order.
#  questionItems: contains the question items and the feedback for them.
#  - pluginNames: names of the target question item plugins.
#    dragSource: drag1, used only for case with one repeating question.
#    words: [] for drag and drop questions.
#    choices: defines the possible match choices and the feedback for each.
#     - match: defines a choice to match to trigger the defined feedback.
#       correct: true, indicates that the choice is the correct answer.
#       levels: defines the feedback levels for the matching choice.
#
# Using & + word (example: &match1) after "levels:" you can create a reference.
# You can later refer to the defined reference levels with * + word (*match1).
#
correctsInRow: 2
nextTask: "[Click here](next_task_document_name) to move to the next task."
shuffle: true
questionItems:
- pluginNames: ["drop1"]
  words: []
  choices:
    - match: ["when I come around"]
      correct: true
      levels: &rightmatch
        - "**Correct!** You answered: *|correct|*."
    - match: ["when around I come"]
      levels: &match1
        - "You can write the level 1 feedback for the match choice here."
        - "You can write the level 2 feedback for the match choice here."
        - "You can write the level 3 feedback for the match choice here."
        - "You can write the level 4 feedback for the match choice here."
    - match: ["when come I around"]
      levels: &match2
        - "Level 1: |answer| is a placeholder for the given answer."
        - "Level 2: |part[0]| refers to the 1st part of the answer."
        - "Level 3: |match[0]| is a placeholder for the current match choice."
        - "Level 4: |correct| is a placeholder for the correct answer."
    - match: [] # Empty brackets for default feedback.
      levels: &defaultmatch
        - "*Level 1 default feedback* in italics with *"
        - "**Level 2 default feedback** in bold with **."
        - "<u>Level 3 default feedback</u> now underlined."
        - "[Level 4 default feedback]{.red} now in red color."
- pluginNames: ["drop2"]
  words: []
  choices:
    - match: ["if I run a mile"]
      correct: true
      levels: *rightmatch
    - match: ["if a mile I run"]
      levels: *match1
    - match: ["if run I a mile"]
      levels: *match2
    - match: []
      levels: *defaultmatch
- pluginNames: ["drop3"]
  words: []
  choices:
    - match: ["who I see at work"]
      correct: true
      levels: *rightmatch
    - match: ["who at work I see"]
      levels: *match1
    - match: ["who see I at work"]
      levels: *match2
    - match: []
      levels: *defaultmatch
- pluginNames: ["drop4"]
  words: []
  choices:
    - match: ["whether I had a computer"]
      correct: true
      levels: *rightmatch
    - match: ["whether a computer I had"]
      levels: *match1
    - match: ["whether had I a computer"]
      levels: *match2
    - match: []
      levels: *defaultmatch

```3.2.4 Creating Area for a Task
The area of the task is defined last, after all the blocks are defined.
Follow the steps described below to define the area for a task. The numbers of the steps correspond to the numbers in Figure 3.6.
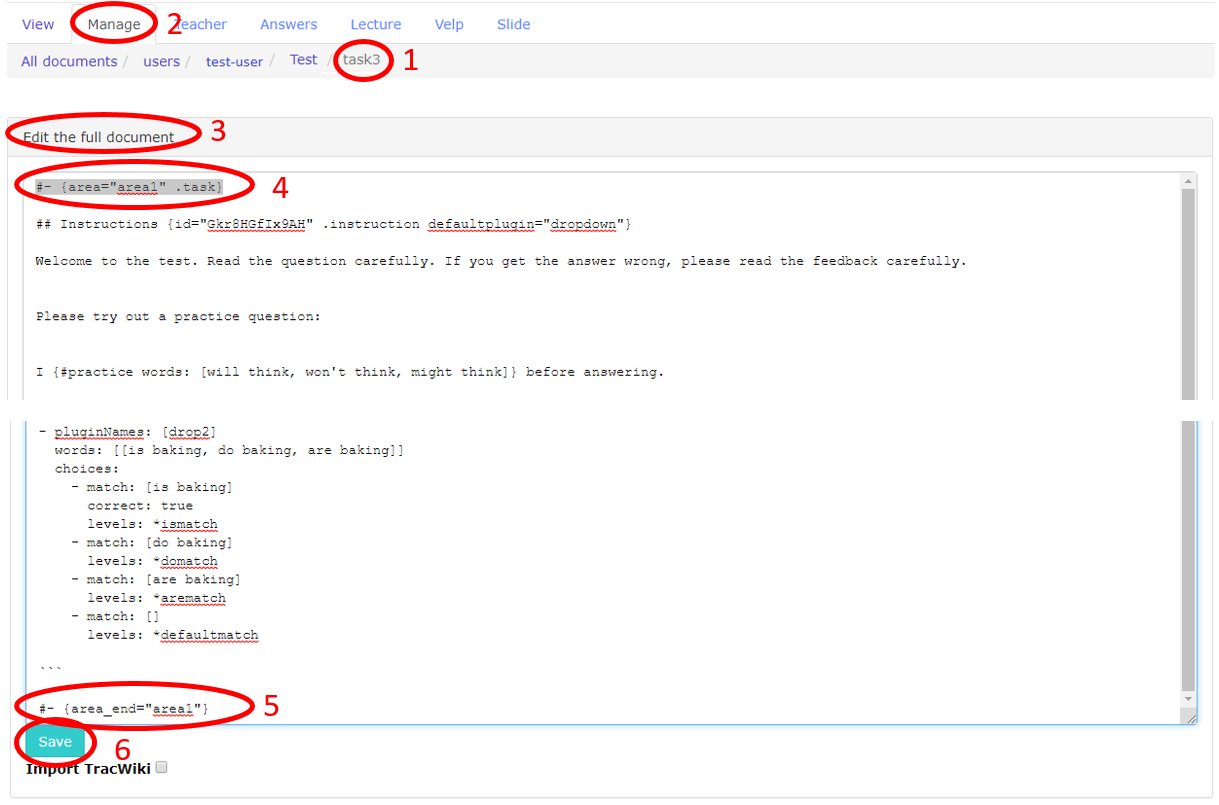
- Select a document containing the task.
- Open Manage tab to manage the document.
- Go to section Edit the full document.
- Add
#- {area="area1" .task}to the first line of the document to define the start of the area. - Add
#- {area_end="area1"}to the last line of the document to define the end of the area. - Click save to save Your editings.
4. Editing Markdown
Chapter describes how to edit an existing task and the TIM blocks.
4.1 Revealing Question Item Blocks of the Task
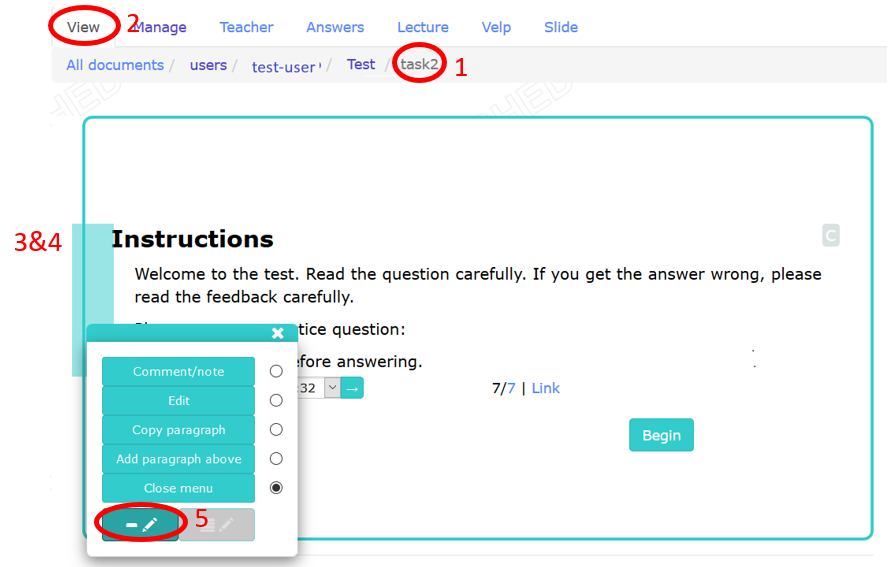
A task containing a feedback block automatically hides existing question items. Follow the steps described below to reveal question item blocks. The numbers of the steps correspond to the numbers in Figure 4.1.
- Select a document containing the existing task.
- Open the View tab to set view.
- Move the cursor to the left edge of the block you want to edit, and a blue rectangle will appear.
- Click on the blue rectangle to open the menu.
- Click the Toggle paragraph edit mode button to reveal the hidden question item blocks.
4.2 Editing a TIM block
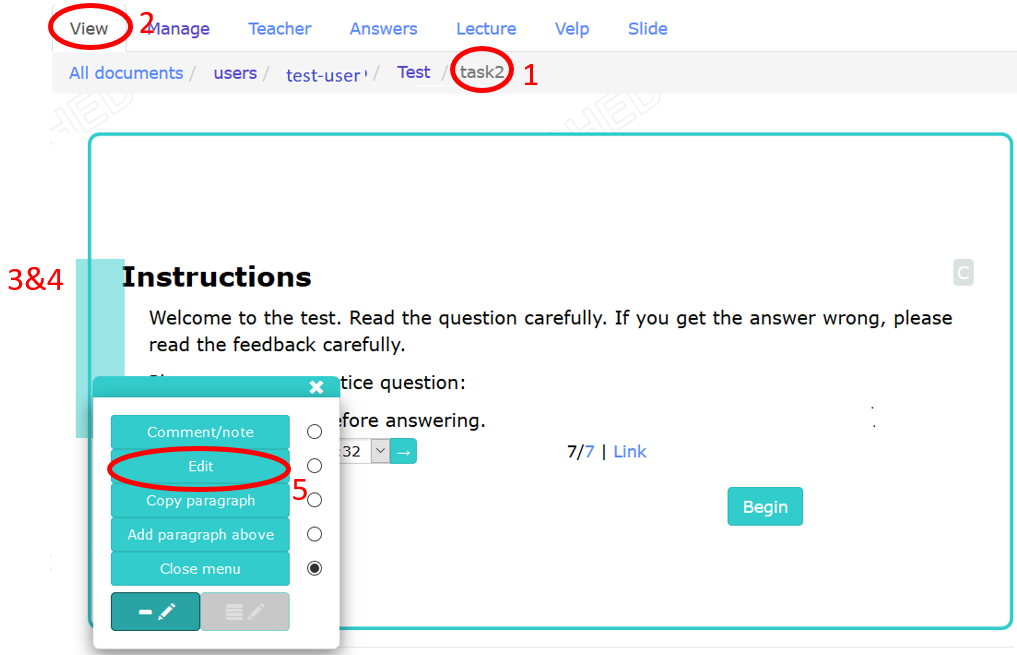
Follow the steps described below to edit a TIM block. The numbers of the steps correspond to the numbers in Figure 4.2.
- Select a document containing the existing task.
- Open the View tab to set view.
- Move the cursor to the left edge of the block you want to edit, and a blue rectangle will appear.
- Click on the blue rectangle to open the menu.
- Click Edit to edit the block.
4.3 Editing Instruction Block Content
The instruction block is the first block of a task. An instruction block consists of task-specific instructions and an optional task-specific practice question. The answer to the practice question given by a test learner is not saved to the database.
4.3.1 Instruction Block for Dropdown Task
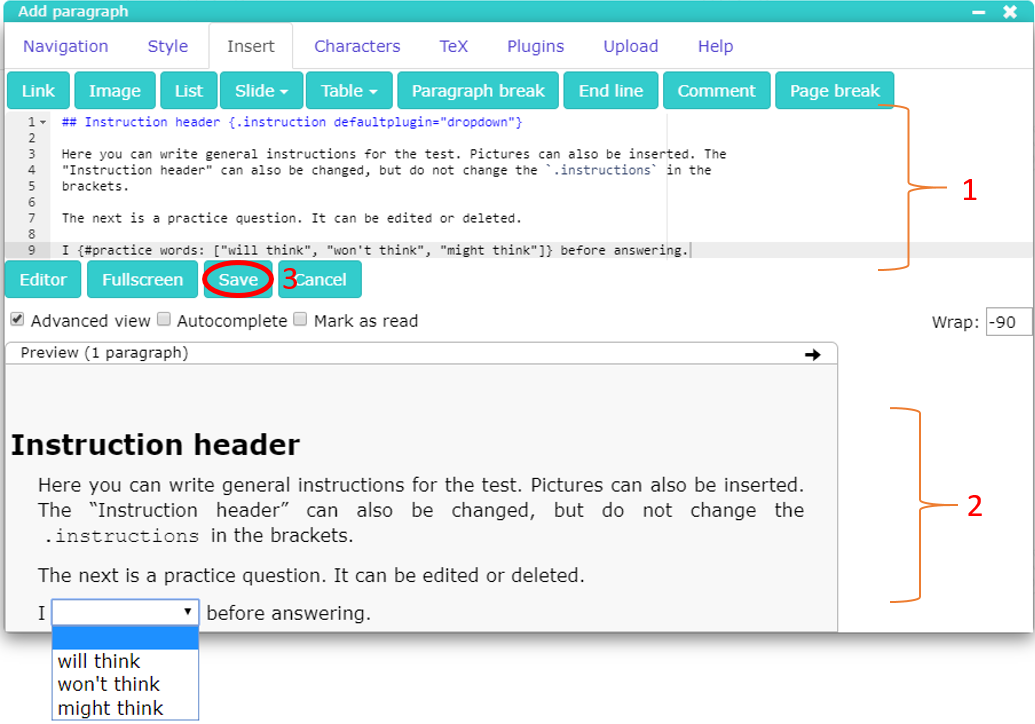
Follow the steps described below to edit markdown of the instruction block for a dropdown task. The numbers of the steps correspond to the numbers in Figure 4.3.
Define a content for the instruction block.
The following header line defines the used default plugin, and it is required for the instruction block as the first line. It is possible to replace the header wordInstructions headerwith another word or it can be erased.
## Instructions header {.instruction defaultplugin="dropdown"}
After the header line, it is possible to write any amount of text as well as insert images and tables.
The following line defines an optional sample question for the instruction block. If the dropdown sample question is used, the words of the dropdown menu are defined inside the brackets separated by comma:
I {#practice words: ["will think", "won't think", "might think"]} before answering.
If the sample question is not used, just erase the line above.Check the preview of the paragraph before saving.
Click Save to save Your editing.
4.3.2 Instruction Block for Radio Button Task
A dropdown question item is converted to radio button question item by adding text radio: true to the inline plugin.
Example:
{#practice words: ["will think", "won't think", "might think"] radio: true}
4.3.3 Instruction Block for Drag & Drop Task
Follow the steps described below to edit markdown of the instruction block for a drag & drop task. The numbers of the steps correspond to the numbers in Figure 4.4.
Define a content for the instruction block.
The following header line defines the used default plugin and it is required for the instruction block as the first line. It is possible to replace the header wordInstructions headerwith another word or it can be erased.
## Instructions header {.instruction defaultplugin="drag"}
After the header line, it is possible to write any amount of text as well as insert images and tables.
The following line defines an optional practice question for the instruction block. If a drag & drop practice question is used the draggable words are defined inside brackets separated by comma:
Drag from here: {#practicedrag1 words: ["I", "before", "will think", "answering"]}
The following line creates a drag area without words.
To here: {#practicedrop2}.
If the sample question is not used just erase the lines above.Check the preview of the paragraph before saving.
Click Save to save Your editing.
4.4 Editing Question Item Block
Question item blocks are created after the instruction block. A task document must contain at least one question item block.
The question item block markdown consists of a mandatory plugin definition and a mandatory in-line plugin with an unique ID.
4.4.1 Dropdown Question Item
Follow the steps described below to define the markdown of a dropdown block. The numbers of the steps correspond to the numbers in Figure 4.5.
- Define the content for the dropdown question item.
The following header line is required for the first line of the question item block. It is possible to replace the header wordsItem headerwith another word or it can be erased.
## Item header {defaultplugin="dropdown"}
A text written inside the marks:::and identified with{.info}is not included in the answer. Any extra instructions or introductory paragraphs should be inside such marks.
::: {.info}
Text not related to the answer
:::
The following line defines the question for the question item block. Worddropdown1inside brackets is the unique ID of the plugin. Every plugin has to have a unique ID. The easiest way to ensure the ID is unique, is to raise the number by one each time a plugin is created. A question item block must have at least one plugin defined. In case of a template for whole task all the ID:s have been set initially correctly.
What {#dropdown1 shuffle: true} on the stove?
Words are shuffled every time question item is loaded ifshuffle: trueand iffalsewords are not shuffled.
- Check the preview of the block before saving the block.
- Click Save to save Your editing.
4.4.2 Radio Button Question Item
A dropdown question item is converted to the radio button question item by adding text radio: true to the inline plugin.
Example:
{#dropdown1 radio: true}
4.4.3 Drag & Drop Question Item
Follow the steps described below to define the markdown of drag & drop block. The numbers of the steps correspond to the numbering in Figure 4.6.
Define a content for the drag & drop question item.
The following header line defines the used default plugin, and it is required for the question item block as the first line. It is possible to replace the header wordItem headerwith another word or it can be erased.
## Item header {defaultplugin="drag"}
A text written inside the marks:::and identified with{.info}will not appear in the parsed answer to the questions. Any extra instructions or introductory paragraphs should be inside such marks.
::: {.info}
Text not related to the answer
:::
The following line defines the words used in a drag & drop question item and whether words are shuffled when question item is loaded:
{#drag1 shuffle: true , words: ["I", "when", "around", "come"]}
Words are shuffled every time question item is loaded if shuffle: true and if false words are not shuffled. The draggable words are defined inside the brackets separated by comma. The worddrag1inside the brackets is the unique ID of the plugin. Every plugin in task has to have a unique ID. The easiest way to ensure the ID is unique, is to raise the number by one each time a plugin is created. A question item block must have at least one plugin defined. In case of a template for whole task all the ID:s have been set initially correctly.
The following line defines the answer area of a drag & drop question item:
You know where I'll be found {#drop1}.
The worddrop1inside the brackets is the unique ID of the plugin. Every plugin has to have a unique ID. The easiest way to ensure the ID is unique, is to raise the number by one each time a plugin is created. A question item block must have at least one plugin defined. In case of a template for whole task all the ID:s have been set initially correctly.
More drag & drop options can be found in the User Manual for Drag Plugin[1].Check the preview of the block before saving the block.
Click Save to save Your editing.

4.5 Editing a Feedback Block
Each task contains only one feedback block. The feedback block is the last block of the task document and it is created after the instruction and question item blocks. The feedback block defines rules for the task, sets words for the question item plugins and defines the feedback to be given for the answer choices.
4.5.1 Defining the Markdown for a Feedback Block
The question items in the feedback block must be defined in the same order as they are created in the document. Definition of the items below is required at the beginning of the feedback block markdown.
Markdown used in Figure 4.7 is defined in the following list:
correctsInRow defines how many correct answers in a row are needed to advance to the next task. The input must be a positive integer. In Figure 4.7, the learner advances to the next task if they answers correct two times in row.
nextTask defines the address of the next task in the TIM file system. The address is defined between quotation marks ("") as a TIM link where the text inside the brackets is the text of the link and the text inside parenthesis is the address of the next task. If the text between the quotation marks is other than link, the text is just shown after the task is completed. In Figure 4.7, the feedback block shows the link named
task2after task1 is completed. The link leads to the TIM documenttask2.shuffle defines whether the question items are put in a random order during the task. The options are
trueorfalse. The default value istrue.questionItems contains the question items and the feedback for them. It must contain at least one question item. The markdown of the question item is defined in Chapter 4.5.2.
Example 1:
``` {#fb1 plugin="feedback"}
correctsInRow: 3
nextTask: "[task2](task2)"
shuffle: true
questionItems:
At the end of task, the following text is shown: task2 where task2 is the link to task2 document. The test will end if the learner answers correctly three times in row. The question items of the task are presented to the learner in a random order.
Example 2:
``` {#fb1 plugin="feedback"}
correctsInRow: 2
nextTask: "[Click here](task2)"
shuffle: true
questionItems:
At the end of task, the following text is shown: Click here where Click here is the link to task2 document. The test will end if the learner answers correctly two times in row. The question items of the task are presented to the learner in a random order.
Example 3:
``` {#fb1 plugin="feedback"}
correctsInRow: 3
nextTask: "To advance task 3 [Click here](task3)"
shuffle: false
questionItems:
At the end of task, the following text is shown: To advance task 3 Click here where Click here is the link to task3 document. The test will end if the learner answers correctly three times in row. The question items of the task are presented to the learner in the order defined in the feedback.
Example 4:
``` {#fb1 plugin="feedback"}
correctsInRow: 1
nextTask: "Test ended. Thank you for participating."
shuffle: false
questionItems:
At the end of task, the following text is shown: Test ended. Thank you for participating. The test will end after one correct answer. The question items of the task are presented to the learner in the order defined in the feedback.
4.5.2 Defining Markdown for Question Item
The items below should be defined for the markdown of the question item (questionItems:).
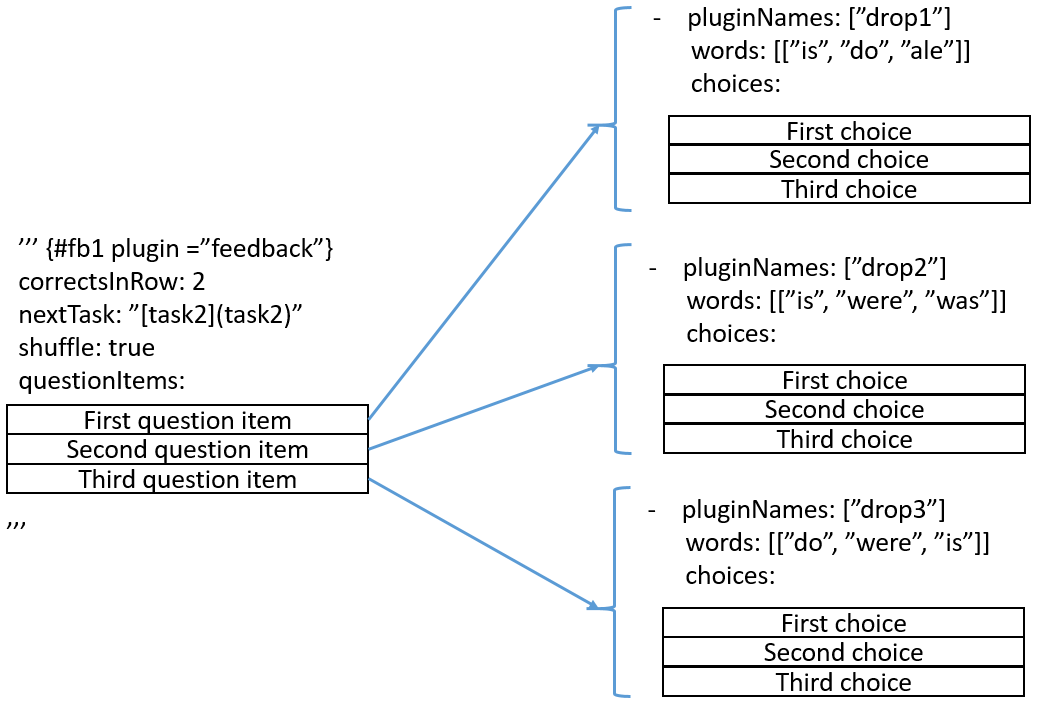
The question item markdown used in Figure 4.8 is defined in the following list:
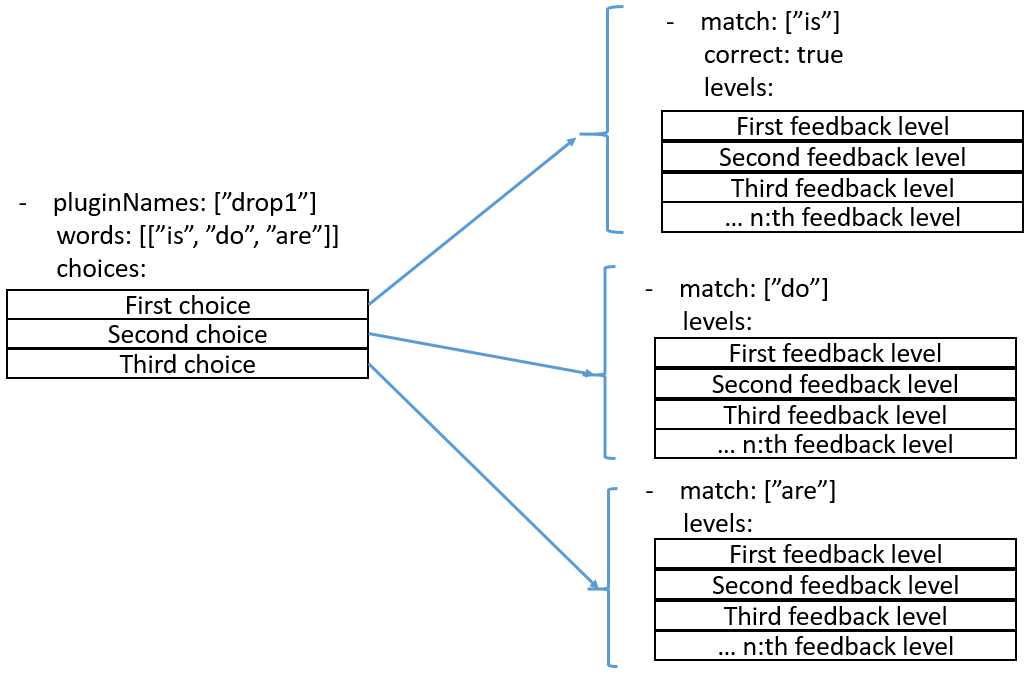
- pluginNames are the names of the target question item plugins used in a single question item block. They must be defined.
PluginNamesare defined inside brackets for example[drop1]. - words is a list of words to be set as choices to the plugin(s) defined in
pluginNames.
- choices defines the possible match choices and the feedback for each when chosen by the learner. It must contain at least one choice.
Example 1:
- pluginNames: ["drop1"]
  words: [["is", "do", "are"]]
  choices:
The words is, do, and are are set to plugin drop1.
Example 2:
- pluginNames: ["drop2", "drop3"]
  words: [["is", "do", "are"], ["today", "yesterday"]]
  choices:
The words is, do, and are are set to plugin named drop2 and the words today and yesterday, to the plugin named drop3.
Example 3:
- pluginNames: ["drag4"]
  words: []
  choices:
No words are set for the plugin named drag4. In case of drag & drop question items, no words are set for the answer plugin.
4.5.3 Defining Markdown for a Choice
The items below should be defined for the markdown of the answer choices (choices:).
Markdown of Choice used in Figure 4.9 is defined in the following list:
- match defines a choice or a combination of choices which trigger a defined feedback. The words must be inside brackets, for example
[is]. If the brackets are empty i.e.[], it means the default answer. In case of a drag & drop answer, the whole answer must be written. - correct defines the correct choice. If it is not defined, the default value is
false. The options aretrueorfalse. - levels defines the feedback for different feedback levels. It must contain at least one feedback level.
Example 1:
- match: ["is"]
      correct: true
      levels:
If the answer option is is chosen, correct: true indicates that the answer is the correct one.
Example 2:
- match: ["What today is day"]
      levels:
If What today is day is answered, the markdown indicates that the answer is wrong.
Example 3:
- match: []
      levels:
Empty brackets are default match and any answer will match with it. Default match should always be the last defined match. Default match is required with drag & drop question items.
4.5.4 Defining Markdown for Levels
The levels are marked after a hyphen (-) inside apostrophes (""). It is possible to use styles with feedback levels to enhance words with different kind of effects. Referring to an answer, match and correct answer can be used with placeholders. It is also possible to refer to a content of a level.
Example from feedback with plain text:
- "This is an example of a levels markdown."The following feedback is shown:
This is an example of a levels markdown.
Example for referring levels:
- match: ["are"]
      levels: &match1
          - "This is false"
          - "This is still false"
          - "Don`t you learn?"
- match: ["do"]
      levels: *match1
By using &[word] (for example &match1) after levels:, you can create a reference. You can later refer to the defined reference with *[word] (for example *match1). In the example, the match to do has the same levels as the match to are.
Examples from using styles:
Styles can be found under the Style tab of the Edit paragraph window. In many cases, it is possible to use shortcut keys to create style for example CTRL + B for bold.
Example 1:
- "*One star* around word means italic."The following feedback is shown:
One star around word means italic.
Example 2:
- "**Two stars** around word means bold."The following feedback is shown:
Two stars around word means bold.
Example 3:
- "<u>Underline tags</u> around word means the text is underlined."The following feedback is shown:
Underline tags around word means the text is underlined.
Example 4:
- "[Brackets]{.green} around word and {.wanted colour} paints word with the colour."The colours that can be used include black, gray, white, red, green, yellow, and blue. The following feedback is shown:
Brackets around word and {.wanted colour} paints word with the colour.
Examples from using placeholders:
Used placeholders are following:
- |answer| tag is replaced by the learners answer.
- |answer[x]| tag is replaced by word x of the learner answer, where x is integer. The numbering starts from 0. So
|answer[0]|is the first word of the answer and|answer[1]|is the second word and so on. - |answer[x-y]| tag is replaced by the words x to y of learner answer, where x and y are integers and y is greater than x. The numbering starts from 0. So
|answer[0-1]|are the first two words of the answer and|answer[1-5]|are words two to six of the answer. - |correct| tag is replaced by the correct answer.
- |match[z]| tag is replaced by the whole match of the plugin, where z is the number of the plugin defined in
pluginNames. The numbering starts from 0. So|match[0]|is the first plugin match and|match[1]|is the second plugin match and so on. - |match[z:x]| tag is replaced by the word x of the match of plugin z, where x and z are integers. The numbering starts from 0. So
|match[0:1]|is replaced by the second word of the match of the first plugin and|match[1:2]|is replaced by the third word of the match of the second plugin and so on. - |match[z:x-y]| tag is replaced by the words x to y of the match of plugin z, where x and z are integers. The numbering starts from 0. So
|match[0:1-2]|is replaced by the second and the third words of the match of the first plugin and|match[1:2-3]|is replaced by the third word and fourth word of the match of the second plugin, and so on. - |part[x]| tag is replaced by part x of the learner answer, where x is integer. The numbering starts from 0. Parts are divided by plugin and plugin counts as one part. So
|part[0]|is the first part of the answer and|part[1]|is the second part of the answer and so on. In case of dropdown plugin each word or set of words separeted by comma is a separate part.
Example 1:
- "Correct! You answered: **|answer|**"If the answer is what day is it?, the following feedback is shown:
Correct! You answered: what day is it?
Example 2:
- "Wrong. Think about word **|answer[1]|**"If the answer is what day is it?, the following feedback is shown:
Wrong. Think about word day
Example 3:
- "Wrong. Think about words **|answer[1-2]|**"If the answer is what day is it?, the following feedback is shown:
Wrong. Think about words day is
Example 4:
- "You answered wrong. Correct answer would be: **|correct|**"If the question is what day {#drop1} it?, and the correct choice in the feedback is defined as is , the feedback is following:
Correct answer would be: what day is it?
Example 5:
- match: ["is"]
      levels:
          - "Pay attention to word **|match[0]|**"
The feedback of the example is the following:
Pay attention to word is
Example 6:
- match: ["is", "today"]
      levels:
          - "Pay attention to word **|match[1]|**"
The feedback of the example is the following:
Pay attention to word today
Example 7:
- match: ["what day is it"]
      levels:
          - "Did You mean words **|match[0:1]|**"?
The feedback of the example is the following:
Did you mean words day?
Example 8:
- match: ["what day is it", "what year is it"]
      levels:
          - "Did You mean words **|match[1:1]|**"?
The feedback of the example is the following:
Did you mean words year?
Example 9:
- match: ["what day is it", "what year is it"]
      levels:
          - "Did You mean words **|match[0:1-2]|**"?
The feedback of the example is the following:
Did you mean words day is?
Example 10:
- match: ["what day is it", "what year is it"]
      levels:
          - "Did You mean words **|match[1:1-3]|**"?
The feedback of the example is the following:
Did you mean words year is it?
Example 11:
- "First part is **|part[0]|**, second part **|part[1]|** and third part is **|part[2]|**"If the question is what day {#drop1} it yesterday?, and the selected choice is was , the feedback is the following:
First part is what day, second part is was and third part is it yesterday?
Example 12:
- "First part is **|part[0]|**, second part **|part[1]|** and third part is **|part[2]|**"If the draggable words in the answer area are in the following order "what day", "is", "it today?", the feedback is following:
First part is what day, second part is is and third part is it today?
4.5.5 Copy and Paste Markdown of a Feedback Block
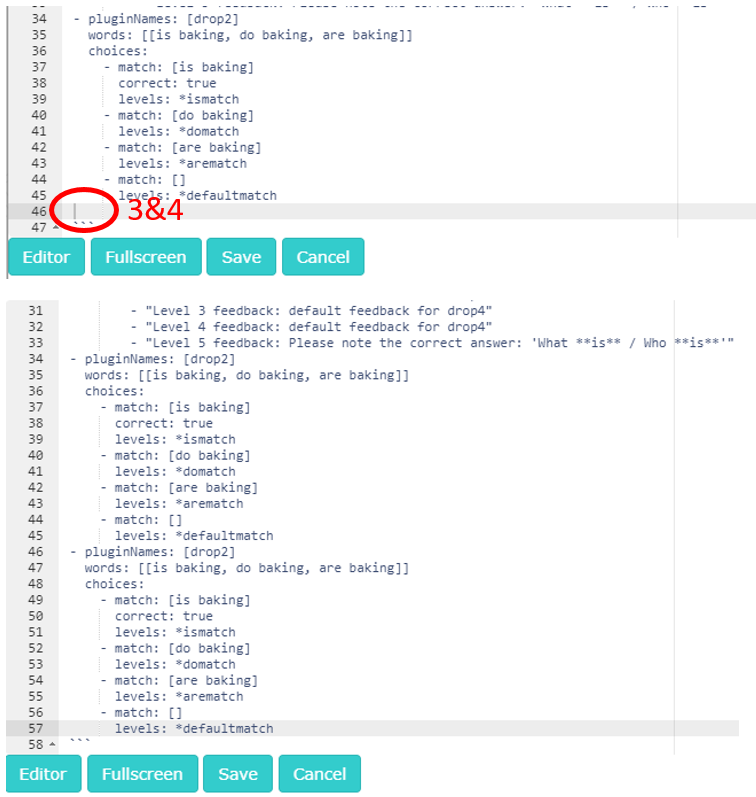
The easiest way to create a feedback block for a task is to modify an existing one. To create a question item or a choice, you may copy and paste one as shown in Figures 4.10 and 4.11.
- Select the lines to be copied by holding down the left mouse button from the start to the end of the area to be copied.
- Press Ctrl + C or the right mouse button on the painted area and select Copy.
- Set the cursor to the place you are about to paste. Make sure that it aligns to the other question items or in case of a choice with the other choices.
- Press Ctrl + V or the right mouse button on the place you are about paste to and select Paste from the menu.
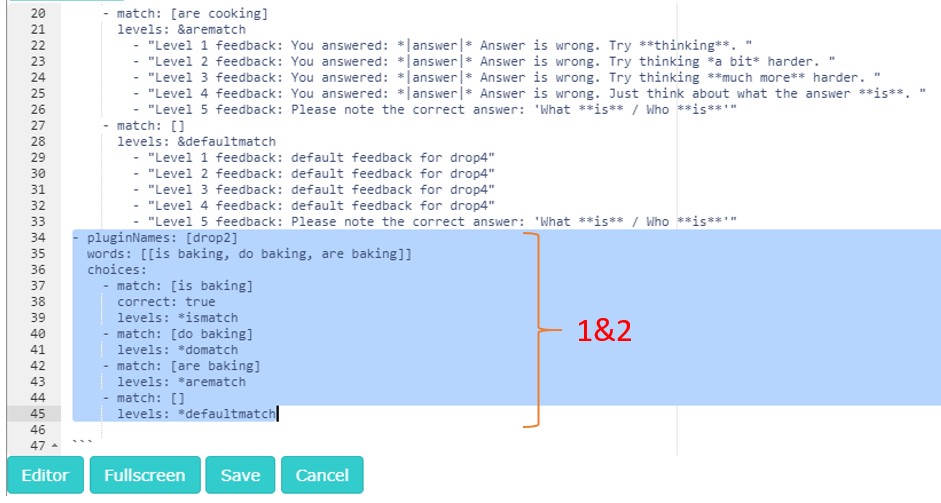
When modifying a markdown for a feedback block, repeated markdowns should always be on the same tabulation level. So make sure the markdown intervals on the left side remain constant as below.
-level 1
   -level 2
   -level 2
-level 1
   -level 2
      -level 3
   -level 2
5. Creating a Report
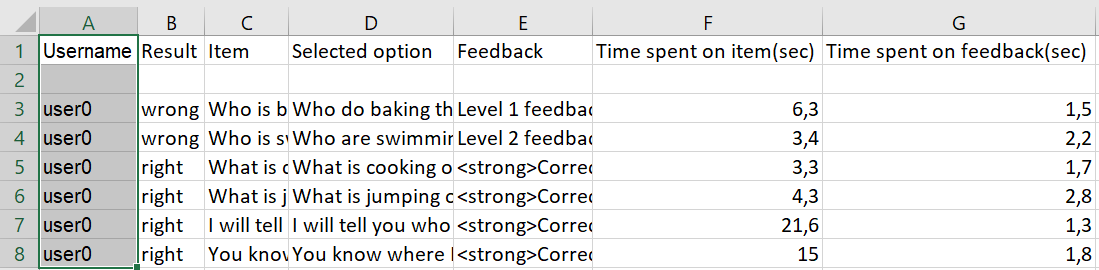
After one or more learners have answered to the test, it is possible to get a report of the answers in the CSV format. The CSV file can then be imported into Excel or other spreadsheet program for further analysis.
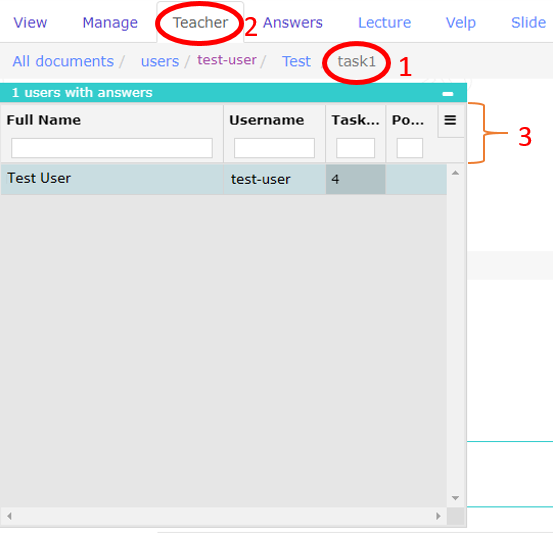
Follow the steps described below to create a report. The numbers of the steps correspond to the numbers in Figures 5.1, 5.2 and 5.3.
- Go to a document containing one of the tasks.
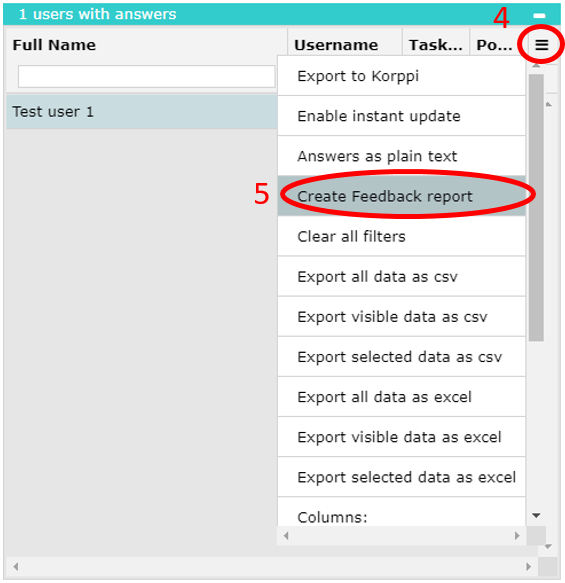
- Open the Teacher tab by clicking it. The # users with answers dialog will pop up. If it is not expanded, click the icon in the right corner.
- You can a search for particular participant by Full Name or Username.
- Click menu button to open menu for exporting report.
- Click Create Feedback report to open the feedback report menu dialog.
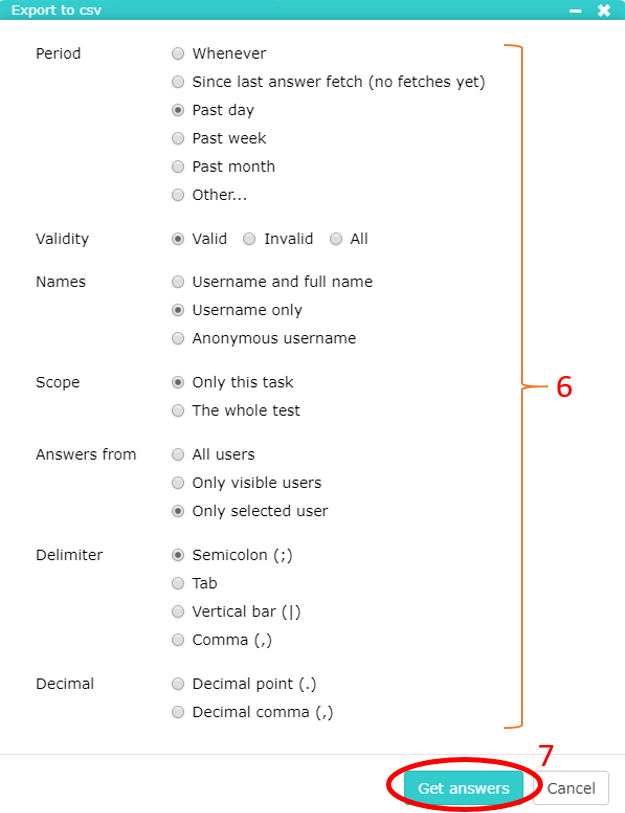
- Select the desired options for the report.
- Click Get answers to create the CSV format report.
- The report will be opened up in another tab of the browser. It can then be copied as text or saved as a file to be imported into the desired spreadsheet program.

6. Examples
The chapter contains two examples of tasks.
6.1 Dropdown task
#- { area="dropdowntask1" .task}
## Instruction header {.instruction defaultplugin="dropdown"}
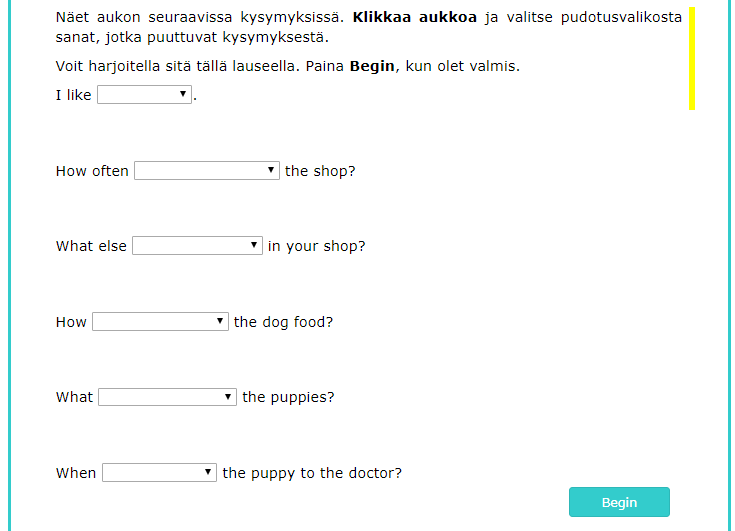
Näet aukon seuraavissa kysymyksissä. **Klikkaa aukkoa** ja valitse
pudotusvalikosta sanat, jotka puuttuvat kysymyksestä.
Voit harjoitella sitä tällä lauseella. Paina **Begin**, kun olet valmis.
I like {#practice words: ["icecream", "to swim", "do math"]}.
## {defaultplugin="dropdown"}
::: {.info}
:::
How often {#dropdown1 shuffle: true} the shop?
## {defaultplugin="dropdown"}
::: {.info}
:::
What else {#dropdown2 shuffle: true} in your shop?
## {defaultplugin="dropdown"}
::: {.info}
:::
How {#dropdown3 shuffle: true} the dog food?
## {defaultplugin="dropdown"}
::: {.info}
:::
What {#dropdown4 shuffle: true} the puppies?
## {defaultplugin="dropdown"}
::: {.info}
:::
When {#dropdown5 shuffle: true} the puppy to the doctor?
``` {#fb1 plugin="feedback"}
# Quick reference for feedback options:
# correctsInRow: number of correct answers in a row to advance to the next task.
# nextTask: the address of next task in the TIM file system.
# shuffle: (true or false) whether question items are given in a random order.
# questionItems: contains the question items and the feedback for them.
# - pluginNames: names of the target question item plugins.
# words: list of words to be set as choices to the plugin(s) in pluginNames.
# choices: defines the possible match choices and the feedback for each.
# - match: defines a choice to match to trigger the defined feedback.
# correct: true, indicates that the choice is the correct answer.
# levels: defines the feedback levels for the matching choice.
#
# Using & + word (example: &match1) after "levels:" you can create a reference.
# You can later refer to the defined reference levels with * + word (*match1).
#
correctsInRow: 2
nextTask: "[Click here](next_task_document_name) to move to the next task."
shuffle: true
questionItems:
- pluginNames: ["dropdown1"]
words: [["do you clean", "do you're clean", "you are clean", "are you clean", "you clean"]]
choices:
- match: ["do you clean"]
correct: true
levels: &rightmatch
- "Oikein"
- match: ["do you're clean"]
levels: &match1
- "|answer|\n\n
mieti tarkemmin"
- "|part[0]| |match[0:0]| **|match[0:1]|** |match[0:2]| |part[2]|\n\n
Katso näitä sanoja kysymyksessäsi."
- "|part[0]| |match[0:0]| **|match[0:1]|** |match[0:2]| |part[2]|\n\n
Käytit oikeaa apusanaa, mutta vielä on yksi ongelma. Emme puhu jostain,
joka tapahtuu nyt."
- "|answer| \n\n
Ei ihan. Katso näitä esimerkkejä:\n\n
What **do** you mean?\n\n
When **do** you get up?\n\n
What **do** you want?"
- "|answer|
\n\n
Valitettavasti kysymyksesi on väärin. Sinun pitäisi käyttää **do**
verbiä **|match[0:1]|** sanaa ennen ja **|match[0:2]|** ei tarvita.
Oikea kysymys on: |correct|"
- match: ["you are clean"]
levels: &match2
- "|answer|\n\n
mieti tarkemmin"
- "|part[0]| |match[0:0]| **|match[0:1]|** **|match[0:2]|**..? katso
tätä osaa lauseesta"
- "|part[0]| |match[0:0]| **|match[0:1]|** |match[0:2]| |part[2]|\n\n
Onko mielestäsi **|match[0:1]|** oikea sana tässä? Emme puhu jostain,
joka tapahtuu nyt.\n\n
-Mitä apusanaa käytämme tällaisissa kysymyksissä?\n\n
-Mihin apusana tuleelauseessa?"
- "|part[0]| |match[0:0]| **|match[0:1]|** |match[0:2]| |part[2]|\n\n
Ei ihan. Katso näitä esimerkkejä:\n\n
What **do** you mean?\n\n
When **do** you get up?\n\n
What **do** you want?"
- "|answer|\n\n
Valitettavasti kysymyksesi on väärin. Sinun pitäisi käyttää **do**
verbiä **|match[0:1]|** sanaa ennen ja **|match[0:2]|** ei tarvita.
Oikea kysymys on: |correct|"
- match: ["are you clean"]
levels: &match3
- "|answer| Mieti tarkemmin."
- "|part[0]| **|match[0:0]|** |match[0:1]| **|match[0:2]|** |part[2]|\n\n
Katso näitä osia lauseessasi."
- "|part[0]| **|match[0:0]|** |match[0:1]| |match[0:2]| |part[2]|\n\n
**|part[0]|**…Sinun pitäisi käyttää toista apusanaa tässä.\n\n
-Mieti, se ei tapahdu nyt."
- "|answer| Ei ihan, katso näitä esimerkkejä:\n\n
What **do** you mean?\n\n
When **do** you get up?\n\n
What **do** you want?"
- "|answer|\n\n
Sinun piti käyttää **do** verbiä **|match[0:0]|** verbin sijaan. Harmi,
oikea vastaus on: |correct|"
- match: ["you clean"]
levels: &match4
- "|answer|\n\n
mieti tarkemmin."
- "**|part[0]|** **|match[0:0]|** **|match[0:1]|** |part[2]|\n\n
Jotain puuttuu lauseestasi."
- "**|part[0]|** **|match[0:0]|** **|match[0:1]|** |part[2]|\n\n
Mieti, mitä apusanaa käytämme tällaisissa kysymyksissä? Mihin se
sijoitetaan lauseessa?"
- "|answer|\n\n
Ei ihan, katso näitä esimerkkejä:\n\n
What **do** you mean?\n\n
When **do** you get up?\n\n
What **do** you want?"
- "**|part[0]|** **|match[0:0]|** |match[0:1]| |part[2]|\n\n
Harmi, se oli väärin.Sinun piti käyttää **do** verbiä **|match[0:0]|**
sanan edessä. Oikea vastaus on: |correct|"
- match: [] # Empty brackets for default feedback.
levels: &defaultmatch
- "*Level 1 default feedback* in italics with *"
- "**Level 2 default feedback** in bold with **."
- "<u>Level 3 default feedback</u> now underlined."
- "[Level 4 default feedback]{.red} now in red color."
- ""
- pluginNames: ["dropdown2"]
words: [["do you sell", "you are sell", "do you're sell", "are you sell", "you sell" ]]
choices:
- match: ["do you sell"]
correct: true
levels: *rightmatch
- match: ["do you're sell"]
levels: *match1
- match: ["you are sell"]
levels: *match2
- match: ["are you sell"]
levels: *match3
- match: ["you sell"]
levels: *match4
- match: []
levels: *defaultmatch
- pluginNames: ["dropdown3"]
words: [["do I choose", "do I'm choose", "I am choose", "am I choose", "I choose"]]
choices:
- match: ["do I choose"]
correct: true
levels: *rightmatch
- match: ["do I'm choose"]
levels: *match1
- match: ["I am choose"]
levels: *match2
- match: ["am I choose"]
levels: *match3
- match: ["I choose"]
levels: *match4
- match: []
levels: *defaultmatch
- pluginNames: ["dropdown4"]
words: [["do you feed", "do you're feed", "you are feed", "are you feed", "you feed"]]
choices:
- match: ["do you feed"]
correct: true
levels: *rightmatch
- match: ["do you're feed"]
levels: *match1
- match: ["you are feed"]
levels: *match2
- match: ["are you feed"]
levels: *match3
- match: ["you feed"]
levels: *match4
- match: []
levels: *defaultmatch
- pluginNames: ["dropdown5"]
words: [["do I take", "do I'm take", "I am take", "am I take", "I take"]]
choices:
- match: ["do I take"]
correct: true
levels: *rightmatch
- match: ["do I'm take"]
levels: *match1
- match: ["I am take"]
levels: *match2
- match: ["am I take"]
levels: *match3
- match: ["I take"]
levels: *match4
- match: []
levels: *defaultmatch
```
#- {area_end="dropdowntask1"}6.2 Drag&drop task
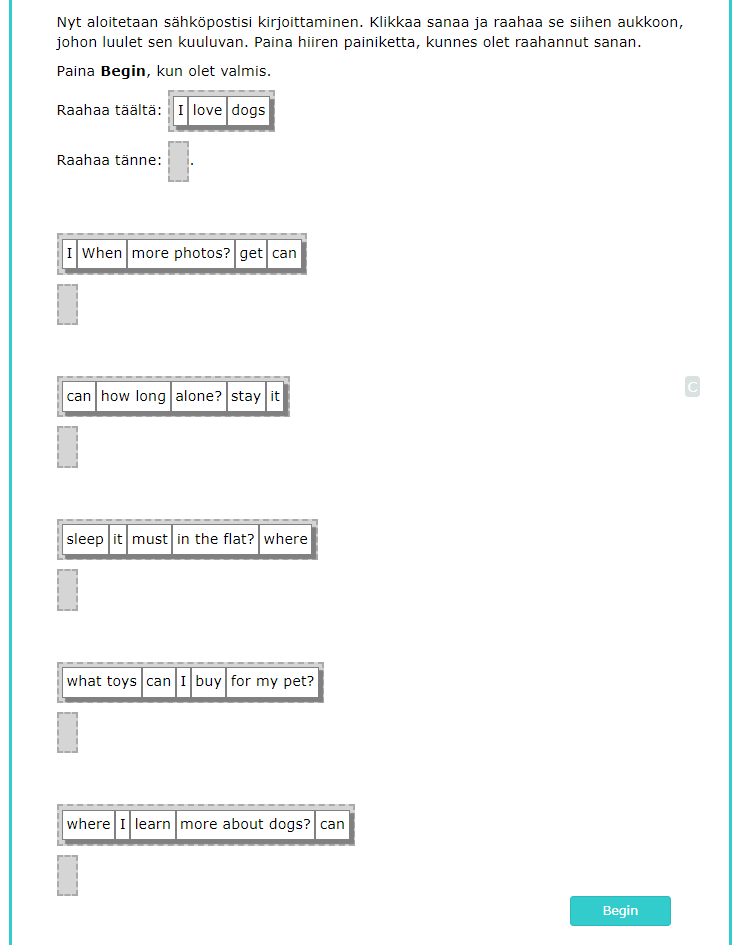
#- {area="draganddroptask1" .task}

## {.instruction defaultplugin="drag"}

Nyt aloitetaan sähköpostisi kirjoittaminen. Klikkaa sanaa ja raahaa se siihen aukkoon,
johon luulet sen kuuluvan. Paina hiiren painiketta, kunnes olet raahannut sanan.

Paina **Begin**, kun olet valmis.

Raahaa täältä: {#practicedrag1 words: ["I", "love", "dogs"]}

Raahaa tänne: {#practicedrop2}.

## {defaultplugin="drag"}
::: {.info}
{#drag1 shuffle: true, words: ["When", "can", "I", "get","more photos?"]}
:::

{#drop1}

## {defaultplugin="drag"}
::: {.info}
{#drag2 shuffle: true, words: ["how long", "can", "it", "stay", "alone?"]}
:::

{#drop2}

## {defaultplugin="drag"}
::: {.info}

{#drag3 shuffle: true, words: ["where", "must", "it", "sleep", "in the flat?"]}
:::

{#drop3}

## {defaultplugin="drag"}
::: {.info}

{#drag4 shuffle: true, words: ["what toys", "can", "I", "buy", "for my pet?"]}
:::

{#drop4}

## {defaultplugin="drag"}
::: {.info}

{#drag5 shuffle: true, words: ["where", "can", "I", "learn", "more about dogs?"]}
:::

{#drop5}

``` {#fb1 plugin="feedback"}
# Quick reference for feedback options:
#  correctsInRow: number of correct answers in a row to advance to next task.
#  nextTask: the address of next task in the TIM file system.
#  shuffle: (true or false) whether question items are given in random order.
#  questionItems: contains the question items and the feedback for them.
#  - pluginNames: names of the target question item plugins.
#    dragSource: drag1, used only for case with one repeating question.
#    words: [] for drag and drop questions.
#    choices: defines the possible match choices and the feedback for each.
#     - match: defines a choice to match to trigger the defined feedback.
#       correct: true, indicates that the choice is the correct answer.
#       levels: defines the feedback levels for the matching choice.
#
# Using & + word (example: &match1) after "levels:" you can create a reference.
# You can later refer to the defined reference levels with * + word (*match1).
#
correctsInRow: 2
nextTask: "Testi päättyi."
shuffle: true
questionItems:
- pluginNames: ["drop1"]
  words: []
  choices:
    - match: ["when can I get more photos?"]
      correct: true
      levels: &rightmatch
        - "Oikein!"
    - match: ["when I can get more photos?"]
      levels: &match1
        - "|answer|\n\n

        Voit käyttää tällaisia lauseita, kun kirjoitat ystävälle,
        mutta yritä tehdä lauseestasi virallisempi."

        - "|answer|\n\n

        **|part[0]|** **|part[1]|** **|part[2]|** **|part[3]|**
        … Lauseesi on OK, mutta on parempi, jos tekisit tämän sähköpostin
        kysymyksistä kohteliaampia, koska et kirjoita ystävällesi.
        Mieti sanajärjestystä tässä."

        - "|answer|\n\n

        |part[0]| |part[1]| **|part[2]|** |part[3]|
        ... Tämä lause on OK. Jos haluat tehdä siitä virallisemman, mieti sanan
        **|part[2]|** paikkaa lauseessa."

        - "|answer|\n\n

        Tällaiset kysymykset ovat OK, mutta harkitse virallisempaa
        tapaa kysyä kysymyksiä. Mieti sanajärjestystä.
        Katso seuraavia esimerkkejä:\n\n

            **A letter to a friend - An official letter**\n\n
            Where I could see it? - Where could I see it?\n\n
            What it could be? - What could it be?\n\n
            When he could come? - When could he come?"

        - "|answer|\n\n

            Kysymyksesi on OK. Kohteliaampi kysymys tässä olisi: |correct|"

    - match: ["when get I can more photos?"]
      levels: &match2
        - "|answer|\n\n

        Mieti tarkemmin."

        - "|answer|\n\n

        **|part[0]|** **|part[1]|** **|part[2]|** **|part[3]|**
        … Onko tämä osa mielestäsi OK?"

        - "|answer|\n\n

        Mieti **|part[1]|** ja **|part[3]|** sanojen paikkaa kysymyksessäsi."

        - "|answer|\n\n

        Kysymyksessäsi on ongelma **|part[1]|** ja **|part[3]|** sanojen
        paikoissa. Mieti sanajärjestystä. Katso seuraavia esimerkkejä:\n\n

            How **could** you do that?\n\n
            What **might** you answer him?\n\n
            Where **could** he go?"

        - "|answer|\n\n

            Harmi, sinun piti vaihtaa **|part[1]|** ja **|part[3]|**
            sanojen paikkaa. Oikea kysymys on: |correct|"

    - match: ["I can get more photos? when"]
      levels: &match3
        - "|answer|\n\n

        Mieti tarkemmin."

        - "**|part[0]|** **|part[1]|** **|part[2]|** |part[3]| **|part4|**\n\n
        Katso lauseesi korostettujen osien paikkoja.

        **|part[0]|** **|part[1]|** **|part[2]|** **|part[3]|**
        … Onko tämä osa mielestäsi OK?"

        - "|answer|\n\n

        Mieti **|part[1]|** ja **|part[4]|** sanojen paikkaa kysymyksessäsi."

        - "|answer|\n\n

        Kysymyksessäsi on ongelma **|part[1]|** ja **|part[4]|**
        sanojen paikoissa. Mieti sanajärjestystä. Katso seuraavia esimerkkejä:\n\n

            How **could** you do that?\n\n
            What **might** you answer him?\n\n
            Where **could** he go?"

        - "|answer|\n\n

            Lauseessasi oli kaksi virhettä: Kysymyssana tulee ensin,
            **|part[1]|** laitetaan **|part[0]|** sanan eteen.
            Oikea kysymys on: |correct|"

    - match: ["when can I more photos? get"]
      levels: &match4
        - "|answer|\n\n

        Mieti tarkemmin."

        - "|answer|\n\n  Yksi sana tässä lauseessa on väärässä paikassa."

        - "|answer|\n\n

        Mieti **|part[4]|** verbin paikkaa lauseessa."

        - "|answer|\n\n

        Kysymyksessäsi on ongelma **|part[4]|** sanan kanssa.
        Mieti sanajärjestystä. Katso seuraavia esimerkkejä:\n\n

            How **could** you do that?\n\n
            What **might** you answer him?\n\n
            Where **could** he go?"

        - "|answer|\n\n

            Valitettavasti kysymyksesi on väärin. **|part[4]|** tulee **|part[2]|**
            sanan jälkeen. Oikea kysymys on: |correct|"

    - match: ["can i get more photos? when"]
      levels: &match5
        - "|answer|\n\n

        Mieti tarkemmin."

        - "|answer|\n\n  Etsi kysymyssana lauseestasi. Mihin sen voisi sijoittaa?"

        - "|part[0]| |part[1]| |part[2]| |part[3]| **|part[4]|**\n\n

        Tässä on kysymyssana. Mieti sen paikkaa lauseessa."

        - "|answer|\n\n

        Kysymyksessäsi on ongelma **|part[4]|** sanan kanssa.
        Mieti sanajärjestystä. Katso seuraavia esimerkkejä:\n\n

            How **could** you do that?\n\n
            What **might** you answer him?\n\n
            Where **could** he go?"

        - "|answer|\n\n

            Harmi, kysymyssanan **|part[4]|** olisi tultava ensin.
            Oikea kysymys on: |correct|"

    - match: ["when get can I more photos?"]
      levels: &match6
        - "|answer|\n\n

        Mieti tarkemmin."

        - "**|part[0]|** **|part[1]|** **|part[2]|** **|part[3]|** |part[4]|\n\n
        Sinun pitäisi miettiä sanojen paikkoja tässä."

        - "|part[0]| **|part[1]** |part[2-3]|
        …mihin se voisi sijoittua lauseessa?"

        - "|answer|\n\n

        Kysymyksessäsi on ongelma **|part[1]|** sanan kanssa.
        Mieti sanajärjestystä. Katso seuraavia esimerkkejä:\n\n

            How **could** you do that?\n\n
            What **might** you answer him?\n\n
            Where **could** he go?"

        - "|answer|\n\n

            Harmi, sinun piti sijoittaa **|part[1]** **|part[3]**
            sanan jälkeen lauseessa. Oikea lause on: |correct|"

    - match: [] # Empty brackets for default feedback.
      levels: &defaultmatch
        - "|answer|\n\n

        Mieti tarkemmin."

        - "**|answer|** Katso kirjoittamaasi lausetta tarkkaan.
        Oletko varma, että kaikki lauseen osaset ovat oikeilla paikoillaan?"

        - "|answer| \n\n

        Sinun kysymyksessäsi on ongelmia sanajärjestyksen kanssa.
        Pystytkö löytämään lauseestasi kysymyssanan (esim. **mikä**)?
        Pystytkö löytämään lauseesta verbit (esim. **mennä** tai **voida**)?
        Mieti niiden paikkaan lauseessasi."

        - "|answer|\n\n

        Ei ihan. Mieti sanajärjestystä. Katso näitä esimerkkejä:\n\n

            How **could** you do that?\n\n
            What **might** you answer him?\n\n
            Where **could** he go?"

        - "|answer|\n\n

            Harmi, lauseesi on väärin. Oikea kysymys on: |correct|"
- pluginNames: ["drop2"]
  words: []
  choices:
    - match: ["how long can it stay alone?"]
      correct: true
      levels: *rightmatch

    - match: ["how long it can stay alone?"]
      levels: *match1
    - match: ["how long stay it can alone?"]
      levels: *match2
    - match: ["it can stay alone? how long"]
      levels: *match3
    - match: ["how long can it alone? stay"]
      levels: *match4
    - match: ["can it stay alone? how long"]
      levels: *match5
    - match: ["how long stay can it alone?"]
      levels: *match6
    - match: []
      levels: *defaultmatch
- pluginNames: ["drop3"]
  words: []
  choices:
    - match: ["where must it sleep in the flat?"]
      correct: true
      levels: *rightmatch

    - match: ["where it must sleep in the flat?"]
      levels: *match1
    - match: ["where sleep it must in the flat?"]
      levels: *match2
    - match: ["it must sleep in the flat? where"]
      levels: *match3
    - match: ["where must it in the flat? sleep"]
      levels: *match4
    - match: ["must it sleep in the flat? where"]
      levels: *match5
    - match: ["where sleep must it in the flat?"]
      levels: *match6
    - match: []
      levels: *defaultmatch
- pluginNames: ["drop4"]
  words: []
  choices:
    - match: ["what toys can I buy for my pet?"]
      correct: true
      levels: *rightmatch

    - match: ["what toys I can buy for my pet?"]
      levels: *match1
    - match: ["what toys buy I can for my pet?"]
      levels: *match2
    - match: ["I can buy for my pet? what toys"]
      levels: *match3
    - match: ["what toys can I for my pet? buy"]
      levels: *match4
    - match: ["can I buy for my pet? what toys"]
      levels: *match5
    - match: ["what toys buy can I for my pet?"]
      levels: *match6
    - match: []
      levels: *defaultmatch
- pluginNames: ["drop5"]
  words: []
  choices:
    - match: ["where can I learn more about dogs?"]
      correct: true
      levels: *rightmatch

    - match: ["where I can learn more about dogs?"]
      levels: *match1
    - match: ["where learn I can more about dogs?"]
      levels: *match2
    - match: ["I can learn more about dogs? where"]
      levels: *match3
    - match: ["where can I more about dogs? learn"]
      levels: *match4
    - match: ["can I learn more about dogs? where"]
      levels: *match5
    - match: ["where learn can I more about dogs?"]
      levels: *match6
    - match: []
      levels: *defaultmatch

```

#- {area_end="draganddroptask1"}
References
[1] Hanna Alatalo, Jarkko Kuivanen, Elisa Nauha, Jere Ojala and Kimmo Urtamo, User Manual for Drag Plugin. https://tim.jyu.fi/view/kurssit/tie/proj/2019/ timcan/kayttoohjeet/user-manual-for-drag-plugin, University of Jyväskylä, Faculty of Information Technology, 2019.
These are the current permissions for this document; please modify if needed. You can always modify these permissions from the manage page.