Functional testing plan of the TIMCAN -project
Hanna Alatalo
Jarkko Kuivanen
Elisa Nauha
Jere Ojala
Kimmo Urtamo
Version 0.0.15
Private
17.4.2019
Jyväskylän yliopisto - University of Jyväskylä
Faculty of Information Technology
Jyväskylä
Info
Title of the document: Functional testing plan of the TIMCAN -project
File:
https://tim.jyu.fi/view/kurssit/tie/proj/2019/timcan/dokumentit/testaus/toiminnallisuustestaus
Abstract: The functional testing plan of the TIMCAN -project describes what functionalities are to be tested, how testing is executed and how the testing shall be reported.
Keywords: Test plan, functional testing, TIM, testing, The Centre for Applied Language Studies, CALS, adaptive feedback, dynamic feedback, virtual learning environment, plugin
Change history
| Version | Date | Changes | Author |
|---|---|---|---|
| 0.0.1 | 11.3.2019 | Creating template | Jere Ojala |
| 0.0.2 | 21.3.2019 | Translation into english | Jere Ojala |
| 0.0.3 | 25.3.2019 | Translation into english | Jere Ojala |
| 0.0.4 | 1.4.2019 | Fixed reference footnote links | Jere Ojala |
| 0.0.5 | 4.4.2019 | Added test cases | Jere Ojala |
| 0.0.6 | 5.4.2019 | Added test cases for building test and answering the built test | Elisa Nauha |
| 0.0.7 | 5.4.2019 | Add test case for report exporting and fix typos | Jere Ojala |
| 0.0.8 | 9.4.2019 | Added test cases for task editing errors and cleaned up prior cases | Elisa Nauha |
| 0.0.9 | 10.4.2019 | Added test cases for building tasks with errors | Elisa Nauha |
| 0.0.10 | 11.4.2019 | Added test cases for exporting | Jere Ojala |
| 0.0.11 | 11.4.2019 | Added test cases for tasks with errors and put in drag&drop task | Elisa Nauha |
| 0.0.12 | 12.4.2019 | Added test cases for exporting | Jere Ojala |
| 0.0.13 | 15.4.2019 | Added test cases for exporting | Jere Ojala |
| 0.0.14 | 16.4.2019 | Added objections, execution and test run | Jere Ojala |
| 0.0.15 | 17.4.2019 | Edited task templates | Elisa Nauha |
1. Target Application
Target Application and test targets has been defined in the Test plan of the TIMCAN -project[1].
2. Objectives of the test session and methods of execution
2.1 Objectives
General objectives of testing are defined in the Test plan of the TIMCAN -project[1]. In functional testing the most essential features are being tested with different inputs. Objective of this is to ensure that system always functions in use the same way without errors.
2.2 Execution
Functional testing shall be executed as a black-box testing manually.
3. Test run
Only the person who is executing the test shall participate in a test run. Tester should possess basic understanding of operating the Windows Operating System. Tester should also possess basic understanding of operating TIM-system.
3.1 Testing environment
Testing environment has been defined in the Test plan of the TIMCAN -project[1].
3.2 Testing report
In testing report should include from test session its identification and summary.
Required identification info of test session has been defined in the Test plan of the TIMCAN -project[1].
Summary should include:
- number of executed test cases,
- number of test cases not executed,
- number of every different conclusion separately specified,
- exceptions from the test plan and their justifications and
- recommended procedures after the test session.
Report of the test cases is compiled on table form.
Conclusion must be one of the following:
- OK is the result when test case has succeeded with end result matches with the expected result.
- Error is the result when end result differs from the expected result or something generally harmful is noticed during the test run.
- Note is the result when tester has noticed abnormality in functionality.
In the case of Error and Note it should be reported with regarding details, such as procedures, input, abnormalities and possible error messages that led to the result.
3.2.1 Example of test session report table
| Case ID | Task and input | Conclusion | Details |
|---|---|---|---|
| 10.5 |
3.3 Test cases
Numbering of the test cases are in form of [Case ID].[Subcase ID].
| Task | Case ID |
|---|---|
| Teacher building a test | 1 |
| Student answering a test | 2 |
| Report exporting of test | 3 |
| Building task with errors | 4 |
| Using dropdown | 5 |
| Using radio selection | 6 |
| Using drag-and-drop | 7 |
4. Test cases for building a test
4.1 Building a test - instruction page
Test case: 1.1
Initial state: User is signed in to TIM development machine
Steps:
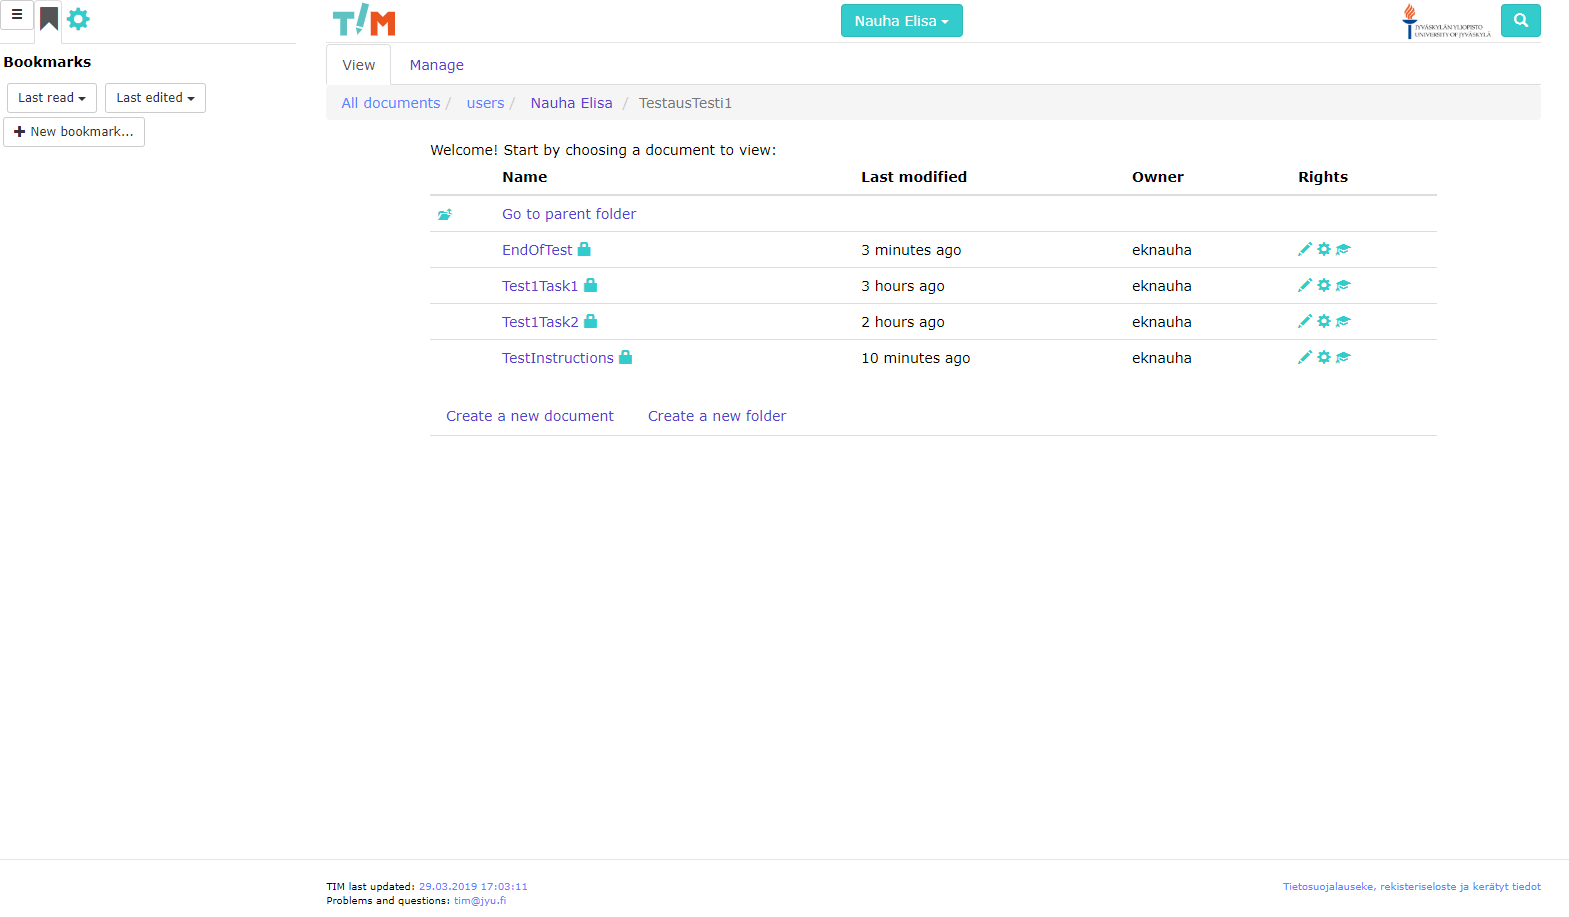
- Create a new folder in your documents called
TestausTesti1 - In manage mode set the default rights for new documents in the folder to view for logged-in users.
- In the folder create a document called
TestInstructions - Go to the "manage" mode and copy the instructions markup in the "edit full document" box and click save.
- Go to the "view" mode.
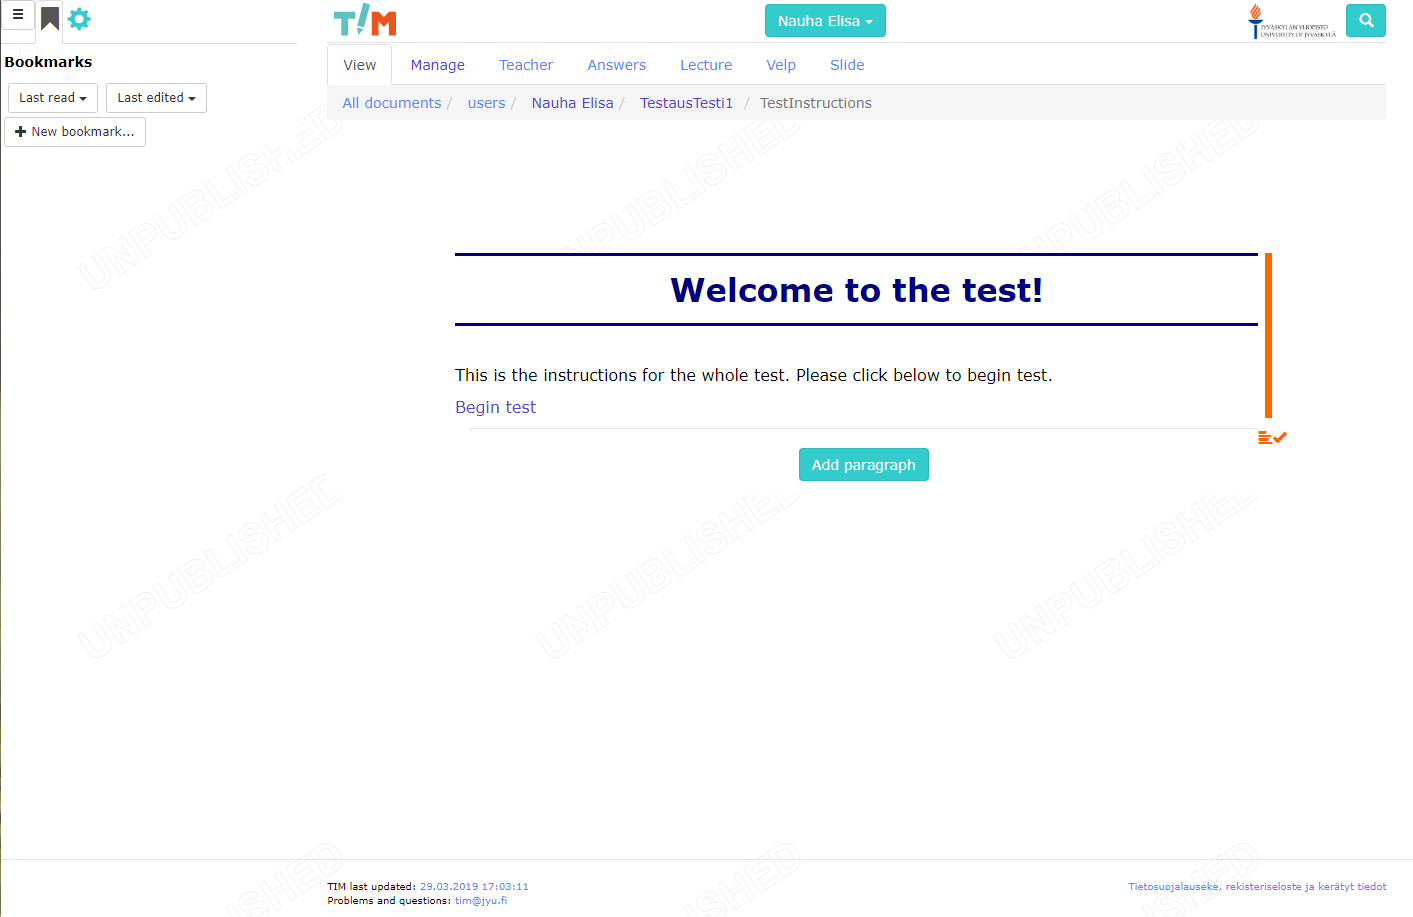
Test data:
# Welcome to the test!

This is the instructions for the whole test. Please click below to begin test.

[Begin test](test1task1)
Expected result:
4.2 Building a test - task 1
Test case: 1.2
Initial state: User is signed in to TIM development machine and has done previous test case.
Steps:
- Go to folder TestausTesti1 in your documents
- In the folder create a document called
Test1Task1 - Go to the "manage" mode and copy the task markup from appendix 1 into the "edit full document" box and click save.
- Set the view rights for all signed in users.
- Go to the "view" mode.
- In the view mode left click on the right side of the feedback paragraph and edit the paragraph.
- Find the line "
nextTask:" and write in"md: [Task 2](test1task2)".
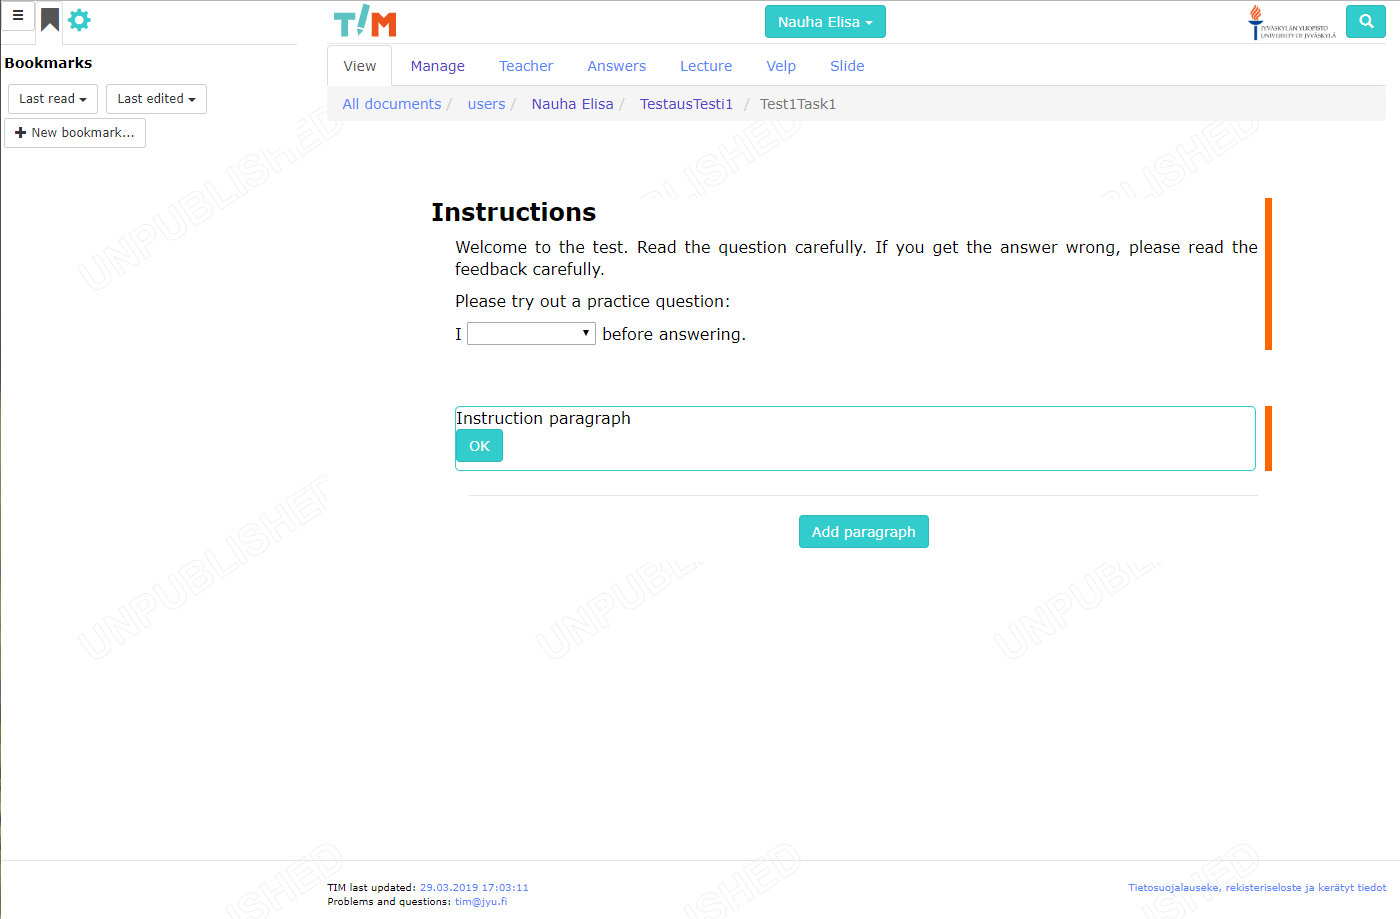
Test data: see Appendix 1
Expected result: Test is ready and looks like so:
4.3 Building a test - task 2
Test case: 1.3
Initial state: User is signed in to TIM development machine and has excecuted test case 1.2.
Steps:
- Go to folder TestausTesti1 in your documents
- In the folder create a document called
Test1Task2 - Go to the "manage" mode and copy the task markup from appendix 2 into the "edit full document" box and click save.
- Set the view rights for all signed in users.
- Go to the "view" mode.
- In the view mode left click on the right side of the feedback paragraph and edit the paragraph.
- Find the line "
nextTask:" and write in"md: [End of test](endoftest)".
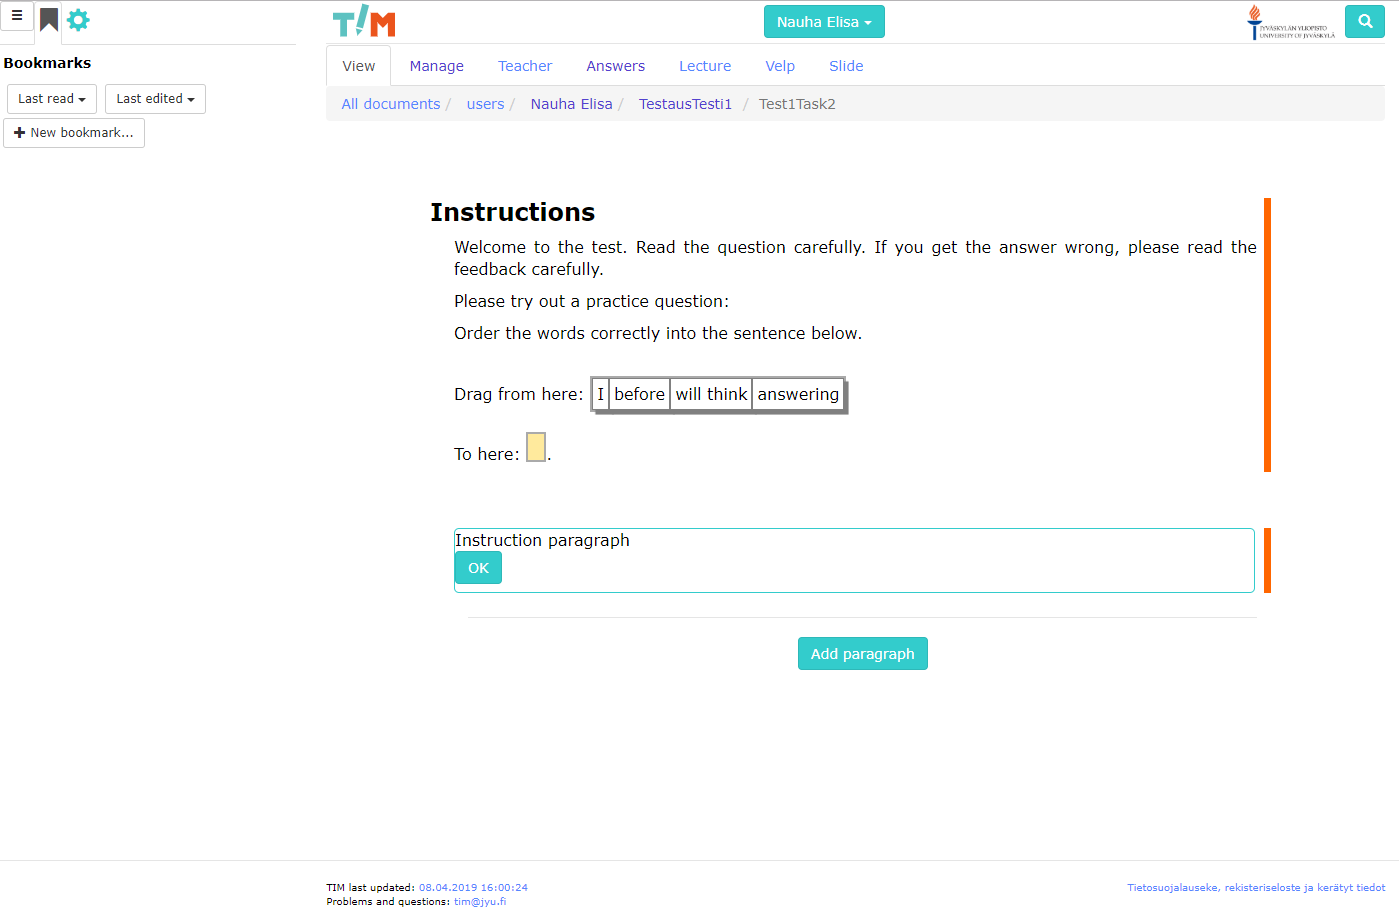
Test data: see Appendix 1
Expected result: Test is ready and looks like so:
4.4 Building a test - end page of test
Test case: 1.4
Initial State: Previous test cases have been completed successfully
Steps:
- Go to the folder
- Create new document called
EndOfTest - Add a paragraph with the test data.
- Go to the manage mode and set the view rights for all signed in users.
- Go to view mode.
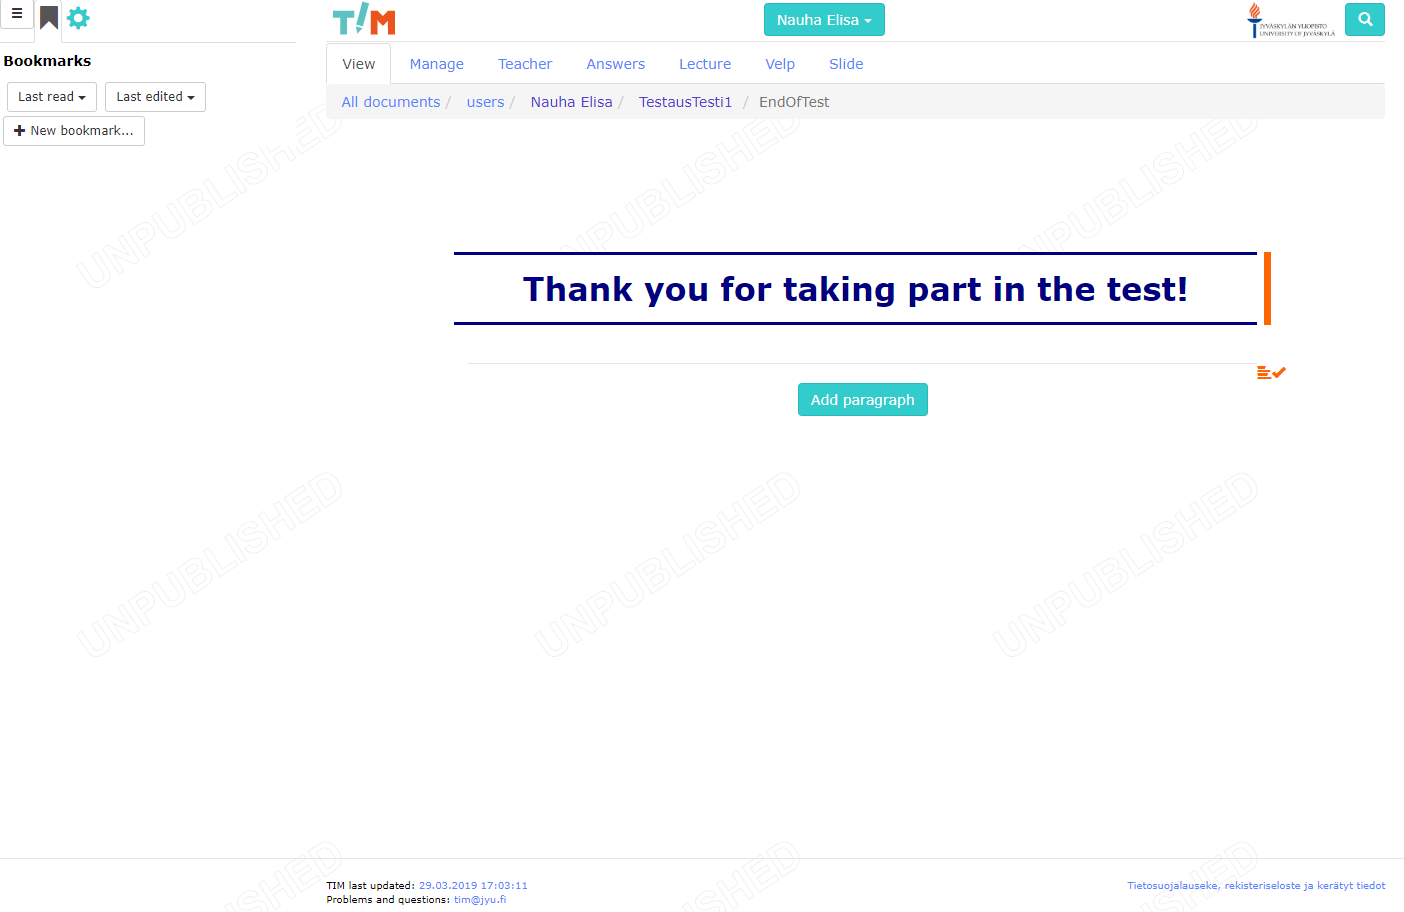
Test Data:
# Thank you for taking part in the test!
Expected Result:
In view mode the page should look like below:
The test folder should look like below:
5. Test cases for student answering the test
5.1 Beginning a test as student
Test case: 2.1
Initial State: The test has been successfully built in the previous test cases.
Steps:
- Sign in to TIM as test user (username:
test1@example.comand password:test1). - Go to page of test
https://timdevs01-2.it.jyu.fi/view/users/*username*/testaustesti1/testinstructions - Click
Begin test
Test Data:
Expected Result: Instruction page for test is visible.
5.2 Answering the task until stopping condition for correct streak
Test case: 2.2
Initial State: The previous test cases have been successfully completed.
Steps:
| Step | Expected result: |
|---|---|
| 1. Answer practice item and click ok | First item should appear |
| 2. Answer first item "do ..." and click ok | Level 1 feedback should appear |
| 3. Click ok on feedback | Next item should appear |
| 4. Answer item "are ..." and click ok | Level 2 feedback should appear |
| 5. Click ok on feedback | Next item should appear |
| 6. Answer item "is ..." and click ok | Correct answer feedback should appear |
| 7. Click ok on feedback | Next item should appear |
| 8. Answer item "is ..." and click ok | Correct answer feedback should appear |
| 9. Click ok on feedback | End of task should appear |
| 10. Click ok | Task 2 should appear |
Test Data: None
Expected Result: See individual steps for expected results.
5.3 Answering the task until stopping condition for final feedback level reached
Test case: 2.3
Initial State: The previous test cases have been successfully completed.
Steps:
| Step | Expected result: |
|---|---|
| 1. Answer practice item and click ok. | First item should appear |
| 2. Answer first item wrong and click ok. | Level 1 feedback should appear |
| 3. Click ok on feedback. | Next item should appear |
| 4. Answer item wrong and click ok. | Level 2 feedback should appear |
| 5. Click ok on feedback. | Next item should appear |
| 6. Answer item wrong and click ok. | Level 3 feedback should appear |
| 7. Click ok on feedback. | Next item should appear |
| 8. Answer item wrong and click ok. | Level 4 feedback should appear |
| 9. Click ok on feedback. | Next item should appear |
| 9. Answer item wrong and click ok. | Level 5 feedback should appear |
| 10. Click ok on feedback. | End of task should appear |
| 11. Click ok. | End of test page should appear |
Test Data: Example wrong answers for questions in task 2: "if run I a mile", "who at work I see", "had whether I a computer", and ""when come I around".
Expected Result: See individual steps for expected results.
5.4 Answering the test and not choosing options
Test case: 2.4
Initial State: Previous test cases have been successfully completed.
Steps:
- Sign in as another test user (username:
test2@example.comand password:test2). - Go to page of test
https://timdevs01-2.it.jyu.fi/view/users/*username*/testaustesti1/testinstructions - Click
Begin test
| Step | Expected result: |
|---|---|
| 4. Do not choose answer for practice item and click ok | A warning asking to choose an answer should appear |
| 5. Choose an answer for the practice item and click ok | First item should appear |
| 6. Do not choose answer for item and click ok | A warning asking to choose an answer should appear |
| 7. Answer item "is ..." and click ok | Correct answer feedback should appear |
| 8. Click ok on feedback | Next item should appear |
| 9. Answer item "is ..." and click ok | Correct answer feedback should appear |
| 10. Click ok on feedback | End of task should appear |
| 11. Click ok | Next task should appear |
| 12. Answer practice item and click ok | First item should appear |
| 13. Answer item "is ..." and click ok | Correct answer feedback should appear |
| 14. Click ok on feedback | Next item should appear |
| 15. Answer item "is ..." and click ok | Correct answer feedback should appear |
| 16. Click ok on feedback | End of task should appear |
| 17. Click ok | Next task should appear |
Test Data: None
Expected Result: See individual steps for expected results.
6. Report exporting test cases
6.1 Exporting test results with default options
Test case: 3.1
Initial State: Previous test cases have been successfully completed.
Steps:
- Sign in as user who created the test.
- Go to page of test
https://timdevs01-2.it.jyu.fi/answers/users/*username*/testaustesti1/test1task1. - Expand
<number> users with answers-dialog if it is substracted.
| Step | Expected result: |
|---|---|
4. Open a dropdown menu located in the upper-right corner of the <number> users with answers-dialog. |
"Feedback answer report" -button option should be in the dropdown menu. |
| 5. Click "Feedback answer report" -button | "Export to csv" -window should appear. |
| 6. Select corresponding options from "Export Options" (Test Data) | Radiobuttons are selected accordingly with only one selected per option. |
| 7. Click "Get Answers" button | New tab will appear with test data as .txt format. TXT should only include answers from test1task1 document. Names should be displayed both username and full name. Headers should include both usernname and full name. Delimiters should be separated with comma. |
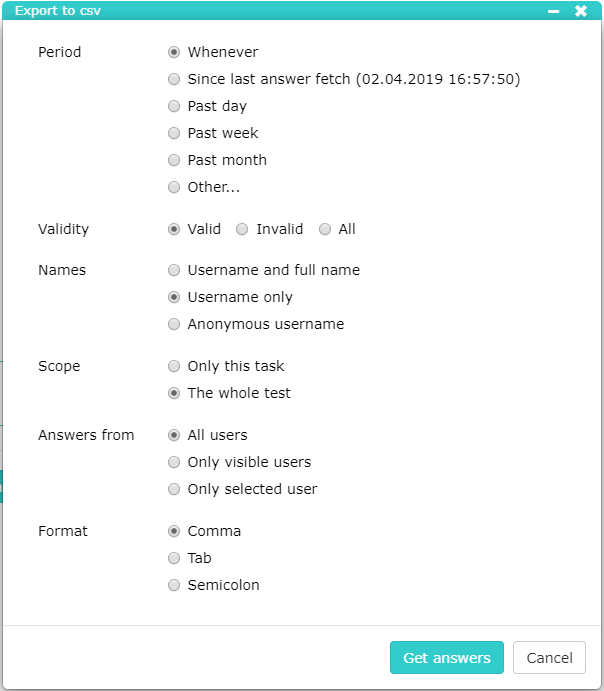
Test Data:
Export Options:
Period: Whenever
Validity: Valid
Names: Username and fullname
Scope: Only this task
Answers From: All users
Format: Comma
Expected Result: See individual steps for expected results.

6.2 Canceling exporting
Test case: 3.2
Initial State: Previous test cases have been successfully completed.
Steps:
- Sign in as user who created the test.
- Go to page of test
https://timdevs01-2.it.jyu.fi/answers/users/nauha-elisa/testaustesti1/test1task1. - Expand
<number> users with answers-dialog if it is substracted.
| Step | Expected result: |
|---|---|
4. Open a dropdown menu located in the upper-right corner of the <number> users with answers-dialog. |
"Feedback answer report" -button option should be in the dropdown menu. |
| 5. Click "Feedback answer report" -button | "Export to csv" -window should appear. |
| 6. Click "Cancel" button | Dialog window should close |
Test Data:
Export Options:
Period: Whenever
Validity: Valid
Names: Username and fullname
Answers From: All users
Format: Comma
Expected Result: See individual steps for expected results.
6.3 Exporting results of the whole test and with only username
Test case: 3.3
Initial State: Previous test cases have been successfully completed.
Steps:
- Sign in as user who created the test.
- Go to page of test
https://timdevs01-2.it.jyu.fi/answers/users/nauha-elisa/testaustesti1/test1task1. - Expand
<number> users with answers-dialog if it is substracted.
| Step | Expected result: |
|---|---|
4. Open a dropdown menu located in the upper-right corner of the <number> users with answers-dialog. |
"Feedback answer report" -button option should be in the dropdown menu. |
| 5. Click "Feedback answer report" -button | "Export to csv" -window should appear. |
| 6. Select corresponding options from "Export Options" (Test Data) | Radiobuttons are selected accordingly with only one selected per option. |
| 7. Click "Get Answers" button | New tab will appear with test data as .txt format. TXT should include answers from the whole test folder. Full name should be not displayed neither the respectful header. |
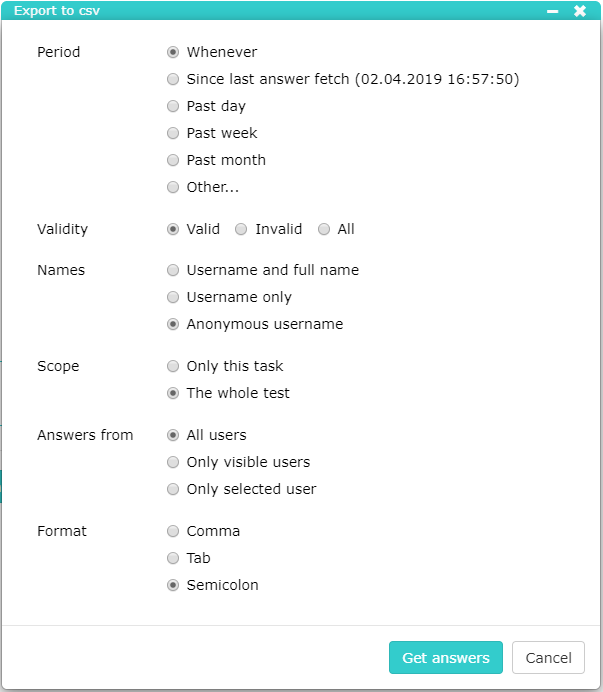
Test Data:
Export Options:
Period: Whenever
Validity: Valid
Names: Username only
Scope: The whole test
Answers From: All users
Format: Comma
Expected Result: See individual steps for expected results.
6.4 Exporting results of the whole test and with anonymous username
Test case: 3.4
Initial State: Previous test cases have been successfully completed.
Steps:
- Sign in as user who created the test.
- Go to page of test
https://timdevs01-2.it.jyu.fi/answers/users/nauha-elisa/testaustesti1/test1task1. - Expand
<number> users with answers-dialog if it is substracted.
| Step | Expected result: |
|---|---|
4. Open a dropdown menu located in the upper-right corner of the <number> users with answers-dialog. |
"Feedback answer report" -button option should be in the dropdown menu. |
| 5. Click "Feedback answer report" -button | "Export to csv" -window should appear. |
| 6. Select corresponding options from "Export Options" (Test Data) | Radiobuttons are selected accordingly with only one selected per option. |
| 7. Click "Get Answers" button | New tab will appear with test data as .txt format. TXT should include answers from the whole test folder. At the header username should be displayed users anonymously, as in user<number>. |
Test Data:
Export Options:
Period: Whenever
Validity: Valid
Names: Anonymous username
Scope: The whole test
Answers From: All users
Format: Comma
Expected Result: See individual steps for expected results.

6.5 Exporting test results with Tab-delimiters
Test case: 3.5
Initial State: Previous test cases have been successfully completed.
Steps:
- Sign in as user who created the test.
- Go to page of test
https://timdevs01-2.it.jyu.fi/answers/users/nauha-elisa/testaustesti1/test1task1. - Expand
<number> users with answers-dialog if it is substracted.
| Step | Expected result: |
|---|---|
4. Open a dropdown menu located in the upper-right corner of the <number> users with answers-dialog. |
"Feedback answer report" -button option should be in the dropdown menu. |
| 5. Click "Feedback answer report" -button | "Export to csv" -window should appear. |
| 6. Select corresponding options from "Export Options" (Test Data) | Radiobuttons are selected accordingly with only one selected per option. |
| 7. Click "Get Answers" button | New tab will appear with test data as .txt format. TXT should include answers from the whole test folder. Delimiters should be tabulators. Only username is displayed. |
Test Data:
Export Options:
Period: Whenever
Validity: Valid
Names: Username only
Scope: The whole test
Answers From: All users
Format: Tab
Expected Result: See individual steps for expected results.
6.6 Exporting test results with semicolon-delimiters
Test case: 3.6
Initial State: Previous test cases have been successfully completed.
Steps:
- Sign in as user who created the test.
- Go to page of test
https://timdevs01-2.it.jyu.fi/answers/users/nauha-elisa/testaustesti1/test1task1. - Expand
<number> users with answers-dialog if it is substracted.
| Step | Expected result: |
|---|---|
4. Open a dropdown menu located in the upper-right corner of the <number> users with answers-dialog. |
"Feedback answer report" -button option should be in the dropdown menu. |
| 5. Click "Feedback answer report" -button | "Export to csv" -window should appear. |
| 6. Select corresponding options from "Export Options" (Test Data) | Radiobuttons are selected accordingly with only one selected per option. |
| 7. Click "Get Answers" button | New tab will appear with test data as .txt format. TXT should include answers from the whole test folder. Delimiters should be semicolons. Only username is displayed. |
Test Data:
Export Options:
Period: Whenever
Validity: Valid
Names: Username only
Scope: The whole test
Answers From: All users
Format: Semicolon
Expected Result: See individual steps for expected results.
6.7 Exporting test results with only one visible user
Test case: 3.7
Initial State: Previous test cases have been successfully completed.
Steps:
- Sign in as user who created the test.
- Go to page of test
https://timdevs01-2.it.jyu.fi/answers/users/nauha-elisa/testaustesti1/test1task1. - Expand
<number> users with answers-dialog if it is substracted.
| Step | Expected result: |
|---|---|
4. Enter "Full Name" -text field and insert 1 |
User list should only display Test user 1 |
5. Open a dropdown menu located in the upper-right corner of the <number> users with answers-dialog. |
"Feedback answer report" -button option should be in the dropdown menu. |
| 6. Click "Feedback answer report" -button | "Export to csv" -window should appear. |
| 7. Select corresponding options from "Export Options" (Test Data) | Radiobuttons are selected accordingly with only one selected per option. |
| 8. Click "Get Answers" button | New tab will appear with test data as .txt format. TXT should include answers from the whole test folder. TXT should only include answers from Test user 1. Delimiters should be semicolons. Only username is displayed. |
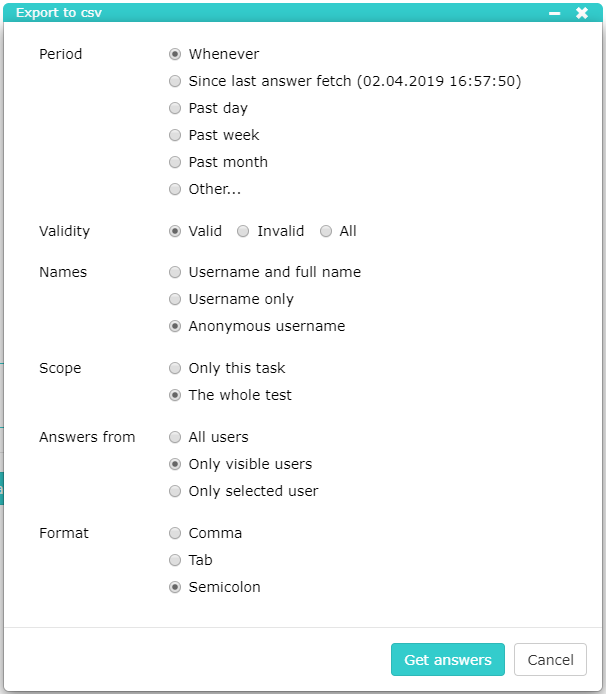
Test Data:
Export Options:
Period: Whenever
Validity: Valid
Names: Username only
Scope: The whole test
Answers From: Only visible users
Format: Semicolon
Expected Result: See individual steps for expected results.
6.8 Exporting test results with two visible users
Test case: 3.8
Initial State: Previous test cases have been successfully completed.
Steps:
- Sign in as user who created the test.
- Go to page of test
https://timdevs01-2.it.jyu.fi/answers/users/nauha-elisa/testaustesti1/test1task1. - Expand
<number> users with answers-dialog if it is substracted.
| Step | Expected result: |
|---|---|
4. Enter "Full Name" -text field and insert test |
User list should both display Test user 1 and Test user 2 |
5. Open a dropdown menu located in the upper-right corner of the <number> users with answers-dialog. |
"Feedback answer report" -button option should be in the dropdown menu. |
| 6. Click "Feedback answer report" -button | "Export to csv" -window should appear. |
| 7. Select corresponding options from "Export Options" (Test Data) | Radiobuttons are selected accordingly with only one selected per option. |
| 8. Click "Get Answers" button | New tab will appear with test data as .txt format. TXT should include answers from the whole test folder. TXT should include answers from both Test user 1 and Test user 2. Delimiters should be semicolons. Only username is displayed. |
Test Data:
Export Options:
Period: Whenever
Validity: Valid
Names: Username only
Scope: The whole test
Answers From: Only visible users
Format: Semicolon
Expected Result: See individual steps for expected results.
6.9 Exporting test results with only visible users when visible user list is empty
Test case: 3.9
Initial State: Previous test cases have been successfully completed.
Steps:
- Sign in as user who created the test.
- Go to page of test
https://timdevs01-2.it.jyu.fi/answers/users/nauha-elisa/testaustesti1/test1task1. - Expand
<number> users with answers-dialog if it is substracted.
| Step | Expected result: |
|---|---|
4. Enter "Full Name" -text field and insert k |
User list should be empty. |
5. Open a dropdown menu located in the upper-right corner of the <number> users with answers-dialog. |
"Feedback answer report" -button option should be in the dropdown menu. |
| 6. Click "Feedback answer report" -button | "Export to csv" -window should appear. |
| 7. Select corresponding options from "Export Options" (Test Data) | Radiobuttons are selected accordingly with only one selected per option. |
| 8. Click "Get Answers" button | New tab will appear with test data as .txt format. TXT should only include row of headers and no user data. Full name header should not be included. |
Test Data:
Export Options:
Period: Whenever
Validity: Valid
Names: Username only
Scope: The whole test
Answers From: Only visible users
Format: Semicolon
Expected Result: See individual steps for expected results.
6.10 Exporting test results with only selected user
Test case: 3.10
Initial State: Previous test cases have been successfully completed.
Steps:
- Sign in as user who created the test.
- Go to page of test
https://timdevs01-2.it.jyu.fi/answers/users/nauha-elisa/testaustesti1/test1task1. - Expand
<number> users with answers-dialog if it is substracted.
| Step | Expected result: |
|---|---|
4. Select Test user 2 from User list. |
User list should have Test user 2 highlighted. |
5. Open a dropdown menu located in the upper-right corner of the <number> users with answers-dialog. |
"Feedback answer report" -button option should be in the dropdown menu. |
| 6. Click "Feedback answer report" -button | "Export to csv" -window should appear. |
| 7. Select corresponding options from "Export Options" (Test Data) | Radiobuttons are selected accordingly with only one selected per option. |
| 8. Click "Get Answers" button | New tab will appear with test data as .txt format. TXT should include answers from the whole test folder. TXT should only include answers from Test user 2. Delimiters should be semicolons. Only username is displayed. |
Test Data:
Export Options:
Period: Whenever
Validity: Valid
Names: Username only
Scope: The whole test
Answers From: Only selected user
Format: Semicolon
Expected Result: See individual steps for expected results.

6.11 Exporting test results with only selected user when visible user list is empty
Test case: 3.11
Initial State: Previous test cases have been successfully completed.
Steps:
- Sign in as user who created the test.
- Go to page of test
https://timdevs01-2.it.jyu.fi/answers/users/nauha-elisa/testaustesti1/test1task1. - Expand
<number> users with answers-dialog if it is substracted.
| Step | Expected result: |
|---|---|
4. Select Test user 2 from User list. |
User list should have Test user 2 highlighted. |
5. Enter "Full Name" -text field and insert k |
User list should be empty. |
6. Open a dropdown menu located in the upper-right corner of the <number> users with answers-dialog. |
"Feedback answer report" -button option should be in the dropdown menu. |
| 7. Click "Feedback answer report" -button | "Export to csv" -window should appear. |
| 8. Select corresponding options from "Export Options" (Test Data) | Radiobuttons are selected accordingly with only one selected per option. |
| 9. Click "Get Answers" button | New tab will appear with test data as .txt format. TXT should only include row of headers and no user data. Full name header should not be included. |
Test Data:
Export Options:
Period: Whenever
Validity: Valid
Names: Username only
Scope: The whole test
Answers From: Only selected user
Format: Semicolon
Expected Result: See individual steps for expected results.
7. Building task with errors
7.1 Building task with varying number of feedback levels
Test case: 4.1
Initial State: A folder called TestausTesti1 has been created.
Steps:
- Go to folder TestausTesti1 in your documents
- In the folder create a document called
Test1Task3 - Go to the "manage" mode and copy the task markup into the "edit full document" box and click save.
- Go to "view" mode and click to edit the feedback paragraph.
- Delete a feedback level from one match option such as:
- "md: Level 2 feedback: You answered: *|answer|* Answer is wrong. Try thinking *a bit* harder. " - Click save. Expected result: Gives red warning: "Different number of feedback levels"
- Go to "view" mode and click to edit the feedback paragraph.
- Paste the deleted feedback level back in the right place.
- Click save. Expected result: Error disappears.
Test Data: None
Expected Result: In step 6 an error should appear and be recovered from in step 9.
7.2 Building task with no link to next task/end of test
Test case: 4.2
Initial State: An errorless task Test1Task3 has been created (test case 4.1)
Steps:
- Click to edit the feedback paragraph of document
Test1Task3. - Delete the input of
nextTask: - Click save. Expected result: Gives red warning: "The following fields have invalid values: nextTask: Field may not be null."
- Click to edit the feedback paragraph.
- Reinput "link" into the
nextTask:-field. - Click save. Expected result: Error should disappear.
Test Data: None
Expected Result: In step 3 and error should be dispalyed and it should be recovered from in step 6.
7.3 Building task with no instruction paragraph plugin
Test case: 4.3
Initial State: An errorless task Test1Task3 has been created (test case 4.1)
Steps:
- Click to edit the instructions paragraph of document
Test1Task3. - Delete the instruction plugin
{#instruction words: [will think, won't think, might think]}and click save. - Click to edit the feedback paragraph and click save. Expected result: Gives red warning: "Instruction not defined"
- Click to edit the instructions paragraph.
- Reinput the instruction plugin and click save.
- Click to edit the feedback paragraph and click save. Expected result: Error should disappear.
Test Data: None
Expected Result: In step 3 and error should be dispalyed and it should be recovered from in step 6.
7.4 Building task with no right answer defined
Test case: 4.4
Initial State: An errorless task Test1Task3 has been created (test case 4.1)
Steps:
- Click to edit the feedback paragraph of document
Test1Task3. - Delete the lines:
    - match: [is baking]
      correct: true
levels: *ismatch- Click save. Expected result: Gives red warning: "No correct answer defined for question item.."
- Click to edit the feedback paragraph.
- Reinput the deleted text.
- Click save. Expected result: Error should disappear.
Test Data: None
Expected Result: In step 3 and error should be dispalyed and it should be recovered from in step 6.
7.5 Building task with wrong names for plugins
Test case: 4.5
Initial State: An errorless task Test1Task3 has been created (test case 4.1)
Steps:
- Click to edit the feedback paragraph of document
Test1Task3. - Change the pluginname
drop1on line 7 tonodrop1 - Click save. Expected result: Gives red warning: "No plugin with such a name (nodrop1) or missing setPluginWords-method"
- Click to edit the feedback paragraph.
- Change the pluginname
nodrop1on line 7 back todrop1 - Click save. Expected result: Error should disappear.
Test Data: None
Expected Result: In step 3 and error should be dispalyed and it should be recovered from in step 6.
7.6 Building task with no default feedback
Test case: 4.6
Initial State: An errorless task Test1Task3 has been created (test case 4.1)
Steps:
- Click to edit the feedback paragraph of document
Test1Task3. - Delete lines:
    - match: []
levels: *defaultmatch- Click save. Expected result: Gives red warning: "Default feedback option needed"
- Click to edit the feedback paragraph.
- Reinput the deleted text.
- Click save. Expected result: Error should disappear.
Test Data: None
Expected Result: In step 3 and error should be dispalyed and it should be recovered from in step 6.
7.7 Building task with no feedback
Test case: 4.7
Initial State: An errorless task Test1Task3 has been created (test case 4.1)
Steps:
- Click to edit the feedback paragraph of document
Test1Task3. - Delete lines:
  choices:
    - match: [is baking]
      correct: true
      levels: *ismatch
    - match: [do baking]
      levels: *domatch
    - match: [are baking]
      levels: *arematch
    - match: []
levels: *defaultmatch- Click save. Expected result: Gives red warning: "Feedback choices needed"
- Click to edit the feedback paragraph.
- Reinput the deleted text.
- Click save. Expected result: Error should disappear.
Test Data: None
Expected Result: In step 3 and error should be dispalyed and it should be recovered from in step 6.
References
[1] Hanna Alatalo, Jarkko Kuivanen, Elisa Nauha, Jere Ojala, Kimmo Urtamo. The Test plan of the TIMCAN -project. Faculty of Information Technologies, Jyväskylän yliopisto | University of Jyväskylä. 2019. https://tim.jyu.fi/view/kurssit/tie/proj/2019/timcan/dokumentit/testaus/testaussuunnitelma
Appendices
Appendix 1: Template for dropdown task markup
## Instructions {defaultplugin="dropdown"}

Welcome to the test. Read the question carefully. If you get the answer wrong, please read the feedback carefully.


Please try out a practice question:


I {#instruction words: [will think, won't think, might think]} before answering.


## Item: {defaultplugin="dropdown"}

What {#drop1} on the stove?


## Item: {defaultplugin="dropdown"}

Who {#drop2} the cake?


## Item: {defaultplugin="dropdown"}

What {#drop3} on the roof?


## Item: {defaultplugin="dropdown"}

Who {#drop4} the 3 mile swim in the race?


``` {#fb1 plugin="feedback"}
correctStreak: 2
nextTask: nonexttaskdefined
instructionID: instruction
teacherHide: true
questionItems:
- pluginNames: [drop1]
  words: [[is cooking, do cooking, are cooking]]
  choices:
    - match: [is cooking]
      correct: true
      levels: &ismatch
        - "**Correct!** You answered: |answer|"
    - match: [do cooking]
      levels: &domatch
        - "Level 1 feedback: You answered: *|answer|* Answer is wrong. Try **thinking**. "
        - "Level 2 feedback: You answered: *|answer|* Answer is wrong. Try thinking *a bit* harder. "
        - "Level 3 feedback: You answered: *|answer|* Answer is wrong. Try thinking **much more** harder. "
        - "Level 4 feedback: You answered: *|answer|* Answer is wrong. Just think about what the answer **is**. "
        - "Level 5 feedback: Please note the correct answer: 'What **is** / Who **is**'"
    - match: [are cooking]
      levels: &arematch
        - "Level 1 feedback: You answered: *|answer|* Answer is wrong. Try **thinking**. "
        - "Level 2 feedback: You answered: *|answer|* Answer is wrong. Try thinking *a bit* harder. "
        - "Level 3 feedback: You answered: *|answer|* Answer is wrong. Try thinking **much more** harder. "
        - "Level 4 feedback: You answered: *|answer|* Answer is wrong. Just think about what the answer **is**. "
        - "Level 5 feedback: Please note the correct answer: 'What **is** / Who **is**'"
    - match: []
      levels: &defaultmatch
        - "Level 1 feedback: default feedback for drop4"
        - "Level 2 feedback: default feedback for drop4"
        - "Level 3 feedback: default feedback for drop4"
        - "Level 4 feedback: default feedback for drop4"
        - "Level 5 feedback: Please note the correct answer: 'What **is** / Who **is**'"
- pluginNames: [drop2]
  words: [[is baking, do baking, are baking]]
  choices:
    - match: [is baking]
      correct: true
      levels: *ismatch
    - match: [do baking]
      levels: *domatch
    - match: [are baking]
      levels: *arematch
    - match: []
      levels: *defaultmatch
- pluginNames: [drop3]
  words: [[is jumping, do jumping, are jumping]]
  choices:
    - match: [is jumping]
      correct: true
      levels: *ismatch
    - match: [do jumping]
      levels: *domatch
    - match: [are jumping]
      levels: *arematch
    - match: []
      levels: *defaultmatch
- pluginNames: [drop4]
  words: [[is swimming, do swimming, are swimming]]
  choices:
    - match: [is swimming]
      correct: true
      levels: *ismatch
    - match: [do swimming]
      levels: *domatch
    - match: [are swimming]
      levels: *arematch
    - match: []
      levels: *defaultmatch
```
Appendix 2: Template for drag & drop task markup
## Instructions {defaultplugin="drag"}

Welcome to the test. Read the question carefully. If you get the answer wrong, please read the feedback carefully.


Please try out a practice question:

Order the words correctly into the sentence below.

\
Drag from here: {#instructiondrag words: [I, before, will think, answering]}


To here: {#instruction}.


## Item {defaultplugin="drag"}
::: {.info}
Please order the words correctly into the sentence below.


\
{#drag1 words: [I, when, around, come]}

\
:::
 You know where I'll be found {#drop1}.


## Item {defaultplugin="drag"}
::: {.info}
Please order the words correctly into the sentence below.


\
{#drag2 words: [I, if, a mile, run]}

\
:::
 I will be quite tired {#drop2}.


## Item {defaultplugin="drag"}
::: {.info}
Please order the words correctly into the sentence below.


\
{#drag3 words: [I, who, at work, see]}

\
:::
 I will tell you {#drop3}.


## Item {defaultplugin="drag"}
::: {.info}
Please order the words correctly into the sentence below.


\
{#drag4 words: [I, whether, a computer, had]}

\
:::
He wanted to know {#drop4}.


``` {#fb1 plugin="feedback"}

correctStreak: 2
nextTask: nonexttaskdefined
instructionID: instruction
teacherHide: true
questionItems:
- pluginNames: [drop1]
  words: []
  choices:
    - match: [when I come around]
      correct: true
      levels: &rightmatch
        - "**Correct!** You answered: |answer|"
    - match: [when around I come]
      levels: &asvmatch
        - "Level 1 feedback: You answered: *|answer|* Answer is wrong. Try **thinking**. "
        - "Level 2 feedback: You answered: *|answer|* Answer is wrong. Try thinking *a bit* harder. "
        - "Level 3 feedback: You answered: *|answer|* Answer is wrong. Try thinking **much more** harder. "
        - "Level 4 feedback: You answered: *|answer|* Answer is wrong. Just think about **what the answer is**. "
        - "Level 5 feedback: Please note the correct word order: 'conjuction subject verb the rest'"
    - match: [when come I around]
      levels: &vsamatch
        - "Level 1 feedback: You answered: *|answer|* Answer is wrong. Try **thinking**. "
        - "Level 2 feedback: You answered: *|answer|* Answer is wrong. Try thinking *a bit* harder. "
        - "Level 3 feedback: You answered: *|answer|* Answer is wrong. Try thinking **much more** harder. "
        - "Level 4 feedback: You answered: *|answer|* Answer is wrong. Just think about **what the answer is** "
        - "Level 5 feedback: Please note the correct word order: 'conjuction subject verb the rest'"
    - match: []
      levels: &defaultmatch
        - "Level 1 feedback: You answered: *|answer|* Answer is wrong. Try **thinking**."
        - "Level 2 feedback: You answered: *|answer|* Answer is wrong. Think about what comes first."
        - "Level 3 feedback: You answered: *|answer|* Answer is wrong. Think about what word comes first."
        - "Level 4 feedback: You answered: *|answer|* Answer is wrong. The conjunction should come first."
        - "Level 5 feedback: Please note the correct word order: 'conjuction subject verb the rest'"
- pluginNames: [drop2]
  words: []
  choices:
    - match: [if I run a mile]
      correct: true
      levels: *rightmatch
    - match: [if a mile I run]
      levels: *asvmatch
    - match: [if run I a mile]
      levels: *vsamatch
    - match: []
      levels: *defaultmatch
- pluginNames: [drop3]
  words: []
  choices:
    - match: [who I see at work]
      correct: true
      levels: *rightmatch
    - match: [who at work I see]
      levels: *asvmatch
    - match: [who see I at work]
      levels: *vsamatch
    - match: []
      levels: *defaultmatch
- pluginNames: [drop4]
  words: []
  choices:
    - match: [whether I had a computer]
      correct: true
      levels: *rightmatch
    - match: [whether a computer I had]
      levels: *asvmatch
    - match: [whether had I a computer]
      levels: *vsamatch
    - match: []
      levels: *defaultmatch

```These are the current permissions for this document; please modify if needed. You can always modify these permissions from the manage page.