1. Rider, Jypeli and ComTest installation instructions
The instructions on this page install the Jypeli development tools (JetBrains Rider and Jypeli) and the ComTest extension for Rider.
1.1 Installation steps
- .NET and Jypeli installed (link to another document)
- Activate your JetBrains student license
- Install Rider
- Test Jypeli
- Install ComTest
1.2 Rider
1.2.1 Downloading and installing
Download Rider by clicking on the Download page https://www.jetbrains.com/rider/
Use the default settings, i.e. click Next and then Install. On Windows, Vesa installed to c:\devel\rider.
MacOS - how do I know which Rider to download?
- Click on the top left corner of the desktop on the appu image
- Select "About this computer" (etc)
- Select the Rider installation package according to your CPU. If the CPU says M1 or M2, select ".dmg (Apple Silicon)". If it says Intel, select ".dmg (Intel)".
For Linux Ubuntu, the installation was made easier by taking Software & Updates from the "store".
1.2.2 First start-up
Start Rider. Accept the terms of use.
For the keymap settings you should choose Visual Studio (Vesa took VS Code which is worthwhile if you have it installed). You can also adjust the keymaps afterwards in Settings -> Keymap.
There is no need to download plugins.
Log in as a JetBrain user using the account you used in section 2 of this manual. However, you can use Rider for 30 days without a license (e.g. if you have problems getting a license).
1.2.3 See if it works
Select New Solution. Then under .NET / .NET Core select Console Application and press Create. Replace the contents of the Program.cs file with the following:
and select Run from the top menu . A console window should open at the bottom of the Rider that says executed by Rider to run the program, followed by "Works :-)".
For creating solutions and projects see for more detailed instructions here.
1.3 Jypeli
1.3.1 Installing
If you have not already installed Jypel in the previous steps, go to the command line and type
dotnet new install Jypeli.TemplatesIf the above does not work or you are on a university machine, type
dotnet new --install Jypeli.TemplatesIf there are problems, see if any of the solutions in section 7 help.
1.3.2 See if it works
- Launch Rider
- Select
New Solution, selectTasohyppelypeli(for university machines, select .NET version 6.0) and pressCreate. The first time you create a project, it may take a little while. - Click on the green triangle at the top next to
Runor use the keyboard shortcut (you can see the keyboard shortcuts by holding your cursor over the Run icon). - A window should now open with an elephant game using the arrow keys. If so, the Jypel installation was successful.
Jypel requires that you have .NET 8.0 installed. You should have these if you have followed the installation instructions.
When you create a project, Rider always defaults to the latest version of Jypel.
If you want to change an existing project to a newer version of Jypel (or in case of possible problems even to an older version), please proceed as follows:
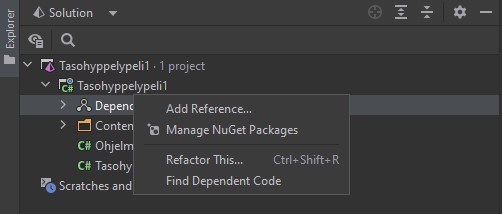
- From your project's Solution Explorer, right-click on the
Dependenciesmenu - Select
Manage NuGet Packages
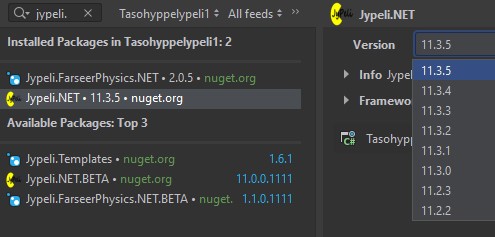
- In the menu that opens, you will see the version of Jypel you are using, as well as the latest available
- In the view on the right hand side you can upgrade to the latest version, or you can use the
Versionmenu to change to another version.
1.4 Rider settings
The default settings for code formatting and analysis are often too aggressive for this course (i.e. help too much or in the wrong direction), so will be changed to the settings recommended in this course.
If you want to back up your current settings, do so from the File menu \(\rightarrow\) Manage IDE Settings \(\rightarrow\) Export Settings...
- Download the settings package (settings.zip)
- TODO: A student could comment on whether that settings still works when Rider is updated
- Go to File \(\rightarrow\) Manage IDE Settings \(\rightarrow\) Import Settings...
- Find and select the file you just retrieved
- Click OK, then Import and Restart
Alternatively, you can customize the settings one by one following the instructions below.
And in the latest Rider, you will in any case need to use the manual below to disable the shortcut (at least for now).
Pro tip: If you use Rider on multiple computers, you can sync your settings by selecting File \(\rightarrow\) Manage IDE Settings \(\rightarrow\) Settings sync.
Here are some examples of warnings that have been removed from in settings.zip. These warnings do more harm than good for this course. The idea is that it is better to have warnings only for things that are really worth considering. As you learn more programming, those more advanced warnings will be more useful. It's worth opening a solution in Rider, if you are manually adjusting the following.
Proofreading: remove the complaints about the English names:
File/Settings, typespellin the search field and go toSpellingand.NET Languages(orReSpellerdepending on the version) and removeEnable.A note on namespaces: namespaces are not always used in the course: type
inspection severityin the search field of the settings and go toEditor/Inspection Settings/Inspection Severity/C#in the settings by selectingInspection Severityfrom the languages below C#. You should see a new menu of language-specific settings for C#. In your search field for this new menu, typenamespaceand uncheckNamespace does not correspond to file location, which can be found in the new menuConstraints violations- under the subheading.Class not created as an entity: in the course, classes are (also) used to store a set of static subroutines, so this warning is not relevant. Similar to as in the previous section, first go to the C# language-specific settings:
Editor/Inspection Settings/Inspection Severity/C#and enterinstantiatedin the search field of the menu that opens, and uncheck inNon-private accessibility, which is under thePotential Code Quality IssuesandClass is never instantiatedsubheading.Themethod could be private: Functions intended for general use should be made public, but since they have not yet been called anywhere, this will not be noticed. Again, go to the C# language-specific settings menu
Editor/Inspection Settings/Inspection Severity/C#as in the previous step. Search formemberand findCommon Practices and Code Improvementsunder the subheadingMember can be made privateunder the settingNon-private accessibility, and remove the check mark.The category is not defined in the namespace: since namespaces are not always used in the course: If there is a name underlined somewhere in the code after
class, go to at the beginning of that name, press the name and a hammer will appear on the left. Click on the hammer and select the menuInspection: 'Declare types in namespaces'/Configure inspection severity/Do not showas shown in the picture below: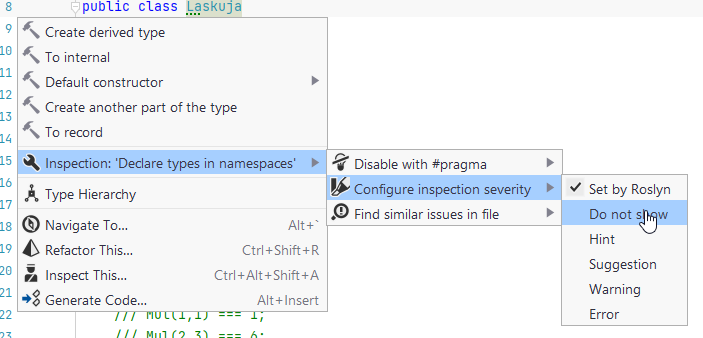 This
This Context Actionsmenu can also be opened by right-clicking on the underlined item and selectingShow Context Actionsfrom the menu. In some cases, the menu can be opened by the light bulb image next to the line numbers .Context Actions-the menu can also be opened by pressingAlt + Enterat the cursor position . This same method makes it easy to adjust out distracting underlines, but first you need to make sure that the setting/underline/tweak in question is not necessary or noteworthy for you.var-Theuse of the word " type": trying to learn the meaning of types. Do as above where, for example, in aint ikatype sentence,intsuggests touse var, i.e. remove this comment.Editor/General/Code Completionremove the check mark "Preselect the best match to insert it by pressing dot, parantheses, and other keys"Editor/Inlay Hintsuncheck "Enable Inlay Hints in .NET languages"Other comments that may be disabled:
- attribute names require an underscore at the beginning, this is not in accordance with the coding conventions of the course (i.e. naming
pelaaja, not_pelaaja) - naming constants if necessary (the course has used the format
VAKIO, Rider wantsVakio=> may change the choice away)- but remember to avoid unnecessary attributes (once you know what the attribute means :-)
- attribute names require an underscore at the beginning, this is not in accordance with the coding conventions of the course (i.e. naming
Vesan muuttamat asetukset DO NOT SHOW-asentoon:
BuiltInTypeReferenceStyle
CheckNamespace
ClassNeverInstantiated_002EGlobal
ConvertIfStatementToReturnStatement
ConvertIfStatementToSwitchStatement
InconsistentNaming
JoinDeclarationAndInitializer
MemberCanBePrivate_002EGlobal
SuggestVarOrType_005FBuiltInTypes
SuggestVarOrType_005FElsewhere
SuggestVarOrType_005FSimpleTypes
UseCollectionExpression
UseObjectOrCollectionInitializerHere is a list of some of the settings that are used or have been used in the examples in the lectures . Of course, everyone can build their own environment, but these may be useful for you if you want to follow exactly the settings used in the lecture .
Move the bottom panels to one side. See the example at. This makes it easier to view printouts, for example, in a slightly wider view. In some situations (e.g. debugade), it may be useful to move some panels to the right if necessary. You can also hide unnecessary panels from view by right-clicking on the icon and then Hide.
Panels can be "unpinned", i.e. hidden from view when they are not active. Click on three dots in the panel and select View Mode -> Dock Unpinned. For example, if you unpin the Debug panel, you can run the ConsoleMain application (in Debug mode), and press the Esc key after the run. The panel closes and the focus goes back to the editor. (No need to touch the mouse, YES! :))
Hide the "balloon" message of a successful translation. In my opinion, this notification is completely unnecessary and just gets in the way. Select Settings \(\rightarrow\) Notifications \(\rightarrow\) Build messages \(\rightarrow\) No popup. I also recommend unchecking Show in tool window, as there is rarely a need to know the exact time when a translation succeeds or fails.
For full screen mode, please go to View \(\rightarrow\) Appearance \(\rightarrow\) Enter Full Screen. My keyboard shortcut is Ctrl+Shift+Enter, but like any keyboard shortcut, this can be changed in Settings \(\rightarrow\) Keymap. I also find Distraction Free Mode nice, although it hides some good UI elements, such as the little triangles for code area reduction.
So-called. For the new UI, select Settings \(\rightarrow\) New UI \(\rightarrow\) Enable New UI. However, it's entirely a matter of taste which you prefer, the old or the new UI.
Displaying the Debug/release menu in the New UI. If you use the new UI option (Settings New UI), you should enable the so-called debug/release translation menu as described in this tutorial.
Using an external console window: I don't use this myself, but if you want to launch a console app in an external console see How to launch console app in external window?
1.5 ComTest
The ComTest testing tool is needed from the fourth demo week onwards.
A ComTest extension for Rider is available for testing for the time being
For information (do not open if you do not want to explore the content): the plugin page on the JetBrains plugin repo:
https://plugins.jetbrains.com/plugin/20223-comtest-rider
The plug-in comes with a real ComTest and requires no further pre-installation or configuration.
1.5.1 Installing a plugin
The latest plugin has not yet been tried on any other operating system than Win11. Please leave a comment if you try it on any other operating system.
- Open Rider and create
ConsoleMainproject - Go to File | Settings | Plugins:
- Select the Marketplace tab and search for
ComTest - Select Install from the Comtest Runner plugin.
- Press Save
- Restart Rider.
In the future, you can update from the same menu, but instead of the Install button, you will see Update.
1.5.2 Adding the ComTest test base to the code
The plugin adds a new comt base to generate a ready-made base for writing unit tests.
Usage:
- Write a body for the function under test, for example
    public static int Summa(int a, int b)
    {
        return 0;
    }
Move the cursor over the body and type
///, and Rider will generate a ready-made body for the function documentation: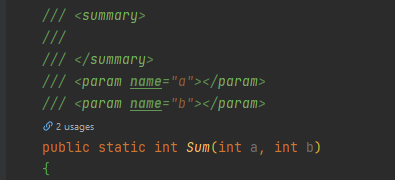
Add a new line below the documentation:
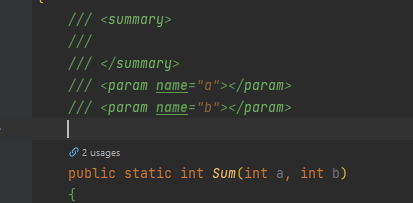
Type
comtand make sure that the corresponding base appears in the suggestions: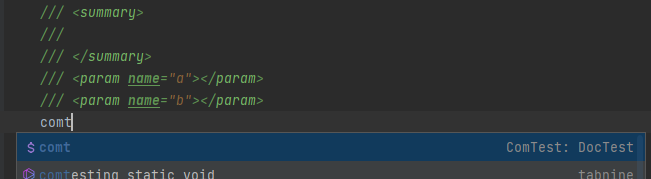
Press Enter. The completed base for the ComTest will appear at the end of the documentation:
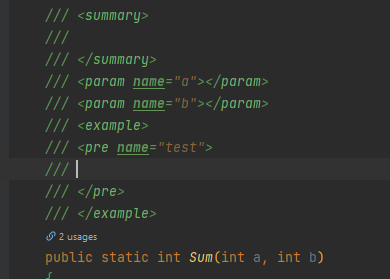
- Type there
<pre name="test"> line and</pre>between line
    /// Sum(0, 0) === 0;
    /// Sum(2, 3) === 5;
    /// Sum(-2, 1) === -1;
Run the tests using the instructions below.
Should come up red.
Correct the function
return-statement to read
return a + b;- Run the tests again, should come up green.
1.5.3 Test code generation and execution
Select Tests | ComTest: Generate Tests from Solution to generate the actual test code based on the ComTest tests made at . This option will generate (or update if the tests had changed) and also run all tests in the solution.
You can also just run the tests (without generating/updating) by selecting Tests | Run All Tests from Solution
Tip: The fastest way is to use hotkeys:
- Generate/update and run tests with
Ctrl + Shift + T(Windows) or⇧ + ⌘ + T(macOS) - Run tests manually:
Ctrl + U, L(Windows) or⌘ + ;(macOS)
1.5.3.1 Making your own hotkey
Vesa: Since Ctrl + Shift + T doesn't work for me and I want Ctrl+Q to be able to run , I'll change the shortcut to :
File/Settings/Keymap- from the pen image to the right to the search word
comt - Choose from the suggestions
ComTest: Generate Test from Solutiondouble-click - delete the old key combination (
Remove...) - double-click again
Add Keyboard Shortcut- Press the desired key combination in the blue framed box (now
Ctrl+Q) OK/Save
1.5.4 Source code
Plugin source code: https://gitlab.jyu.fi/tie/tools/comtest.intellij
1.5.5 Esimerkkejä ComTestin käytöstä
2. Solution ja projekti
Rider käyttää ns. projekti-solution-struktuuria koodin organisointiin.
Projekti sisältää yhteen ohjelmaan (peliin tai konsolisovellukseen) liittyvän koodin ja grafiikka- ja musiikkitiedostot.
Projekti kuuluu aina johonkin solutioniin. Yksi solution voi sisältää yhden tai useampia projekteja. (Sivuhuomio: Solution on Microsoftin keksimä nimi tällaiselle projekteja koostavalle kapistukselle. Sana ei varsinaisesti tarkoita mitään.)
Esimerkiksi yksi demokerta voi olla yksi solution joka sisältää useita projekteja (demotehtäviä). Useiden projektien lisäämisessä samaan solutioniin on se etu, että silloin voi pitää samaan demoon liittyvät tehtävät yhtä aikaa näkyvillä ilman että niitä tarvitsee jatkuvasti avata tai sulkea.
Riderissa tehdyt solutionit ja projektit ovat yhteensopivia Visual Studion kanssa.
2.1 Suositeltava hakemistorakenne
Kurssilla kannattaa kaikki kurssin asiat tehdä esimerkiksi alikansion (hakemiston) ohj1 alle. Tuo ohj kansio ohj1 voi alla käyttötarkoituksesta riippuen eri paikassa:
Mikroluokan koneessa
c:\MyTemp\Anonymous\ohj1ja omassa kannettavassa esimerkiksi:
Windows: `/c/kurssit/ohj1`
Mac ja Linux: `~/kurssit/ohj1`
ja sitten tuon kansion alla on alikansiota tyyliin:
ohj1
 |
 +-demot
 |  +-demo1
 |  | +-HelloWorld
 |  | +-Lumiukko
 |  |
 |  '-demo2
 |    +-Lumiukko2
 |    +-LukujenLaskemista
 |
 '-ohjaukset
    +-paate1
    | +-HelloWorld
    | +-Lumiukko
    '-paate2
Eli esimerkiksi demo1 on yksi solution jonka alla on useita projekteja. Usein projekti on yksi demotehtävä.
2.2 Uusi solution
Luodaan uusi solution ja siihen projekti. Tässä esimerkissä luodaan demo1-niminen solution ja siihen Lumiukko-niminen projekti demot-alikansioon:
Mikäli haluat lisätä projektin olemassa olevaan solutioniin, siirry lukuun 9.
- Valitse
New Solution.- Mikäli joku vanha solution on jo auki, niin sama onnistuu yläpalkista
File/New Solution.
- Mikäli joku vanha solution on jo auki, niin sama onnistuu yläpalkista
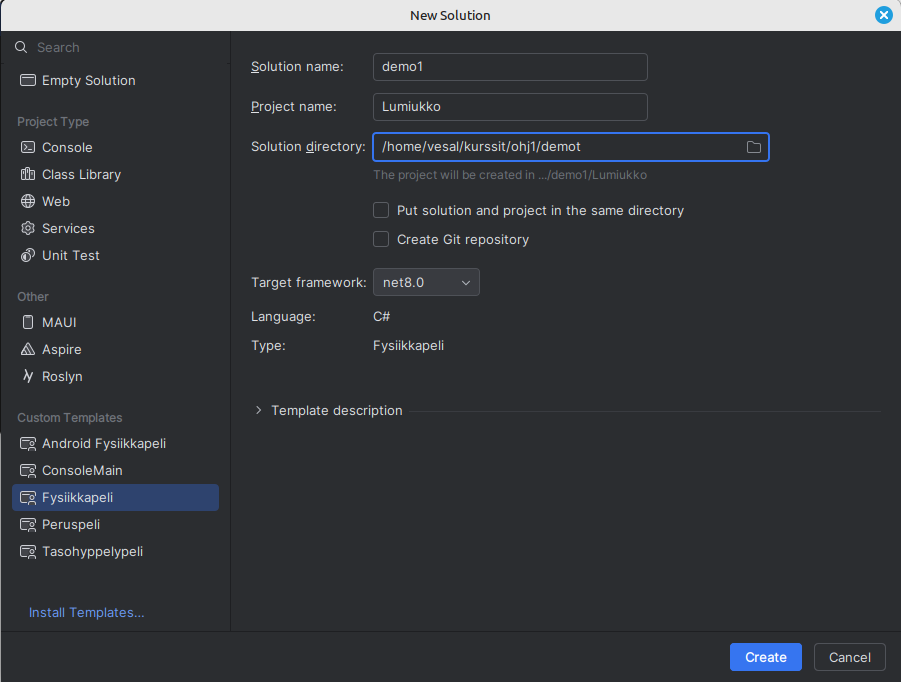
Valitse vasemmalta templates-listasta
FysiikkaPeli.Anna solutionin nimeksi
demoX, esimerkiksidemo1Anna projektin nimi, esimerkiksi
LumiukkotaiTeht3Lumiukko(Huom Iso alkukirjan!).Kirjoita tai selaa poluksi (
Anonymoustilalle oma käyttäjätunnuksesi jos se on eri):- oma Windows kone:
C:\kurssit\ohj1\demot - Mac:
/Users/Anonymous/kurssit/ohj1/demot - Linux:
/home/Anonymous/kurssit/ohj1/demot - mikroluokssa
C:\MyTemp\Anonymous\ohj1\demot
HUOM! Yliopiston mikroluokissa projekti tulee tehdä ensin tietokoneen kiintolevylle, esim.
C:\MyTemp\Anonymous\.... Siirrä lopuksi tiedostot U-asemallesi tai muualle talteen.- oma Windows kone:
Jätä
Put solution and project in the same directory-boksi tyhjäksi.Framework-kohtaannet8.0Klikkaa
Create.Levylle syntyy nyt hierarkia:
kurssit                    - kaikkien kurssien hakemisto
  ohj1                     - ohj1 kurssin hakemisto
    demot                  - demojen hakemisto
      demo1                - demo1:n hakemisto
        demo1.sln          - solutionintiedosto jossa luetellan mitä projekteja
        Lumiukko           - hakmeisto jonka alla Lumiukko-projekti
          bin              - hakemisto jonne tulee ajettavaa koodia
          obj              - hakemisto jonne tulee käännettyjä tiedostoja
          Lumiukko.cs      - C#-tiedosto johon tulee lumiukon piirtävä koodi
          Ohjelma.cs       - C#-pääohjelma
          Lumiukko.csproj  - projektin tiedosto jossa kerrotaan mitä tiedotoja projektiin liittyy
Klikkaa Solution Explorerissa Lumiukko.cs-kooditiedostoa. Koodissa pitäisi näkyä:
Kokeile käynnistää ohjelma
Run/Run 'Lumiukko', jolloin pitäisi näkyä uusi ikkuna vaaleansinisellä taustalla. Jos kaikki toimii, sulje ikkuna.Pyyhi pois koko se rivi jossa lukee "
Kirjoita ohjelmakoodisi tähän" ja kirjoita tilalleKäynnistä ohjelma uudestaan ja tarkista että ohjelma muuttui.
- Kirjoita luokan dokumentaatiokommentti näppäilemällä luokan esittelyrivin (eli
public class...) yläpuolelle kolme kauttaviivaa///. Kirjoita<summary>-tagien väliin selvitys luokan toiminnasta (eli että piirretään lumiukko) - Kirjoita vastaavasti
Begin-metodin dokumentaatiokommentit.
2.3 Uusi projekti olemassa olevaan solutioniin
Oletetaan, että solution on jo olemassa. Lisätään siihen toinen projekti olemassa olevan lisäksi. Tässä esimerkissä luodaan uusi ConsoleMain-projekti olemassa olevaan demo1-solutioniin.
- Klikkaa Explorer-paneelissa solutionin
demo1nimeä hiiren oikealla (Macissa kahdella sormella). - Valitse
Add -> New Project - Valitse vasemmalta
ConsoleMain-projektimalli - Anna nimeksi
HelloWorld - Paina
Create. - Ensimmäisellä kerralla projekti ajetaan klikkaamalla Explorerissa sen nimeä
HelloWorldhiiren oikealla ja valitseRun HelloWorld. Myöhemmillä kerroilla voit käynnistää projektin käynnistämällä yläpalkista haluamasi projektin.
2.4 Jypeli-projektit
Jypeli-projektin voi tehdä valitsemalla solutionia tai projektia luodessa Custom Templates -kohdasta oikean projektimallin.
ConsoleMain(Konsolisovellukset, joissa on Ohj1 kurssin pohja)Fysiikkapeli(Fysiikkaa käyttävät pelit ja muut graafiset sovellukset)Tasohyppelypeli(Esimerkkipeli)Android Fysiikkapeli(Android-alustaa varten)
2.4.1 Pääohjelma Jypeli-projekteissa (Main)
Jypeli-projektissa Main-pääohjelma menee Ohjelma.cs-tiedostoon, joten jos copy-pastetat koodin, joka sisältää Main-pääohjelman, niin poista Main-pääohjelma Portaat-luokan (tms. projektisi nimeä vastaava luokka) sisältä. Projektissa ei saa olla kahta Main-pääohjelmaa.
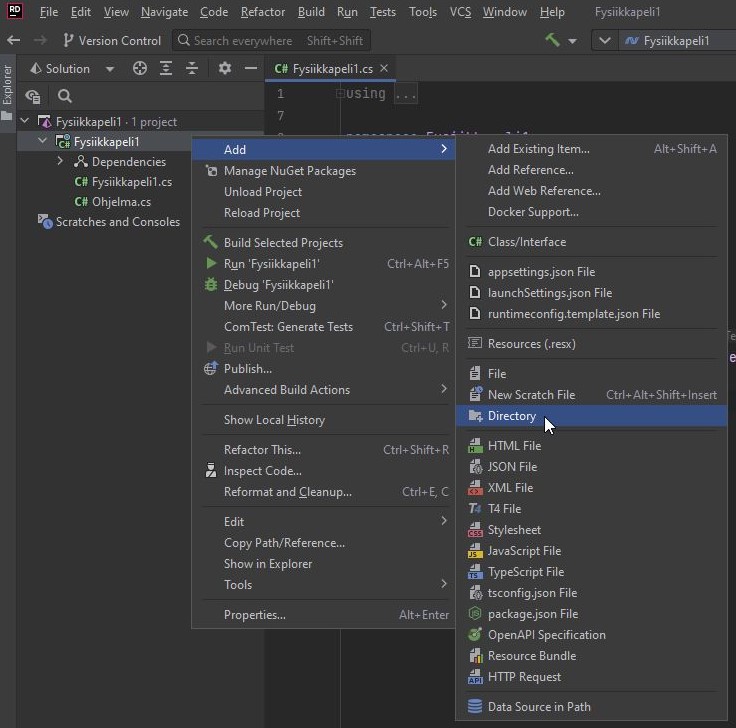
2.4.2 Sisällön tuominen Jypeli-projektiin (Content-kansio)
Kuvat ja äänet lisätään peliprojektin Content-kansioon, joka näkyy editorin tiedostolistauksessa.
Content-kansion voi luoda klikkaamalla hiiren oikealla projektia -> Add -> Directory
- Lisää tiedosto klikkaamalla kansiota hiiren oikealla napilla -> Add -> Add Existing Item
- Valitse tiedosto(t) jonka haluat lisätä ja paina ok.
- Valitse Copy.
- Klikkaa tuomaasi tiedostoa Content-kansiossa hiiren oikealla ja valitse Properties
- Vaihda Copy to output directory -kohtaan "Copy if newer"
3. Muita ohjeita ja vinkkejä
3.1 Pikanäppäimet
- jos valittu Visual Studion näppäinasettelu
3.2 Ikkunat
Riderisssa voi eri ikkunoita siirrellä hiirellä paikasta toiseen.
- Kun ikkunaa siirtää ja irrottaa, siitä tulee Float-näkymä (View Mode).
- Ikkunan oikeassa yläkulmassa on ikoni, jolla ikkunan saa telakoitumaan (Dock).
- Oletuksena ikkuna telakoituu viimeiseen "kotiinsa". Jos telakoidun ikkunan raahaa ja päästää irti johonkin reunoista (vasen, ala tai oikea), ikkuna telakoituu sinne.
- Telakoituja ikkunoita voi avata ja sulkea klikkaamalla niiden nimeä.
- Ikkunan rattaankuvasta voi
View Mode-kohdasta valita myösWindow, jolloin ikkunasta tulee erillinen käyttöjärjestelmän ikkuna jonka voi vetää vaikka toiseen näyttöön. - Ikkunan rattaankuvasta löytyy myös
Move Tojosta voi suoraan valita mihin ikkuna telakoituu. - lähdekoodi-ikkunoita (mm.
.cs-päätteisiä) voi asetelle allekkain, rinnakkain tai vetää ihan omiksi ikkunoikseen, joita voi siirtää vaikka toiseen näyttöön. - Eri paikkaa viedyn lähdekoodi-ikkunan saa omaan TAB-listaansa joko vetämällä sen toisen lähdekoodi-ikkunan keskelle tai sitten sulkemalla ikkunan ja avaamalla uudelleen
3.2.1 Näkymät
Ikkunanäkymä (siis niiden määrä ja sijoittelu) voi vaihdella tiloittain. Kurssilla tärkeimät tilat ovat muokkaus ja debug. Oletuksena ollaan muokkaustilassa ja debugtilaan päästään kun ohjelma pysähtyy breakpointtiin.
3.2.2 Ikkunoiden hakeminen
Ikkunat voi helposti vahigossa hukata ja silloin niitä voi etsiä seuraavista paikoista:
View/ToolWindowsDebug/Windows
Tärkeimmät ikkunat (suluissa mistä menusta ikkunan löytää jos se on hukkunut):
Muokkaustila:
- peruseditointialue, tässäkin voi tiedostoja siirtää rinnakkain katseltavaksi tai irroitttaa kokonaan omiksi ikkunoikseen
- Solution Explorer - näyttää solutionin rakenteen
- Run - näyttää ohjelman tulosteen
- File (
View) - ohjelman käännösvirheet - Debug (
View) - testien tulokset
4. Debuggaus
5. Ongelmia
5.1 Rider-lisenssin uudelleenaktivointi
Lisenssi täytyy mahdollisesti aika ajoin uudelleenaktivoida kohdasta Help -> Manage licenses -> Activate.
5.2 dotnet not found / command not found: dotnet
Katso .NET-asennusohjeet
5.3 Linux
Jos komentoriviltä tulee:
A fatal error occurred. The folder [/usr/share/dotnet/host/fxr] does not exist 5.4 Jypeli-peli ei käynnisty, esim. You must install or update .NET
Etene kuten kohdassa 5.2.
5.5 Näppäinkomennot eivät toimi
Iso osa editorin näppäinoikoteistä (TODO: Esimerkkejä?) ei toimi sellaisenaan muilla kuin Yhdysvaltalaisilla näppäimistöillä. On siis tarpeen valita toimimattomille suosikkikomennoillesi uudet näppäinoikotiet asetuksista: File → Settings → Keymap → Editor actions.
5.6 Silk.NET.Core.Loader.SymbolLoadingException' occurred in Silk.NET.Core.dll: 'Native symbol not found (Symbol: glfwWindowHintString)
Yllä olevan virheviestin syynä on todennäköisimmin että sinulla ei ole GLFW asennettuna, tai se on liian vanha. Monen Linux-distron mukana tulee versio 3.2, mutta Jypeli vaatii vähintään version 3.3.
Asenna uusin GLFW-versio käyttämäsi paketinhallinnan avulla.
5.7 System.PlatformNotSupportedException: GLFW is not supported on this platform...
Voi olla että tietokoneellasi ei ole näytönohjaimen ajureita asennettuna. Mene Windowsin asetukset -> Päivitykset -> Valinnaiset (päivitä-nappulan alapuolella) -> Ajurit. Asenna sieltä jotenkin näyttöön liittyvä ajuri, esimerkiksi "Intel Display Driver"
Jos ajuria ei löydy ja käytät kannettavaa, todennäköisesti sinulla on integroitu näytöonohjain, jolloin ajuri voi löytyä prosessorin valmistajan (Intel tai AMD) sivulta. Hae ajurit Googlesta esimerkiksi hakusanalla Intel graphics driver tai AMD graphics driver prosessorin valmistajasta riippuen.
5.8 Muita ongelmia?
Jos vastaan tuli jokin muu ongelma jota ei tällä sivulla ole raportoitu, ilmoita siitä jotta ongelma ja korjaus voidaan dokumentoida tänne.
5.9 Ongelmia Riderin tai Jypelin kanssa
Kirjoita alle jos sinulla on jotakin ongelmia Riderin kanssa:
These are the current permissions for this document; please modify if needed. You can always modify these permissions from the manage page.