Solutions and projects in Rider
Other Rider pages
1. Solution and project
Rider uses a so-called project-solution structure to organise code.
A project contains the code, graphics and music files associated with a single program (game or console application) .
A project is always part of a solution. A single solution can contain one or more projects. (Side note: Solution is a name invented by Microsoft for such a collection of projects. The word doesn't actually mean anything.)
For example, a single demo can be a single solution containing several projects (demo tasks). The advantage of adding several projects to a single solution is that you can keep the tasks related to the same demo visible at the same time without having to constantly open or close them.
Solutions and projects created in Rider are compatible with Visual Studio.
1.1 Recommended directory structure
In a course, it is advisable to put all the things in the course under a subdirectory (directory) such as under ohj1. That directory ohj1 can be under a different location depending on the purpose:
On a microcomputer
c:\MyTemp\Anonymous\ohj1and in your own laptop, for example:
Windows: `/c/kurssit/ohj1`
Mac ja Linux: `~/kurssit/ohj1`
and then under that folder is a subfolder like:
ohj1
 |
 +-demot
 |  +-demo1
 |  | +-HelloWorld
 |  | +-Lumiukko
 |  |
 |  '-demo2
 |    +-Lumiukko2
 |    +-LukujenLaskemista
 |
 '-ohjaukset
    +-ohjaus1
    | +-HelloWorld
    | +-Lumiukko
    '-ohjaus2
For example, demo1 is one solution with several projects under it. Often a project is one demo task.
Syntax error in macro template: unexpected '%'
2. Uusi solution
Luodaan uusi solution ja siihen projekti. Tässä esimerkissä luodaan demo1-niminen solution ja siihen Lumiukko-niminen projekti demot-alikansioon:
Mikäli haluat lisätä projektin olemassa olevaan solutioniin, siirry lukuun 3.
- Valitse
New Solution.- Mikäli joku vanha solution on jo auki, niin sama onnistuu yläpalkista
File/New Solution.
- Mikäli joku vanha solution on jo auki, niin sama onnistuu yläpalkista
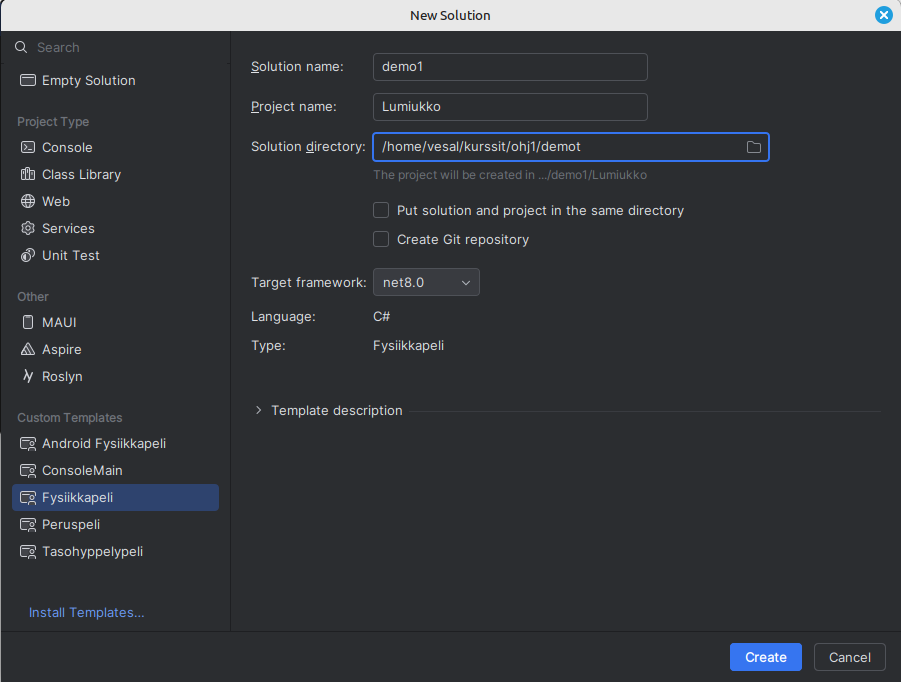
Valitse vasemmalta templates-listasta
FysiikkaPeli.Anna solutionin nimeksi
demoX, esimerkiksidemo1Anna projektin nimi, esimerkiksi
LumiukkotaiTeht3Lumiukko(Huom Iso alkukirjan!).Kirjoita tai selaa poluksi (
Anonymoustilalle oma käyttäjätunnuksesi jos se on eri):- oma Windows kone:
C:\kurssit\ohj1\demot - Mac:
/Users/Anonymous/kurssit/ohj1/demot - Linux:
/home/Anonymous/kurssit/ohj1/demot - mikroluokssa
C:\MyTemp\Anonymous\ohj1\demot
HUOM! Yliopiston mikroluokissa projekti tulee tehdä ensin tietokoneen kiintolevylle, esim.
C:\MyTemp\Anonymous\.... Siirrä lopuksi tiedostot U-asemallesi tai muualle talteen.- oma Windows kone:
Jätä
Put solution and project in the same directory-boksi tyhjäksi.Framework-kohtaannet8.0Klikkaa
Create.Levylle syntyy nyt hierarkia:
kurssit                    - kaikkien kurssien hakemisto
  ohj1                     - ohj1 kurssin hakemisto
    demot                  - demojen hakemisto
      demo1                - demo1:n hakemisto
        demo1.sln          - solutionintiedosto jossa luetellan mitä projekteja
        Lumiukko           - hakmeisto jonka alla Lumiukko-projekti
          bin              - hakemisto jonne tulee ajettavaa koodia
          obj              - hakemisto jonne tulee käännettyjä tiedostoja
          Lumiukko.cs      - C#-tiedosto johon tulee lumiukon piirtävä koodi
          Ohjelma.cs       - C#-pääohjelma
          Lumiukko.csproj  - projektin tiedosto jossa kerrotaan mitä tiedotoja projektiin liittyy
Klikkaa Solution Explorerissa Lumiukko.cs-kooditiedostoa. Koodissa pitäisi näkyä:
Try launching the program
Run/Run 'Lumiukko', which should display a new window with a light blue background. If everything works, close the window.Delete the entire line that says "
Kirjoita ohjelmakoodisi tähän" and type in its place
        Level.Background.Color = Color.Black;
        PhysicsObject pallo = new PhysicsObject(200, 200, Shape.Circle);
        pallo.Color = Color.White;
Add(pallo);- Run the program again and check that the program changed.
- Write a class documentation comment by typing three slashes
///above the class introduction line (i.e.public class...). Type<summary>between the tags, an explanation of how the class works (i.e. that draws a snowman) - Similarly, type the documentation comments for the
Beginmethod.
3. A new project for an existing solution
Assume that a solution already exists. Add another project to it in addition to the existing one. In this example, a new ConsoleMain project is created for the existing demo1 solution.
- In the Explorer panel, right-click on the
demo1name of the solution (two fingers on a Mac). - Select
Add -> New Project - Select the
ConsoleMainproject template from the left - Enter a name
HelloWorld - Press
Create. - The first time you run the project, right-click on its name
Lausekkeitain Explorer and selectRun HelloWorld. In subsequent iterations, you can launch the project by launching the desired project from the top bar.
4. Note on Jypeli projects
In a Jypeli project, the Main main main program goes into the Program.cs file, so if you copy-paste code that contains the Main main program, then remove the Main main program from the Portaat class (or similar class in your project name) inside .
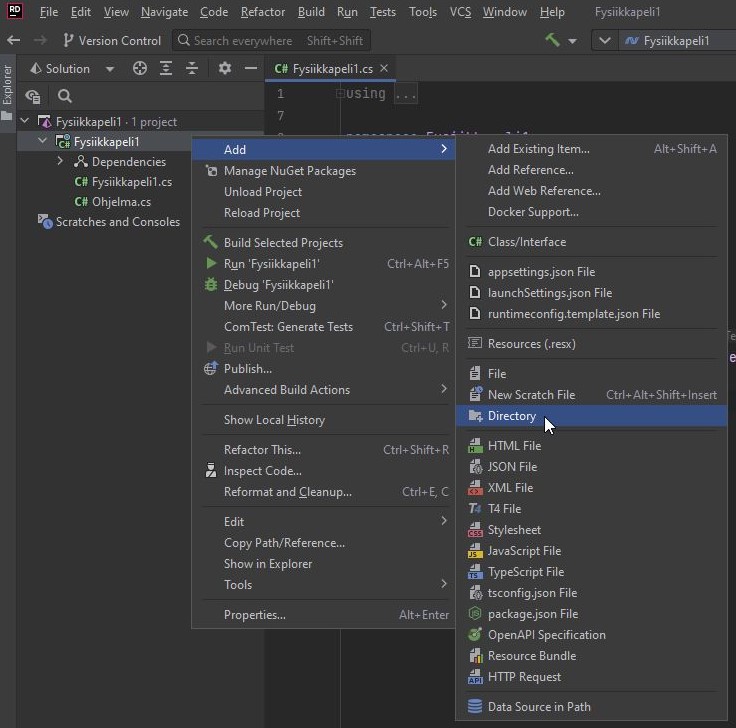
4.1 Sisällön tuominen Jypeli-projektiin (Content-kansio)
Kuvat ja äänet lisätään peliprojektin Content-kansioon, joka näkyy editorin tiedostolistauksessa.
Content-kansion voi luoda klikkaamalla hiiren oikealla projektia -> Add -> Directory
- Lisää tiedosto klikkaamalla kansiota hiiren oikealla napilla -> Add -> Add Existing Item
- Valitse tiedosto(t) jonka haluat lisätä ja paina ok.
- Valitse Copy.
- Klikkaa tuomaasi tiedostoa Content-kansiossa hiiren oikealla ja valitse Properties
- Vaihda Copy to output directory -kohtaan "Copy if newer"
5. Hotkeys
- if selected Visual Studio keyboard layout
6. Windows
In Rider, you can move different windows from one place to another with the mouse.
- When you move and unmove a window, it becomes a float view(View Mode).
- In the upper right corner of the window, there is an icon todock the window.
- By default, the window docks to its last "home". If you drag the docked window and let go of one of the edges (left, bottom or right), the window will dock there.
- Docked windows can be opened and closed by clicking on their name.
- From the window's wheel image, you can also select
WindowfromView Mode, making the window a separate operating system window that can be dragged to another screen. - The window's cursor image also contains
Move Towhere you can directly select where the window will be docked. - source code windows (e.g.
.csterminal windows) can be placed below each other, side by side or dragged into their own windows, which can be moved to another screen. - A source code window moved to a different location can be added to its own TAB list either by dragging it to the middle of another source code window or by closing the window and reopening it
6.1 View from
Window views (i.e. their number and layout) may vary from one account to another. For the course, the main modes are edit and debug. The default is edit mode and debug mode is entered when the program stops at a breakpoint.
6.2 Fetching windows
Windows can easily get lost in waxigo and you can look for them in the following places:
View/TollWIndows- Debug/Windows
Main windows (in brackets, where to find the window if it is lost):
Edit mode:
- basic editing area, here too you can move files to view them side by side or detach completely into their own windows
- Solution Explorer - shows the structure of the solution
- Run - shows the output of the program
- File (
View) - program compilation errors - Debug (
View) - test results
These are the current permissions for this document; please modify if needed. You can always modify these permissions from the manage page.