English version of the materials are work in progress!
Expect bugs, typos, and other issues. The English version is expected to be completed during spring 2026.
Exercise: Transformation of an ER Diagram
In this guided exercise, we will get to know the transformation of ER diagrams into relational database relations (i.e. effectively tables). Transformation is a useful preliminary step for implementing databases, as by applying transformation rules you can easily form a relational database suitable for the conceptual model.
The exercise has several subtasks. You can progress in the exercise by completing each subtask one at a time.
This exercise is a continuation of Exercise 2.1. Do Exercise 2.1 first before starting this exercise.
Before starting the exercise, familiarize yourself with the following chapters:
Chapter 3.1, which presents basic concepts of relational databases. In this task, you must especially understand what relation, primary key, and foreign key are.
Chapter 3.2, which presents all transformation rules. In this task, we will get to know the general transformation process, and a more detailed examination of rules is left outside this task.
Huomautus
Jos huomaat virheitä tai sinulla on kysyttävää tehtävistä, ota yhteyttä kurssin opettajiin
- lähettämällä sähköpostia osoitteeseen
itka2004-teachers@jyu.onmicrosoft.com - laittamalla viestiä kurssin Teams-ryhmään tai osallistumaalla ohjauksiin: Teams ja ohjaukset
Assignment
Let's return to the student database modelled in Exercise 2.1 and transform it into a relational database.
Follow the steps in the sections below and complete the answers in the submission boxes below based on them. You will find a check button at the end of each section with which you can test the correctness of your answer.
Transforming Entity Sets
{#openEntity Sets plugin="jsrunner" id="CR3KriY0RDj2" nocache="true"} groups: - Anonymous showInView: true button: Avaa osatehtävä "Entity Sets" fields: - 947075.ex21-er-avainattribuutit.ALL=ex21-er-avainattribuutit - 947075.ex31-step1.ALL=ex31-step1 - 947075.ex31-step2.ALL=ex31-step2 - 947075.ex31-step3.ALL=ex31-step3 program: |!! if ("<span class="error" ng-non-bindable>The `belongs` filter requires `nocache=true` attribute.</span>" !== "True") { let v = tools.getValue("ex21-er-avainattribuutit", undefined); if (!v) { tools.println("Complete Exercise 2.1 first before starting this exercise!"); return; } } gtools.outdata.saveAreaVisibility = false; gtools.outdata.areaVisibility = { "osa1": true, }; !!
Let's look at the student database ER diagram again for revision:
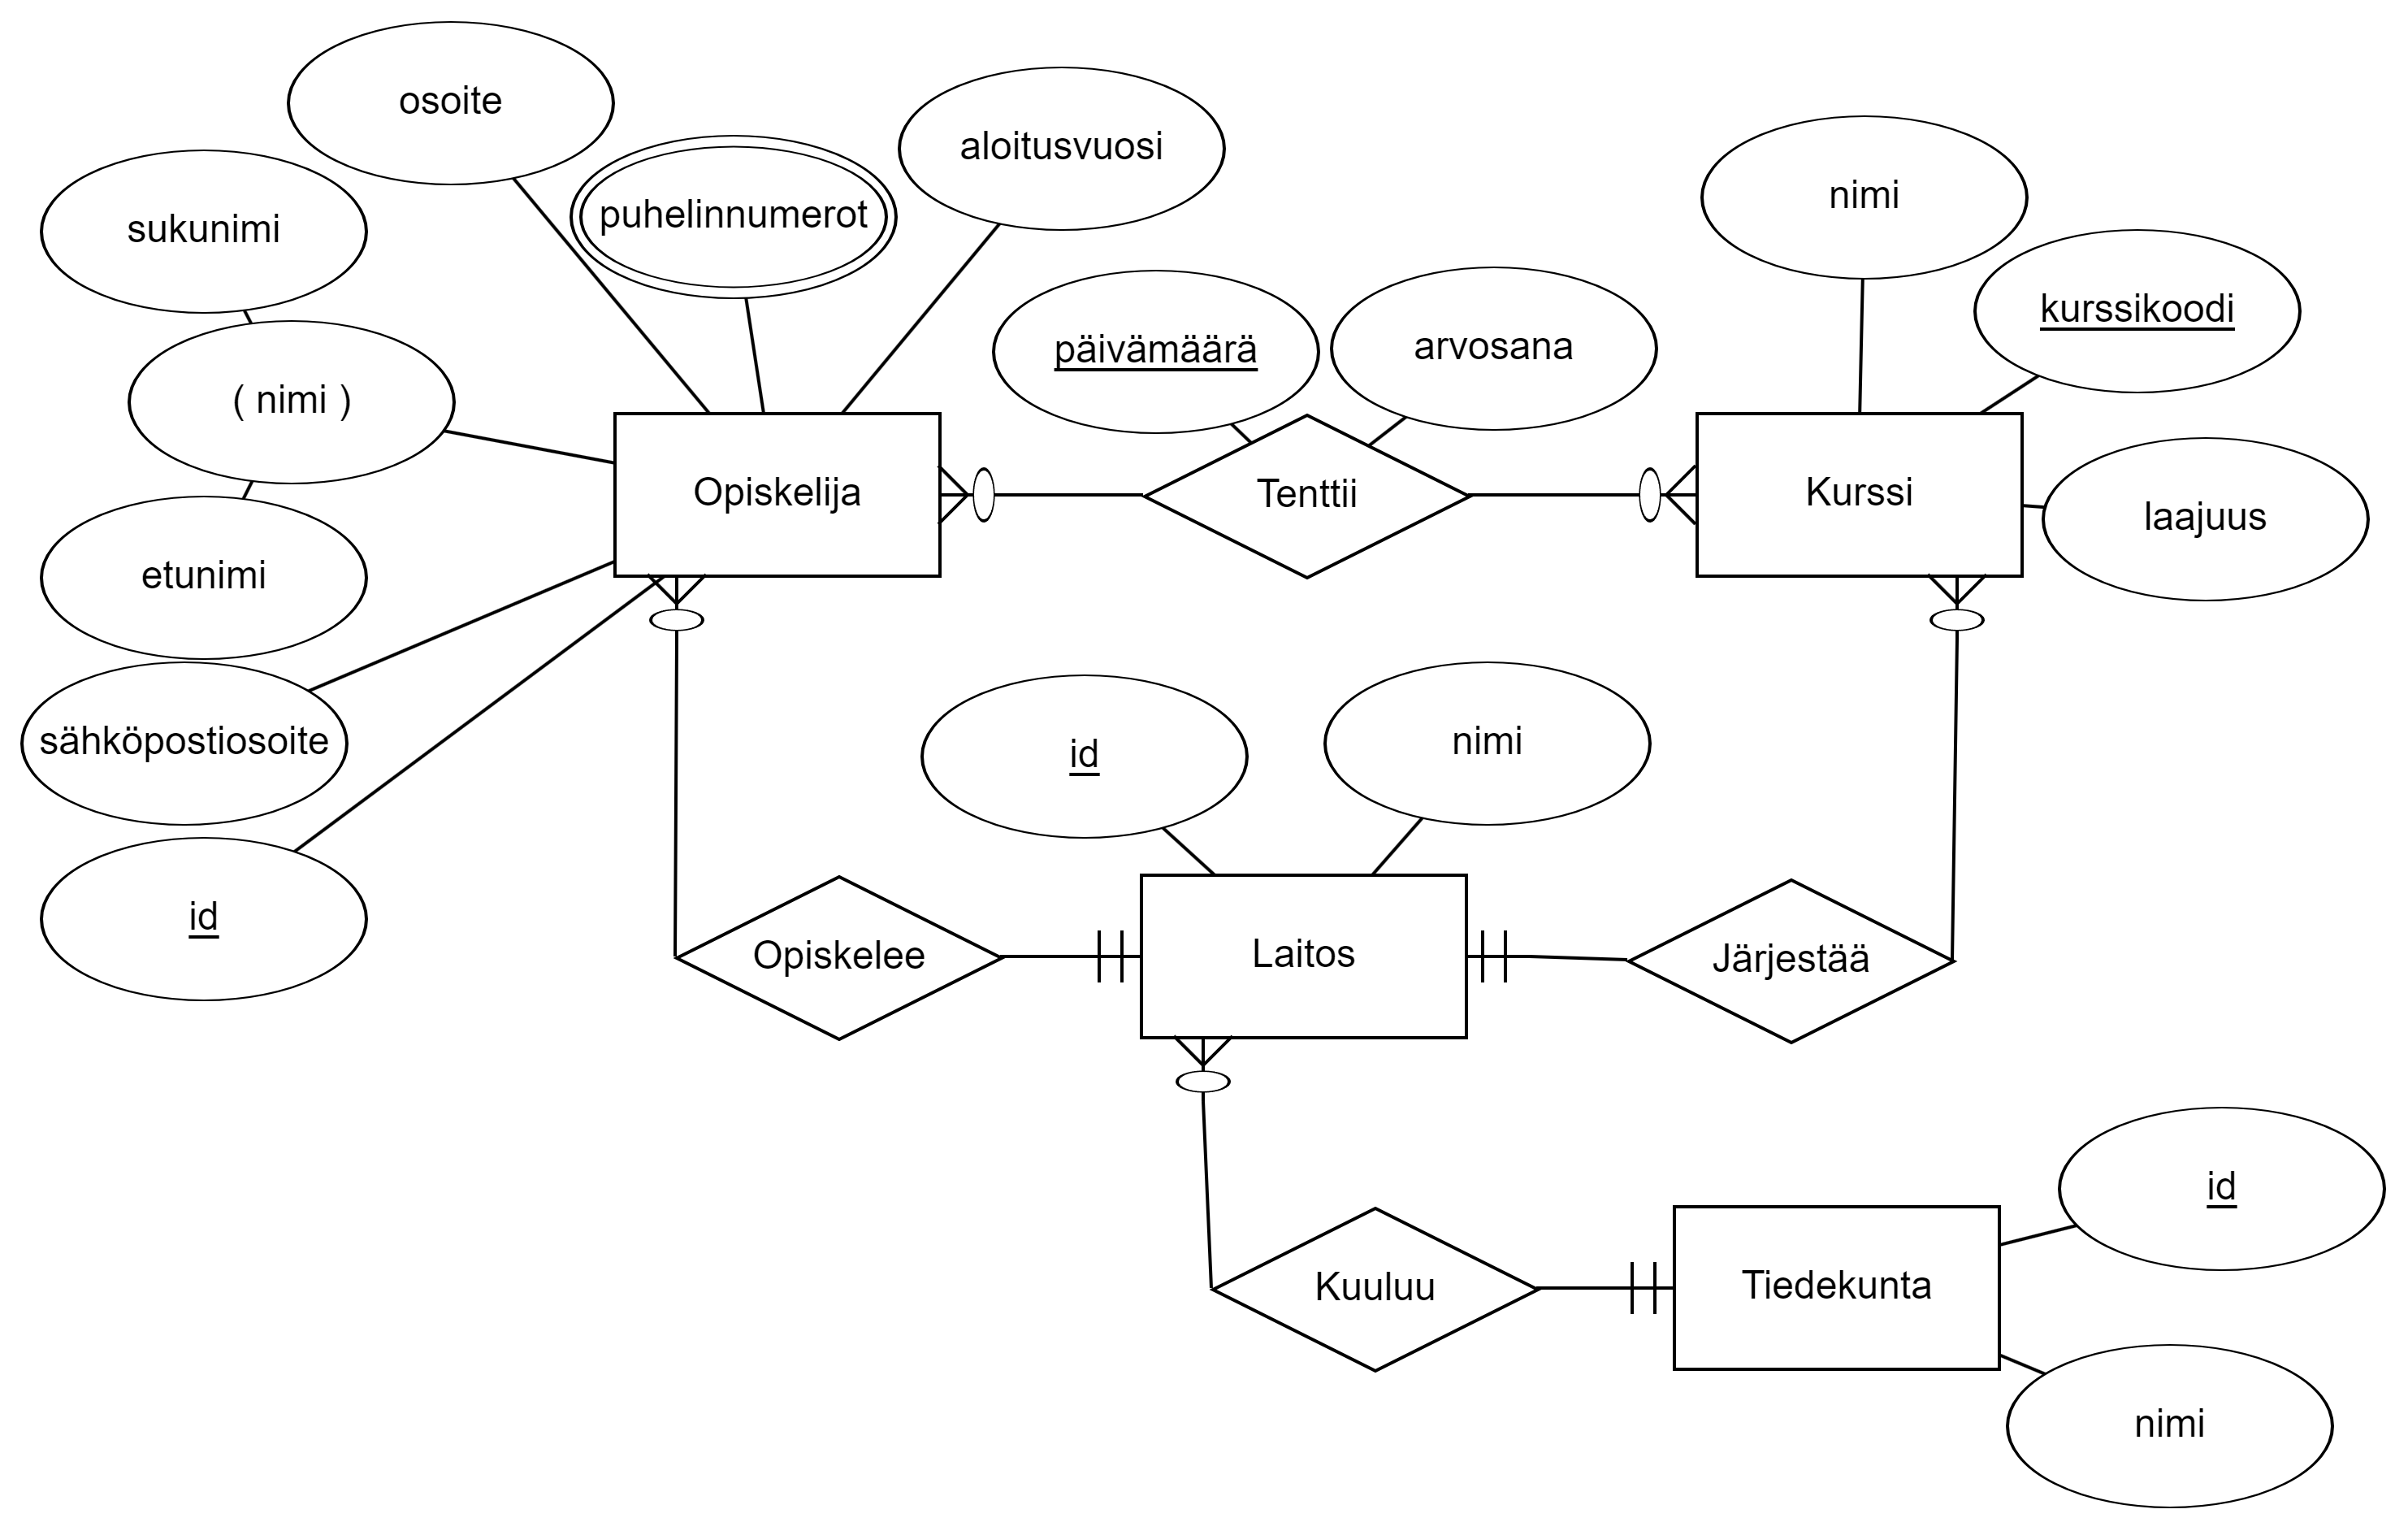
Let's start by transforming entity sets and their basic attributes. Basic attributes here mean all those attributes that are not composite, multivalued, or derived.
Let's apply the first transformation rule here:
There are different notation ways for a relational database: relations can be described as a table or, for example, as classes of UML diagrams. In this course, we use the same notation way presented in Chapter 3.1:
RELATION_NAME(attribute1, attribute2, attribute3)
Primary keys are marked in these tasks exceptionally by marking key attributes inside {| |} brackets. For example in the following schema
RELATION_NAME({|attribute1, attribute2|}, attribute3)
attributes attribute1 and attribute2 belong to the relation's primary key.
So let's add all entity sets and their basic attributes to the answer box. At this stage, it is not yet worth transforming special attributes, such as composite, derived, or multivalued. Define relations first and set all simple attributes in them:
- Move the cursor to an empty line
- Press the "New relation" button, which adds a template for a new relation.
- Set the relation name to
STUDENTand add the student's ordinary attributes (i.e., all attributes that are not composite, multivalued, or derived) to the relation:idemailaddressstart_year
- Mark the key attribute
idas a primary key- Paint the attribute
id - Press the "Mark as primary key" button
- Paint the attribute
- Add a new empty line and repeat steps 1-4 for all other entity sets
You can float the diagram editor with the Float button. Then the text moves to the right edge, and space is freed up for the editor on the right.
Harjoitus: ER-kaavion transformointi
Tässä ohjatussa harjoituksessa tutustutaan ER-kaavioiden transformointiin relaatiotietokantojen relaatioiksi (eli käytännössä tauluiksi). Transformointi on hyödyllinen esiaskel tietokantojen toteuttamiselle, sillä soveltamalla transformointisääntöjä saat helposti muodostettua käsitteelliseen malliin sopivan relaatiotietokannan.
Harjoituksessa on useita osatehtäviä. Pääset harjoituksessa eteenpäin suorittamalla jokainen osatehtävä kerrallaan.
Tämä harjoitus on jatkoa Harjoitukselle 2.1. Tee ensin Harjoitus 2.1 ennen kuin aloitat tämän harjoituksen.
Ennen harjoituksen aloittamista tutustu seuraaviin lukuihin:
Luku 3.1, jossa esitetään relaatiotietokantojen peruskäsitteitä. Tässä tehtävässä tulee erityisesti ymmärtää, mitä ovat relaatio, perusavain sekä viiteavain.
Luku 3.2, jossa esitellään kaikki transformointisäännöt. Tässä tehtävässä tutustutaan yleiseen transformointiprosessiin, ja tarkempi sääntöjen tarkastelu jää tämän tehtävän ulkopuolelle.
Huomautus
Jos huomaat virheitä tai sinulla on kysyttävää tehtävistä, ota yhteyttä kurssin opettajiin
- lähettämällä sähköpostia osoitteeseen
itka2004-teachers@jyu.onmicrosoft.com - laittamalla viestiä kurssin Teams-ryhmään tai osallistumaalla ohjauksiin: Teams ja ohjaukset
Tehtävänanto
Palataan Harjoituksessa 2.1 mallinnettuun opiskelijatietokantaan ja transformoidaan se relaatiotietokannaksi.
Seuraa alla olevien osioiden vaiheita ja täydennä alla olevien palautuslaatikoiden vastaukset niiden perusteella. Löydät jokaisen osion lopusta tarkistuspainikkeen, jolla voit testata vastauksesi oikeellisuuden.
Kohdetyyppien transformointi
Katsotaan kertaukseksi vielä opiskelijatietokannan ER-kaavio:

Aloitetaan transformoimalla kohdetyypit ja niiden perusattribuutteja. Perusattribuuteilla tarkoitetaan tässä kaikkia niitä attribuutteja, jotka eivät ole koottuja, moniarvoisia tai johdettuja.
Sovelletaan tähän ensimmäinen transformointisääntö:
Rule 1 (Strong entity sets): a separate relation is made for every strong entity set. Ordinary attributes of the entity set (i.e., attributes that are not multivalued, derived, or composite) are made attributes of the relation. Primary key of the relation is formed from the key attributes of the entity set.

Relaatiotietokannalle on olemassa erilaisia merkintätapoja: relaatiot voidaan kuvata taulukkona tai vaikkapa UML-kaavioiden luokkina. Tällä kurssilla käytämme samaa merkintätapaa, joka on esitetty Luvussa 3.1:
RELAATION_NIMI(attribuutti1, attribuutti2, attribuutti3)
Perusavaimet merkitään näissä tehtävissä poikkeuksellisesti merkitsemällä avainattribuutit {| |}-sulkujen sisään. Esimerkiksi seuraavassa kaaviossa
RELAATION_NIMI({|attribuutti1, attribuutti2|}, attribuutti3)
attribuutit attribuutti1 sekä attribuutti2 kuuluvat relaation perusavaimeen.
Lisätään siis kaikki kohdetyypit ja niiden perusattribuutit vastauslaatikkoon. Tässä vaiheessa ei vielä kannata transformoida erikoisattribuutteja, kuten koottuja, johdettua tai moniarvoisia. Määritä ensin relaatiot ja aseta niihin kaikki yksinkertaiset attribuutit:
- Siirrä kursori tyhjälle riville
- Paina "Uusi relaatio" -painiketta, joka lisää pohjan uudelle relaatiolle.
- Aseta relaation nimeksi
OPISKELIJAja lisää relaatiolle opiskelijan tavalliset attribuutit (eli kaikki attribuutit, jotka eivät ole koottuja, moniarvoisia tai johdettuja):idsähköpostiosoiteosoitealoitusvuosi
- Merkitse avainattribuutti
idperusavaimeksi- Maalaa attribuutti
id - Paina "Merkitse perusavaimeksi" -painiketta
- Maalaa attribuutti
- Lisää uusi tyhjä rivi ja toista vaiheet 1-4 kaikille muille kohdetyypeille
Voit kelluttaa kaavioeditorin Kelluta-painikkeella. Silloin teksti siirtyy oikeaan laitaan, ja editorille vapautuu tilaa oikealle.
Transforming Special Attributes
``{#openSpecial Attributes plugin="jsrunner" id="iW3z4mBHWKNg" nocache="true"} groups: - Anonymous showInView: true button: Avaa osatehtävä "Special Attributes" fields: - 947075.ex21-er-avainattribuutit.ALL=ex21-er-avainattribuutit - 947075.ex31-step1.ALL=ex31-step1 - 947075.ex31-step2.ALL=ex31-step2 - 947075.ex31-step3.ALL=ex31-step3 program: |!! if ("<span class="error" ng-non-bindable>Thebelongsfilter requiresnocache=true` attribute." !== "True") { let v = tools.getValue("ex21-er-avainattribuutit", undefined); if (!v) { tools.println("Complete Exercise 2.1 first before starting this exercise!"); return; }
v = tools.getValue("ex31-step1", undefined); if (!v) { tools.println("Fill and save the "Entity Sets" subtask answer before opening this subtask!"); return; } } gtools.outdata.saveAreaVisibility = false; gtools.outdata.areaVisibility = { "osa2": true, }; !! ```
Next, let's transform all special attributes in entity sets. Special attributes are, among others, multivalued, composite, derived, and all others for which their own transformation rules apply.
In the student database, it is noticed that the entity set STUDENT has two special attributes: name and phone_numbers. Transformation rules 4 and 5 apply to these:
Note that in the example above, a relation F2 was created for the multivalued attribute and the key attribute f1 of relation F was added to it. Relation F2 attribute f1 is thus a foreign key to relation F. In other words, a foreign key, as its name suggests, refers to an attribute in another relation (see Chapter 3.1).
Foreign keys can be marked in a relation schema in the following way:
F2.f1 -> F.f1
Meaning: Relation F2 attribute f1 is a foreign key referring to relation F attribute f1.
Let's transform attributes according to the rules into the box below:
- Move the cursor to a new line and add a new relation.
- Give the relation the name
STUDENT_PHONE_NUMBERS. This relation corresponds to the multivalued attributephone_numbersof the entitySTUDENT. - Add the primary key
idof relationSTUDENTas attributes to relationSTUDENT_PHONE_NUMBERS. Set its name tostudent_idfor clarity. - Add a new attribute
phone_numberto the relation, which contains a single phone number. - Mark
student_idandphone_numberas the primary key. - Move the cursor to a new line and add a new foreign key by pressing "New foreign key".
- Set the foreign key to be the attribute
student_idof relationSTUDENT_PHONE_NUMBERSand define it to refer to attributeidof relationSTUDENT.
- Set the foreign key to be the attribute
- Apply rule 4 to attribute
name.
You can float the diagram editor with the Float button. Then the text moves to the right edge, and space is freed up for the editor on the right.
Erikoisattribuuttien transformointi
Transformoidaan seuraavaksi kaikki kohdetyypeissä olevat erikoisattribuutit. Erikoisattribuutit ovat muun muassa moniarvoiset, kootut, johdetut ja kaikki muut sellaiset, joille pätevät omat transformointisäännöt.
Opiskelijatietokannassa huomataan, että kohdetyypillä OPISKELIJA on kaksi erikoisattribuuttia: nimi sekä puhelinnumerot. Näihin sopivat transformointisäännöt 4 ja 5:
Rule 4 (Composite attributes): composing (simple) attributes are chosen to be included in the relation from every composite attribute. The composite attribute is discarded.

Rule 5 (Multivalued attributes): a separate relation (so-called "attribute relation") is made for every multivalued attribute. The multivalued attribute as well as key attributes of the entity set to which the multivalued attribute being transformed belongs are chosen as the primary key of the attribute relation.

Huomaa, että yllä olevassa esimerkissä moniarvoiselle attribuutille luotiin relaatio F2 ja siihen lisättiin relaation F avainattribuutti f1. Relaation F2 attribuutti f1 on siis viiteavain relaatioon F. Toisin sanoin, viiteavain nimensä mukaisesti viittaa johonkin toisessa relaatiossa olevaan attribuuttiin (ks. Luku 3.1).
Relaatiokaavassa viiteavaimet voidaan merkitä seuraavalla tavalla:
F2.f1 -> F.f1
Eli: Relaation F2 attribuutti f1 on viiteavain, joka viittaa relaation F attribuuttiin f1.
Transformoidaan attribuutit sääntöjen mukaan alla olevaan laatikkoon:
- Siirrä kursori uudelle riville ja lisää uusi relaatio.
- Anna relaation nimeksi
OPISKELIJA_PUHELINNUMEROT. Tämä relaatio vastaa kohteenOPISKELIJAmoniarvoista attribuuttiapuhelinnumerot. - Lisää relaatiolle
OPISKELIJA_PUHELINNUMEROTattribuuteiksi relaationOPISKELIJAperusavainid. Aseta sen nimeksi selkeyden vuoksiopiskelija_id. - Lisää relaatiolle vielä uusi attribuutti
puhelinnumero, joka sisältää yksittäisen puhelinnumeron. - Merkitse
opiskelija_idsekäpuhelinnumeroperusavaimeksi. - Siirrä kursori uudelle riville ja lisää vielä uusi viiteavain painamalla "Uusi viiteavain".
- Aseta viiteavaimeksi relaation
OPISKELIJA_PUHELINNUMEROTattribuuttiopiskelija_idja määritä se viittaamaan relaationOPISKELIJAattribuuttiinid.
- Aseta viiteavaimeksi relaation
- Sovella vielä sääntöä 4 attribuutille
nimi.
Voit kelluttaa kaavioeditorin Kelluta-painikkeella. Silloin teksti siirtyy oikeaan laitaan, ja editorille vapautuu tilaa oikealle.
Transforming Relationships
Finally, let's transform relationship sets. In the relational model, transforming relationships depends only on the maximum cardinality of the relationship. Generally, minimum cardinality is not marked in relations in any way, but the handling of minimum cardinalities is usually universally the responsibility of either the application/person using the database or the database management system.
Let's examine from the ER diagram what kind of cardinalities are in the student database:
- One-to-many (1:N) relationships are those where the maximum cardinality of one entity participating in the relationship is 1 and the other entity's maximum cardinality is N.
- Student has a 1:N relationship to Department (student Studies in at most one department, and a department can have multiple students)
- Department has a 1:N relationship to Faculty (department Belongs to at most one faculty, and a faculty can have multiple departments)
- Course has a 1:N relationship to Department (course is Organized by at most one department, and a department can have multiple courses)
- Many-to-many (N:M) relationships are those where the maximum cardinality of both entities participating in the relationship is N.
- Student has an N:M relationship to Course (student Takes multiple exams for courses, a course can have many students taking exams)
- One-to-one (1:1) relationships are relatively rare, and there are none in this student database
Before you continue, go through the student database ER diagram once more and ensure that you understand the classification above.
Since the student database has only 1:N and N:M relationships, only the following two transformation rules are needed:
Let's transform relationships into the submission box below:
N:M relationships:
Let's first examine the only N:M relationship TakesExam, whose transformation is straightforward:
- Move the cursor to an empty line and add a new relation with the "New relation" button.
- Set the relation name to
TAKES_EXAM. This relation will become a relationship relation. - Add the attributes belonging to the primary key of relations
STUDENTandCOURSEas attributes of relationTAKES_EXAM:student_id(corresponds to primary keyidof relationSTUDENT)course_code(corresponds to primary keycourse_codeof relationCOURSE)
- Add the attributes of relationship
TakesExamto the attributes of relationTAKES_EXAMdategrade
- Mark the combination of primary keys taken from relations
STUDENTandCOURSEas well as attributedateas the primary key.- Paint attributes
student_id,course_codeanddateand press the "Mark as primary key" button. - Note: Here
dateis exceptionally also taken into the primary key, as in the ER diagram it is marked as a key attribute of the relationship. This choice was justified in Exercise 2.1.
- Paint attributes
- Finally, mark
student_idandcourse_codeas foreign keys- Move cursor to a new line and press "New foreign key"
- Set the foreign key to attribute
TAKES_EXAM.student_id - Set the referenced attribute to
STUDENT.id - Repeat the same for attribute
course_code
1:N relationships:
Let's examine the relationship Studies:
- Move the cursor to the
STUDENTrelation side (since in the ER diagram entitySTUDENThas the "fork" i.e. N-side in theStudiesrelationship). - Add attribute
dept_idto relationSTUDENT, corresponding to theidkey attribute ofDEPARTMENTrelation. - Mark
dept_idalso as a foreign key pointing to attributeidof relationDEPARTMENT- Move cursor to a new line and press "New foreign key"
- Set foreign key as
STUDENT.dept_id - Set referenced attribute as
DEPARTMENT.id
Transform the rest of the relationship sets yourself using the instructions above.
You can float the diagram editor with the Float button. Then the text moves to the right edge, and space is freed up for the editor on the right.
Suhteiden transformointi
Transformoidaan lopuksi vielä suhdetyypit. Relaatiomallissa suhteiden transformointi riippuu vain suhteen maksimikardinaliteettista. Yleisesti minimikardinaliteettia ei merkitä relaatioihin millään tavalla, vaan minimikardinaliteettien käsittelystä vastaa yleensä joko tietokantaa käyttävä sovellus/henkilö tai tietokannanhallintajärjestelmä.
Tarkastellaan ER-kaaviosta, millaisia kardinaliteetteja on opiskelijatietokannassa:
- Yhdestä moneen (1:N) -suhteet ovat ne, joissa yhden suhteeseen osallistuvan kohteen maksimikardinaalisuus on 1 ja toisen kohteen maksimikardinaalisuus on N.
- Opiskelijalla on 1:N-suhde Laitokseen (opiskelija Opiskelee korkeintaan yhdessä laitoksessa, ja laitoksessa voi olla useita opiskelijoita)
- Laitoksella on 1:N-suhde Tiedekuntaan (laitos Kuuluu korkeintaan yhteen tiedekuntaan, ja tiedekunnalla voi olla useita laitoksia)
- Kurssilla on 1:N-suhde Laitokseen (kurssia Järjestää korkeintaan yksi laitos, ja laitoksella voi olla useita kursseja)
- Monesta moneen (N:M) -suhteet ovat ne, joissa kummankin suhteeseen osallistuvan kohteen maksimikardinaalisuus on N.
- Opiskelijalla on N:M-suhde Kurssiin (opiskelija Tenttii useita kursseja, kurssilla voi olla montaa opiskelijaa tentittävänä)
- Yhdestä yhteen (1:1) -suhteet ovat suhteellisen harvinaisia, eikä niitä ole tässä opiskelijatietokannassa
Ennen kuin jatkat, käy läpi vielä opiskelijatietokannan ER-kaavio läpi ja varmista, että ymmärrät yllä olevan luokittelun.
Koska opiskelijatietokannassa on vain 1:N- ja N:M-suhteita, tarvitaan vain seuraavat kaksi transformointisääntöä:
Rule 7 (1:N relationship): for every binary 1:N relationship set, key attributes of the 1 side entity set are placed as a foreign key in the relation formed from the N side entity set. If the relationship has attributes, they are placed in the relation formed from the N side entity set (i.e., the same relation to which the foreign key was added).

Rule 8 (N:M relationship): a separate relation (so-called "relationship relation") is formed for every binary N:M relationship set. Key attributes of the entity sets related to the N:M relationship are chosen as attributes of the relationship relation's primary key. If the relationship has attributes, they are placed in the relationship relation.

Transformoidaan suhteet alla olevaan palautuslaatikkoon:
N:M-suhteet:
Tarkastellaan ensin ainoaa N:M-suhdetta Tenttii, jonka transformointi on suoraviivaista:
- Siirrä kursori tyhjälle riville ja lisää uusi relaatio "Uusi relaatio"-painikkeella.
- Aseta relaation nimeksi
TENTTII. Tästä relaatiosta tulee suhderelaatio. - Lisää relaation
TENTTIIattribuuteiksi relaatioidenOPISKELIJAjaKURSSIperusavaimeen kuuluvat attribuutit:opiskelija_id(vastaa relaationOPISKELIJAperusavaintaid)kurssi_kurssikoodi(vastaa relaationKURSSIperusavaintakurssikoodi)
- Lisää relaation
TENTTIIattribuutteihin vielä suhteenTenttiiattribuutitpäivämääräarvosana
- Merkitse relaatioista
OPISKELIJAjaKURSSIotettujen perusavainten sekä attribuutinpäivämääräyhdistelmä perusavaimeksi.- Maalaa attribuutit
opiskelija_id,kurssi_kurssikoodijapäivämääräja paina "Merkitse perusavaimeksi" -painiketta. - Huom: Tässä
päivämääräotetaan poikkeuksellisesti myös perusavaimeen, sillä ER-kaaviossa se on merkitty suhteen avainattribuutiksi. Tätä valintaa perusteltiin Harjoituksessa 2.1.
- Maalaa attribuutit
- Merkitse lopuksi
opiskelija_idjakurssi_kurssikoodiviiteavaimeksi- Siirrä kursori uudelle riville ja paina "Uusi viiteavain"
- Aseta viiteavaimeksi attribuutti
TENTTII.opiskelija_id - Aseta viitatuksi attribuutiksi
OPISKELIJA.id - Toista sama attribuutille
kurssi_kurssikoodi
1:N-suhteet:
Tarkastellaan suhdetta Opiskellee:
- Siirrä kursori relaation
OPISKELIJApuolelle (sillä ER-kaaviossa kohteellaOPISKELIJAon "haarukka" eli N-puoliOpiskelee-suhteessa). - Lisää relaatioon
OPISKELIJAattribuuttilaitos_id, joka vastaaLAITOS-relaationid-avainattribuuttia. - Merkitse
laitos_idvielä viiteavaimeksi, joka osoittaa relaationLAITOSattribuuttiinid- Siirrä kursori uudelle riville ja paina "Uusi viiteavain"
- Aseta viiteavaimeksi
OPISKELIJA.laitos_id - Aseta viitatuksi attribuutiksi
LAITOS.id
Transformoi loput suhdetyypit itse käyttäen yllä olevia ohjeita.
Voit kelluttaa kaavioeditorin Kelluta-painikkeella. Silloin teksti siirtyy oikeaan laitaan, ja editorille vapautuu tilaa oikealle.
Finally
When you are ready, you can continue forward to other exercises.
You can give a short self-assessment of your success and general feedback on the exercise below.
Lopuksi
Kun olet valmis, voit jatkaa eteenpäin muihin harjoitustehtäviin.
Voit antaa lyhyen itsearvion onnistumisestasi ja yleisesti palautteen harjoituksesta alla.
These are the current permissions for this document; please modify if needed. You can always modify these permissions from the manage page.