Virtual network configuration
Authors: Mikhail Zolotukhin and Timo Hämäläinen
Trying to wget the certificate for the VM bob didn't work (for alice it did). I kept receiving a message including this information "Resolving users.jyu.fi (users.jyu.fi)... failed: Temporary failure in name resolution." Therefore I just went to the webpage introduced in the wget command, copied the text from there, and added it into a a new file (which I named "ca_ties327.pem") that I made with gedit.
—try "sudo netplan apply" in bob's terminal, it looks like you have problem with the internet access there
—1. Introduction
This tutorial explains how to import and configure the virtual network environment that will be used during the course. The remainder of this tutorial is organized as follows. Several preliminary tasks are presented in Section 2. Section 3 describes how to import the network elements. Secure access to pfSense configurations are provided in Section 4. Section 5 explains how to write firewall rules with the help of pfSense web interface. Enabling pfSense web UI on host machine is shown in Section 6. Assignments are listed in Section 7. Section 8 concludes the tutorial.
This tutorial (including assignments) takes on average 8.15 hours to complete.
2. Preliminary questions
- Read about different attack scenarios (Section 5) in article "Toward developing a systematic approach to generate benchmark datasets for intrusion detection". Explain the statement that today's networks are hard on the outside and soft on the inside. What does this mean? What problems can this cause?
- Read also about security issues when using Oracle's Virtualbox to get familiar with the most important security concerns. Use the same link and check the networking modes that can be set on VMs.
- Finally, get familiar with some basics of firewalling in pfSense by reading blog post "Taming the beasts… aka suricata blueprint". What advises presented in the post you find the most interesting?
Link to the blog post does not seem to work for me: "You seem to have stumbled upon a page that does not exist."
—Thanks! It looks like they have moved the pfsense forum to Netgate web site. I have fixed the link.
—When using link to Oracle's Virtualbox: 502 Bad Gateway and site won't open.
—Thank you, we have noticed. The link is ok, but their website is down for 6 hours already: https://uptime.com/virtualbox.org, please try again later. Edit: it's up!
—3. Importing the virtual network
Download all the virtual machines (.ova files) from this directory (password: Ties327_2023). The machines were configured using these instructions.
In case you are a student of some another course which has
stolenborrowed our tutorials, and you have created your own virtual machines during your time at that course, we still recommend you to download and use the VMs provided here. Based on the experience from the previous years, 146% of students who used their own VMs had all sorts of issues when trying to complete the tutorials and assignments simply because they had made some small errors and typos when configuring their machines from scratch.
Start VirtualBox and import the files downloaded one-by-one by navigating to "File -> Import appliance", and selecting an .ova as the file to import.
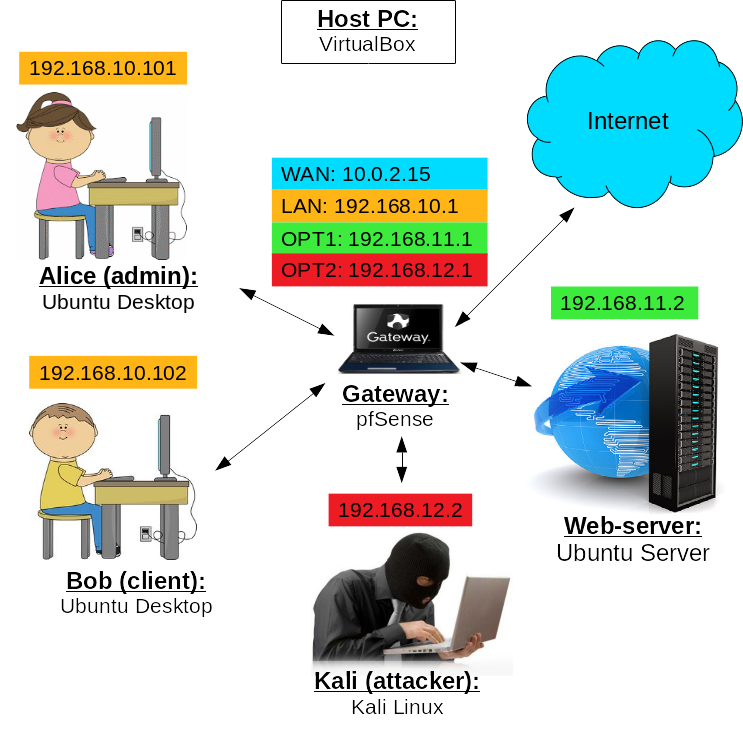
After importing the appliances, you should end up with the virtual network consisting of gateway, alice, webserv, bob and kali as can be seen on the figure above. For the gateway, we used pfSense, for alice and bob - Ubuntu Desktop, for webserv - Ubuntu Server, and for kali - Kali Linux.
Usernames and passwords for the VMs are listed below (username/password):
- gateway: gateway/gateway
- alice: alice/alice
- webserv: webserv/webserv
- bob: bob/bob
- kali: kali/kali
There is also user root/root on kali-VM, but we will use kali/kali by default in the tutorials if not mentioned otherwise.
If you are using one of the course's servers, all users should have different names for internal network interfaces: "lan", "opt1" and "opt2", e.g. add your account name after the interface, i.e. your interface names will look like "lan_Anonymous", "opt1_Anonymous" and "opt2_Anonymous". Edit interface names of all the machines downloaded by selecting a VM in the list and changing name for each adapter (except NAT if present) in "Settings -> Network".
- Start gateway-VM. Remember, that the gateway VM should be always up and running when you work with the environment (at least in the first 8 assignments) as it is the one that provides connectivity between subnets and access to the Internet.
Once gateway-VM has booted, test that it is connected to the Internet: press "7" in the main menu and enter some host name, e.g:
google.fithen press "Enter" it should start pinging the host. If it does not work, double-check that you have done everything right.
4. Configuring secure access to the gateway
SSH-connection dosen't work with any of course´s servers. How quick you can fix it? Thanks!
—4.1 Configuring access via HTTPS
Start alice-VM. Remember that you also need to have gateway-VM running. Check that alice-VM has access to the Internet. For example, try to browse to "google.fi" in Firefox.
In 99% of the cases everything should work fine, i.e. you will be able to access the Internet from alice-VM without a problem. However, a couple of students have reported that they have problems with accessing any website from alice-VM. There are two different use cases:
Use case 1: from alice-VM you cannot ping gateway-VM by IP, i.e. the following command does not work:
$ ping 192.168.10.1If this is the case, first, make sure that alice-VM does try to obtain an IP address from the gateway. For this purpose, check that the gateway is up and running and execute on alice-VM:
$ sudo netplan applythen check the IP with
$ ifconfigIf it does not help, i.e. there is no IP address and pinging still does not work, there might be something that blocks this network on your host PC: firewall, anti-virus, some other program, etc. Try to switch it off, at least temporarily.
Another option is that your home router's IP is the same as one of the gateway's interfaces, i.e. 192.168.10.1, 192.168.11.1 or 192.168.12.1. If this is the case, you can edit either your router's IP or the corresponding subnet IP of the gateway-VM, so that they are different.
If nothing of the above helps, you can try to change IP addresses of the gateway-VM's interfaces to something different, e.g.:
192.168.10.1 -> 10.0.10.1
192.168.11.1 -> 10.0.11.1
192.168.12.1 -> 10.0.12.1
You can read how to do it in section "2.1 Gateway" of our tutorial. Alternatively, you can try to download this gateway-VM and use it instead of the old one. It is basically the same, the only differences are the IP addresses of the gateway's interfaces are set as listed above.
After that, you should run on alice-VM and bob-VM:
$ sudo netplan applyto fetch a new address from 10.0.10.0/24 network.
Unfortunately, you will also need to edit webserver-VM's netplan settings:
$ sudo nano /etc/netplan/00-installer-config.yamlas follows:
network:
 version: 2
 ethernets:
  enp0s3:
   dhcp4: no
   addresses: [10.0.11.2/24]
   gateway4: 10.0.11.1
   nameservers:
    addresses: [8.8.8.8,8.8.4.4]
and then apply the changes:
$ sudo netplan applyOn kali-VM, edit file:
$ sudo nano /etc/network/interfacesas follows:
auto eth0
iface eth0 inet static
address 10.0.12.2
gateway 10.0.12.1
netmask 255.255.255.0
dns-nameservers 8.8.8.8 8.8.4.4
and reboot the VM.
After that, everything should work, at least it solved all the issues for all the students who had this kind of problem. However, you should remember that your IP addresses are now different so all the commands in this and future tutorials should be adjusted for your current IP addresses. In the assignments' answer boxes however, you should use the corresponding IP addresses from 192.168.10.0/24, 192.168.11.0/24 and 192.168.12.0 subnets, i.e. manually edit "10.0" to "192.168".
If even the IP change does not help, please move to the course's servers.
Use case 2: from alice-VM you can ping the gateway and even google's server 8.8.8.8, but still cannot access the Internet, i.e. the following two commands work:
$ ping 192.168.10.1
$ ping 8.8.8.8
but this one does not:
$ ping google.fiFor this use case, no solution has yet been found. Try the same methods as described in the use case 1. If none helps, start using the course's servers.
We now have to configure secure access to our pfSense gateway from alice-VM. For this reason, on alice-VM, open terminal (Ctrl+Alt+T) and input the following commands to download self-signed CA certificate file created for this course:
$ wget http://student:Ties327_2023@users.jyu.fi/%7Emizolotu/teaching/files/ca_ties327.pemand certificate+key file for pfSense signed by this CA:
$ wget http://student:Ties327_2023@users.jyu.fi/%7Emizolotu/teaching/files/pfsense.pemEach of these and future wget commands is a single line, but we might place some on multiple lines for better readability.
- In alice-VM's Firefox, go to "Menu -> Settings -> Privacy & Security -> View Certificates -> Authorities". Click "Import...", select just downloaded CA file "ca_ties327.pem". Place marks in all checkboxes to trust this CA to identify websites and email users. Click "Ok", then again "Ok". Restart Firefox.
In alice-VM's Firefox, go to our gateway's LAN IP address:
192.168.10.1If you see "Your connection is not secure", it is a reasonable answer from Firefox, since it does not trust the default self-signed certificate used by the gateway, click "Advanced" and then "Accept the risk and continue".
Note that sometimes this IP can already be in use as the default gateway on your host computer, causing a subnet conflict. In this case you need to go to gateway/pfsense and reconfigure LAN interface to use another IP, like 192.168.20.1, for example.
—That's a good point, thanks.
—- Enter username and password (by default they are "admin" and "pfsense") and sign in.
- Eventually, you will find yourself in "Status / Dashboard", where you can see all basic information about the system and the network interfaces.
In pfSense's menu, go to "System -> Certificates". Switch to "Authorities" and click "+ Add" to add a new certificate authority. In textbox "Descriptive name", type "Ties327". In menu "Method", select "Import an existing Certificate Authority". Now we have to copy-paste the content of file "ca_ties327.pem" to textbox "Certificate data". For this purpose, open "ca_ties327.pem" from alice-VM's terminal:
$ gedit ca_ties327.pemcopy the content (including lines "BEGIN CERTIFICATE" and "END CERTIFICATE"), paste it to the textbox "Certificate data", and click "Save". Close "gedit".
Now we have to import the certificate. In pfSense's certificate manager switch to "Certificates" and click "+ Add/Sign" to add new certificate. In menu "Method", select "Import an existing Certificate". In textbox "Descriptive name", type "pfsense". Open "pfsense.pem" in alice-VM's terminal:
$ gedit pfsense.pemCopy the text between lines "BEGIN CERTIFICATE" and "END CERTIFICATE" (including those lines) and paste it to the textbox "Certificate data". Copy the text between lines "BEGIN RSA PRIVATE KEY" and "END RSA PRIVATE KEY" (including those lines), paste it to the textbox "Private key data" and click "Save". Close "gedit".
- Finally, go to "System -> Advanced" in pfSense's menu. Switch to "Admin Access". Make sure that "HTTPS" is selected as "Protocol", and change SSL Certificate from "webConfigurator default" to "pfsense" that we just created. Scroll to the bottom of the page and click "Save".
Let's test that all certificates have been configured correctly. In alice-VM's browser, go to
https://pfsense.home.arpa/If everything has been done properly, you will not see any security errors and there will be a lock icon in the left top corner with text "Verified by: University of Jyvaskyla" :) If you cannot access the gateway by the name "pfsense.home.arpa", just use the IP address "192.168.10.1", in this case the connection will be shown as "insecure", but it should not cause any problems. We further "fix" this when configuring a DNS server.
You can also change the admin account password from its default value if you like.
- We should also add ties327 certificate on bob-VM. For this reason, start bob-VM. Check that bob-VM has access to the Internet. For example, try to browse google.fi in Firefox.
Download certificate file "ca_ties327.pem":
$ wget http://student:Ties327_2023@users.jyu.fi/%7Emizolotu/teaching/files/ca_ties327.pemOpen Firefox, go to "Menu -> Settings -> Privacy & Security -> View Certificates -> Authorities". Click "Import...", select just downloaded file "ca_ties327.pem". Place marks in all the checkboxes to trust this CA to identify websites and email users. Click "Ok", than again "Ok". Close Firefox.
4.2 Configuring access via SSH
Few times further in the course we will require to access the gateway via SSH. In this section, we briefly show how to configure secure shell.
- In pfsense web configurator, go to "System -> Advanced". Scroll to "Secure Shell" and put check mark into box "Enable Secure Shell". In scroll list "SSHd Key Only", select "Public Key Only". Scroll down and click "Save".
Open a terminal on alice-VM and generate an SSH key:
$ ssh-keygenPress Enter to use default answers to the questions asked during the process.
In case of success, a new key will be generated. Print it as follows:
$ cat .ssh/id_rsa.puband copy it to the clipboard.
- Go back to pfsense web configurator and navigate to "System -> User Manager". There should be one user "admin". Start editing it by clicking on the pencil button. On tab "Users", scroll down and find "Authorized SSH Keys" in section "Keys". Copy-paste the public key from your clipboard to the box and click "Save".
Check that you now have passwordless access to the gateway from alice-VM terminal:
$ ssh admin@192.168.10.1type "yes" to continue connecting. If you see the pfsense main menu, everything has been done right by this point. Press Ctrl+C to exit.
5. Firewall rules in pfSense
Before we start working with the rest of the VMs, it would be reasonable to configure simple firewall rules for subnets OPT1 and OPT2. By default, pfSense allows computers from LAN connect to everywhere. However, from networks OPT1 and OPT2 you cannot go anywhere, since the access is blocked by pfSense's firewall. Check the pfSense firewall rules guide if you are not familiar with pfSense firewalling.
In alice-VM's Firefox, go to
https://pfsense.home.arpa/and login (by default, username: "admin", password: "pfsense").
- Go to "Firewall -> Rules". Here you can create, edit and remove rules of your firewall for different interfaces. Check default rules for WAN and LAN interfaces. For example, there are two default rules for LAN that allow IPv4 and IPv6 traffic from LAN to anywhere.
- Similarly, we will create a simple rule to allow computers from OPT1 subnet 192.168.11.0/24 to connect anywhere via IPv4. Go to OPT1 rules and click "Add rule to the top of the list" button. Select
- action: "Pass"
- interface: "OPT1"
- address family: "IPv4"
- protocol: "Any"
- source: "OPT1 net"
- destination: "any"
- description: "vnc opt1"
- Let's test this rule using webserv-VM. Start webserv-VM. Check that it has access to the Internet, e.g. ping "google.fi", this will confirm that the rule has been added correctly.
- Repeat step 3 for OPT2 subnet 192.168.12.0/24 by creating similar rule in OPT2 section. The only differences are: interface is "OPT2", source is "OPT2 net" and description is "vnc opt2".
Test your new rule. For this purpose, start kali-VM, login as kali, test the Internet connection, it must work:
$ ping 8.8.8.8$ ping google.fiIf you have problems with pinging external addresses by their names, e.g. you can ping "8.8.8.8", but not "google.fi", check the instructions below. If you can ping neither, then probably something is wrong with the rule you have added for OPT2. If you can ping both, just move to the next step.
In order to add DNS servers on kali-VM, you have to directly edit file "/etc/resolv.conf":
$ sudo nano /etc/resolv.confby adding the following lines:
nameserver 8.8.8.8
nameserver 8.8.4.4
and removing (or commenting out) other lines that start with "nameserver".
Next, run in the terminal the following command to set immutable bit for this file:
$ sudo chattr +i /etc/resolv.confAfter this, name resolving should work.
DNS in Kali doesn't work on default. Kali nameserver in /etc/resolv.conf was set to 10.0.2.3 (by DHCP?), ping replies on this address on all VMs but I don't know what device it is. I changed manually the DNS to 8.8.8.8 and it starts to work. The same configuration as in the other VMs didn't work on Kali:
nameserver 127.0.0.53 options edns0 trust-ad search home.arpa
What is the correct way to set the DNS in Kali in this course?
—There indeed can be a problem with DNS on kali, the fix is very straightforward, I added the instructions. I will re-upload the kali-VM with this fix applied later. For now, you can just fix it yourself as instructed.
Edit: the new (fixed) version of kali-VM has been uploaded.
—The firewall rules we have just created are self-explanatory. In the assignment part of this tutorial, you will be asked to create several rules for different interfaces. When creating rules, remember two important things:
- Firewall rules should be in the table of the interface on which the traffic is received first (i.e. from where it originated), e.g. if you want to block traffic from the OPT1 interface to the LAN interface, then the rule has to be added for the OPT1 interface.
- Rules for a given interface are processed from the top of the table to the bottom and, if a rule matches, the rest below is ignored.
SSH to the pfSense gateway from alice-VM as explained in the previous section. Enter "8" to start shell. To list the rules just added to OPT1 and OPT2, execute respectively:
# pfctl -sr | grep "vnc opt1"and
# pfctl -sr | grep "vnc opt2"As one can see, OPT1 and OPT2 interface names are em2 and em3. You can also notice that OPT1 and OPT2 subnet aliases have been substituted with their corresponding network addresses, i.e. 192.168.11.0/24 and 192.168.12.0/24. Keep this in mind when working with firewall rules in pfSense.
Exit the shell and the SSH session initiated with pfSense.
The final test you can carry out is browsing from alice-VM's Firefox our bank web page by IP address using SSL/TLS protocol (https):
https://192.168.11.2/accounts/index.phpIf you see "Your connection is not secure"-message, everything is ok. That is because certificate "server_oceanic.pem" was created for domain name "oceanic.ties327.jyu.fi", not IP address "192.168.11.2". We will solve this problem later by configuring a DNS server. At this point, you should not do anything, just close the browser and go to the next section.
6. Enabling pfSense web UI on the host (optional, but recommended)
Another way to access pfSense web configurator is by enabling port forwarding in the gateway's network settings. This is optional though, you can skip this for now and come back later if you really feel like you need this.
- In the pfSense's web configurator, go to "Firewall -> Rules", choose WAN and add a Pass rule for IPv4 TCP traffic from any source to "WAN address" (i.e. source = "any", destination = "WAN address") and set destination port range from HTTP (80) to HTTPS (443). Save and apply changes.
- Next, go to "Interfaces -> WAN". Scroll all the way down and uncheck "Block private networks and loopback addresses". Save and apply changes.
We also have to enable port forwarding on the WAN interface (em0) of the gateway. Go to Settings of the gateway-VM in VirtualBox manager main window. Select "Network" from panel on the left and choose "Adapter 1" (which should be attached to NAT). Click "Advanced -> Port Forwarding", and add two following rules:
Port Forwarding Rules Name Protocol Host IP Host Port Guest IP Guest Port HTTP TCP 127.0.0.1 8080 10.0.2.15 80 HTTPS TCP 127.0.0.1 8081 10.0.2.15 443 Here "10.0.2.15" is the WAN IP address of the gateway-VM, in your case it can be different. Check the correct IP address in the gateway-VM's shell by executing:
$ ifconfig em0Once you have inserted the rules, click OK. Now, you should be able to access the pfsense web interface from your host computer by navigating to:
https://localhost:8081You have to first accept the security exception on the SSL certificate (adding self-signed ca_ties327 to the trusted authorities in your host PC browser as we have done on alice- and bob-VM would not be a good idea).
7. Assignment (5p.)
7.1 Preliminary
Read the materials mentioned in the section with preliminary questions given in the beginning of the tutorial and complete the tests below (1 point).
7.2 Basic
Configure the pfSense's firewall in such a way that all IPv4 traffic that goes from OPT1 and OPT2 subnets to the VMs of the LAN will be blocked. At the same time, VMs from the LAN still should have access to the Internet and subnets OPT1 and OPT2 by any IPv4 protocol. For this purpose, add two new rules: one for each subnet OPT1 and OPT2. Please do not modify or remove already existing rules. Use words "vnc opt1" and "vnc opt2" in the rule descriptions, i.e. the same as in the tutorial.
To find the rules added, use the procedure described in step 8 of Section 5, i.e. SSH to the pfSense gateway, start shell, use pfctl and grep with the corresponding text pattern. After that, you can either copy-paste your rules to a text file and then upload it to the answer box, or simply copy-paste the rules directly to the box.
The grading script in each of the following two answer boxes expects 2 rules: 1 from the tutorial + 1 new. The rules should be in the same order as they are shown in the pfSense's firewall rule tables, i.e. if pfctl for some reason prints the rules in the wrong order, you should edit your answer accordingly. To separate rules from each other, please use an empty line, e.g.:
block drop in log quick inet from 169.254.0.0/16 to any label "Block IPv4 link-local"
ridentifier 1000000101

block drop in log quick inet from any to 169.254.0.0/16 label "Block IPv4 link-local"
ridentifier 1000000102
One more important thing: the scripts used to grade the answers assume the IPs are 192.168.10.0/24, 192.168.11.0/24 and 192.168.12.0/24 for LAN, OPT1 and OPT2 subnets respectively. Therefore, if your subnet IPs are different from the ones used in the tutorial, you should manually edit your answers accordingly.
OPT1 (2 rules, 0.5 points):
OPT2 (2 rules, 0.5 points):
In this tutorial, we have imported certificates prepared in advance, but you can create your own ones. For this purpose, in pfSense's web configurator navigate to "System -> Certificates" and create your own CA and server certificate signed by this CA.
Requirements:
- Common name of the CA certificate should contain your username, i.e. "Anonymous"
- Common name of the pfSense certificate should be equal to the pfSense domain name
- Validity duration of both the CA and the pfSense certificate should be exactly 365 days
Test that your certificate is working as expected when using it as a SSL/TLS certificate of your pfSense gateway. If you have problems with accessing the gateway's web interface after changing the certificate, try to browse via IP address, i.e. 192.168.10.1. This way you will be able to access the interface even if your certificate is not correct, so you can experiment without worrying about being locked out of the gateway.
In the case of success, copy-paste both certificates to the answer box below starting with the CA (the order is important for the grading script). The result should look as follows:
-----BEGIN CERTIFICATE-----
some bunch of letters and
numbers from the CA certificate
-----END CERTIFICATE-----

-----BEGIN CERTIFICATE-----
another bunch of letters and
numbers from the pfSense certificate
-----END CERTIFICATE-----
CA + pfSense certificate (1 point):
Any particular reason why the grading script gives 0.8 points instead of 1 point when things are in working order?
—Have you tested that your certificate works if you use it as pfSense certificate instead of the one we have set in the tutorial?
—This is indeed broken, I also get 0.8 points even when everything is working (tested) and according to the assingment specs. Could you fix it?
—Why would you use upper case? :) I could not predict this kind of things...
—Apparently I exceeded the answering limit. It kept pushing 0.8 points EVEN THOUGH it's working as intended. I can't answer anymore to this. > Have you tested that the cert works...
Yes And it does work. I created the keys via commandline but apparently it was supposed to be done via the UI? I don't know, but my final score is 0.2 even though it works. Yes I'm frustrated.
—the last answer (0.2) - mixed up the order?
—Let's do this way:
If you get 0.8 points for this assignment, but you are sure your answer is correct, i.e. the certificate works, copy-paste your CA certificate, pfsense private key and pfsense certificate (in this exact order) to the feedback answer box so I can import them and check manually.
If it works correctly, I will improve the score to 1.0, if it does not, the score will be reduced to 0.0 :)
—Mixed up the order?
Yes I mixed up the order on my last answer because I tried everything else. And yes it was desperate.
—dont't worry; upload your ca cert, pfsense private key and pfsense cert to the feedback box, i will check
—7.3 Advanced
You can also create your own CA and keys as well as sign certificates using OpenSSL. Install OpenSSL on any of your Ubuntu VMs, e.g. alice-VM:
$ sudo apt install openssl -yand perform the following tasks in OpenSSL:
Create an openssl configuration file, because the one used by openssl in TIM is missing or corrupted or lacks keyUsage parameter. Here is the command to create such a file (the line break is intentional here!):
$ echo "[ v3_req ]
keyUsage = nonRepudiation, digitalSignature, keyEncipherment" > my_openssl.cnf
Your command list should start with this one, i.e. simply copy-paste this command to the answer box (without symbol "$" obviously).
Create a self-signed certificate, it will play the role of the CA in the assignment. For this purpose, first create a new certificate key and name it "ca.key":
$ openssl genrsa ...Then create certificate "ca.pem" and sign it with the CA key created in the previous command:
$ openssl req ...Create a new certificate key for server "oceanic.ties327.jyu.fi":
$ openssl genrsa ...Create a certificate signing request for this server:
$ openssl req ...Sign the request with the CA:
$ openssl x509 ...
Complete the commands above and copy-paste them in the correct order to the answer box below (without "$" symbol). We recommend you to test that your commands work on Ubuntu, e.g. alice-VM, before submitting them! As previously, use an empty line to separate the commands from each other.
Requirements:
- CA key and certificate file names should be respectively: "ca.key" and "ca.pem"
- CA's common name should include your username, i.e. "Anonymous"
- Server key and certificate file names should be respectively: "server.key" and "server.pem"
- Server's common name should be "oceanic.ties327.jyu.fi"
- Server certificate should be valid for exactly 365 days
There are two more important things to make your commands work in the TIM environment:
When you use command "openssl req ..." to create a self-signed certificate or a signing request, you should pass the config file created in the first command using flag "-config" with value "my_openssl.cnf".
Furthermore, when using command "openssl req ..." to create a self-signed certificate or a signing request, openssl will ask you to enter information such as country, organisation, common name, etc. You obviously cannot interact with openssl when entering commands into the answer box. Therefore, you have to make all the commands non-interactive. For this reason, you can use "-subj" parameter to pass all the information needed, e.g. "/C=FI/ST=KeskiSuomi/L=Jyvaskyla/O=JYU/OU=ITFacuty/CN=...".
Below is an example how a "openssl req ..." command to create a self-signed certificate or a signing request should look like (the whole command is one line):
$ openssl req ... -config my_openssl.cnf -subj
"/C=FI/ST=KeskiSuomi/L=Jyvaskyla/O=UniversityOfJyvaskyla/OU=ITFaculty/CN=..."
Use an empty line to separate the commands from each other, i.e. the answer should look like this:
echo "[ v3_req ]
keyUsage = nonRepudiation, digitalSignature, keyEncipherment" > my_openssl.cnf

openssl genrsa ...

openssl req ... -config my_openssl.cnf -subj ...

openssl genrsa ...

openssl req ... -config my_openssl.cnf -subj ...

openssl x509 ...
When testing the commands on a VM, you can inspect your server certificate as follows:
$ openssl x509 -in server.pem -noout -textMake sure that the issuer is your CA. Looks like this causes the most of the problems.
OpenSSL commands (6 commands, 1 point):
Would be great if we could get some tips for what we are doing wrong. It's kind of frustrating to get 0,75p/1p and not knowing what's wrong when everything works in the VM.
—naah, would be too easy :)
—In the pfSense firewall, write more rules to make the web server (only webserv-VM, not the entire OPT1 subnet) accessible from subnet OPT2 over IPv4 only by FTP (21), SSH (port 22), HTTP (port 80), HTTPS (port 443) and OpenVPN (port 1194). The rest of IPv4 traffic from OPT2 to the web server should be blocked. In your "pass" rules, select protocol UDP for OpenVPN and TCP - for other applications. Use "vnc opt2" as the description.
Test your rules in the virtual environment before submitting them. For this purpose, you can run Ping and Nmap from kali-VM as follows:
$ ping google.fi  # this should work
$ ping 192.168.10.101  # this should not
$ ping 192.168.11.1  # this should work
$ ping 192.168.11.2  # this should not
$ nmap 192.168.11.1 -p22,80,443 -sT -Pn  # ports should be open
$ nmap 192.168.11.2 -p21,22,80,443 -sT  # there should be no ports filtered
$ sudo nmap 192.168.11.2 -p1194 -sU  # there should be no ports filtered
If you use the entire OPT1 subnet as the destination in your pass rules, the test commands above will also work, but you will not get full points, therefore please make sure that you are using the correct destination in your rules.
In the case of success, copy-paste the rules obtained with pfctl to the answer box below. As previously, separate the rules from each other with an empty line.
The grading script expects 8 rules: 2 from before + 6 new ones. Remember that the rule order is important! It is also worth mentioning that even though using aliases is a good idea in general, do not do it in this assignment since the grading script may have hard time to understand what you are doing.
OPT2 rules (8 rules, 1 point):
added a couple of seven test commands
Why 192.168.11.1 should reply to ping or have ports open from Kali? Doesn't the specs especially say that only webserv-VM should be accessible from OPT2? So the whole 192.168.11.0/24 should be blocked from 192.168.12.0/24, with the exception of spesific ports of 192.168.11.2? I only get 0.1 points and I think I have succesfully configured the rules.
—7.4 General comments and feedback
Let us know how many hours in total have you spent on this assignment:
On a scale from 1 to 10, estimate how interesting and difficult was the tutorial:
You can also give us some general feedback:
8. Conclusion.
This tutorial explained how to import and configure different components of the virtual network: gateway, admin, web server, attacker and a client.
More information on the topic can be found at:
These are the current permissions for this document; please modify if needed. You can always modify these permissions from the manage page.
9. Comments (click here to comment)