BGP hijacking.
Authors: Mikhail Zolotukhin and Timo Hämäläinen
1. Introduction
In 2008, a Pakistan ISP configured static route 208.65.153.0/24 pointing to null in order to block YouTube access for its customers. However, the ISP started to announce the prefix 208.65.153.0/24 towards its upstream provider PCCW Global that propagated the announcement to its peers successfully preventing access to the service for users around the world.
In 2013, traffic intended to go from Mexico to the United States diverted to Belarus before reaching its destination. By advertising false BGP broadcasts, a Belarusian ISP successfully propagated illegitimate routes onto the Internet. In this case, corporate or state espionage is likely an explanation.
In 2014, BGP hijacking was used to intercept Bitcoin miners' connections to a mining pool server. By rerouting traffic to a mining pool controlled by the attackers, it was possible to steal the cryptocurrency resulting from the victim’s mining. This attack collected an estimated $83,000 in cryptocurrency over a two-month period.
Finally, in 2017, traffic sent to and from Google, Facebook, Apple, and Microsoft was briefly routed through a previously unknown Russian Internet provider Wednesday under circumstances researchers said were suspicious and intentional.
In this tutorial, we get familiar with BGP hijacking attack examples of which are given above. The remainder of this tutorial is organized as follows. Several preliminary tasks are presented in Section 2. Environment configuration is described in Section 3. BGP hijacking attack is presented in Section 4. Assignments are listed in Section 5. Section 6 concludes the tutorial.
This tutorial (including assignments) takes on average 9.49 hours to complete.
2. Preliminary questions
- What is BGP protocol, what its main purpose and how does it work?
- What is BGP hijacking, what can be consequences of this type of attack?
- Check sections 2 and 3 of article Bamboozling Certificate Authorities with BGP to learn taxonomy of BGP attacks. What are two main metrics of a BGP hijacking attack efficiency? How can the attack be used to hijack a certificate authority?
3. Provider configuration
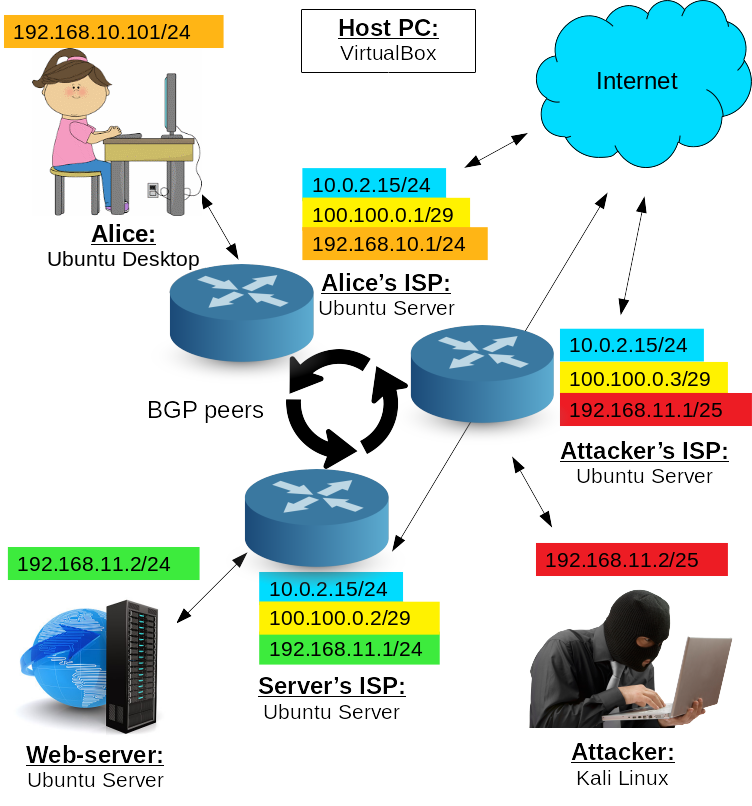
- Run alice-VM, webserv-VM and kali-VM. You should not start the gateway-VM in this tutorial.
Reconfigure alice-VM netplan:
$ sudo nano /etc/netplan/01-network-manager-all.yamlas follows:
network:
 version: 2
 ethernets:
  enp0s3:
   dhcp4: no
   addresses: [192.168.10.101/24]
   gateway4: 192.168.10.1
and apply netplan changes:
$ sudo netplan apply
Reconfigure kali-VM's network interface:
$ sudo nano /etc/network/interfacesas follows:
auto eth0
iface eth0 inet static
address 192.168.11.2
gateway 192.168.11.1
netmask 255.255.255.224
and reboot the VM.
Check webserv-VM's netplan settings:
$ sudo nano /etc/netplan/00-installer-config.yamlthey should look as follows (edit if needed):
network:
 version: 2
 ethernets:
  enp0s3:
   dhcp4: no
   addresses: [192.168.11.2/24]
   gateway4: 192.168.11.1
   nameservers:
    addresses: [8.8.8.8,8.8.4.4]
In VirtualBox, create three new VMs and configure them as follows:
VM 1:
- Name: provider-for-alice
- RAM: 1024
- Hard drive: 10 Gb
- Network adapters: 1 - NAT, 2 - internal network "provider-net", 3 - internal network "lan"
VM 2:
- Name: provider-for-webserv
- RAM: 1024
- Hard drive: 10 Gb
- Network adapters: 1 - NAT, 2 - internal network "provider-net", 3 - internal network "opt1"
VM 3:
- Name: provider-for-kali
- RAM: 1024
- Hard drive: 10 Gb
- Network adapters: 1 - NAT, 2 - internal network "provider-net", 3 - internal network "opt2"
Instead, you can also three times full-clone (with re-initializing MACs) one of your Ubuntu Servers, e.g. dnsserv or test-VM from the introduction tutorial, rename it and edit its network settings in VirtualBox Manager. If this is the case, you should also edit its netplan settings:
$ sudo nano /etc/netplan/00-installer-config.yamlso they look as follows:
network:
 version: 2
 ethernets:
  enp0s3:
   dhcp4: yes
In each of the VMs cloned, you can change the name by editing file:
$ sudo nano /etc/hostnamethen rebooting the VM. This is not mandatory, but it will make working with these clones more comfortable as you will see in which VM's terminal you are typing commands.
Network names should be adjusted when on the lecture server, right?
—yep
—These take huge junk of my computers memory.. For future would be good to mention at the beginnin of the course that xxx-amound of memory is needed to complete all the tasks!
—It was mentioned in the intro
—- If you have chosen to create VMs from scratch, install Ubuntu Server on each of these three machines. As previously, you can configure one VM, install Ubuntu on it, and then simply full-clone it two times with re-initializing MACs. After that, just correct the two resulting clones' settings, i.e. name, network adapters, etc.
- Once all three VMs are ready, run them.
Start with configuring provider-for-alice-VM. Check that you have access to the Internet:
$ ping google.fi
Install FRR on provider-for-alice:
$ sudo apt install frr -yEnable BGP daemon, by first running:
$ sudo nano /etc/frr/daemonschanging "bgpd=no" to "bgpd=yes" and saving the changes.
Finally, enable IP forwarding by executing in the terminal:
$ sudo sysctl -w net.ipv4.ip_forward=1
(Re)start and enable FRR service:
$ sudo systemctl start frr$ sudo systemctl restart frr$ sudo systemctl enable frrStop and disable firewall:
$ sudo systemctl stop ufw$ sudo systemctl disable ufwotherwise BGP peers will be blocked.
Launch vtysh command shell, type:
$ sudo vtyshThe prompt will be changed to the hostname (in my case "provider"), which indicates that you are inside vtysh shell.
- Repeat steps 7-10 for other provider VMs: provider-for-webserv and provider-for-kali.
Configure peering IP addresses of provider-for-alice-VM's interfaces (here we assume that the 2nd and the 3rd interface names are enp0s8 and enp0s9 respectively):
provider# configure terminal
provider(config)# interface enp0s8
provider(config-if)# ip address 100.100.0.1/29
provider(config-if)# no shutdown
provider(config-if)# exit
provider(config)# interface enp0s9
provider(config-if)# ip address 192.168.10.1/24
provider(config-if)# no shutdown
provider(config-if)# exit
provider(config)# exit
provider# write
Check that all three interfaces are up and have correct IP addresses:
provider# show interfaceYou can edit the configurations by removing an entry using keyword "no". For example, if you made a typo in IP address for interface enp0s8 by entering 199.199.0.1/29 instead of 100.100.0.1/29, adding correct IP address will not solve the problem. In this case, you have to edit the configuration using "no" as follows:
provider# configure terminal
provider(config)# interface enp0s8
provider(config-if)# no ip address 199.199.0.1/29
provider(config-if)# ip address 100.100.0.1/29
provider(config-if)# exit
provider(config)# exit
provider# write
Configure peering IP addresses of provider-for-webserv-VM's interfaces (here we again assume that the 2nd and the 3rd interface names are enp0s8 and enp0s9 respectively):
provider# configure terminal
provider(config)# interface enp0s8
provider(config-if)# ip address 100.100.0.2/29
provider(config-if)# no shutdown
provider(config-if)# exit
provider(config)# interface enp0s9
provider(config-if)# ip address 192.168.11.1/24
provider(config-if)# no shutdown
provider(config-if)# exit
provider(config)# exit
provider# write
Check that you can now ping Alice's provider from the webserv's one:
provider# ping 100.100.0.1and, vice versa, you can ping webserv's provider from the Alice's one:
provider# ping 100.100.0.2It should work, otherwise double-check how you have configured the interfaces. We will configure the attacker's provider a bit later.
On Alice's provider, configure BGP peering as follows:
provider# configure terminal
provider(config)# router bgp 100
provider(config-router)# no auto-summary
provider(config-router)# no synchronization
provider(config-router)# no bgp ebgp-requires-policy
provider(config-router)# neighbor 100.100.0.2 remote-as 200
provider(config-router)# exit
provider(config)# exit
provider# write
Do the similar thing on webserv's provider:
provider# configure terminal
provider(config)# router bgp 200
provider(config-router)# no auto-summary
provider(config-router)# no synchronization
provider(config-router)# no bgp ebgp-requires-policy
provider(config-router)# neighbor 100.100.0.1 remote-as 100
provider(config-router)# exit
provider(config)# exit
provider# write
On both, Alice's and webserv's provider, run
provider# show ip bgp summarythat should show the table of neighbors with "0" in column State/PfxRcd. If it is not "0", but "Active", you probably did not disable the firewall, or did something wrong when entering the configuration commands above, please double-check.
Finally, we can configure prefix advertisements. On provider-for-alice-VM:
provider# configure terminal
provider(config)# router bgp 100
provider(config-router)# network 192.168.10.0/24
provider(config-router)# exit
provider(config)# exit
provider# write
and on provider-for-webserv-VM:
provider# configure terminal
provider(config)# router bgp 200
provider(config-router)# network 192.168.11.0/24
provider(config-router)# exit
provider(config)# exit
provider# write
On both, Alice's and webserv's provider, run again
provider# show ip bgp summarythat should show the table of neighbors with "1" in column "State/PfxRcd" (it may take few seconds for state to increment).
If it is not "1", you can also try the following command:
provider# clear ip bgp *which will hard reset all BGP neighbor connections, drop peerings, etc. Basically, it is needed to refresh BGP configurations, without restarting the provider VMs. If it does not help, you did something wrong when entering the commands above.
More details about BGP peers can be obtained by using commands, for Alice's provider:
provider# show ip bgp neighbors 100.100.0.2 advertised-routes
provider# show ip bgp neighbors 100.100.0.2 routes
for webserv's provider:
provider# show ip bgp neighbors 100.100.0.1 advertised-routes
provider# show ip bgp neighbors 100.100.0.1 routes
and for both of them:
provider# show ip bgp
provider# show ip route bgp
provider# show ip route
Now, we can test the resulting providers. From alice-VM browse to
http://192.168.11.2/accounts/index.phpIt should work. If you cannot access webserv-VM from alice-VM, you probably have done something wrong by this point. Most likely you have forgot to enable IP forwarding on one of the provider-VMs, but it may be something else, so double-check your configurations.
It is worth noticing that Alice-VM (as well as webserv and attacker) will not have access to the Internet in such configuration, but it is not required in this tutorial. If, for some reason, you need the Internet connection on Alice (or other clients), you can for example temporarily change its network adapter to NAT and interface to DHCP, install packages you need, and then change it back to the internal network and static address. Another solution would be to configure iptables on the Alice's (or other client's) provider so that external traffic is forwarded to the NAT interface, but this is beyond the scope of this tutorial.
Now, it is time to configure the attacker and his evil provider. On provider-for-kali-VM, run vtysh, if it is not running yet:
sudo vtyshand then configure interfaces:
provider# configure terminal
provider(config)# interface enp0s8
provider(config-if)# ip address 100.100.0.3/29
provider(config-if)# no shutdown
provider(config-if)# exit
provider(config)# interface enp0s9
provider(config-if)# ip address 192.168.11.1/25
provider(config-if)# no shutdown
provider(config-if)# exit
provider(config)# exit
provider# write
Then, proceed with peers and network advertisements:
provider# configure terminal
provider(config)# router bgp 300
provider(config-router)# no auto-summary
provider(config-router)# no synchronization
provider(config-router)# no bgp ebgp-requires-policy
provider(config-router)# neighbor 100.100.0.2 remote-as 200
provider(config-router)# network 192.168.11.0/25
provider(config-router)# exit
provider(config)# exit
provider# write
Notice, that we use mask "25" that is more specific than "24" which the webserv's provider uses. Run:
provider# show ip bgp summary"Active" in State/PfxRcd column is ok at this point.
Go back to the web server's provider and add the attacker's provider as a neighbor.
provider# configure terminal
provider(config)# router bgp 200
provider(config-router)# neighbor 100.100.0.3 remote-as 300
provider(config-router)# exit
provider(config)# exit
provider# write
then check that provider-for-webserv now has two neighbors:
provider# show ip bgp summary
Go again to the attacker's provider and check its neighbors:
provider# show ip bgp summaryThe number in the state column should be "2" as there are both Alice's and webserv's provider advertise one network each.
The trick here is that the attacker's provider advertises lower mask than the webserv's one and therefore the route proposed by the attacker's provider is more specific. For this reason, Alice's provider and all its clients (namely Alice) will prefer the route advertised by the attacker's provider. To demonstrate this, create "accounts" directory on kali-VM:
$ sudo mkdir /var/www/html/accountsand add file index.php
$ sudo nano /var/www/html/accounts/index.phpType there something that will indicate that the server corresponds to the attacker, e.g.
You are under attack :(save and exit. Start Apache service:
$ sudo systemctl start apache2
From alice-VM, browse server's IP again:
http://192.168.11.2/accounts/index.phpThis time Alice should be routed to the malicious server.
If you cannot access kali-VM from alice-VM, you probably have done something wrong by this point, e.g. might have not enabled IP forwarding on provider-VMs, may be something else, double-check the configurations.
Obviously, provider-for-webserv can fight for Alice by providing more specific network mask. That is exactly, what Youtube did in 2008 to fight Pakistan's ISP. Youtube began to announce more specific prefix, however the service would still not be available for a large part of YouTube users. Those were the users whose traffic took a path towards Pakistan Telecom AS17557, thus it could not reach YouTube. The traffic was being backhauled by a static route configured on Pakistan AS17557 edge router.
Everything looked O.K. The thing that worked for me was to restart Alice's VM.
—4. Assignment
4.1 Preliminary
Complete the test below based on the preliminary questions (1 point).
4.2 Basic
Complete the test below based on the tutorial results (0.5 points):
How can BGP hijacking be detected? What is looking glass and how can it be used to detect BGP hijacking attacks? Complete the test below devoted to the BGP hijacking detection (0.5 points).
As mentioned in the last paragraph of the tutorial, the most straightforward way to mitigate this attack from the legitimate web server's provider is to announce a more specific path. Implement this solution by announcing the web server's network with mask 26 from the provider-for-webserv-VM.
For this purpose, first change IP address (rather mask) of the 3rd network interface as follows:
provider# ...
provider(config)# ...
provider(config-if)# no ip ...
provider(config-if)# ip ...
provider(config-if)# ...
provider(config)# ...
provider# ...
Then, announce the same network as before but with mask 26:
provider# ...
provider(config)# ...
provider(config-router)# no network ...
provider(config-router)# network ...
provider(config-router)# ...
provider(config)# ...
provider# ...
Complete the commands above and test that everything works correctly in your virtual network, i.e. Alice gets redirected to the legitimate web server. Then, copy-paste the complete commands to the answer boxes below. Do not copy "#"-symbols and the parts of the text before them, i.e. copy only the commands. Separate commands from each other with an empty line!
The grading script expects that the network interface name, the network announced and the router's bgp number are the same as in the tutorial, i.e. if you use some other values in your virtual environment, you should modify your commands accordingly when submitting the answers.
It is also worth noticing, that in FRR most of the commands can be shortened, e.g. instead of "configure terminal", you can use "conf t" and it will work. However, in answer boxes of this and all the following assignments, please type full commands as used in the tutorial and the articles linked.
Changing network interface (7 commands, 0.5 points):
What do I do wrong? The connection works as intended with these settings, but I get no points at all :(
—Added the right answer to the comment box. Hope that will do! I run out of tries because of stupid mistakes :(
—Bella - configure
Joni - ok
—Changing network announcement (7 commands, 0.5 points):
If you also want to continue with the advanced assignments, you should revert changes back, i.e. change mask from 26 to 24 for both: the 3rd network interface of the provider-for-webserv and the network it announces. For this purpose, use exactly the same commands as before, only switch the masks. Make sure that after that Alice is redirected to the attacker's web page as previously.
4.3 Advanced
Learn about BGP hijacking prevention methods. You can start from this article, although commands there are a bit outdated and a bit incorrect. For correct commands, you can use the latest frr documentation or any other source you can find.
One solution for BGP hijacking prevention is accepting only prefixes with length 24 and less on provider-for-webserv-VM. For this purpose, first create prefix list called "my_prefix_list" which denies addresses with mask greater than 24, but permits the ones with mask 24 or less (i.e. mask should be between 0 and 24):
provider# ...
provider(config)# ... my_prefix_list deny ... le ...
provider(config)# ... my_prefix_list permit ... le ...
Tip: the mask range is inclusive in the commands above, i.e. if you want to deny the mask greater than 24, you should specify the range between 25 and 32, i.e. the command in the article linked above is not correct in this regard.
Next, modify router settings by adding both the provider-for-webserv's neighbors to this prefix list:
provider(config)# ...
provider(config-router)# neighbor ...
provider(config-router)# neighbor ...
Finally, exit and write changes:
provider(config-router)# ...
provider(config)# ...
provider# ...
Test that your configuration is working. i.e. Alice should have access to the legitimate web server. When you test a new bgp configuration, you can also use command:
provider# clear ip bgp *to refresh BGP peers (this command is not part of the assignment, do not copy it to the answer box).
Complete the first nine commands above and copy-paste them in exactly the same order as they are listed to the answer box below. Use an empty line to separate commands from each other.
Accepting only prefixes with length 24 and less (9 commands, 0.8 points):
Out of answer limits. Works as intended but I get 0.6 out of 0.8. I guess that's it? I should've opened a new Chat topic on my issue with last remaining answering try left to get the correct answer or just "nah keep trying :)"?
—Hmm... I honestly was not expecting the answer like this, there is a shorter version of the 2nd line without "ge", only with "le", that is why I put it into the command template, but ok; updated the points
Tip: please use "le" as instructed; there is an answer in the article linked, you just need to adjust it slightly based on the information given in the assignment.
—To test another method, we need to revert the changes just introduced. For this purpose, on the provider-for-webserv-VM, remove both neighbors from the prefix-list created:
provider# ...
provider(config)# ...
provider(config-router)# no neighbor ...
provider(config-router)# no neighbor ...
provider(config-router)# ...
provider(config)# ...
provider# ...
Copy-paste the complete commands separated from each other with an empty line to the answer box below.
Removing neighbors from the prefix list (7 commands, 0.3 points):
You can also remove the prefix-list itself, but it is not required. In any case, after that, Alice should again be redirected to the malicious web server.
The second approach is more straightforward. We can simply create an access list to filter out the incorrect (malicious) AS path. For this purpose, on provider-for-webserv-VM, create an access list called "my_access_list" that permits only AS path of the provider-for-alice, i.e. 100:
provider# ...
provider(config)# ... my_access_list permit ...
Next, modify router settings by adding both provider-for-webserv's neighbors to this access list:
provider(config)# ...
provider(config-router)# neighbor ...
provider(config-router)# neighbor ...
Finally, exit and write changes:
provider(config-router)# ...
provider(config)# ...
provider# ...
Test that your configuration is working. i.e. Alice should have access to the legitimate web server.
Complete the commands and copy-paste them in exactly the same order as they are listed above to the answer box below. Use an empty line to separate commands from each other.
Accepting only AS path of the provider-for-alice (8 commands, 0.6 points):
Is there something wrong with my answers (this and next one)? It works perfectly fine in my environment.
—yeah, the script expected another type of list in comands 4 and 5, but it looks like it does not matter; I updated the script; so just resubmit your answers, it should give full points; same for the next one
—As previously, revert the changes just introduced by removing both neighbors from the access list created on the provider-for-webserv-VM:
provider# ...
provider(config)# ...
provider(config-router)# no neighbor ...
provider(config-router)# no neighbor ...
provider(config-router)# ...
provider(config)# ...
provider# ...
Copy-paste the complete commands separated from each other with an empty line to the answer box below.
Removing neighbors from the access list (7 commands, 0.3 points):
4.4 General comments and feedback
Let us know how many hours in total have you spent on this assignment:
On a scale from 1 to 10, estimate how interesting and difficult was the tutorial:
You can also give us some general feedback:
5. Conclusion
In this tutorial, we got familiar with BGP routing protocol and BGP hijacking attack. Despite this type of attack being as old as the BGP protocol, from November 28th of 2015 up to 31st of May, 2017 there were 2615 BGP leaks detected around the world. Most of the time, these illegitimate advertisements have no malicious purpose and they are caused by misconfiguration, mostly due to improper filtering. The AS that leaks the prefix inserts itself somewhere in the AS path. As a result, traffic is redirected through the leaker AS which can impact network performance.
More information on the topic can be found at:
These are the current permissions for this document; please modify if needed. You can always modify these permissions from the manage page.
6. Comments