The first touch of GPU programming
CUDA vs HPI
There are currently a number of interfaces for GPU programming on the market. The two primary players are CUDA from NVIDIA and HIP from AMD; though technically ROCm is AMD's competitor to CUDA, their open source framework HIP provides an interface which is similar to CUDA and can in fact compile to CUDA devices too.
Manufacturers' support for the different interfaces varies:
platform \ manufacturer Nvidia AMD CUDA Supported Not supported HIP Supported Supported GPU programming is also possible with interfaces like OpenACC and OpenCL, and oneAPI for Intel GPUs.
The 2016 version of this course covered OpenCL 1.2, so if you are interested, you can have a look in the old material (only in Finnish).
How to phrase this part? * ROCm is to AMD what CUDA is to NVIDIA * HIP is essentially an interface like OpenACC(?), but pretty directly tied to ROCm and CUDA. * There appear to be ways to compile HIP to oneAPI (https://www.intel.com/content/www/us/en/developer/videos/hip-on-aurora.html)
—Overview of the GPU hardware
- Generally, computing hardware is divided into two categories: the host, which is typically a CPU, and devices, which is usually GPUs but could in principle be any unit the host is able to communicate with.
- We may at times refer to for instance CUDA devices or ROCm devices which would mean any device to which CUDA, respectively ROCm, compiles. Primarily this would mean respectively NVIDIA and AMD GPUs.
- The acronym GPU is a little ambiguous nowadays though, as there are many so-called GPU devices that are built primarily for computational purposes, and not with graphics rendering in mind.

Host device
- The host device is typically the computer's central processing unit (CPU), and for the purposes of this course devices are assumed to be GPUs.
- The primary role of the host device will be to manage the GPU devices installed in the system.
- The execution of an application starts on the host device like a regular application, but it can then leverage the computational power of GPU devices.
- The host device can allocate part of the GPU's memory for its use and command the GPU devices to perform various operations.
Device
- A device contains one or more compute units and a single computing unit contains one or more processing elements.
- For example, on the LUMI supercomputer a GPU device contains 220 copmpute units and 14080 processing element (called
stream processors)
Calculation units and processing elements
- Processing elements belonging to the same computing unit are typically closely linked and share resources with each other
- Computation is performed by processing elements, but a single processing element may not be directly equated with a traditional processor kernel
Calculation units and processing elements (continued)
- On a general device, processing elements belonging to the same computational unit execute program code either together as a SIMD unit (i.e. each computational unit is a vector processor) or separately as SPMD units (i.e. as separate kernels).

- However, the actual hardware implementation does not necessarily fit perfectly into either category. We will return to this issue later when we discuss Nvidia and AMD's implementation-level solutions
GPU applications
- A GPU application behaves like a normal application on the host device, but also accesses the computing resources of GPU through some framework to accelerate computations that it may do better than the host CPU.
GPU application (continued)
- Specifically, GPU application is divided into
- kernels, which run on the device, and a
- host program, which runs on the host device

Kernel
- A kernel can be thought of as a subroutine that can be called to perform computational operations on a GPU device
- The host program is responsible for creating, launching and managing the kernels
Global index space
Before launching a kernel, the host program must define a specific index space.
Once the kernel is launched, this index space defines the global index numbers for a set of threads (work-items).

Strands execution paths
- Each thread starts executing code from the beginning of the kernel, but the index numbering allows the execution paths of the different threads to branch:

- In practice, one should be very careful with
if - elsestatements in GPU code. CUDA and AMD devices group threads into sets called warps and wavefronts, respectively. Within such a group branching can cause the code to be evaluate serially instead of in parallel. - More on warps and wavefronts later, but for now simply know that they are subsets of and different from the work-group discussed in the next section.
Work-groups
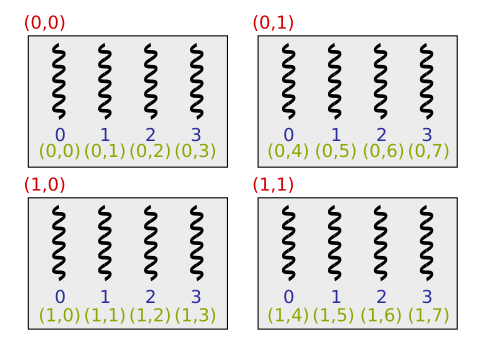
- Threads are divided into work-groups (also called a block) as defined by the host program and each thread group is assigned its own thread group index number
- In addition, each thread is assigned its own local index number within the thread group.
- Indexing can be one-, two- or three-dimensional
Example of indexing threads
- Below is an example of a situation where 16 threads are divided into four work-groups, each containing four threads:
Thread groups and subtasks
- Dividing threads into thread groups directs the programmer to divide the task into subtasks that can be solved independently and in parallel:

Thread groups and calculation units
- Only at runtime does the system need to know the actual structure of the device.
- Below is visualized two potential systems, one with device A and one with device B.

Memory template
- A single thread has access to various memory areas:

- The programmer must determine which memory area the referenced data resides in.
Global memory
- Global memory is an area of memory to which each thread has read and write access, regardless of their work-group affiliation.
- For GPUs, most memory is global memory.
- Global memory is typically implemented off the GPU chip, leading to limited memory bandwidth and latencies in the hundreds of clock cycles.
- For modern GPUs, global memory is accessed through a cache.
Local memory
- Local memory is a memory area visible only to threads within the same work-group.
- Local memory is typically used when threads in the same work-group need to share data.
- In modern GPUs, local memory is integrated into the GPU chip itself, often with each compute unit having its own local memory. This makes local memory an order of magnitude faster than global memory.
- Local memory is very limited, modern GPUs may have 64 kb of local memory available per compute unit, and using too much within a work-group can impact performance.
- In CUDA and HIP terminology, local memory is referred to as shared memory.
Constant memory
- Constant memory is a memory area visible to all threads, whose contents remain the same during kernel execution
- Memory requests to constant memory often pass through cache.
- In CUDA and HIP constant memory is declared using
__constant__and must be declared at compile time.
Private memory
- Private memory is an area of memory visible only to an individual thread.
- The compiler may allocate data to private memory when resources are scarce within a compute unit.
- Typically implemented as part of global memory.
- This means, if your kernel is allocating too much memory it might not fit in the on-chip registers and instead use global memory, which is magnitudes slower. So avoid this at all cost!
Relaxed consistency
- Usually the memory model for GPUs are consistent from the perspective of a single thread.
- This means that for instance the order of memory operations is predefined.
- However, the memory model is generally not consistent across threads.
- Which means that you cannot expect that information written by one thread to a memory address will be available when another thread attempts to read that same address.
- Using synchronization primitives some cross-thread consistency can be achieved.
- In CUDA and HIP such synchronization primitives are for example
__syncthreads()and__threadfence(), the former much more common than the latter.
Our first HIP program
Information about the hip/hip_runtime.h installation goes here
info about hip_runtime install?
—- Let's take a look at the following example program: gitlab:first-hip-program
- The example program includes a comprehensive version (
main.hip.cpp), which does a bunch of extra things like checking device information, and handles all error situations explicitly; and is extensively commented. - Additionally, there is also a so-called. barebones version, which includes only a minimum amount of code.
Kernel code
- A kernel is like a function, but it will be executed individually by each thread on the device.
- Let's have a look at our simple kernel
add_one.
__global__ void add_one(int *buffer, int n)
{
    const int idx = threadIdx.x + blockIdx.x * blockDim.x;

    if(idx < n)
        buffer[idx]++;
}- A kernel is written like other functions, with a few exceptions:
- Note that the kernel is marked with the
__global__keyword, which indicates that the host will call it and it will run on the device. The exception being in CUDA Dynamic Parallelism, which we won't be covering. - The kernel return value is
void, i.e. it has no return value. Return variables are generally arguments in the kernel, or the kernel modifies one of the input variables. In our kernel here, the variablebufferis getting modified. - Inside a kernel we have access to some special constants and functions used to manage threads. In out kernel we use some of these constants to compute the global thread index
idx.threadIdx.xis the local thread index within the block (work-group).blockIdx.xis the block index (work-group index)blockDim.xis the size of the block (work-group), i.e. how many threads are in each block.- Finally, there is also
gridDim.xwhich is the number of blocks in thegrid.
- Note that the above all use
.x, this is the first dimension of the "grid". When configuring threads and blocks for a GPU kernel, they can be index in 1, 2 or 3 dimensions;.yand.zare used for the other directions. Just note that there are certain limitations on the maximum total number of threads in a block, and the number of blocks in the various directions.

- Regardless of the dimensionality of the grid we use, we can always compute a global index. Here's an example in a 2-dimensional grid
int threadsInBlock = blockDim.x * blockDim.y;
int gIdx = threadIdx.x + threadIdx.y * blockDim.x + threadsInBlock * (blockIdx.x + blockIdx.y * gridDim.x);
The order of counting, i.e.
xfirst oryfirst, can be important to ensure that the threads the GPU bundle together for execution have neighboring global indices. This can be important for efficient memory operations on the GPU.In the last part of the kernel
we check if the global thread index is smaller than
n, the number of elements inbuffer, so if we have more threads than the length of the array, the last threads won't get to work on it.Without the check we'd be going out of bounds, which would be bad.
Error handling
- Most hip runtime calls return an error code of type
hipError_t. Different functions may have different types of return error codes, which can be looked up in the documentation. - The
hipSuccessis the general code that a call ran without any issues. - Examples of other errors could for example be
hipErrorMemoryAllocationhipErrorInvalidDevicehipErrorInvalidMemcpyDirectionhipErrorNotReadyhipErrorRuntimeMemory
- The
hipError_ttype is simply an enum defined inhip_runtime.h, so you can check out the different options there if you like.
Overview of devices
- A machine may have multiple devices.
- We can request information about the number of available devices with
Example
We can similarly query about other information like the
the runtime version,
the driver version,
and a whole slew of different device properties,
Streams and Selecting a Device
Selecting a device to compute on is easy in HIP!
- This sets the device with index 0 as the active device. Following instructions will be in relation to the context of that device.
- This is only really relevant on machines with multiple GPUs though, as HIP assumes device 0 to be the active by defualt.
Streams are queues on the GPU to which we can shedule tasks.
Creating multiple streams allow us to potentially overlap various independent tasks on the GPU, which may improve performance; as illustrated in the figure below.

H2D and D2H in the image are abbreviations of Host to Device and Device to Host.
Note that not all tasks can be concurrent; and the order of issuing tasks to the scheduler on the GPU can impact concurrency as well. These CUDA Webinar slides (which the above illustration was based on) has some good illustrations of the general concept on slides 16-19.
A stream can be created as follows
The stream may then be supplied to the configuration for a kernel call, making the call execute on that stream.
A number of asynchronous HIP functions also takes a stream as an argument, e.g.
hipMemcpyAsync.
Memory on the Device, Malloc and Memcpy
In general, we distinguish between memory on the host and memory on the device, and as we work with data on devices we will be moving the data back and forth between the host and the device, since information on the device is generally not accessible directly from the host.
Copying memory between host and device is a somewhat expensive process though, and should be avoided whenever possible in critical computation where speed is important.
We will cover some basics below, but you can read more about GPU memory here.
Allocation of memory on the device is generally done using
// Header information
hipError_t hipMalloc(void **ptr, size_t size);

// Example
int *deviceBuffer;
hipMalloc(&deviceBuffer, N * sizeof(int));- This allocates memory for an array of
Nint's. deviceBufferis now a pointer to a memory address on the device, and can in general not be dereferenced outside of kernels.
Copying memory to the device uses Memcpy.
// Header information
hipError_t hipMemcpy(void *dst, const void *src, size_t size, hipMemcpyKind kind);

// Example
int *hostBuffer_ptr = hostBuffer.data(); // assuming hostBuffer is a std::vector<int>
hipMemcpy(deviceBuffer, hostBuffer_ptr, N * sizeof(int), hipMemcpyDefault);- This copies
Nint-size data from the host memory locationhostBuffer_ptrto the device memory locationdeviceBuffer. - The
hipMemcpyDefaultflag essentially tells HIP to figure out for itself that this is a transfer from Host to Device based on the pointers. We could also have given the argumenthipMemcpyHostToDeviceinstead. The argument for the latter is that the code would then throw an error if we by accident provided two host memory pointers. WithhipMemcpyDefaultHIP will simply assume we wanted ahipMemcpyHostToHostflag and not complain. But assuming you can manage your pointers properly,hipMemcpyDefaultis the recommended flag. - There are a bunch of other
Memcpymethods; see the documentation here. For examplehipMemcpyAsync, which takes a stream as an argument, allowing you to manage memory transfer and computation simultaneously.
Configuring and launching a kernel
Launching a kernel is simple in HIP. The syntax is
// Full
kernel<<<numberOfBlocks, threadsPerBlock, SharedMemoryInBytes, Stream>>>(arg1, arg2, ...);
// Simple, on the 0 stream and with no shared memory
kernel<<<numberOfBlocks, threadsPerBlock>>>(arg1,arg2,...);- The arguments in the
<<<...>>>brackets are the configuration. - If the stream is not given, then HIP defaults to the 0 stream.
- If the shared memory isn't provided, it defaults to 0.
When setting up the configuration we use the dim3 type
int maxThreads = 1024;
const dim3 numBlks((N - 1)/maxThreads + 1);
const dim3 thrPrBlk(maxThreads); // same as: (maxThreads, 1, 1)- The type
dim3is astructwith theuint32_tcomponentsx,y,z. - If a component in the
dim3 structisn't specified, the default value is 1. - For
numBlkswe compute the minimal number of blocks required. Note that the division is an integer division leaving no remainder, so try to go through the steps and convince yourself that the above formulation will in fact always give the lower bound on the number of blocks needed.
With the configuration we call our kernel with the syntax given above
The first OpenCL 1.2 program
I imagine we are tossing the rest of this document.
—- In this course, the OpenCL interface is mainly used through the C++ wrapper. This choice simplifies the code somewhat and in particular simplifies memory management.
- If a working OpenCL implementation is installed on the computer, the C++ wrapper only needs the
CL/cl.hppheader file - to run, and if required, the wrapper can be downloaded from the Khronos group website. More detailed documentation can be found here.
- Let's take a look at the following example program: git /first-opencl-program
- The example program includes an extended version (
main.cpp) which checks the suitability of the parameters used for the OpenCL device used and handles all error situations - In addition, the package includes a simplified version which demonstrates the C++ wrapper C++11 features and exception handling
- Finally, there is also a so-called. barebones version, which includes only the absolute minimum amount of code (no argument validation and error code handling).
main.cppfile starts with the inclusion of theCL/cl.hppheader file:
#include <CL/cl.hpp>- All classes and functions related to the C++ wrapper belong to the
clnamespace - The namespace prefix would not need to be explicitly mentioned if we were to use
using namespace cl. However, we include it in this example for clarity. VECTOR_CLASSandSTRING_CLASSin the C++ wrapper refer by default to the data typesstd::vectorandstd::string
Error handling
- Most OpenCL library calls either
- return an error code of type
cl_intor - take as argument a pointer to an error code variable of type
cl_intwhere the OpenCL call status is written
- return an error code of type
CL_SUCCESS(0) is a generic all ok return value- Other typical error codes:
CL_DEVICE_NOT_FOUND / -1,CL_OUT_OF_RESOURCES / -5,CL_INVALID_COMMAND_QUEUE / -37,CL_INVALID_KERNEL_ARGS / -52
- The numeric values corresponding to the error codes can be found in the
CL/cl.hfile
- The C++ wrapper can also report errors using exceptions
- Exceptions are disabled by default, but can be enabled as follows:
#define __CL_ENABLE_EXCEPTIONS
#include <CL/cl.hpp>- Exceptions are caught with the
try-catchstructure:
try {
    ...
} catch(const cl::Error &err) {
    std::cerr << "Virheviesti: " << err.what() << std::endl;
}
OpenCL platform
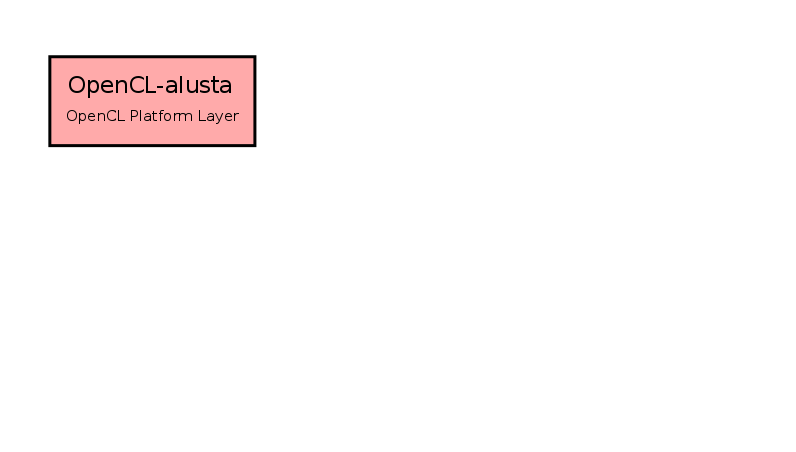
- To use the OpenCL implementation installed on a computer, we first need to get access to the OpenCL platform layer
- Through the OpenCL platform, we further access the OpenCL devices and their resources installed on the hardware
- In the C++ wrapper, the OpenCL platform is wrapped inside a
cl::Platformclass that provides a static member function for fetching OpenCL platforms:
static cl_int cl::Platform::get(VECTOR_CLASS<Platform> * platforms)cl_int err;
std::vector<cl::Platform> platforms;
err = cl::Platform::get(&platforms);
if(err != CL_SUCCESS) {
std::cerr << "OpenCL-alustojen hakeminen epäonnistui." <<
std::endl;
std::cerr << "OpenCL-virhekoodi: " << err << std::endl;
return 1;
}
if(platforms.size() < 1) {
std::cerr << "OpenCL-alustoja ei löytynyt." << std::endl;
return 1;
}
- Next, we could query the OpenCL platform on various issues using the
getInfomember function :
cl_int cl::Platform::getInfo(cl_platform_info name,
STRING_CLASS * param)- The OpenCL version supported by the OpenCL platform can be checked with the
CL_PLATFORM_VERSIONflag and the vendor name can be found with theCL_PLATFORM_VENDORflag - The OpenCL platform may also support various standards and implementation-specific extensions.
CL_PLATFORM_EXTENSIONSflag returns a list of supported extensions.
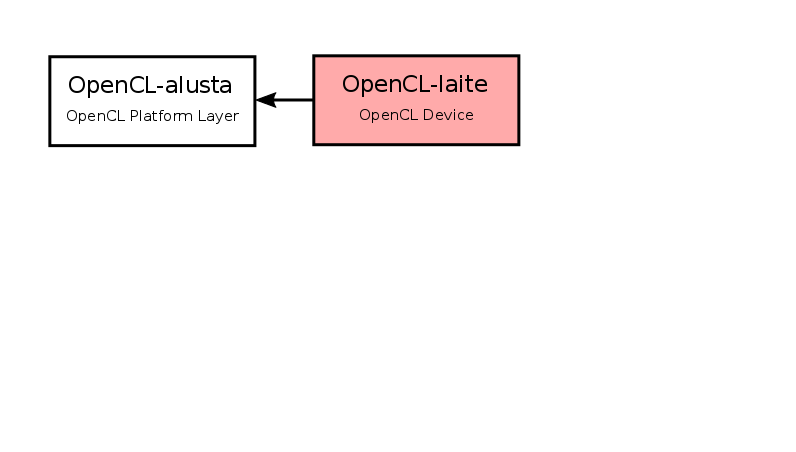
Searching for OpenCL devices
- The OpenCL platform may include multiple OpenCL devices
- In the C++ wrapper, an OpenCL device is wrapped in the
cl::Deviceclass and thecl::Platformclass contains thegetDevicesmember function for querying OpenCL devices :
cl_int cl::Platform::getDevices(cl_device_type type,
VECTOR_CLASS<Device> * devices)- An argument above
typecan take values such asCL_DEVICE_TYPE_CPU,CL_DEVICE_TYPE_GPUorCL_DEVICE_TYPE_ACCELERATOR. In the context of this course,CL_DEVICE_TYPE_GPUis of course the most interesting option.
std::vector<cl::Device> devices;
err = platforms[0].getDevices(CL_DEVICE_TYPE_GPU, &devices);

if(err != CL_SUCCESS) {
    std::cout << "OpenCL-laitteiden hakeminen epäonnistui." <<
        std::endl;
    std::cerr << "OpenCL-virhekoodi: " << err << std::endl;
    return 1;
}

if(devices.size() < 1) {
    std::cout << "OpenCL-laitteita ei löytynyt." << std::endl;
    return 1;
}
- We could ask
cl::Deviceabout various things, as we have done in the past:
template <typename T>
cl_int cl::Device::getInfo(cl_device_info name,
T * param)CL_DEVICE_MAX_WORK_GROUP_SIZE-the flag returns the largest possible size of the thread groupCL_DEVICE_MAX_MEM_ALLOC_SIZE-the flag returns the largest available global memory spaceCL_DEVICE_LOCAL_MEM_SIZE-the flag returns the largest available local memory spaceCL_DEVICE_EXTENSIONS-the flag returns the extensions supported by the OpenCL device
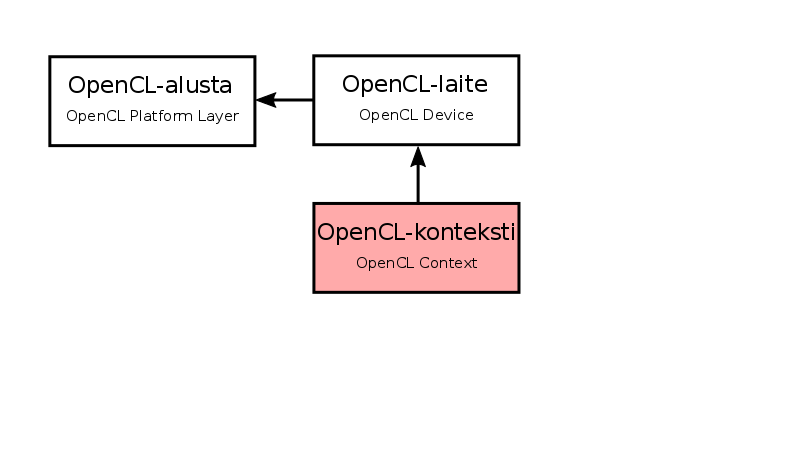
OpenCL context
- The OpenCL device resources are managed via the OpenCL context
- In the C++ wrapper, the OpenCL context is wrapped in the
cl::Contextclass, whose build function takes as arguments the OpenCL devices to be included:
cl::Context::Context(VECTOR_CLASS<Device>& devices,
                     cl_context_properties * properties = NULL,
                     void (CL_CALLBACK * pfn_notify)(
                         const char * errorinfo,
                         const void * private_info,
                         ::size_t cb,
                         void * user_data) = NULL,
                     void * user_data = NULL,
                     cl_int * err = NULL)
std::vector<cl::Device> oneDevice;
oneDevice.push_back(devices[0]);
cl::Context context(oneDevice, 0, 0, 0, &err);
if(err != CL_SUCCESS) {
std::cout << "OpenCL-kontekstin luominen epäonnistui." <<
std::endl;
std::cerr << "OpenCL-virhekoodi: " << err << std::endl;
return 1;
}
cl::Contextcan also be created without thecl::Devicealias:
cl::Context::Context(cl_device_type type,
                     cl_context_properties * properties = NULL,
                     void (CL_CALLBACK * pfn_notify)(
                         const char * errorinfo,
                         const void * private_info,
                         ::size_t cb,
                         void * user_data) = NULL,
                     void * user_data = NULL,
cl_int * err = NULL)- In this case, all device types corresponding to the
typeargument will be included
- The OpenCL context information can be accessed using the
getInfomember function:
template <typename T>
cl_int cl::Context::getInfo(cl_context_info name,
T * param) - In particular, the
CL_CONTEXT_DEVICESflag, which returns the OpenCL entities associated with the context, is useful if thecl::Contextentity was created without thecl::Deviceentity.
Kernel source code
- Kernels are written in the (limited) C language
- Consider a simple kernel that takes as arguments the integers (
npcs) of the table (buffer) and adds one to each element:
__kernel void add_one(__global int *buffer, int n) {
    const int global_id = get_global_id(0);

    if(global_id < n)
        buffer[global_id]++;
}__kernel-keyword indicates that this is a kernel that can be called from the host__global-keyword indicates that the tablebufferis stored in global memory
- The global index number is obtained by using the
get_global_idsubroutine. The argument to the subroutine determines the index dimension:
const int global_id = get_global_id(0);- Each thread increments the table element corresponding to its own global index number by one:
if(global_id < n)
buffer[global_id]++; - The above assumes that there are more threads than there are elements in the table
- In simple cases, kernels can be written into the host program as strings:
const char *kernel =
"__kernel void add_one(__global int *buffer, int n) { \n" \
" const int global_id = get_global_id(0); \n" \n
" if(global_id < n) \n" \
" buffer[global_id]++; \n" \
"} \n";- After this, the source code for the kernels can be compressed inside a
cl::Program::Sourcesobject:
cl::Program::Sources sources;
sources.push_back(
cl::Program::Sources::value_type(kernel, strlen(kernel)));- The kernel source code can also be stored in a separate file. OpenCL does not support this directly, but for example the
xxdtool available in the linux environment is perfectly suitable for this purpose - Let's assume that the kernel source code is written to a separate
kernel.clfile. In this case, the commandxxd -i kernel.cl > kernel.cl.datwould produce the following file:
unsigned char kernel_cl[] = {
  0x0a, 0x2f, 0x2f, 0x20, 0x59, 0x64, 0x69, 0x6e, 0x2c, ...
  0x6b, 0x61, 0x20, 0x6f, 0x74, 0x74, 0x61, 0x61, 0x20, ...
  ...
  0x2b, 0x3b, 0x20, 0x0a, 0x7d
};
unsigned int kernel_cl_len = 857;- Now we could include the source code as part of the host program:
#include "kernel.cl.dat"

...

cl::Program::Sources sources;
sources.push_back(cl::Program::Sources::value_type(
(const char*) kernel_cl, kernel_cl_len));- In addition to the string embedded in the source code of the host program and the use of the
xxdtool , the source code for the kernels could be loaded from a separate text file at runtime string table
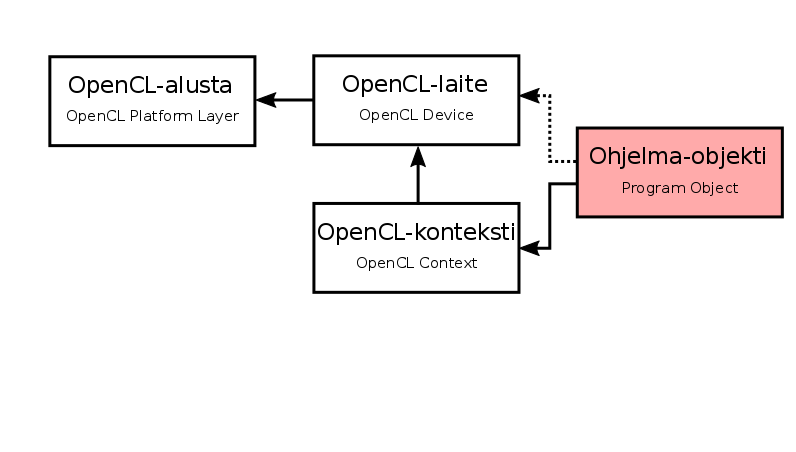
Compiling kernel source code
- To compile the kernel source code, we need a Program object, which encapsulates the associated OpenCL context, the kernel source code/binary, the compiled version of the kernel source code, translation logs and kernel "handles"
- In the C++ wrapper, the program object is wrapped inside the
cl::Programclass, whose build function takes as arguments the associated OpenCL context and kernel source code:
cl::Program::Program(const Context& context,
                     const Sources& sources,
                     cl_int * err = NULL)
cl::Program program(context, sources, &err);
if(err != CL_SUCCESS) {
std::cout << "Ohjelma-objektin luominen epäonnistui." <<
std::endl;
std::cerr << "OpenCL-virhekoodi: " << err << std::endl;
return 1;
}
- The source code of kernels attached to a program object can be compiled using the
buildmember function of thecl::Programclass:
cl_int cl::Program::build(const VECTOR_CLASS<Device>& devices,
                          const char * options = NULL,
                          void (CL_CALLBACK * pfn_notify)(
                              cl_program,
                              void * user_data) = NULL,
void * data = NULL) - The output of the compilation process and possible errors can be found by passing the
CL_PROGRAM_BUILD_LOGflag to the ´getBuildInfo´ member function:
template <typename T>
cl_int cl::Program::getBuildInfo(cl_program_build_info name,
                                 T * param)
err = program.build(oneDevice, 0);
if(err != CL_SUCCESS) {
std::string log;
program.getBuildInfo(oneDevice[0],
CL_PROGRAM_BUILD_LOG, &log);
std::cout <<
"OpenCL-kääntäjän tuloste:" << std::endl <<
log << std::endl;
std::cout <<
"Ytimien lähdekoodin kääntäminen epäonnistui." <<
std::endl;
std::cerr << "OpenCL-virhekoodi: " << err << std::endl;
return 1;
}- If the source codes of the kernels are stored in a single string, we could omit the creation of from
cl::Program::Sourcesaltogether, and pass the source codes of directly as a string to thecl::Programbuild function:
cl::Program::Program(const Context& context,
                     const STRING_CLASS& source,
                     bool build,
cl_int * err = NULL)- If, in addition, we were to call the
buildmember function with the value of theCL_TRUEargument, the source codes of the kernels would already be compiled when creating thecl::Programmole , so we would not need to call thebuildmember function separately
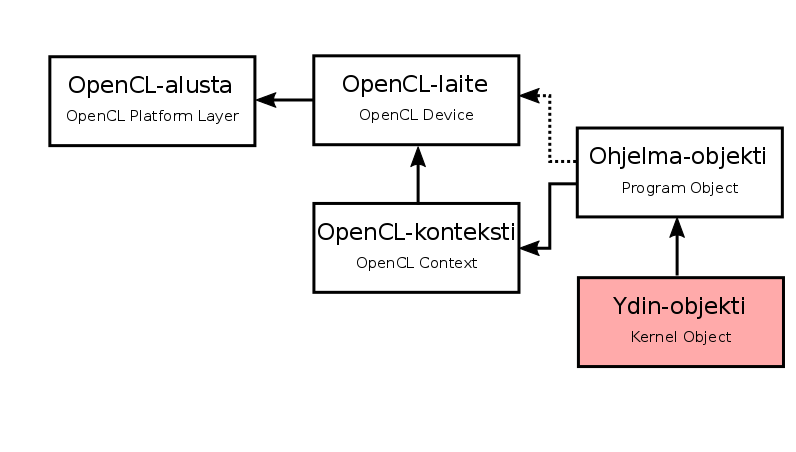
Creating a core object
- A kernel object encapsulates the properties associated with a single kernel
- In the C++ wrapper, a kernel object is encapsulated inside the
cl::Kernelclass, whose build function takes the Program object and kernel name as arguments:
cl::Kernel::Kernel(const Program& program,
                   const char * name,
                   cl_int * err = NULL)
cl::Kernel kernel(program, "add_one", &err);
if(err != CL_SUCCESS) {
std::cout << "Ytimen luominen epäonnistui." << std::endl;
std::cerr << "OpenCL-virhekoodi: " << err << std::endl;
return 1;
}
- We could also use the functions found in the C++11 standard to create the core object :
template<typename T0,
         typename T1 = detail::NullType,
         ...,
         typename T31 = detail::NullType>
struct make_kernel::detail::functionImplementation<T0, T1, ..., T31>
cl::make_kernel::make_kernel(const Program &program,
                             const STRING_CLASS name,
cl_int *err = NULL)- In the example program, a kernel object could be created as follows:
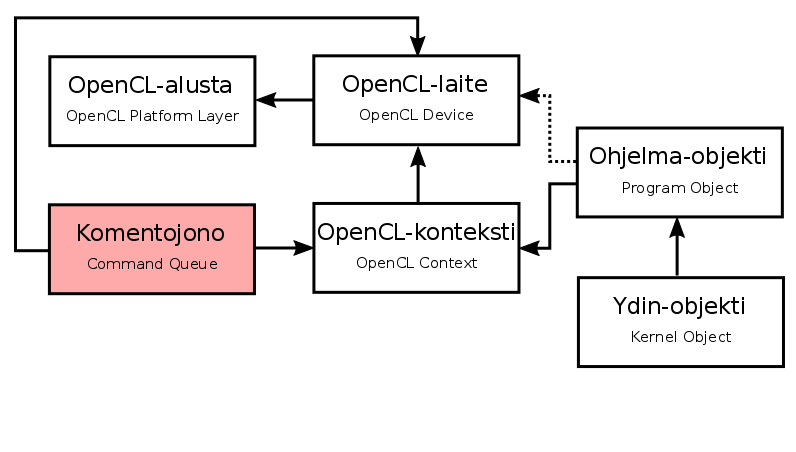
auto kernel = cl::make_kernel<cl::Buffer&, int>(program, "add_one");Creating a command line
- The host application sets the kernel startup commands in an OpenCL target Command Queue
- The runtime system automatically executes the kernels in the given order
- The Command Queue can also be used to set, for example, data transfer commands and events, which allow the status of the command queue to be monitored in real time.
- The command string is encapsulated inside the
cl::CommandQueueclass, where the build function takes as arguments the OpenCL context and the OpenCL device to which the command string is to be attached:
cl::CommandQueue::CommandQueue(
    const Context& context,
    const Device& device,
    cl_command_queue_properties properties = 0,
    cl_int * err = NULL)
cl::CommandQueue queue(context, oneDevice[0], 0, &err);
if(err != CL_SUCCESS) {
std::cout << "Komentojonon luominen epäonnistui." << std::endl;
std::cerr << "OpenCL-virhekoodi: " << err << std::endl;
return 1;
}
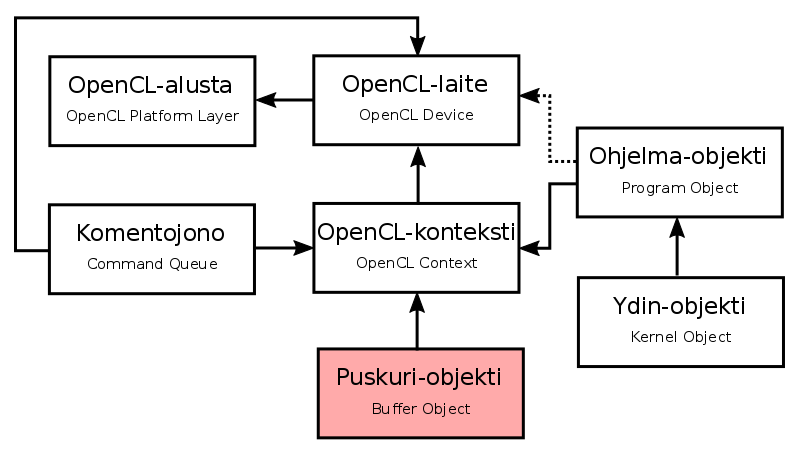
Creating a buffer object
- The global and constant memory of an OpenCL device is managed by means of Buffer objects
- The Buffer object is encapsulated inside the
cl::Bufferclass, which takes as arguments the OpenCL context associated with , theflagsflag variable, and the size of the buffer:
cl::Buffer::Buffer(
    const Context& context,
    cl_mem_flags flags,
    ::size_t size,
    void * host_ptr = NULL,
    cl_int * err = NULL)
cl::Buffer deviceBuffer(context, CL_MEM_READ_WRITE, N*sizeof(int), 0, &err);
if(err != CL_SUCCESS) {
std::cout << "Muistin varaaminen epäonnistui epäonnistui." << std::endl;
std::cerr << "OpenCL-virhekoodi: " << err << std::endl;
return 1;
}
Writing data to the buffer
- The
enqueueWriteBuffermember function of the command line sets the command to write data from host memory Setting the blocking_writeflag toCL_TRUEin the buffer object makes the call block , i.e. the subroutine returns only when the transfer is complete
cl_int cl::CommandQueue::enqueueWriteBuffer(
    const Buffer& buffer,
    cl_bool blocking_write,
    ::size_t offset,
    ::size_t size,
    const void * ptr,
    const VECTOR_CLASS<Event> * events = NULL,
    Event * event = NULL)
err = queue.enqueueWriteBuffer(deviceBuffer, CL_FALSE, 0, N*sizeof(int),
hostBuffer, 0, 0);
if(err != CL_SUCCESS) {
std::cout << "Isäntälaite -> OpenCL-laite -siirtokäskyn asettaminen " \
"komentojonoon epäonnistui." << std::endl;
std::cerr << "OpenCL-virhekoodi: " << err << std::endl;
}Setting kernel arguments
- Kernel arguments are set one by one using the
setArgmember function:
template <typename T>
cl_int cl::Kernel::setArg(cl_uint index, T value)
kernel.setArg(0, deviceBuffer);
if(err != CL_SUCCESS) {
std::cout << "Ytimen 1. argumentin asettaminen epäonnistui." <<
std::endl;
std::cerr << "OpenCL-virhekoodi: " << err << std::endl;
return 1;
}
kernel.setArg(1, N);
if(err != CL_SUCCESS) {
std::cout << "Ytimen 2. argumentin asettaminen epäonnistui." <<
std::endl;
std::cerr << "OpenCL-virhekoodi: " << err << std::endl;
return 1;
}Starting the kernel
- The kernel start command is set in the command line with the
enqueueNDRangeKernelmember function - The size of the global index space is set with the
globalargument, and the size of the thread group is set with thelocalargument.
cl_int cl::CommandQueue::enqueueNDRangeKernel(
    const Kernel& kernel,
    const NDRange& offset,
    const NDRange& global,
    const NDRange& local,
    const VECTOR_CLASS<Event> * events = NULL,
Event * event = NULL)- It's a good idea to check the maximum size of the thread group:
::size_t maxWorkGroupSize;
oneDevice[0].getInfo(CL_DEVICE_MAX_WORK_GROUP_SIZE, &maxWorkGroupSize);

if(err != CL_SUCCESS) {
    std::cout << "OpenCL-laitteen suurimman mahdollinen säieryhmän koon "\
    "kysyminen epäonnistui." << std::endl;
    std::cerr << "OpenCL-virhekoodi: " << err << std::endl;

    return 1;
}- Calculating the global index space and the size of the beam group:
::size_t workGroupCount = N/maxWorkGroupSize+1;

cl::NDRange globalDim(workGroupCount*maxWorkGroupSize, 1, 1);
cl::NDRange localDim(maxWorkGroupSize, 1, 1);

err = queue.enqueueNDRangeKernel(kernel, cl::NullRange,
    globalDim, localDim, 0, 0);

if(err != CL_SUCCESS) {
    std::cout << "Ytimen käynnistyskäskyn asettaminen komentojonoon " \
        "epäonnistui." << std::endl;
    std::cerr << "OpenCL-virhekoodi: " << err << std::endl;

    return 1;
}
Reading data from the buffer
- The
enqueueReadBuffermember function in the command line sets the command to read data from the Buffer object into the host device memory blocking_readsetting the flag toCL_TRUEmakes the call block i.e. the subroutine returns only when the transfer is complete
cl_int cl::CommandQueue::enqueueReadBuffer(
    const Buffer& buffer,
    cl_bool blocking_read,
    ::size_t offset,
    ::size_t size,
    const void * ptr,
    const VECTOR_CLASS<Event> * events = NULL,
    Event * event = NULL)
err = queue.enqueueReadBuffer(deviceBuffer, CL_TRUE, 0, N*sizeof(int),
hostBuffer, 0, 0);
if(err != CL_SUCCESS) {
std::cout << "OpenCL-laite -> Isäntälaite -siirtokäskyn asettaminen " \
"komentojonoon epäonnistui." << std::endl;
std::cerr << "OpenCL-virhekoodi: " << err << std::endl;
return 1;
}These are the current permissions for this document; please modify if needed. You can always modify these permissions from the manage page.